A large number of methods for finishing the ceiling makes it possible for any owner to choose an option to their liking, but many of them remain faithful to the old method - whitewashing, which has not lost any of its relevance. This work is one of the ways to get an excellent result, but spend a minimum of money and not very much time on the operation. This finishing technology cannot be called too complex, however, it also has its own characteristics. Therefore, before starting the operation, you need to find out how to whitewash the ceiling, how to prepare the base, select tools and suitable materials.
What is ceiling whitewashing
Whitewashing the ceiling is one of the simplest finishing methods. Due to its simplicity and low cost, it is quite possible to do it on your own. For the most beautiful and high-quality result, the procedure is repeated several times a year.
For the most beautiful and high-quality result, the procedure is repeated several times a year.
Benefits of whitewashing
Do-it-yourself whitewashing is a cheap and quick finishing method. Some consider it a relic of the past. However, a number of advantages make whitewashing very popular today:
- A simple process algorithm. I follow fairly primitive rules; you can do everything yourself;
- Availability. Materials and technical equipment are cheap and readily available;
- Environmentally friendly. This method of surface treatment is rightfully considered the most hypoallergenic and clean;
- Beauty. The color after this treatment is even, white and pure;
- It has a pronounced bactericidal effect, thereby preventing the formation of mold;
- Water resistance. Condensation cannot damage the whitewash layer or cause color changes.
This method of surface treatment is rightfully considered the most hypoallergenic and clean.
Other methods
Chalk and lime, although they are the most common materials, are not the only ones on the construction market. Special ceiling paints made from cement or lime are available for sale. These are mineral water-based paints.
They have a number of advantages:
- vapor-tight;
- are not afraid of serious temperature changes;
- abrasion resistant;
- suitable for any surface (brick, concrete and even plastered);
- dry quickly;
- safe for humans;
- prevent the spread of fungus;
- passes air through the pores, allowing the structure to “breathe”.
Experts also note a drawback: the paint wears off with water over time, just like any other whitewash. Of course, buying the right amount of such paint will cost much more than cheap lime and chalk. This is the main disadvantage of this whitewashing method. Consumption is the same as for lime and chalk: 2 kg per 10 sq. m.
Although mineral paint is used more often for finishing facades, painting the ceiling with it in living rooms is not without meaning. It will be easier to do the finishing work yourself:
- no need to prepare a solution by collecting a lot of strange components;
- not so many protective equipment are required;
- applied to the ceiling much easier and without special tools.
Finishing the ceiling with water-based mineral paint is a more modern, convenient and high-quality method. It does not require special instructions or whitewashing skills.
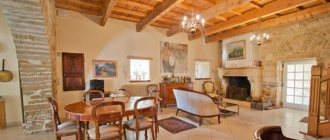
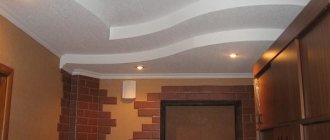
Aesthetically, this ceiling looks more impressive. And besides, after some time, if the owner of the house wants to change the color of the ceiling, he can easily repaint it with the same paint, but in a different color. A finishing method that allows you to easily change the design is always more valuable than any other.
Whitening the ceiling
How to whitewash a ceiling
There are several options for whitewashing the ceiling. These include working with chalk, lime and water-based paint. Each of the materials has a number of features and has rules for use.
Each of the materials has a number of features and has rules for use.
Chalk
Easily available, inexpensive and hypoallergenic. It is often used in public places (schools, kindergartens, residential premises, shops and administrative buildings). The service life of the chalk coating is 2 years. This material is not capable of covering up small cracks. Chalk should not be used in cold or damp areas.
Easily available, inexpensive and hypoallergenic.
Lime
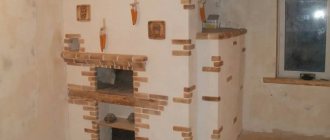
It has a strong bactericidal effect, and therefore is widely used in areas where animals are located, in basements and workshops with high moisture. When renovating an apartment, whitewashing with lime is suitable for the bathroom. It is able to cover up minor cracks and does not smear. This whitewash protects well from mold. You can work with lime in cold or damp conditions. Service life – 4 years.
Has a strong bactericidal effect.
Water-based paint
It is quite dense, which allows you to achieve a good uniform color in one thin layer. Has low vapor permeability. It is odorless and ready for use after a few hours. Unlike chalk and lime, water-based emulsion can be made into any color or shade thanks to additives.
It is odorless and ready for use after a few hours.
What is the best way to finish the ceiling?
Various factors can influence the choice of material. These include:
- the type of whitewash that was used up to the ceiling before;
- the degree of strength of strictly finishing material;
- its general condition (stains, other defects);
- features of working with types of whitewash;
- presence of allergy sufferers in the family.
Determining the type of finish that was previously used may cause some difficulties. New owners of an apartment or house may not know what kind of coverage they were given as a “gift.” In this case, determination is possible: simply run a dry finger or palm over the surface. The chalk will remain on the skin, and the lime will leave no traces.
The range in this case is small, but there is still a choice, since you can whitewash the ceiling with lime, chalk or water-based paint. None of the compositions is without drawbacks, but each undoubtedly has advantages. Therefore, you first need to get acquainted with the properties of all candidates.
Slaked lime
This binder material does an excellent job of masking small defects - tubercles, cracks, crevices. Its undoubted advantage is its bactericidal properties and the ability to prevent the formation of mold. The disadvantages of the material are that the surface takes a long time to dry, an unpleasant odor, and a possible allergic reaction. Quicklime is a substance that must be handled with care: it can cause burns to the skin. For this reason, before preparing the working solution, it is necessary to “arm yourself” with protective clothing and gloves. Or prudently buy a “friendly” composition.
To prepare 10 liters of solution, you need to purchase and/or prepare (sieve) lime (2.5 kg), certified salt (100 g), warm water and a small amount of blue. First, the components are diluted in a liter of water, then the remaining liquid is gradually poured in, diluting the solution to the required consistency and volume. The prepared whitewash is left for 15-20 minutes, then it is filtered through a sieve (gauze).
Chalk
This is the second simple contender, who is also not without good qualities. Chalk is environmentally friendly, so it does not pose any danger even to sensitive owners. The chalk coating “can” breathe, so there will be no problems with the microclimate in the house or apartment. If we talk about disadvantages, the first of them is possible shedding of the material. The chalk will stay on your hands when you touch it. This coating cannot be washed either; dampness is contraindicated for this finish, otherwise it will fall off in pieces.
To prepare a solution for whitewashing, you need to prepare 5 kg of chalk, a little blue (20 g) and wood glue (PVA), which will improve the adhesion of the mixture to the base and also give the coating maximum strength. All ingredients are mixed with water to form a viscous substance. If it does not stick to the working tool, then it is recommended to add a little more glue. It is also recommended to filter the chalk solution before starting work.
Water-based paint
It must be said that this particular material is today the first answer to the question of what and how to whitewash the ceiling. Competitors with disadvantages are used much less often. The big advantage of water-based paint is its ready-made appearance, which does not require the preparation of a mixture. This finish will not crumble or stain your hands, and it dries quickly. Its disadvantage is relative - it is a higher price.
Pigment can be added to this composition, so the ceiling can be made of any color. If water-based paint contains hydrophobic additives, then the mixture can be used even in damp rooms. To ensure that there are no problems, the material is purchased with a small reserve, since the compositions in different batches may differ slightly in shade.
There are several types of emulsion:
- Satin paint. It will make it possible to hide small defects in the ceiling thanks to the shine of the painted surface.
- Matte emulsion. These compositions have a denser texture, so they can hide even significant imperfections in the base. The disadvantage of this type of material is the long drying time of the paints.
Moisture-resistant water-based paints with bactericidal components have their own “field of activity”. They are used for finishing rooms with high humidity - bathrooms, kitchens, etc.
What tools and protective equipment will be required?
To whitewash the ceiling with your own hands, you will need a brush up to 20 cm wide, a roller with a long handle, a bath, clean lint-free rags, adhesive tape, plastic oilcloth, a bucket (or other large container for the solution), a vacuum cleaner with a special attachment and a spray gun. For protection you will need: a respirator, glasses, closed special clothing, thick rubber gloves.
For protection you will need: a respirator, glasses, closed special clothing, thick rubber gloves.
Which is better, roller or brush?
In any case, it will not be possible to do all the work with just a roller or brush. You will need both items. To choose the right tool, you should turn to the knowledge of experienced painters.
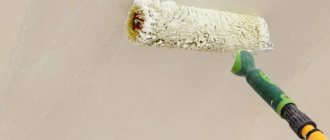
It is better to buy a roller with long pile, because foam rubber and neoprene absorb excess paint, which then remains streaks and bubbles. To buy a truly good quality product, you should pay attention to some characteristics. The roller should not deform when squeezed by hand. No obvious seams or protruding fibers.
It is better to buy a roller with long pile, because foam rubber and neoprene absorb excess paint.
How to paint a ceiling with a roller: step by step process
Roller painting the ceiling is not a very labor-intensive process, since with a skillful approach and preparation, all finishing work can be completed in 2-3 hours. How to properly paint a ceiling with a roller - you can watch the video and painting tricks below if you decide to carry out this procedure yourself.
Painting the ceiling, in addition to a roller, cannot be done without the following tools:
- Paints of the desired shade;
- Paint roller;
- Finishing Brushes;
- Containers for mixing paint;
- Cleaning cloth.
Painting ceilings with rollers is divided into several stages. First of all, in order to properly paint the ceiling with a roller, you should clean the work area itself, wipe and dry.
Next steps will be as follows:
- Applying a primer that has a transparent texture and improves the adhesion area of the paint to the ceiling. The primer can also be applied with a roller;
- The next step is to use a roller for water-based paint for the ceiling. It is dipped in paint, after which it should be rolled a little on the surface so that the excess paint is absorbed into the instrument itself.
- Painting must be done smoothly and without unnecessary movements in order to paint the ceiling with a roller without streaks, which is very simple to do. The paint is applied in one layer, then it is better to let it dry and apply a second one. This way the coating will be more uniform, and the paint consumption will be much less. All corners are painted with a brush, as it is more convenient for performing these procedures.
The most important trick in painting a ceiling with a roller is that each subsequent layer should be applied directly perpendicular to the previous one - this way the paint will lie more evenly and the joints will not be so visible.
Ceiling whitewashing process
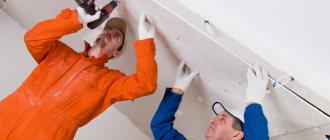
Before proceeding directly to the whitewashing itself, you need to prepare the work area. All things and furniture should be taken out, and what cannot be removed should be covered with oilcloth. All areas that should not be painted should be sealed, and all electrical wires and outlets should be insulated. It is better to dismantle the chandelier, but if this is not an option, it is also insulated and covered.
It is worth considering a source of additional lighting in advance. It is better to also cover the floor with old newspapers or film. Then you should prepare the wall before painting. To do this you need to level the surface. Using putty and primer, we bring it to the desired state and move on to the main part of the whitewash.
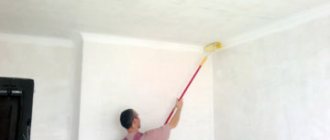
The technique for applying chalk, lime and water-based paint is the same. At the first stage, all corners, joints and hard-to-reach places are painted with a brush, and then the main part. For a wide area, use a roller with a long handle. To whitewash the ceiling with a roller without streaks, strokes must be applied perpendicular to the window opening. When using a roller, paint in 2 layers.
Before applying the second coat, the surface must be completely dry, otherwise bubbles will form.
When using a roller, paint in 2 layers.
Ceiling preparation
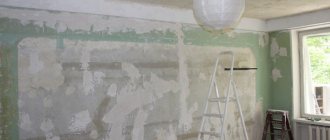
You cannot whitewash a ceiling using an old coating: when wet, the previous layers of whitewash will begin to peel off and stick to the brush, making the process difficult. In addition, the surface will not be perfectly smooth, which is completely undesirable. When cleaning the ceiling, you must take everything out of the room or cover it with polyethylene, otherwise you will have to wash everything from lime and plaster.
Step 1: Surface Cleaning
Cleaning the ceiling with a spatula
To clean you will need:
- bucket with water;
- sponge;
- medium-sized metal spatula;
- clean rags;
- ladder.
If you clean a dry ceiling, a lot of dust will rise, and the process itself will take a long time; It is much faster and more convenient to remove the whitewash after moistening. You should not immediately wet the entire area, as the surface dries out very quickly; it is better to divide the ceiling into small sections and moisten as you go.
After wetting the whitewash, you need to wait a few minutes until the layers are saturated with water to the base, then the coating can be very easily removed with a spatula. Finally, wipe off any remaining chalk or lime with a clean, damp cloth until no traces remain.
Step 2. Sealing joints and cracks
For further preparation you will additionally need:
- serpyanka;
- putty;
- sandpaper;
- primer;
- brush or roller;
- level.
There are always joints between the ceilings, which gradually diverge over time. To prevent them from appearing on the ceiling, they are embroidered, filled with putty mixture, and covered with sickle tape on top. Putty is again applied over the serpyanka and thoroughly rubbed with a spatula, making the surface even.
While the joints are drying, the ceiling is carefully inspected and defects are eliminated. Small cracks are simply rubbed with mortar, recesses and chips are puttied.
Step 3: Remove stains
Very often stains appear on the ceiling that show through the finish. It can be quite difficult to remove them, but this must be done at the preparation stage, otherwise after a while they will again be visible through the whitewash layer. Stains from water leaks are removed using bleach or bleach: dip a sponge in the liquid and press it onto the stain until it lightens. Of course, you need to wear rubber gloves to protect your skin.
How to clean a ceiling
To remove rust stains, you will need copper sulfate. Prepare a saturated solution of bright blue color, spread the stain well, let it dry and repeat everything again. If necessary, re-process until the marks fade. After this, the problem areas are well primed and dried.
Step 4. Alignment
It is best to use putty to eliminate small defects on the ceiling: cracks and unevenness.
When all noticeable defects have been removed, a level is applied to the ceiling surface in different places to determine the magnitude of the differences in height. If there are recessed areas, they are puttied separately, and when the solution dries, the entire ceiling is covered with putty. Usually a finishing putty is used, which is applied in 2 layers 1-2 mm thick.
To work, take two spatulas - a narrow and a wide one; when applying, hold the spatula at a slight angle to the ceiling. The resulting sagging or stripes are removed after the mixture has dried with sandpaper. It is necessary to sand the entire treated area to give the surface maximum smoothness. Finally, the ceiling is wiped with a dry cloth to remove dust and primed.
Primer
Prices for mixtures for leveling walls and ceilings
Mixtures for leveling walls and ceilings
Is it possible to whitewash over old whitewash?
Whitewashing “the old way” is a fairly common task, because in order for the ceiling surface to remain white and smooth, it needs to be updated at least once a year. This can only be done if the walls are well preserved.
If there are stains, cracks and shabby areas, you should not try to hide it all. You need to completely wash and level the surface, and then paint. To remove the old layer you need to make a solution of non-hot water and a few drops of lemon juice. Actively wet a small area and remove the old layer with a spatula. You need to do the same with lime, but you will have to work a little with a brush.
To remove old water-based paint, you need to wet a small area with 60 water and let it soak. Remove everything with a spatula. If the paint is waterproof, then before wetting it you need to scratch it well with a metal brush. It is strictly forbidden to apply lime to chalk or vice versa!
Actively wet a small area and remove the old layer with a spatula.
Features of ceiling repair in the kitchen
When deciding how to whitewash the ceiling in the kitchen, take into account the operating features of this room. They influence the requirements for the selection of building materials for whitewashing floors. This is especially true for cooking, when the level of humidity in the kitchen increases significantly during the evaporation of water. We should not forget about the formation of soot when frying food on the stove, and about the fat settling on surfaces - contamination can only be eliminated with regular wet cleaning.
The temperature in the kitchen is constantly changing. When the room is ventilated on a frosty day, the surface of the ceiling cools to a temperature slightly above zero, and if food is cooked on a gas stove, it heats up to almost 50 degrees. To tidy up your kitchen space, when whitewashing, you should not forget about all the factors that influence the condition of the ceiling.
We advise you to study - How to choose the right geyser, taking into account all the parameters
In the kitchen, it is possible to whitewash the ceiling with lime with your own hands, but in this case it will not be possible to wash it (read: “Repairing the ceiling in the kitchen with your own hands: choosing a material”). The situation is similar with the use of chalk mortar. You can paint the ceiling with water-based paint, but such a surface cannot be washed.
As for the use of glue-based paints, glue-based whitewashing of the ceiling often leaves characteristic defects after drying: streaks, sagging and roller or brush marks.
A reasonable solution to update the ceiling in the kitchen is, of course, water-dispersion paint (acrylic or latex). The surface painted with it can be washed, and it will last much longer than when using conventional white. Whitewashing or painting the ceiling in the kitchen is carried out in the same order as it was done in the living rooms and bathroom.
How to find out what was applied to the ceiling before
There are two main ways to determine what kind of whitewash there was before:
- External characteristics. If you run your hand over the surface, the chalk smears, but the lime does not. In the case where the ceiling was painted with water-based paint, the coating simply peels off, but leaves no traces;
- We use lemon juice. Ordinary chemistry. Chalk will hiss under the influence of acid.
If you run your hand over the surface, the chalk smears, but the lime does not.
Water-based paint
Painting
Whitewashing with water-based paint is done a little differently, but is not particularly difficult. It is enough to find out a number of nuances when working with this coating.
The whole process occurs in several stages:
- surface cleaning;
- padding;
- putty;
- painting.
The ceiling must be cleaned down to the ceiling slab.
When the surface is cleaned, it is primed using a store-bought primer. It is better to purchase ready-made mixtures for paint.
Putty
All irregularities and cracks are sealed with putty.
After the putty has dried, it must be sanded. This is necessary to ensure that the surface is perfectly flat. Otherwise, the edges of the filled cracks will be visible under the paint. Special meshes are used for grinding.
At the last stage, the coloring composition is prepared and applied. Paint consists of two parts: the coating itself and the color. The color allows you to give the surface any shade.
You need to be careful with color, just like with blue when preparing a chalk composition. The most important thing is not to overdo it, otherwise the color will be too saturated.
What to do with cracks
To achieve a beautiful, even color, you must level the surface. After removing the old layer, cracks or bumps often become noticeable. To eliminate this situation, it is best to use adhesive putty. It is quite easy to prepare. You need to take 1 liter of warm water and dilute 50 g of glue in it. A mixture of gypsum, wood glue and gypsum in a 1:2:2 ratio is added to the liquid. We wait until the putty is completely dry and carefully rub the entire canvas. After this, it should be primed.
To achieve a beautiful, even color, you must level the surface.
Whitewashing with chalk
With chalk, the price of finishing will not differ much from the previous option. Preparation for work also includes checking the old coating - if it was lime, it will have to be completely removed mechanically. Otherwise, streaks and stains will appear due to the fact that the lime reacts with the chalk.
Positive sides:
- Maximum environmental friendliness of finishing, since chalk is a natural material
- Finishing costs are minimal
- Even an untrained person can apply the coating
- Excellent white surface color after drying
Negative sides:
- It is very difficult to prepare a mixture of the required quality - if you “mistake” the consistency, streaks and streaks may appear on the surface
- A layer of chalk will reveal even the slightest defects in the base surface
Tip: to do better work, use light from an energy-saving “cold” spectrum lamp. It reveals all the flaws in applying the solution.
How to remove stains
After removing the old whitewash, you need to very carefully get rid of all stains, otherwise they will appear after fresh whitewashing. It is necessary to clean the surface from mold, rust and dirt. Warm water will do a great job of removing rust. However, to prevent the reappearance of water, you need to wash the area with a solution of copper sulfate in water in a ratio of 1:50.
Grease stains are removed using regular soda ash, which is sold at any hardware store. You need to apply a rag soaked in the solution to the stain. When the stain has completely disappeared, wash the problem area thoroughly.
Grease stains are removed using regular soda ash, which is sold at any hardware store.
Types of whitewash solutions
The main classification of whitewash compositions is based on the main component, according to which they are divided into three main groups:
- Cretaceous;
- Calcareous;
- Calcareous-chalk.
In addition to the main component, other additives may be present in the whitewash solution, but individually for each type and operating conditions, so there are many recipes for whitewash compositions.
There are two ways to make a whitewash solution: mix powdered lime and chalk with water, then add the necessary improving components in the required proportions, or dilute the concentrated paste (dough) with water, also with the addition of optimizers.
When choosing a whitewash material according to the degree of readiness, you need to know that independently preparing a solution from the necessary components (mixing with water, mixing, sifting/straining) requires certain experience - when whitewashing, the likelihood of defective coating due to violation of technology is high, and it is difficult to hide flaws on the ceiling . Therefore, if you have doubts about your qualifications, it is better to give preference to materials that are as ready for use as possible, for example, commercially available industrially produced pastes - lime and chalk. In addition, when choosing a composition, it is necessary to take into account the purpose of the room and the expected class of its finishing - the higher the quality of the ingredients of the whitewash solution, the better the forecast for the whitewashing result.
Primer for better application
It is very important to prime the ceiling well before whitewashing. In this way, the applied material will adhere better to the old layer, minor irregularities will be hidden, and the service life will increase. The soil also has moisture-resistant properties and is bactericidal. The primer will make the surface less porous, which means that the amount of chalk, lime or paint solution will be significantly reduced. For processing it is better to use a strengthening mixture.
It is necessary to dilute the primer in accordance with the instructions, and then carefully and evenly apply it to the surface to be prepared. It is impossible for smudges or “bald patches” to remain. After waiting for complete drying, if possible, it is advisable to apply another layer.
The soil has moisture-resistant properties and is bactericidal.
Lime whitewash
There are several materials for such design. One of them is lime. Before starting finishing work, you need to very thoroughly prepare the floor plane for work and check what composition it was previously coated with. Do not apply lime to the chalk surface - stains and stains will appear.
Advantages of the method:
- Low cost
- The antibacterial properties of lime will make the air cleaner
- The coating layer will be quite durable and resistant to mechanical stress such as abrasion
- The surface is porous, which gives it the opportunity to “breathe”
Minuses:
- You will have to carefully prepare the working composition to achieve the optimal consistency
- The coating is short-lived and will require updating in a couple of years
Advice: before starting work, you need to slightly moisten the surface to be treated, then the lime will adhere better.
How to properly dilute the solution
If water-based paint is used, it is either not diluted at all, or a small amount of warm water is added, bringing it to the desired thickness. Color is also introduced.
If water-based paint is used, it is either not diluted at all, or a small amount of warm water is added.
In order to make a chalk solution yourself for whitewashing approximately 10 square meters of ceiling, you take not only water and chalk. In order for the coating to be stable, even and long-lasting, you will also need wood glue and blueing.
- Dissolve 100 g of glue in 5 liters of warm (but not hot) water.
- Add 3 kg of sifted chalk powder
- Stir until smooth. It is important that there are no lumps, otherwise streaks will remain.
- Pour in 15-20 g of blue or ultramarine. This way we achieve a brighter white color.
- Check the consistency for density. To do this, pour a little solution onto the knife blade. If the knife remains clean, you should add a little more chalk powder. We bring everything to the moment when the blade begins to be covered with an even thin layer.
In order for the coating to be stable, even and long-lasting, you will also need wood glue and blueing.
Lime for whitewashing ceilings is sold in two forms: dry slaked lime, the so-called “Pushonka”, and paste. There is less dry powder in quantity, but slaked lime in the form of a paste dissolves easier and better.
You can also make slaked lime at home. To do this, take quicklime lump lime and add warm water at a ratio of 1:3. Next, cover with a lid and leave for 2 weeks.
To prepare a lime solution, you need to mix 2 kg of lime, 3 liters of warm water, 20 g of blue, 15 g of drying oil and 5 g of table salt. Stir everything thoroughly and strain through a sieve to remove lumps. Whitewashing is carried out in 2 layers.
There is less dry powder in quantity, but slaked lime in the form of a paste dissolves easier and better.
Surface preparation
There are two ways to clean a whitewashed ceiling: dry and wet. In the first case, a grinding machine is used, sometimes a drill with special attachments. There is only one drawback when using them: strong dust will rise in the room, and if you work without a respirator and glasses, you can seriously undermine your health. Therefore, before you paint the ceiling over whitewash, you should still clean it using the wet version. There are two ways to remove whitewash using the wet method:
- using a roller and solution;
- spatula.
We advise you to study - Installation of plastic windows according to GOST - detailed instructions
Before proceeding with any of these methods, the master must be sure to cover all furniture and even the floor from dust. The most ordinary maple is quite suitable for this. Before starting work, you need to wet a small part of the surface with water. To do this, you can use an ordinary roller, as well as a brush or spray bottle. In order for cleaning to be effective, since this determines how well the ceiling can be whitewashed, experts recommend using soda ash and soap instead of ordinary water, which should be dissolved in water.
In order to prepare the solution, you will need to rub two tablespoons of soap and dissolve them in ten liters of water and add five tablespoons of soda. Then it is mixed well. After this, you should generously wet the whitewashed areas of the ceiling with the solution. The surface of the whitewashed ceiling should be moistened very strongly with water or the prepared solution. Lime is not a moisture-resistant material, and therefore it absorbs the solution very well. The more it is absorbed, the easier it will be to peel off the whitewash layer from the ceiling.
When the whitewash gets wet, you should take a spatula in your hands and begin to remove it. So gradually the entire ceiling is cleared of whitewash. However, sometimes it is not completely cleared: there are areas where lime is still visible. Painting a whitewashed ceiling that is not completely cleaned will be ineffective. Therefore, before painting a whitewashed ceiling with water-based paint or any other, you should wet these areas again and go over them with a spatula again.
And if this does not help, then you need to resort to using a grinding machine. At the same time, we must not forget that it leaves indentations on any surface, so you should work very carefully. When the ceiling is cleared of whitewash, you should go over it with sandpaper, but if the work is done efficiently, this is not at all necessary. So, when the ceiling is ready, you need to proceed to the next stage - painting. However, before painting the ceiling with water-based paint after whitewashing, it must be over-primed.
To do this you need to prepare the following materials:
- construction mixture;
- priming;
- paint – it is advisable to paint with water-based emulsion;
- roller;
- brush;
- spray gun.
After completely cleaning the remaining lime with sandpaper, the surface is primed. To do this, it is processed with a brush or roller dipped in soil. The process can be repeated two times. If, nevertheless, there remain unevenness on the surface that is noticeable to the naked eye, then the master, before starting to paint, must treat it with putty, after which experts recommend walking over the surface with primer again.
Ceiling whitewashing technology
The DIY whitewashing technology is quite simple and anyone can do it:
- We clean the room and cover the floor.
- We clean the surface from the old layer.
- Level the ceiling using putty.
- We prime.
- Apply the dye perpendicular to the window.
Apply the dye perpendicular to the window.
Lime whitewash
The composition is an aqueous solution of slaked lime, which is applied to stone and wooden structures using a brush, paint roller or spray.
Slaking quicklime, which can be lump or powder, on your own makes sense only for significant volumes of whitewashing work.
This process is accompanied by the release of a significant amount of heat, boiling of the solution and vaporization, so in an apartment it is not wise to extinguish lime. In addition, complete slaking will take from a day to a day and a half, so for the volume of urban housing it is more advisable to buy already slaked lime, which is sold in stores under the name “fluff”.
If you dilute the “fluff” with water according to the instructions on the package, the resulting solution can already be whitened, but working with such a mixture is inconvenient - it is not elastic, and the coating obtained after it dries will not have the required strength and aesthetics.
To obtain lime whitewash with improved characteristics, more complex solutions are prepared from fluff, adding the following components:
- Table salt - to increase the strength of the whitewash coating. Hardening of the applied whitewash layer occurs during the calcination of lime due to the entry of carbon dioxide from the air into its solution. Moreover, the longer the calcination process, the more strength the coating will gain. But carbon dioxide enters the whitewash layer only as long as it is wet, so salt is added to the whitewash composition - it slows down the evaporation of moisture, prolonging the curing of the coating and increasing its strength.
- Wood glue (as options - wallpaper or PVA) - adds strength to the coating and makes it not dirty upon contact.
- Laundry soap - to give elasticity to the liquid composition. Soap dissolved in whitewash prevents the solution from absorbing moisture into the wall, so the whitewash layer, after application, remains mobile longer and spreads more evenly over the surface of the ceiling. Thanks to the elasticity of the composition, brush strokes and their overlaps with each other become invisible, since the solution has time to spread before dehydration and loss of mobility.
- Natural drying oil – increases the elasticity and moisture resistance of the dried coating.
- Cement – strengthens the whitewash layer and improves its adhesive characteristics (on concrete, brick and plastered bases).
- Potassium alum, an alternative to salt, creates a film on the surface of the solution that prevents water evaporation.
Ready-made whitewash concentrates based on lime - paste - are also produced.
It is much easier to work with such mixtures, since all the necessary information on preparing whitewash from them is contained in the instructions for using the paste.
Primer solution for lime whitewash
3 kg of slaked lime are diluted in four liters of water. In another container with three liters of hot water, dissolve 200 g of grated laundry soap, then add 100 g of Oxol drying oil. The two resulting solutions are combined and mixed - the concentrated primer is ready. To work, you need to add water to it to bring the total volume of the composition to 10 liters. It is better to prime twice, with a time interval for the first layer to dry.
Lime whitewash recipes
It is not advisable to use a simple aqueous solution of slaked lime for whitewashing ceilings, since by adding inexpensive components the characteristics of this material can be significantly improved.
- Lime-adhesive whitewash. 200 g of dry wood glue is soaked in water for 10-12 hours, after which a paste is made from it - according to the instructions on the package (the preparation method depends on the type of glue). 5 kg of slaked lime (“fluff” or dough) is diluted with 7 liters of water. Dissolve 100 g of planed laundry soap in 0.5 liters of hot water, and pour this emulsion into the diluted lime with stirring. Then, in the same way, welded and slightly cooled glue is added to the solution. 200 g of table salt is dissolved in a liter of water and also poured into the whitewash composition. The preparation is completed by adding ultramarine (“blue”) - place it in a gauze bag, which is rinsed in whitewash until the blueness of the desired intensity is obtained.
To be able to apply whitewash with a spray bottle, the whitewash solution must be filtered through 2 layers of gauze. To obtain a high-quality lime coating, straining must also be done before working with a brush or roller.
- Waterproof lime whitewash. 2 kg of slaked lime are diluted in 3 liters of water. Dissolve 100 g of laundry soap shavings in 0.5 liters of warm water, add two tablespoons of Oxol drying oil, and after thoroughly mixing, pour the emulsion into the whitewash solution. Also dissolve 2 tbsp in whitewash. spoons of salt, after which the composition is mixed and filtered.
Previously, the hiding power of the whitewash solution is judged by the lath immersed in it and removed - the whitewash should cover the lath with a thin, even layer without gaps. If necessary, the concentration of the composition is adjusted by adding small portions of lime or water.
Advantages and disadvantages of lime whitewash
"Pros":
- Compared to chalk ones, they are more durable and durable;
- Vapor permeable and sufficiently moisture resistant for use even in “wet” rooms (bathrooms, showers);
- They have good adhesion to concrete, plaster and putty;
- They have disinfectant and antibacterial properties - they not only have a detrimental effect on existing fungus, but also protect the base from its formation in the future.
"Minuses":
- Not suitable for application to efflorescence and rust stains;
- May be an allergen for humans;
- Limited in color when tinting.
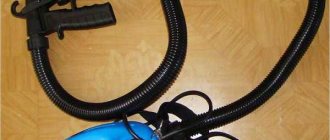
Features of using a vacuum cleaner
Whitewashing a large area of surface is a rather labor-intensive process. Therefore, instead of a brush or roller, you can use a spray gun, a spray gun, or even a vacuum cleaner. To use such a household item, it is important that it meets certain requirements:
- There must be a hole for the exhaust air to escape;
- The power of the home unit must be sufficient for the paint layer to apply evenly.
For the whitewashing process, you will need a special attachment, which either comes in a factory set, is sold in a store, or you can make it yourself.
Most often, one of three attachments is used:
- Spray gun with attachment for vacuum cleaner;
- Nozzle in the form of a lid for a jar;
- Homemade nozzle from a nylon cap.
The whitewashing process requires a special attachment.
How to whitewash yourself with a brush or roller, spray gun or vacuum cleaner?
You can whitewash the ceiling with chalk manually or with a spray gun.
- The surface to be treated is mentally divided into several squares, approximately one meter per meter.
- Before application, the solution must be thoroughly stirred, as the chalk quickly settles to the bottom.
- The solution will need to be applied twice. A second layer is applied after the first has completely dried.
- When working with a brush or roller, the first layer is applied in the direction from the window, and the next one is perpendicular to the first. This technique helps avoid divorces.
The procedure should be as follows:
- mix the solution, pour it into a half-liter jar;
- install a sprayer on the jar;
- insert a vacuum hose into the sprayer, regulate the flow of solution using the second hole on the lid;
- Apply the composition with smooth circular movements.
Tip When applying the solution with a spray gun, follow the rule: the distance between the spray gun and the ceiling should be 70–100 cm.
Here
How to quickly remove old coating?
Preparatory work is the most important stage in ceiling repair; how to whitewash a ceiling with lime; how to quickly remove chalk whitewash:
- Dry method - allows you to quickly remove chalk whitewash from the ceiling using a spatula and an iron brush. Then the surface is simply washed with water and detergent.
- Wet method - applicable only when the whitewash is applied in a thin layer. To wash, use warm water and detergent.
- If the solution cannot be removed from the concrete surface, then you need to moisten it with water from a spray bottle. The ceiling will have to be treated twice, the first being the most intensive. When the coating absorbs moisture, it can be easily removed with a spatula.
- Applying a chemical solution, which can be purchased at a hardware store. This method is relevant for the most complex surfaces. The solution is applied with a sponge or spray, and can be washed off after a few minutes with warm water.
Re-dyeing
Important Do not try to finish the job as quickly as possible, because in the absence of experience, unwanted stains may result, and some areas may remain unpainted
Safety precautions
Safety precautions are critically important so that repairs do not harm your health. You will need a respirator, as there will be a lot of dust and after just an hour of working without protection, coughing attacks will begin. You should protect your eyes with construction glasses. They can be found in any hardware store, they are not expensive - 150-200 rubles (the price is valid for March 2021), and the eyes will be safe, because the whitewash solution is quite acidic and can greatly irritate the mucous membranes of the eyes. It is also worth wearing closed old clothes (which you don’t mind) or a special suit to protect your skin. You can't do without gloves.
You will need a respirator, as there will be a lot of dust and after just an hour of working without protection, coughing attacks will begin.
A method proven by generations
First, let's look at all the pros and cons of the oldest method of finishing the ceiling - whitewashing with lime. It is not for nothing that this method has been popular for so many years and to this day lime is sold in construction stores in huge quantities.
Despite the laboriousness of the process, people do not stop whitewashing ceilings, but now more in non-residential than residential premises: in the garage, offices, workshops, budgetary institutions, sometimes in the kitchen and bathroom.
Lime is produced by burning carbonate. Essentially it is sodium alkali, it is used for household and construction purposes. To whiten the surface of a wall or ceiling with it, the lime is slaked, i.e. connect with water. And in this combination, lime turns into a good finishing material.
Whitewashing with a brush
Advantages:
- low price;
- bactericidal properties;
- resistance to temperature changes;
- moisture resistance;
- closes cracks;
- adheres well to any material (brick, stone, wood and even plaster).
This method also has its drawbacks: stains, stains, and you can get burned if you don’t use gloves. It is safer to whitewash with chalk.
Tips and tricks from the experts
Experienced malaria specialists claim that the whitewashing process is quite simple. Compliance with the process algorithm and a high-quality tool will allow you to get an excellent result. Experts recommend not saving on equipment.
The easiest and cheapest way to finish the ceiling is to whitewash it yourself. This method has a number of advantages: low cost, ease of process, so there is no need to hire specialists, bactericidal and water-repellent action, environmental friendliness and hypoallergenicity.
You can whitewash the ceiling using chalk, lime or water-based paint. It is better to use chalk for repairing residential and public places. Lime is useful for finishing damp rooms and sheds. Water emulsion is used for semi-open areas and attics.
The tools you will need are a bath, a brush, a roller and personal protective equipment. Whitewashing over old whitewash is possible only in rare cases when the surface remains uniform and even. In all other cases, you will need to clean the ceiling from the old layer, cover up the cracks and prime it.
Compliance with the process algorithm and a high-quality tool will allow you to get an excellent result.
The whitewashing technology involves first painting corners and hard-to-reach places, and then covering the main canvas perpendicular to the window. It is best to whitewash the ceiling in two layers. The painting algorithm is quite simple and if you do not skip important steps, the result will be quite satisfactory.
How to prepare a ceiling for whitewashing
The final result directly depends on how correctly the ceiling surface is prepared for the application of whitewash. In some cases, in order to properly whitewash the ceiling, it is not even necessary to wash off or strip off the old whitewash down to the concrete or plastered brick.
The preparation process consists of three to four stages, depending on the condition of the ceiling and the presence of the old finishing layer:
- We determine what exactly the ceiling was whitewashed with, the materials, the thickness of the layer, the presence of defective stains, rust, fungus;
- We erase or clean off the old layer of decorative coating down to the concrete or stone base;
- Using a brush and a water solution, we wash and remove the remaining whitewash that has ingrained itself into the pores of the surface.
In theory, you don’t have to wait until the washed ceiling is completely dry; it will be enough to wait for the average degree of drying, when there are no more wet spots, and the surface has acquired a color slightly darker than that of dry concrete.
An exception is the surface affected by rusty spots or fungal deposits. Typically, in such a situation, treatment is performed with copper sulfate or a special disinfectant. In this case, it is important to wait until the applied solution dries completely in order to identify missing areas and evaluate how much rusty deposits have been removed.
The edge of the spatula should not be sharp, otherwise you can make holes
In any case, before whitewashing the ceiling with your own hands, in order to obtain a good quality decorative coating, craftsmen recommend stripping the chalk or lime, as they say, to the very roots. This guarantees an even, uniform layer of new whitewash, without lumps of adhering dust and marks left by the brush.
You can determine what exactly is on the ceiling using a clean cloth. If you run it over the chalk, then traces of the chalk coating will remain on the fabric surface; as a rule, nothing remains on the rag from lime whitewash.
Preparing a new ceiling surface for whitewashing
It would seem that the simplest option is to apply the coating to a new, clean concrete or plaster surface. In fact, this is not entirely correct, especially if for sanitary reasons it is necessary to whitewash with lime, which adheres very poorly to new surfaces. Even if it is plaster or concrete, the brick on the ceiling is pre-treated with a primer, which in theory improves the adhesion of the decorative layer to the base.
Therefore, regardless of what exactly you plan to whiten the ceiling with, its surface must be wiped clean from dirt and dust, and this is done in a dry way, without water. As soon as the remnants of cement and everything that stuck during the renovation or construction of the room are removed, it will be necessary to perform priming that improves the squeezing out of micro-air bubbles that have settled on the surface of the concrete.
To do this, mix a small amount of warm water with liquid soap or detergent, ratio 1:50. A small amount of table salt is added to the resulting solution. It is believed that salt is a guarantee that the organic matter remaining from liquid soap will not interfere with the wetting of the ceiling surface with lime or soap solution.
Do-it-yourself “empty” whitewashing of the ceiling helps a lot. This is a method in which the surface of the ceiling is cleaned with a stiff brush with plastic bristles, plain water with a small addition of PVA. As a result, sand, cement particles, all dirt and dust are washed away before the primer is applied. The next step is to treat the concrete surface with iron sulfate, and only after the mordant has dried should the primer be applied.
How to whitewash a ceiling using old whitewash
There can be quite a lot of reasons for such a decision. Often the situation requires whitewashing the ceiling using old whitewash, regardless of the condition of the base surface. You just need to quickly whitewash the ceiling; there is no time to wash off, clean and prepare the ceiling surface in accordance with classic recipes.
It is clear that the old layer can be whitewashed with the same material that was used earlier, and preferably from the same reserves of chalk or lime.
To prepare, first wipe the surface dry with clean rags. This is done in order to remove the maximum amount of dust. You cannot wash off the dirt; the dust instantly sticks to the chalk or lime base, and if you try to apply a fresh layer, mud stains will definitely appear through it.
Sanding old lime helps improve whitewash adhesion
If you need to whitewash a lime base, then removing dust alone will not be enough. Lime itself easily calcinates to a very dense crust, to which moisture, and especially a fresh layer of whitewash, does not adhere well. Therefore, before whitewashing the ceiling, clean the surface with a dry, stiff brush and rag. This produces a small amount of lime dust, which is highly irritating to the mucous membranes of the eyes and skin of the hands. It is clear that in such conditions it is necessary to wear safety glasses and a respirator.
After such stripping, the old lime base becomes rougher, so it will be easier to whitewash even with ordinary pure lime, without the addition of laundry soap or wallpaper glue.