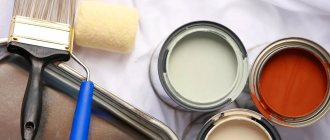
Painting the ceiling in the bathroom with your own hands For high-quality coating of the ceiling in the bathroom, only special paints for rooms with high humidity are suitable. In the store you can immediately purchase tintable paint, and then your ceiling will not be an ordinary white color, but any other color that matches the overall design of the bathroom. To paint the ceiling in the bathroom you need: – paint for the ceiling in the bathroom; – foam rubber and fur roller; – paint tray; – telescopic rod; – stepladder; – finishing plaster; – wide spatula; – fine-grained sandpaper; – antifungal primer; - brush. Paint the ceiling before finishing the walls. When redecorating a room, protect the plumbing fixtures located there from construction dirt. Line the bottom and edges of an enamel or acrylic bathtub and sink with a thick layer of newspaper, then cover with plastic wrap. [yandex1] Clean the ceiling of old paint or other finishes. Examine it carefully. The bathroom may have signs of leaks or areas covered in mold. All these areas must be treated with special antifungal compounds, which are sold in the store. Prime the ceiling. To prevent mold, use an impregnation with antifungal properties in the bathroom, even if the ceiling was completely clean. Apply the protective coating with a foam roller attached to a telescopic rod. Usually there is not much space in the bathroom and turning around with a stepladder is very inconvenient. Prepare the leveling mixture. Choose it depending on the condition of the ceiling. For small defects, finishing plaster is suitable. The ceiling must be absolutely flat. Any bump, depression or crack covered with paint will be clearly visible. Apply the plaster with a wide spatula. Dry completely and sand with fine-grit sandpaper. Then prime again. [yandex1] Prepare tools for painting the ceiling. A short-pile fur roller is best suited for this purpose. It gives a more even finish without leaving streaks. Attach the roller to the telescopic rod. Pour the paint into a special plastic tray. Dip the roller into the paint and roll it along the embossed edge of the tray to remove excess. Use a paint brush to coat all hard-to-reach areas on the ceiling. Make narrow stripes around the entire perimeter, at the junction of the ceiling and walls. Apply paint to the ceiling with a roller. Apply each layer in one direction. There should be no poorly painted areas. In order to properly evaluate your work, look at the ceiling from different angles. Then you will see all the unfinished areas. If you find any, do them before the paint dries. [yandex1] Apply the next layer of paint perpendicular to the previous one. And only after the surface has completely dried. The last layer can be done in the direction away from the door, although this point is not particularly important for modern paints.
Especially for useful tips for everyone.
Painting the ceiling is perhaps the most budget-friendly method of all types of finishing work, especially if it is done on your own, without hiring workers. Indeed, in this case, the costs will go only to building materials. And the small space of small apartments does not always allow the installation of tension coverings. For these reasons, many people who are about to make repairs surf the Internet in search of information on how to paint the ceiling themselves.
- - dye
- – rollers
- – brushes
- – masking tape
- – bathtub with ribbed bottom
Before you paint the ceiling, you need to choose the right tools and materials. To remove the previous coating, you will need a scraper, a wire brush or sandpaper. When painting, protect the upper part of the walls with masking tape. And of course, it’s simply impossible to paint the ceiling without a roller, brushes and a ribbed plastic tray. When choosing materials, take into account some subtleties: almost all rollers are suitable for painting, both from foam rubber and from goat hair or sheepskin. They perfectly absorb and hold any paint: be it silicone, water-dispersed, latex or acrylic. The situation with brushes is somewhat different. Natural bristles are only suitable for solvent-based paints, while for water-based paints you need to prepare synthetic hair brushes. It is worth considering that to paint the corners you will need rollers with a small base diameter of 15 mm. The size of the rollers for the main work depends on the scale of the surface. Typically their length is from 140 to 250 mm, and their diameter is from 38 to 55 mm. Decide what you will use to paint the ceilings. Thixotropic coatings and water-dispersion paints are optimal for residential premises. In addition, they fit well: without drips, evenly distributed, and do not drip from the brush. To paint the ceiling in the kitchen and bathroom, choose materials that are resistant to fungus and mold. Please note that a matte surface will mask the unevenness of the coating, while a glossy surface, on the contrary, will highlight them. Based on this, use glossy paint only for painting perfectly smooth ceilings, especially if the space is well lit. You can also paint the ceiling in well-lit rooms with water-based paints, which contain additives that reduce the coefficient of light reflection. Then we proceed directly to the repair itself. First of all, we get rid of the previous coating. Choose the method yourself - you can do it mechanically, using a metal brush and sandpaper, or you can remove the old paint with a chemical solvent. In this case, it is enough to sand and prime the poorly coming off coating. Keep in mind that water-based emulsion cannot be applied to chalk or lime to avoid green stains. In this case, old coatings are washed off with water. Before painting the ceiling, it should be primed for better adhesion to the paint. For loose surfaces and their strengthening, deep penetration primers are suitable. For other surfaces, a regular primer is sufficient. Wooden surfaces are coated with impregnating primers. The primer is poured into a tray with a ribbed bottom; its size will depend on the size of the roller. To avoid using a stepladder, place the roller on the extension, then prime the ceiling twice. Scotch tape can serve as a primer indicator. Glue a piece of it to the treated surface. This will only be possible if the priming is done well. After priming, the ceiling will need to be leveled. Irregularities and cracks, as well as seams between the plates, are masked with putty. After the first layer has dried, the irregularities are sanded, and the putty is applied as the next layer. So we putty layer by layer until the surface is completely leveled. After drying, the final layer is wiped with a sponge to remove dust. The quality of this work depends on how well each new layer is dried. After all the preparatory work, you can paint the ceiling. They paint, just like they prime, in several layers. Excess paint is removed from the roller by rolling it along the ribbed surface of the pallet. The first layer is applied with diluted paint, after the drying time indicated on the package, 2 more layers are applied, but the paint is not diluted. Allow time to dry between coats. The paint is applied with a wide roller from the window: the first layer is perpendicular to the light, the second is parallel. Offer from our partner How to paint a ceiling with your own hands
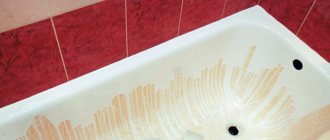
The bathroom is always damp, so it is best to use any waterproof coatings for finishing. If the finishing material is chosen incorrectly, mold and mildew will appear on the walls.
When taking a bath or shower, evaporation is generated. It rises up to the ceiling with air masses.
Some of the moisture then flows down the walls from above. Experts believe that in such difficult conditions, the best finishing would be to paint the ceiling in the bathroom yourself.
Let's try to figure out how to paint the ceiling in the bathroom. First of all, the paint must have water-repellent components.
Among these paints: water-based and water-dispersion. And yet, what paint to paint the ceiling in the bathroom with, today, paints are presented in a wide range, from different manufacturing companies, you can buy them in every construction department of any store. Each package must indicate all the components that make up a particular paint.
All types of paints must be certified, labeled, and accompanied by documents confirming their quality.
All paints have their own expiration date. They should not be expired, and should be stored at certain temperatures in well-ventilated areas.
If paint is stored in warehouses that are not properly ventilated in the summer and not heated in cold weather, such paints will lose their properties.
Frozen and expired paints become completely unsuitable for use. And in the summer, during extreme heat and stuffy indoors, it can release carcinogens that are dangerous to human health.
If the ceiling in the bathroom is suddenly painted with such paint, then soon, under the influence of steam, it will begin to release its harmful substances. Which will certainly affect your well-being.
It is better to buy paint in special stores that cooperate directly with manufacturers.
Paint for walls in the bathroom: what paint to paint the bathroom
Paint for walls in the bathroom can be: oil, acrylic, water-based, water-dispersion, silicate, silicone, enamels, emulsions. So what paint should you paint your bathroom with? Acrylic, water-based, silicone, and silicate are suitable for ceiling decoration in the bathroom.
Acrylic paint belongs to the class of water-dispersion paints. It is best suited for painting the ceiling in the bathroom. It contains not only water-repellent components, but also special anti-mold particles.
The paint repels any dirt from its surface, does not absorb water, smoothes out all unevenness, heals cracks, and fights harmful microorganisms that settle in pairs in bathrooms.
Thanks to the antibacterial particles included in its composition, fungus and mold will not grow in your bathroom.
Latex acrylic paint, more elastic, will always shine on the ceiling. If your bathroom ceiling is painted with acrylic paint, it will be easy to care for. You just need to wash it with a sponge and water from time to time, not often.
Water-based paint is odorless, does not cause allergic reactions, is completely safe to use, fits well on the ceiling in an even layer.
Available in a wide range of shades. Care: do not wash as it wears off easily.
During operation, the ceiling in the bathroom should be taken care of with great care. You just need to carefully wipe off any dirt that appears with a clean sponge, without using any solutions, especially soap. If the water-based paint washes off, you will have to repaint the ceiling.
The most expensive and high-quality silicone paint.
Silicate paint and silicone are the latest developments. Thanks to the technological process during their manufacture, they tolerate any temperature well, mask small cracks, and have repulsive properties. Silicate and silicone paints are several times better in performance than acrylic and water-based paints.
Under no circumstances should you choose oil paint to paint the ceiling in the bathroom.
It does not allow air to pass through, does not repel water and pollution. Soon enough, spots of mold and mildew will definitely appear on the ceiling. The same goes for enamel.
What to look for when choosing paint?
How to choose paint in a store
To ensure that the repair process goes as smoothly as possible, special attention is paid to the quality of the paint, because the final result of the repair directly depends on this. You should also know that high-quality products cannot be very cheap and it is simply not prudent to “rush” to any tempting offers at a good price.
How to make a ceiling in a bathroom? Recommendations for choosing material and installation technology
If you save on paint, you can make a mistake in the future, because cheap water-based paint for your bathroom will be short-lived and need constant updating. Consequently, the overall price will be higher.
Advice: Before choosing, you should read the product documents. In most cases, counterfeit products do not have accompanying documents. And, as a rule, conscientious sellers will present at least some documents, and in large stores such documentation must be mandatory.
Step-by-step preparation for painting the ceiling yourself
Preparing the ceiling for painting with your own hands is carried out in several stages:
- First, the entire ceiling should be cleaned of old finishes, dirt and dust.
- Secondly, it should be primed with a good quality primer, deep penetration.
- Thirdly, putty with waterproof putty. When the ceiling is dry, it should be primed again.
This completes the step-by-step preparation for painting the ceiling. After a few days you can start painting.
You should prepare in advance all the tools for painting: a paint tray, a roller with a short handle, a roller with a long handle, paint brushes, clean rags. First, prepare the paint well, stir until smooth, so that there are no lumps. The paint should not be too liquid.
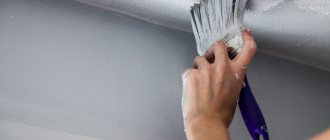
All painting work starts from the corners, and the ceiling is no exception.
We take brushes in our hands, and in a thin layer, trying not to splash the paint, we paint all the places between the ceiling and walls, the places behind the pipes, the pipes themselves and the corners. If the paint bleeds slightly, you should immediately remove the smudges with a soft cloth.
Under no circumstances should the stains dry out. You should wipe it off carefully, without smearing the paint even more. Next, take a roller, preferably one with an elongated, telescopic handle, and apply a beautiful, thin layer of paint.
We draw a thin strip along the ceiling with a roller, draw the next strip next to it, extending a few centimeters along the edge, onto the first strip of paint. Thus, we paint the entire ceiling. We try to ensure that there are no gaps between the strips or unpainted areas.
When the first layer of paint has dried, apply the second, also evenly and in a thin layer.
Usually two layers are enough. But you can apply a third layer, the final one. Now the entire ceiling in your bathtub is reliably protected from moisture, mold and mildew.
Today there is a huge selection of building materials for repairing the ceiling in the bathroom: suspended and suspended ceilings, lining and much more. But ceilings painted with water-dispersion or water-based paint continue to be very popular. It's both beautiful and cheap.
Photo: depositphotos.com
Tools, workwear
When performing preparatory work you will need:
- a small spatula to remove the old layer of paint;
- coarse and fine-grained sandpaper;
- medium spatula (malka) for applying plaster;
- drill with an attachment for making plaster mixture;
- stepladder or small scaffolding;
- roller or brush to apply a layer of primer.
For direct painting you will need:
- roller with short fur – 2 pcs.;
- small and large paint brush;
- tray for paint (primer).
From clothes and specials. funds you need to have:
- painter's overalls, preferably with a hood;
- glasses;
- gloves;
- respirator.
What paint to paint the ceiling in the bathroom?
Ceiling paints come in glossy and matte.
Glossy paints shine too much, constantly attracting attention to themselves; it does not look very nice on the ceiling. In addition, when painting the ceiling with such paint, even minor putty defects will be visible on it: tubercles, small pits, scratches. Therefore, it is better to stick to matte paint, this is the best option.
It is also necessary to take into account that the painted surface must be washed occasionally; for this, the paint must be washable. Cheap paint is often not cheap, and if you run a wet rag over a surface painted with similar paint, it will simply remain on the rag. It is not recommended to paint the ceiling with cheap water-based paint.
As for environmental cleanliness, water-based paint does not meet its requirements. Although ceilings continue to be painted with it, the best option today is water-dispersion paint. It is divided into acrylic, silicone and silicate:
- acrylic paint lays beautifully on the surface, “clogs” small cracks and is very easy to clean. It is this type of water-dispersion paint that builders recommend using;
- silicone paint creates a protective film, washes well, and practically does not get dirty;
- silicate paint is good because it prevents the formation of fungus on the surface of the ceiling, but does not mask cracks, unlike acrylic paints.
As for color, they will choose absolutely any shade for you using a color scheme.
There won't be any problems with this. In some cases, there is no need to tint, since ready-made paint comes in almost any shade. However, white color is a classic and fits absolutely any interior.
Read more in the article on our website Bathroom paint: selection rules, types, manufacturers
Why should you paint the ceiling?
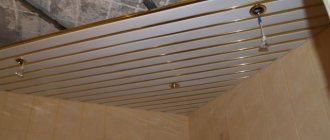
Tensile structures reduce the free space of the room, so they are not suitable for bathrooms. Installation of plastic panels is difficult, so people often choose the simplest finishing method - painting the ceiling. The material is easy to work with and does not require lengthy preparation of the base.
Advantages and disadvantages
The advantages of this cladding method include:
- Speed of work completion. Painting is an inexpensive finishing option that many can afford.
- Possibility of carrying out all stages of repair without the involvement of specialists. If you choose the right paint and follow the technology for applying it, there will be no problems.
- Practicality and durability of the finished coating.
- Possibility to choose any color. Manufacturers offer different paint options, including textured ones.
- Good adhesion of the coloring composition to any substrate. The product can be applied to wood, concrete, brick, and drywall.
- Possibility of decorating the finished coating with patterns, paintings, and ornaments.
The main disadvantage of painting is that the composition is not able to hide ceiling defects, so they have to be eliminated in advance. After flooding, the surface becomes covered with stains and requires refinishing.
Why you should abandon standard whitewashing
Treating ceilings with chalk compounds was common in the past. The material is applied in a few minutes. The main advantages are environmental safety and low cost. However, chalk whitewash is not suitable for finishing rooms with high humidity. The paint quickly crumbles, gets wet, and makes the room dusty.
Materials and tools for painting the ceiling
You will need the following materials:
- solvent - necessary for diluting and reducing the viscosity of paints and enamels. It is also needed for cleaning hands and tools after finishing work;
- primer - when painting the ceiling with any paint, use primer GD-032. It is diluted with RS-2 solvent. Do not use white spirit or gasoline;
- drying oil - it is best to choose drying oil on a natural basis, it is needed for making paints;
- putty - it is recommended to use waterproof putty to level the ceiling;
- Drying agent - it is used to ensure that the surface dries as quickly as possible. However, you must use it according to the instructions, otherwise the coating will lose its strength.
The quality of the work you do depends entirely on the quality of the tools you use. To paint the ceiling, you will need the following tools:
- rollers - will come to the rescue for painting large volumes. Which roller is best to paint the ceiling? Rollers are excellent, convenient tools for painting ceilings. They allow you to get the job done much faster compared to brushes. Rollers come in different sizes and pile lengths. A roller with long pile is indispensable for painting uneven and porous surfaces, for rough painting (paint is applied in a thick layer). A medium pile roller is used for finer work. Short pile is used if you decide to paint with glossy paint;
- Brushes of various thicknesses and lengths are wonderful tools for painting and most of the work is done with their help. A high-quality brush is made from natural bristles of various lengths. When working, such a brush will bend better and provide comfortable whitewashing or painting. Therefore, it is necessary to check whether the brush is springy. Paint brushes are best suited for painting the ceiling. They vary in shape - they can be round or rectangular with a diameter of about 160 mm and a bristle length of about 100 mm;
- unnecessary rags with which you will wipe up dripping drops of paint.
Which color do you prefer?
If a detailed design of the room is developed during the renovation process, choosing a paint color will not be difficult, because it will be indicated in the project. Otherwise, you will have to select the paint yourself. Of course, you can give in to your own taste preferences, but you should know that for small rooms, which in most cases is the bathroom, it is better to choose light colors and shades. It is not necessary to cover the ceiling white; you can use various shades of beige, blue, green, lilac, etc.
Advice: If the desired shade is selected, then it is better not to resort to tinting yourself, but to use the tinting services in a hardware store, this will make it possible to create the required color quickly and efficiently, and, if necessary, additionally order the missing amount of similar paint.
Surface preparation
In order to paint the ceiling efficiently, it is necessary to thoroughly prepare the surface. They begin work by completely cleaning the ceiling from paint or whitewash. All irregularities are sanded down, small cracks are rubbed with putty, having previously moistened them with water.
Before filling large cracks in the ceiling, it is necessary to widen them so that the putty can easily penetrate the crack. The putty must be applied with a small spatula. Next, the surface needs to be as free from dust as possible.
Should I resort to budget-friendly repair methods?
When the coating is in satisfactory condition, a light refinishing of the paintwork can be carried out. This will be very budget-friendly, but you need to know the type of paint, because there is often a mismatch of colors and compositions. If the old coating was applied by whitewashing, you can renew it, but these measures may not last long. The question may arise, “How to whitewash the ceiling in the bathroom?” Lime and chalk mortars are used for whitewashing. And at the same time, one excludes the use of the other, that is, chalk mortar cannot be applied to a whitewashed ceiling with lime. Therefore, it is better to cover the ceiling with water-based paint than to whitewash the ceiling in the bathroom.
What to choose: matte or glossy paint?
Acrylic paints come with a matte or glossy effect. The second ones are a little more expensive, but they look more elegant.
The gloss there is not so sparkling as to have enormous reflective abilities, therefore, there is not much difference in the choice.
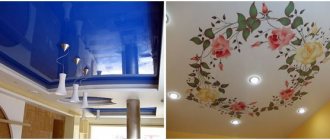
Let's say the same glossy stretch ceiling will cause great discomfort in the bathroom, since it has the ability to display glare from lighting fixtures. Lying in the bathroom, you often look up and the glare from the spots unpleasantly “hurts” your eyes.
In the case of paint, such inconveniences will not arise, since it shines, but does not have a mirror effect.
But there is a minus here: every grain of sand and unevenness is visible on the gloss. Agree, it is very rare when the ceiling is prepared so well that there is not a single smallest bulge.
But the matte surface is more “velvety”, therefore, the ceiling will look perfect, even if there are small errors on it. Moreover, as you remember, acrylic paint lays down in a rather dense layer.