In repairs, accuracy and quality of work are important. Great attention is always paid not only to beautiful finishes, but also to smooth floors, smooth walls and ceilings. In capital construction, walls sometimes deviate from the vertical axis; they have relief, irregularities or bends. In such cases, correction of the main walls takes place before finishing. The most convenient option is to install beacons for plastering walls using a laser level. If you properly level the main walls, there will be no major flaws left on them, and any finishing or decoration can be easily done. Although this type of repair work requires specialized tools, the process itself is quite simple and can be done without the help of professionals by studying the theoretical material.
What to do before starting work
The preparation stage plays an important role in installing beacons using a laser level, which helps to significantly reduce the time required for installing the slats. Not only the final result, but also the specifics of the work will depend on the quality of the preparatory work.
Not only the final result, but also the specifics of the work will depend on the quality of the preparatory work.
Marking walls and ceilings
Before placing beacons under the plaster using a laser level, all surfaces are marked. The first mark is placed 30 cm from the corner. How often the profiles should be positioned depends on the size of the rule; to create an even coating, its ends should extend 5-10 cm beyond the rail.
So, having marked the first line, you need to attach the tool so that its ends extend a few centimeters beyond the mark and put a new mark. When marking a wall with a window, work begins with placing slats along the edges of the window and filling the space around it. Then additional beacons are installed and the wall processing continues. If during marking the rail ends up in the door, it should be installed closer to the latter.
Before placing beacons under the plaster using a laser level, all surfaces are marked.
Lighthouses for plaster: advantages
Plastering walls improves the appearance. Makes the surface smooth. There are advantages to using beacons:
- At the end of the work, a perfectly flat surface is obtained. A beginner can do the job with beacons.
- Properly installed beacons can reduce mixture consumption. Correctly performed work reduces not only the time for leveling the surface, but also the consumption of material.
- Using beacons, work proceeds faster and more accurately than without them.
- Some mixtures have a high percentage of shrinkage. This is, for example, cement mortar. With beacons, the created surface is easier to adjust.
Some craftsmen do not set beacons to ensure the evenness of the created surface. Basically this leads to a curved surface, more time and material consumption of the putty.
How to place beacons using a laser level
To install beacons using a laser level, a “brick” type device with a vertical circle of 360 degrees is suitable. If you install the tool correctly, there will be a gap of about 1 cm between the laser and the plaster.
If you install the tool correctly, there will be a gap of about 1 cm between the laser and the plaster.
Installation of plaster beacons using a Bosch GLL 3-80 laser
First, significant defects must be assessed and the laser level for plastering walls must be positioned so that the laser lies parallel to the bottom edge of the wall. It uses a diagonal screw that smoothly rotates the level. Of course, when setting the level, the quality of the main wall should be noted, but, regardless of the rest of the unevenness of the entire wall, the first few rows are laid out in parallel.
Before setting beacons using a laser level, you need to make sure that the projected laser beam does not collide with any uneven walls. This is easy to notice: when encountering any minimal obstacle on the way, the beam does not travel to the end of the room. The distance between the laser and the most protruding point of the surface should not exceed 1 mm.
Next, holes for the dowels are drilled. The heads of the screws must be placed in one row in order to further align the beacons evenly and continue repair work. The next step is to unscrew and align the screws in one plane.
First, significant defects must be assessed and the laser level for plastering walls must be positioned so that the laser lies parallel to the bottom edge of the wall.
There are two main ways to align screws:
- Installing the device on the previously marked lines and unscrewing the screws so that the beam lies exactly on their heads;
- Install the device at a distance of 2-3 mm from the previously marked lines, unscrew the bolt to a position where there is a clearance of no more than 2-3 mm from its head to the wall.
It is more convenient to start with a screw located on the most convex part of the wall. You need to make a mark on the screwdriver at the appropriate distance (you can first stick a small piece of tape) and unscrew the remaining bolts to this mark.
These methods are suitable if the laser beam passes exactly parallel to the bottom of the wall. Otherwise, to set the beacons using a laser level, you need to unscrew the screws, adjusting the level with a thread.
First, the outer beacons are installed evenly, a lace is pulled along them and the rest are unscrewed accordingly. This option for installing beacons is performed without a laser level.
First, the outer beacons are installed evenly, a lace is pulled along them and the rest are unscrewed accordingly.
How to draw a right angle between walls for subsequent installation of beacons
When marking and installing, it is important not only to make smooth walls, but also to create right angles between perpendicularly placed partitions.
Unfortunately, these works are carried out extremely rarely, which is associated with a large overuse of plaster during repairs. When performing the work yourself, we recommend that you determine the ideal geometry of each room; overhead costs will be small when using cement-sand or gypsum plaster.
Work on leveling corners is carried out in the following order:
choose the wall from which you will start: in rooms with windows, the outer wall of the apartment is taken as the basis, in interior rooms - the central wall, which you rest your gaze on when you enter the room;
subsequent actions depend on the condition of the main wall, if it has the shape of a “propeller” (various irregularities), the installation of embedded beacons begins and the wall is “pulled” into a flat vertical plane, then the rest of the room is marked;
to draw an angle (for a wall that is piled away from you), use a square or ceramic tile as a sample and the rule that is attached to the wall to determine the curvature of the angle - draw a line taking into account the embed. Do the same for all three walls;
to draw a corner (for a wall that is piled up on itself), markings are done along the ceiling with the help of an assistant, but this is a very labor-intensive task. In practice, leveling is carried out similarly to the version of a wall piled “away from you”, using a vertical level to determine the maximum “internal” angle of inclination of the wall. Then the right corners of the room are set similarly to the previous option.
How to check the flatness of a surface with a laser level
When leveling walls using a laser level, it is worth noting only the installation of slats. You need to turn on the vertical plane of the device and fix it so that the projected plane runs strictly parallel to the wall. In this case, the laser does not build the leveled wall itself, but a plane parallel to it.
If the laser is interrupted and does not reach the end of the wall, then the surface is not perfectly flat. The instrument should be moved slightly and the change in the laser observed. To clarify differences on the wall, a wooden or metal meter with a millimeter scale is best suited.
To ensure that there are no moving parts on the instrument, this may cause inaccurate measurements (for this reason, it is better not to use a tape measure).
Next, you should select vertical sections at a distance of several centimeters from each other and install the measuring instruments perpendicular to the surface. It is necessary to note the measurements through which the laser will pass and repeat the procedure after 70-100 cm. Based on these data, you can approximately imagine the degree of curvature of the wall.
If the laser is interrupted and does not reach the end of the wall, then the surface is not perfectly flat.
How to install: step-by-step instructions
The technology for making mortar beacons is quite complicated, especially for a person without experience, but a definite advantage is that a fixative is not needed.
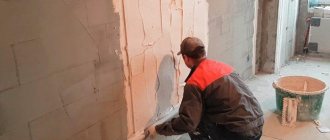
First of all, it is necessary to apply a sufficiently thick strip of plaster between the marking screws
Please note that the solution must be applied immediately before making the guide, and not immediately on the entire wall. Using the rule, you need to form a lighthouse, flattening it on both sides and on top
In addition, it is possible to install plasterboard guides. When the walls are relatively flat, this option seems to be one of the most acceptable and cheapest. You can use scraps of plasterboard left after repairs.
First, the plasterboard scraps need to be cut into strips 3-4 cm wide. The solution is applied to the preliminary surface with slaps. The distance between the tubercles of the solution should be 20-30 cm. This will ensure good adhesion, at the same time, the drywall will not bend as a rule.
Next, the strips are pressed against the wall with the mortar and aligned using the rule using the screws screwed in during marking. The result is a flat surface on which it is convenient to guide the rule. In this case, the drywall strips will not bend and the wall will not be aligned incorrectly.
Wooden guides are not used in modern practice, since pulling them out of the wall after completing plastering work is extremely problematic. As a result, the wood may begin to rot, and traces of rot will appear on the finish coat. However, wooden beacon bars must be installed using the same technology as metal or plastic ones. The wooden blanks will be slightly wider, but otherwise the fastening procedure is the same.
String beacons require a slightly different approach during installation. When installing them, you must follow the following instructions:
- After the surface has been primed twice and thoroughly dried, you need to secure the brackets of the string device in the places where dowels were installed during marking.
- Next, you need to tighten the strings between the clamps. Their placement and distance from the wall should be as determined during marking.
- The strings are stretched to the point of so-called ringing: if you pluck them, a characteristic ringing sound should appear.
- Next, the string is fixed with a solution. This is done so that during the plastering process it does not sag and the evenness of the wall is not at risk.
- After the applied mortar has completely hardened, you can begin plastering the walls.
Regardless of which type of fastening you choose - with fasteners or on a solution, installing profiles or guides of other types will not cause difficulties. The main thing is to carefully prepare the surface, and then follow the instructions step by step.
Pros and cons of using
Installing beacons with a laser level has significant advantages over other installation methods, including:
- Ease of implementation compared to installing beacons with a plumb line;
- High accuracy in measurements;
- Significant time savings (especially noticeable when performing large-scale work);
- High quality coating. Plastered walls do not contain any defects, burrs or irregularities;
- This method is especially convenient when working on large-scale walls.
Plastered walls do not contain any defects, burrs or irregularities.
However, there are also disadvantages to working with a laser level:
- To perform the work efficiently, experience and professional knowledge are required;
- Large material costs may be required.
Many developed chains of construction stores offer a large selection of tools and materials, including various levels. The quality of wall leveling largely depends on proper preparation and choice of materials.
To do the job well, experience and professional knowledge are required.
The process of installing beacons is not as complicated as it might seem at first glance. However, in order to correctly install beacons and carry out subsequent repair work, at least a little experience in the construction industry is required. You should also study some theoretical material and note important details. It is convenient to draw up an algorithm of actions and highlight points for each stage. After this, you can confidently begin the practical part.
Surface preparation
Before installing beacons, the surface must be prepared, regardless of what walls are planned to be plastered - brick, foam or gas block, plasterboard, concrete or others. The foundation preparation process consists of several stages, each of which is very important. You can't miss a single one.
The first step is to remove the old covering from the wall, and we are talking not only about wallpaper, but also about plaster, paint or something else
Please note the specificity of the procedure. So, the wallpaper will have to be removed in any case, just like water-based paint
If the walls are covered with oil paint (it is almost impossible to remove), then you can leave the paint, after making notches to improve the adhesion of the plaster and the oil composition. Old plaster can also be preserved if it does not fall off or “bounce”, but if there is even the slightest concern, it is better to dismantle the coating
It is extremely important to take the time and thoroughly clean the surface of the base
Next, the wall is washed from dust and dirt, and particles of the remaining old coating are removed. The surface should be clean and slightly rough.
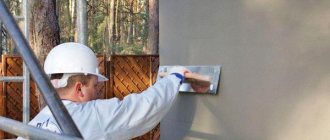
The walls are well primed using a deep penetration liquid primer
Please note that priming work is carried out 2-3 times. Each time you need to wait until the previous layer of primer has completely dried
Depending on the type of surface, before installing beacons and plastering, you may need to apply a certain material to the wall. So, for brick walls no additional processing is required. Concrete surfaces must be treated with liquid cement mortar. Wooden and metal walls are additionally reinforced with special plaster nets, which are secured between the beacons.
In principle, at this point the preparatory work can be considered completed. Before starting any repair work, you need to protect adjacent objects and surfaces with masking tape: cover the door jambs, stick a strip of tape on the floor and on the ceiling where they are adjacent to the walls. This will completely protect the environment and will not require much time in the future to clean adjacent surfaces.
Models for professional work in small spaces
For professional work with apartments, you need more functional tools that work with a larger number of planes.
Bosch GSL 2 Professional
The model is well suited for checking the evenness of floors in professional quality apartments. The level gauge projects two planes at a distance of up to 20 m with a scanning angle of 360 degrees. The accuracy of the device is 0.3 mm per meter, the price of devices in this series is from 7,000 rubles.
ADA instruments ULTRALiner 360 4V Set
In addition to one horizontal line, the tool allows you to line up four vertical lines at a distance of up to 20 m, with a receiver - up to 70 m. The accuracy is 0.2 mm per meter. Price – from 20,000 rubles.
Stabila LAX 400
The model is suitable for professional tiling, electrical marking, and pipe installation. In addition to the horizontal, it provides two vertical planes with the ability to move horizontally without changing the installation. Accuracy – 0.2 mm per meter, distance – up to 20 m, with a receiver – up to 40 m. Price from 34,000 rubles.
Leica Lino L2P5
The model allows you to build two lines (horizontal and vertical) and five points (up-down-right-left-center of the cross) at a distance of up to 15 m, with receivers up to 30 m. Accuracy 0.3 mm per meter, price - from 25,000 rubles .
Beacons for self-leveling floors - benchmarks
If floor differences do not have any prohibitive values, then it would be more advisable to use self-leveling self-leveling floors. Many beginners make the mistake of naively believing that the mixture itself will fill all the unevenness.
When pouring the self-leveling mixture, special beacons are used. You don’t even have to buy them, but make them yourself.
If you don’t want to bother making beacons for screeded floors, you can buy them. A benchmark is a professional beacon, which is a tripod with a rotating mechanism.
By rotating the central bolt you set the required filling level. Benchmarks are placed in 1 m increments. After pouring the self-leveling floors, the benchmarks are removed.
Types of plaster beacons
Installation of fasteners on a plaster beacon
A plaster beacon is a device designed to help find a reference point for the formation of geometrically correct surfaces from cement-sand and gypsum mortar mixtures. They facilitate and speed up the process of producing plastered surfaces, allowing high-quality work to be carried out by both professional plasterers and general-purpose builders.
Classic beacons are a metal or plastic V-shaped profile, which is attached to the surface being treated using special fasteners or fixed with adhesive or plaster mortar.
In the production of work, it is allowed to use beacons from other materials, for example, wood, as well as forming them directly from the plaster mixture using V- and T-shaped profiles.
So, beacons are distinguished by the material they are made of:
Among the disadvantages, it can be noted that it is easily deformed during transportation, and, most importantly, it requires removal from the plastered surface, since it is susceptible to rust.
Metal plaster beacons
But there are some differences when installing it - plastic products do not have the rigidity of metal, and therefore it is not suitable for installation on “flat cakes”; this beacon must be fixed with glue along its entire length.
If this is not observed, then the required level will not be maintained - it bends under the weight of the spatula, and its rigidity is not enough to return to its place. The surface will not comply with SNiP standards.
Plastic plaster beacons
They are used for plastering wooden walls, since it is convenient to attach them to a homogeneous material. Wooden beacons are not produced as such; thin bars of suitable size are used. They also do not require removal from the plaster layer after completion of work.
In addition to traditional methods of creating landmarks, there are alternatives:
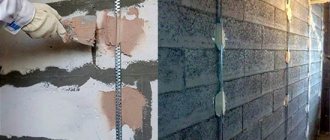
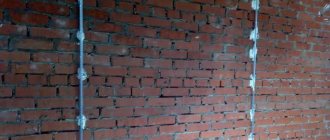
String beacons
The principle of this method is that two carabiners are attached to the surface of the wall to be leveled, top and bottom, symmetrically to each other, to which galvanized wire is attached.
Due to the bolts in the carabiners, the latter is tensioned and forms an approximate guide. Then it is fixed with plaster or glue and serves as a reliable beacon.
The advantages of this design are obvious - the low price of consumables (350 rubles per kg), the speed of installation of beacons and a slight trace of the wire after it is removed from the plaster.
Formation of beacons from plaster mixture
There are many methods and technologies, but they have the same principle - the formation of a lighthouse from plaster mortar. According to the markings, a certain amount of solution is applied, a level, usually a profile, is pressed against it, the vertical is set, the excess solution is removed with a spatula, usually the profile or level is removed. After hardening, the lighthouse is ready.
A fairly simple and effective method. Having acquired the skill, the formation of beacon landmarks will not take much time, and will also help you save a lot on purchased consumables.
Fasteners for lighthouse profiles
In conclusion of this section, it should be mentioned that there are special fasteners for beacon profiles on sale: ears, latches, etc. They are attached to the wall with dowel-nails or self-tapping screws, the profile is inserted into them, and, depending on the fastening system, it is fastened or bent on the last one.
Using them is quite simple, but almost all professional plasterers prefer to place the lighthouse on gypsum or cement mortar.
Lobelia: description, planting and care, when it should be sown, description of varieties (50 Photos & Videos) + Reviews
Kinds
They also have their drawbacks. For example, during installation, a metal beacon is easy to deform if you make any awkward movement. It is dangerous to “forget” such beacons in the walls, since they can rust, and this rust will appear on the finishing coating. Beacons must be mounted on a solution that will ensure their rigidity (for example, gypsum).
However, not everything is as simple as it might seem at first glance. Plastic beacons are only suitable for plastering interior walls, since plastic does not tolerate low temperatures. Also, if the beacons are installed incorrectly, they will deform under pressure. This, in turn, will lead to the walls not being perfectly smooth.
Also recently, so-called string beacons have appeared, which are a metal cable stretched between two carabiners. It has a common disadvantage of all metal options - susceptibility to rust, but it is much easier to work with. All levels are perfectly level if the carabiners are correctly secured.
Laying tiles using laser
Here, of course, you cannot do without a standard bubble level; the laser level serves as an auxiliary device. Despite this, his role is very significant.
When laying tiles, a laser checks the evenness of vertical and horizontal seams
After all, for the eye to perceive it, it is enough to deviate by one millimeter and the difference will be striking.
To control horizontal seams, it is convenient to place the device on an improvised shelf (if the design of the level does not provide for other mounting on the wall). The shelf moves along with each laid row, moving to the opposite corner.