Preparation of gypsum plaster mortar
Let's consider what tools, materials are needed and what is the correct recipe for preparing gypsum plaster using the example of the Rotband mixture.
To perform the actions you will need:
— the plaster mixture itself;
- clean water, preferably heated to 25–28 degrees;
- a suitable container for mixing water and dry powder;
— a construction mixer or drill complete with a special mix attachment;
- Master OK.
Cooking method
1. Prepare a dry, clean container of suitable volume. It is preferable to use plastic containers, since metal ones are very difficult to clean after use.
2. Take the Rotband plaster mixture and water in the quantitative ratio: 1 bag (30.0 kg) per 18 liters of water.
3. The dishes are filled with water and the plaster mixture is poured into it - 5-7 full trowels.
Attention! The water, tools and utensils used must be absolutely clean, since dirt particles will significantly reduce the setting time of the mixture. It will set before use or midway through the finishing process!
4. The composition is thoroughly mixed manually with a trowel or using an automated method (drill, mixer).
5. Add the remaining Rotband powder in the package to the solution and stir again until the lumps and clots completely disappear.
Important! If you leave lumps, even small ones, the dry matter in them will actively absorb water, which will lead to premature setting of the mass!
6. Let the solution sit for 3-4 minutes and repeat mixing again.
7. Upon completion of the last manipulation, the solution is ready for use. The mass must be used within 19–24 minutes immediately after preparation.
Current recommendations
To ensure that the plaster solution turns out to be of high quality and there are no problems with its use, it is recommended to adhere to the following current tips:
— you cannot add water or powder concentrate to the prepared mixture during plastering work;
— leaving the solution “for later” is prohibited. It will quickly harden or begin to clump - both processes make the mass unsuitable for further use;
— it is necessary to follow safety precautions and precautions when using electrical appliances (mixer, hair dryer, drill) when working with plaster;
— you need to wear protective equipment: gloves, thick clothing, goggles, a respirator, appropriate shoes.
Good luck with your work and ideal results on plastered surfaces!
Procedure for diluting plaster
The purpose of plaster is to give the walls a smooth surface for subsequent finishing work. Plaster also acts as a protective coating for facade walls from atmospheric influences. A solution with a solid filler is poured onto the surface of the external walls and a surface in the form of a “fur coat” is obtained.
Indoors, plaster is used as a preliminary rough layer. Special dry mixtures are stirred with water to achieve the desired consistency. We will tell you how to mix gypsum plaster, as well as similar solutions, in this article.
How to apply plaster correctly
If you don’t like to take the word for advertising and all sorts of ratings, then learn to determine for yourself which mixture is better. To do this, its properties, shelf life, composition are assessed, what is required by GOST and how the gypsum mixture meets these requirements.
Mandatory in modern conditions:
- Gypsum mixtures with the addition of special fillers, with the help of which the mixture becomes moisture resistant;
- To prevent the gypsum
powder from hardening, a so-called retarder is added to it - it allows you to increase the time of working with the composition.
Main types of plaster
Different types of coatings are designed for plastering walls in certain conditions (exterior finishing of facades or covering walls indoors). We list the main types of dry mixtures:
- cement-sand;
- plaster;
- clay-sand;
- limestone;
- cement clay-lime.
Cement-sand
The walls are prepared with this mixture before finishing with the finishing coat.
This type of plaster is simple in composition. Finishing walls with such material can be called cementing surfaces. Cementation is mainly used to level out minor surface defects. This also helps strengthen the base for the finishing coating of the walls.
We prepare a cement-sand mixture simply: pour cement and sand into a container in a ratio of 1:3, add water. Using a mixer, shovel or other device, stir the solution until a homogeneous creamy mixture is obtained.
Plaster
The dry mixture is prepared from gypsum with the addition of various components. Each manufacturer creates its own powder composition. Mix gypsum plaster, strictly following the instructions.
Gypsum plaster is used to line interior walls. Small areas with complex surface topography are finished with plaster.
Clay-sand
Covering the walls with clay-sand mortar serves as a protective fence for the facades of buildings from atmospheric phenomena.
Clay-sand mixtures are used for finishing facades
The solution is prepared using the same technology as cement-sand plaster.
Limestone
Plaster based on a mixture of lime and sand forms a layer on the walls that has high heat-insulating properties.
Prepare the solution yourself in the same proportions as the cement-sand mixture.
This solution is used both for cladding the facades of buildings and for finishing interior walls.
Preparing a lime-based plaster mixture significantly reduces the cost of finishing walls, especially if lime lies near the construction site and is freely available.
Cement clay-sand
How is plaster made from cement, clay and sand and why is such a mixture needed? The answer is quite simple. Clay is added to save on cement consumption. Cement and clay are taken in equal parts. Sand is added in an amount of 1/3 of the total volume of the dry composition. For more information about plasters, watch this video:
This type of plaster is made independently. It is advantageous to prepare it when components such as sand and clay lie close to the building where plastering work is carried out.
Let’s summarize all the above types of plaster and their areas of application into a single table:
| № | Name of plaster | Application area |
| 1 | Cement-sand | Leveling walls for further finishing |
| 2 | Plaster | For interior work |
| 3 | Clay-sand | Universal |
| 4 | Limestone | For building facades |
| 5 | Cement clay-sand | Universal |
The process of applying and leveling the surface
The mixture must be mixed immediately before application. The first layer for leveling the walls should be no more than 5 mm. Application that is too thick can slide off and create an even more uneven surface than it was before.
Installation of beacon strips
To obtain a flat surface, it is better to install beacon profiles. These support guides are designed to fix the thickness of the plaster layer. They greatly facilitate the work of leveling the surface.
Beacon profiles are attached to the surface of the rough wall in height from floor to ceiling, using the same plaster and checked with a block level vertically, horizontally and diagonally. The width between them is 130-150 cm, you need to retreat 20-30 cm from the corners.
Using a trowel or trowel, spread the mortar between the slats, filling the entire space. Next, by removing the remaining plaster, we level the surface; the solution should hide the beacon slats.
The rule for the screed should be 20-30 cm longer than the distance between the beacon profiles.
Afterwards it is better to remove the beacon profiles and wipe down their locations, because Over time they will rust and the plaster will peel off.
If a thicker layer of plaster is needed, then the material is applied to the wall for the first time and compared with a comb. After complete drying, the surface is primed and a second layer is applied.
If surfaces made of foam plastic materials are plastered, for example, when insulating walls, it is necessary to reinforce the plaster with mesh. Betonkontakt is used as a primer for such a surface.
After an hour, when the material has set, but has not completely dried, you can eliminate the unevenness, cut off the corners and refine the flaws.
Until the material is completely dry, no further work is carried out. After complete drying, rub it with a hard grater. To obtain a smooth surface, you need to moisten it a little and go through it again with a float or felt sponge.
If you plan to paint the top with light tones or paste with light wallpaper, then it is better to apply a thin layer of finishing plaster. It will completely hide flaws and give a uniformly white color to the surface. First you need to prime the wall.
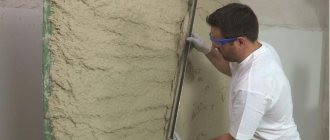
Technology for mixing plaster mortar
Stir the mixture with a construction mixer
Mixing the plaster mortar is simple:
- Prepare the container for mixing. The volume of the dishes must correspond to the volume of one batch of solution. The inner surface of the container must be clean and free of any deposits.
- Dry ingredients are poured into the dishes. The entire poured volume is thoroughly mixed, removing solid inclusions.
- While mixing the mixture, water is gradually added to it.
- The process is interrupted for 10-15 minutes, and then stirring is continued until the solution is completely ready.
- To make sure that the solution is at normal thickness, place a 1 cm thick mixture on the trowel. The solution should not flow down and not be too dense.
The dry mixture should be poured with warm water at a temperature of 20-250C. This is especially true for working outdoors at low above-zero air temperatures.
Popular manufacturers
Many companies produce gypsum plaster. But in terms of popularity, not a single product can compare “Knauf” Rotband (“Knauf” Rotband) Indeed, high plasticity, an easy-to-work consistency, which is why the mortar adheres well and adheres well, the absence of shrinkage and, as a result, a surface without cracks after drying, are liked by builders.
But there is one big drawback: the price is greatly inflated. At the same time, not due to the best quality and operational characteristics - they are approximately the same for all leading ones, “DeLuxe”, “Unis”, “Ceresit”, etc.), but due to the promoted brand.
Among the competitors, there are several companies that are really good in terms of product quality.
"Volma". The Russian manufacturer supplies the following line of mixtures to the retail chain:
- “Layer”, “Plast”, “Canvas” - for classic manual application;
- "Gypsum asset" - for mechanized.
The product is intended for leveling walls, restoration and decorative work. Peculiarities:
- low price;
- good adhesion to all types of wall materials;
- insufficiently high ductility;
- does not like significant changes in temperature and humidity;
- maximum thickness of one layer - 3 cm;
- no shrinkage during drying;
- does not peel off or crack;
- the color is not only white, but also beige or pink;
- It sets faster than the stated 45 minutes, which creates problems, especially for home craftsmen.
The company guarantees high performance characteristics of the plaster with a layer thickness of up to 5 cm, but subject to reinforcement with fiberglass or basalt mesh.
"Prospectors". Another domestic manufacturer. Supplies mixtures for interior work to the building materials market. They can be used for finishing walls and ceilings, sealing seams and joints, and restoring stucco.
There are no complaints about product quality. It is plastic, fits well, and glosses easily. Plus, the maximum permissible thickness of the base layer is large - up to 5 cm. The disadvantage lies in the area of logistics - packaging in bags of 15 and 30 kg, which is not always profitable.
"Unis". The Russian one has several enterprises in the country. It produces products with the following technical and operational parameters:
- White color;
- diluted in a ratio of 0.4-0.5 l / kg;
- base layer thickness - 5-50 mm;
- compressive strength - 2.45 MPa;
- plasticity is maintained at temperatures from +5 to +30°C;
- the life activity of the solution is 50 minutes;
- consumption per 1 cm of layer - 8-9 kg/m2.
Reviews vary widely in quality. At some enterprises, control over compliance with the technological process has been established. As a result, there are no complaints. At the same time, where this point is missed, shortcomings are noted:
- does not mix well - lumps remain;
- slides off the walls, despite experiments with the amount of water;
- takes a long time to dry.
Can be applied manually or by machine.
"Ceresit". The German company, under the trademark “Ceresit”, produces in the Urals (Chelyabinsk) not only gypsum plaster, but also gypsum-polymer plaster for facade work.
The plaster mixture is impact-resistant, plastic, with an optimal consistency, which allows you to apply different patterns using rollers - imitation of some types of decorative plaster. The disadvantage is the price. Too high. But you have to pay for quality and brand.
"Deluxe" Plaster mortars are not inferior in quality and technical characteristics to German manufacturers, but at a lower price.
"Bolars." The product is used for leveling walls and ceilings. It has:
- color - white or gray;
- compressive strength – 2.45 MPa;
- consumption for a layer 1 cm thick - 10 kg/m2;
- solution lifetime - 60 minutes.
Mixes easily. Lay in a layer of 2 to 30 mm. If the solution thickens ahead of time, you need to re-stir without adding water. Among the disadvantages, consumers note the high price - the most expensive plaster among domestic manufacturers.
Tools needed for mixing plaster
First of all, the container itself for mixing the solution is important. Determine the volume of work, daily output and number of batches. Based on this data, builders can choose a trough, an old bathtub, or some kind of tank as a container.
It’s another matter when the volume of finishing work reaches large sizes. In this case, you cannot do without a concrete mixer. It is profitable to rent a mortar mixer.
To mix the solution you will need buckets and shovels.
If there is no central water supply in the accessible vicinity, care must be taken to have a large container filled with water.
Strict compliance with safety regulations is mandatory.
Gypsum plaster walls
Plastering walls with gypsum plaster is necessary for high-quality and quick leveling of the surface. Similar preparation is ideal for subsequent application of paint or wallpaper. This is the best option for treating the walls of hallways, kitchens and other living spaces.
It is made from environmentally friendly material, has excellent heat-insulating and noise-absorbing properties, has good vapor permeability, does not shrink, hardens quickly and is quite easy to use. All these arguments distinguish work with gypsum plaster walls from similar ones using cement mixtures.
Plastering station
What kind of design is this and what are its advantages? A plastering station is needed to prepare, mix, serve and apply mortar.
Using a plastering station will make your work easier
The station can be mobile or stationary:
- A stationary station is usually installed on a construction site. This is an insulated van, sometimes a change house, with a large receiving bunker. To move such a station, a manipulator will be required. For high volumes of work, this type of station is preferable.
- A mobile station is mobile and usually has wheels to move around the site. An excellent option for field work, you won’t find a better one.
When a mobile station is selected, the following criteria are taken into account: power, productivity, solution supply range, funnel volume, receiving hopper.
Characteristics and place of use
Most often, gypsum mixtures are applied to a concrete base.
Before plastering walls with gypsum plaster, you need to take into account that it is applied to concrete, foam and aerated concrete, brick and gypsum bases.
However, it should be taken into account that the surface must be protected from deformation under the influence of temperature and humidity changes in the environment.
| Specifications | Unit | Magnitude |
| Working temperature | ⁰С | 5 — 30 |
| Minimum thickness of applied layer | mm | 5 |
| Maximum applied layer thickness | mm | 50 |
| Recommended layer thickness | mm | 10 |
Technical characteristics are given as average data, based on information provided by the manufacturer of Rotband gypsum wall plaster.
How to breed Rotband: recommendations from experts
Plastering walls to level them and protect them from external influences is the oldest method of finishing, which remains at the peak of popularity to this day. This technology can be used as preparation for further decorative finishing or even as the main and only wall covering.
Do-it-yourself mortar for plastering walls, the proportions of which may vary depending on the characteristics of the building and the tasks assigned to the master, is made from several materials. In order to correctly compose the finishing mixture, it is necessary to take into account other nuances, from the skill of the plasterers to the specific qualities of the existing components.
Advantages and disadvantages
The surface of gypsum plaster is even and smooth
Why do most citizens prefer to plaster with gypsum plaster when doing their own repairs? The wide popularity of the material is explained not only by the simplicity and ease of use, but also by a number of distinctive characteristics inherent in the composition. Here are the main ones:
- Applying gypsum plaster allows you to get a flat and smooth base of the wall, which is considered the most important argument for subsequent painting or wallpapering.
- The material is applied in a thin layer, which allows us to talk about its economical consumption.
- The low thermal conductivity of the composition plays the role of additional thermal insulation of the room.
- A characteristic feature of gypsum is that it absorbs moisture into its pores when there is an excess of it and releases it when the air dries out significantly, allowing you to create and maintain an optimal microclimate in the room.
- Plastering walls is considered an environmentally friendly way to decorate a living space, since gypsum does not cause an allergic reaction and does not have an unpleasant odor.
- The resulting durable surface allows you to safely drive nails into it or screw in dowels.
- Immunity to heat and open fire is another advantage that plastered walls receive.
It is better not to use such mixtures in damp rooms.
One of the disadvantages of gypsum compositions is their high hygroscopicity. This does not allow the use of the mixture for finishing rooms with high levels of humidity and for outdoor work.
But, despite this, the material is widely used not only for leveling the walls of residential premises, but also of offices, shops, shopping centers, banks, and hairdressers.
Advice from experienced craftsmen on how to learn this business
Consider surface type
Each wall requires a special approach:
- a concrete wall with a smooth surface must first be primed with quartz;
- walls made of foam concrete also need to be pre-primed, and if necessary, you can use “serpyanka” - fiberglass mesh;
- brick walls with cement mortar with the addition of lime;
- a wooden wall must first be covered with shingles.
Walls made of penoplex, aerated concrete and aerated block also have their own characteristics and require careful preparation before plastering.
Practice
If you have no experience at all, then before you start plastering a wall, practice applying the solution on some surface to get your hand a little better.
Tip for procedure without mesh
Attention
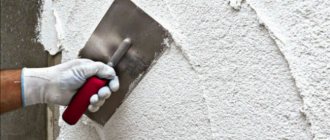
Such delicate work can be done in one stage: a solution is applied to the wall using a trowel, which is subsequently leveled with a rule and a trowel.
When the wall is ready, you can start applying the texture using a plastic trowel.:
- rain - with oblique movements;
- bark beetle - up and down movements, etc.
If you decide to use a mesh to level the wall before plastering, you can learn how to do it correctly using this material.
Features for decorative
- “Venetian” plaster and “silk plaster” should not be applied near stairs, in corridors and in general in residential areas where there are cats and dogs, because scratches and chips are very noticeable and difficult to disguise.
- For corridors and high-traffic areas, you should choose strong solutions (with marble chips, etc.).
We invite you to watch a video about the nuances of applying decorative plaster:
For a spacious room - mechanical type of work
We are talking about a special tool, namely a plastering machine. Undoubtedly, it saves the process of applying the solution, but it is also not cheap: this should be purchased only if you want to engage in repair and construction work and make a profit from it, so that the purchase will help at home and eventually pay for itself.
In order to quickly plaster walls, you need to take advice from experienced craftsmen (both on preparing the wall, installing pendulums, and on the main part of the work). The plastering process itself goes through several stages: preparatory, installation of pendulums, spraying, main application of plaster, covering and grouting.
Wall application
The thicker the layer, the more liquid the plaster should be.
Despite the widespread popularity of using the composition, many do not know how to properly plaster walls with gypsum plaster. The question is important, since if the installation technology is violated, the work will not be enjoyable, and the result will not be achieved. First of all, you need to take into account the following nuances, which can be called basic:
- Gypsum plaster should be applied to a previously prepared surface. It must be cleaned of dust and dirt and treated with a primer. This will ensure optimal adhesion of the composition to the surface and create improved adhesion;
- Before applying the composition, you need to decide on the thickness of the layer. The thinner it is, the more liquid the resulting composition should be; in the opposite situation, on the contrary, it should be thick;
- it is advisable to distribute it over the wall with a thin spatula, level it as a rule;
- the first layer is distributed and leveled in the horizontal direction, the second layer in the vertical direction;
- the next layer is applied only after the previous one has dried, at least 3 hours.
As mentioned earlier, the life span of the finished solution is short, so it is recommended to mix a small amount at a time.
Finishing without beacons
In case of minor defects, you can plaster the walls without the use of additional means.
Plastering can be done using beacons, without them, with or without reinforcing mesh. Application without the use of additional elements is used when there is a need to make a top decorative layer and slightly level the surface. First of all, you need to use the rule to determine the deviations of the plane. This can be done by pressing it against the wall or ceiling.
The depressions are filled with a small amount of working solution, which will then need to be stretched over the entire uneven area. Having found protruding places, you can cut them off using a grinder, a hammer drill, or (if the plane is very distorted and has a large number of irregularities) apply the composition to the depressions using the previously described method.
Use the rule to check if the surface is level
Having finished the alignment and applying the rule, you need to make sure that there are no gaps between it and the wall. After this, you can move on to the next section.
After the surface has completely hardened, it should be sanded. Thus, the wall will be ready for wallpapering or other type of subsequent finishing.
When preparing the surface and finding cracks on it, it is advisable to treat them separately and then putty them, only after that a layer of primer is applied.
With beacons
Guides will help maintain the thickness of the finish
The method of applying gypsum plaster on beacons is somewhat different from the previously described method. In this case, guides are installed on the wall, along which further alignment occurs. It is necessary to carefully check their placement in a plane relative to the horizontal.
In addition, it is advisable to distribute them in such a way that the thickness of the applied composition is minimal; this will lead to the least consumption of the mixture, faster completion of work and quick drying.
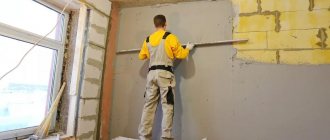
How to plaster a wall correctly
Surface leveling using beacons
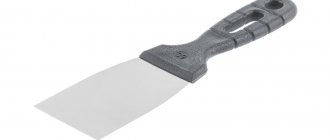
Beacons are often used when plastering walls in order to control the thickness of the applied layer and the evenness of the finish. To plaster the surface in this way, prepare the following tools:
- two building codes of different lengths;
- trowel;
- building level;
- metal spatula;
- containers for primer and plaster mortar;
- construction mixer or drill with an attachment;
- pencil;
- paintbrush;
- grater;
- hacksaw for metal;
- hammer;
- perforator;
- galvanized beacons and fasteners for their installation.
The process of applying gypsum mortar using beacons can be described sequentially:
- In order for the plaster to adhere well to the base, and the surface to be strong and smooth after drying, the wall must first be cleaned of all contaminants: paint, oil stains, fragments of the previous finish, construction dust, mortar deposits, etc. The easiest way to remove small particles is with a wide brush. The solution and fragments of old plaster are removed with a hammer, grease and oil stains are wiped off with a solvent.
- After this, the working base is treated with a deep penetration primer and allowed to dry completely.
- When the surface is prepared, begin mixing the gypsum plaster. Then beacons are placed on the wall, securing them level so that the thickness of the plaster layer is as small as possible. Before installing beacons, markings are made on the surface. In the marked places, throw a little mortar onto the wall and embed the beacons in it, guided by the level. The step between the beacons should be 30-50 cm - the smaller this distance is, the easier it will be to finish the wall with plaster. In any case, the step between the beacons should not exceed the length of the building regulations.
- Using the beacons as a guide, plaster mortar is poured onto the wall and leveled in an even layer. For this work, use the h-shaped rule . Excess mixture is removed or used to fill bald spots.
- The plaster is allowed to dry a little, after which the surface is leveled with a rule-cutter. After about 30 minutes, do a test trim. If the rule does not remove the top layer of plaster, but clings to the rest of the mortar, the wall is left to dry for a few more minutes. Please note that in this case it is also not worth overexposing the plaster.
- After 2 hours, when the plaster has set well, the wall is puttied. To do this, first moisten it with a spray bottle and wait until the water is absorbed into the plaster. As soon as the shine disappears from the surface, the wall is rubbed with a special trowel. The water with which the base was moistened turns the top layer of plaster into gypsum milk. This milk is distributed with a grater over the wall, filling up the smallest irregularities.
- After this, the wall is smoothed well again with a wide spatula or a special trowel. If you need to make the surface glossy, the next day it is moistened again with a spray bottle and polished with a spatula until the desired effect is achieved .
The dried gypsum surface is ready for finishing - for example, painting or wallpapering.