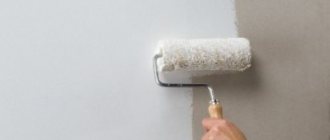
Friends, today we’ll talk about an interesting topic. More and more often we are asked questions related to whether there is a need to do some work on the walls if certain repairs are planned, be it wallpapering or painting the walls. We understand that the popularity of such issues is due to the fact that people want to save on repairs and not overpay for unnecessary actions that are not mandatory.
Thus, today we will cover the topic of whether it is necessary to plaster a wall in a panel house. Since most people continue to live in panel houses, as in Soviet times, we are focusing on this type of house.
Types of compositions and specific application
The modern construction market offers a large selection of plaster compositions. Each of them has a set of advantages and disadvantages. Don't buy the first thing you see. Assess what exactly needs to be plastered and what conditions will be in this room in the future. If you can’t decide for yourself, consult a professional.
Cement
The most affordable and long-known composition for plastering. Easily created by hand. The main components are:
- High quality cement.
- River sand, necessarily sifted.
- Pure water.
Manufacturers of cement compositions introduce additional components to improve plasticity and increase moisture-repellent properties.
This plaster mixture is used for finishing facades or rooms where humidity is regularly increased, for example, a kitchen, bathroom or basement. It hardens for quite a long time, about 12 hours.
Plaster
It is better to buy a ready-made mixture for plastering based on gypsum. There are no harmful substances in the composition, therefore it is considered absolutely safe. Other benefits include:
- the weight of the structure with applied plaster will not change much;
- does not shrink, so the surface will be perfectly smooth after drying;
- gypsum easily absorbs excess moisture, but at the same time also releases it, and this has a positive effect on the indoor microclimate;
- does not burn;
- quickly and easily eliminates all irregularities;
- sound and thermal insulation.
But there are also disadvantages:
- not intended for outdoor use or rooms with a humid microclimate;
- high price;
- It hardens quickly, so a beginner needs to make small batches.
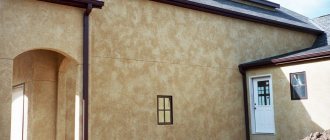
Decorative
These are special compositions that, in addition to the main components, also have additional fillers that help create that unique pattern on the wall that makes the building stand out from the crowd. With the help of decorative plaster it will be possible to disguise some imperfections, create a unique decor on the facade and protect the house from external influences.
In addition, such compositions are universal - suitable for application to a wide variety of surfaces. Typically, manufacturers do not introduce any harmful additives. The service life of such a coating is significantly higher than that of conventional plaster.
But all materials also have disadvantages. Here it is:
- The high cost is both the material itself and the price for performing the work, because not all types of decorative plasters can be handled independently.
- Careful preparation of the base - for some, the wall must be perfectly flat.
- Difficult to dismantle.
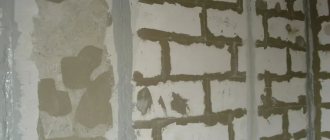
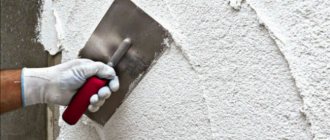
Grout
After plastering the concrete wall with the last layer, immediately proceed to grouting without waiting for it to dry. Grouting must be done in two stages. First, in a circular manner, that is, you need to press the blade of a wooden trowel to the surface and make circular movements strictly counterclockwise. In this case, the sharp edge of the blade will cut off all protrusions, irregularities and unnecessary plaster.
Grouting walls
The next stage involves grouting in acceleration. To do this, press the grater against the wall and make straight strokes with sharp movements. In this way, traces of grout made in a circle are removed. And in order to improve the grout, put a soft cloth (for example, felt or felt) on a grater and rub the surface.
What surfaces should be plastered?
It is not always necessary to resort to applying plaster to the wall. But here are a few situations when it is impossible to do without it.
Brick
In a new house, brick plastering is necessary in several cases:
- for wallpaper or painting;
- the presence of large irregularities on the wall;
- for insulation;
- the seams are not completely filled with mortar.
The same moments can arise in a house with a long service life. You will definitely have to apply plaster if the structure begins to crack.
Foam concrete or aerated blocks
These two materials have a porous structure, so any moisture from the outside quickly accumulates in the voids. To prevent water from causing destruction of the material, plastering is used. Be sure to choose moisture-repellent compounds. In addition, the plaster will create an additional thermal insulation layer.
Concrete
As for concrete, this material has a smooth surface. Ordinary cement plaster will not adhere to concrete. Therefore, before applying the solution, be sure to install a mesh for reinforcement, and also prime the base well. Here plaster is used for sealing seams and spot plastering.
Anti-pollution
All traces of greasy oil, soot and paint negatively affect the adhesion of the plaster. That is why you need to get rid of contaminants. Classic dust and dirt are removed with a wire brush. Oily clay removes traces of oil perfectly. It covers all dirt and allows it to dry. You can remove the resulting crust using a spatula. In wooden structures, oily stains must be cut out, since after some time they will inevitably protrude and destroy the plaster.
If you can’t get rid of stains with clay, then you can use a 3% hydrochloric acid solution. After such cleaning, the walls must be washed with clean water several times. Brickwork can also be cut out with a chisel and hammer. To fill cavities, craftsmen prefer to prepare a cement solution. Surfaces can be plastered only after all basic manipulations have been completed.
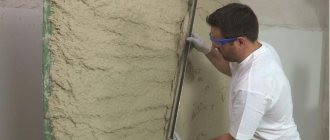
Preparatory work
This is probably not the first time you have heard about the need to properly prepare the surface before plastering a concrete wall. And this is not in vain, because the evenness, quality, durability and strength of the floor depend on it. Of course, you should thoroughly clean the wall of dirt, dust, etc., and also ensure that it is rough.
Cleaning new buildings and previously finished walls
If you are cleaning the walls of a newly rebuilt building, you need to remove all remnants of the formwork compound, and all kinds of sagging, protruding fragments, and the like must be cut down. It is also important to get rid of any greasy stains, dust and resin. This can be done either using a handy tool (broom, brush, rag or scraper) or by blowing it with compressed air. Another option is to rinse with plenty of water.
Before applying plaster, the walls must be cleaned and moistened
Walls that have remnants of old coating (paint, wallpaper, etc.) must be thoroughly cleaned. If there are loose layers of putty, get rid of them. Cover cracks, potholes, etc. with a thick layer and sand with sandpaper.
Concrete surfaces must be scored to ensure stronger adhesion to the plaster. This can be done with a hammer, hatchet, chisel and similar tools. Use plastic plugs or foam to protect electrical installations. And in order not to contaminate the system pipes, cover them with film first. Next, check the stability of the surface base by tapping on the wall. If the sound turns out to be muffled, everything is fine, otherwise you need to knock down the fragile layer and make a new one.
Primer
The primer itself increases the strength and durability of the wall by improving the quality of adhesion. Also worth noting is the prevention of mold, corrosion, rot and other unfavorable factors. The primer perfectly accelerates the drying process, develops resistance to moisture and, for denser surfaces, improves the absorption of solutions.
Primer concrete-contact
In the modern world, a unique type of primer is produced - contact concrete, which perfectly stabilizes the surface and increases the quality of plaster application. It is a durable material, but you will need to thoroughly clean the wall before applying it.
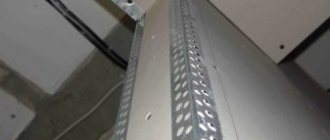
Net
At the junctions of concrete with other materials used, which are usually heterogeneous in structure, the plaster usually cracks. This happens due to the fact that the coefficient of thermal expansion is completely different, “due to” which drying on them occurs unevenly.
In order for you to avoid such problems, we will tell you how to plaster a concrete wall correctly. To do this, you will need a special fiberglass mesh (size 5x5 mm), which you need to attach to the middle of the joint and secure the edges.
Using fiberglass mesh
It also happens that the layer thickness is more than 20 mm, then it is necessary to level the walls using a stretched plaster mesh. The cross section may be different. By the way, such a mesh provides further strong protection against cracking due to impacts, elevated temperatures and humidity. In order for the plaster mesh to meet all requirements, the tension must be maximum, and if the mesh is metal, it should be painted to avoid corrosion.
Final preparation
The last thing you need to do is properly check for evenness. Using a level, plumb line and laser level, you need to weigh the surface to determine the horizontal and vertical accuracy of the plane. Having installed the beacons and marks, they are leveled.
Be sure to make sure the surface is level
Re-inspect the surface for dust, dirt, stains and protrusions. Because during the preparation process unnecessary little things may arise. Then you can start plastering.
Finally
In principle, you already understand how to plaster a concrete wall, so all that remains is to add and summarize. In order to do it efficiently and get an impeccable result, spare no expense and buy all the necessary equipment, because it makes the work easier and helps in the work.
Remember that each layer of solution is applied only after the previous one has completely dried. A lime-based solution is considered dry when the wall turns white, on a cement wall - within 2-6 hours, on a lime-gypsum wall - within 10-15 minutes. Do not experiment with different solutions - this is unacceptable. Use the same solution for each layer. And do not forget the main condition for high-quality plaster: both the last and every other layer must be done neatly, evenly and cleanly. The quality of further decorative finishing depends on this.
- Author: Julia
Rate this article:
- 5
- 4
- 3
- 2
- 1
(5 votes, average: 5 out of 5)
Share with your friends!
Technology of laying tiles on drywall
One Russian man figured out how to use drywall as a base for laying tiles on walls without plaster in order to save time spent on leveling surfaces. After all, 80% of the final result depends on this difficult stage of work. And everything worked out! Nowadays there is even a special production of drywall necessary for these purposes.
There are two types of gypsum fiber materials for different applications:
- GVL - for repairs and redevelopment of premises located in dry or normal conditions in terms of humidity and temperature.
- GVLV – for work in rooms with high humidity (bathrooms, kitchens, etc.) using special hydrophobic impregnation.
To lay ceramic tiles on walls without plaster in rooms with high humidity and associated with steam formation, it is recommended to use moisture-resistant plasterboard marked GVLV.
Which glue to choose? It is important to carefully read the instructions to choose the one that is suitable for cladding on a plasterboard base.
For these purposes, there are materials with different compositions:
|
Next, you need to prepare the adhesive mixture in accordance with the manufacturer's recommendations. By following these rules, you can achieve good results. The tiles will lie on the drywall without problems and will not come off. It is also recommended to first prepare a solution for working with an area of no more than 0.7–1.0 m². There is no need to dilute a large amount of glue at once.
If you have never laid tiles on drywall, do not be intimidated by the technological difficulties. This work is carried out in the same way as with any leveled surface.
First of all, it is necessary to install the guide strips at a distance of 40 cm from each other. If the gaps are longer, this will lead to serious consequences. The drywall will “walk”, as a result of which the tiles will gradually begin to peel off and the seams will become deformed. GKL sheets should be attached to the planks with self-tapping screws or staples using a construction stapler.
In accordance with Western technologies, laying tiles on walls without plaster requires two layers of drywall. In this case, the guide strips are installed only under the lower ones. If thin types of gypsum plasterboard are used, it is recommended to reduce the gap between the jumpers.
It's time to talk about preparing the plasterboard base for laying tiles. To increase stability and form a monolithic structure, you need to treat all joints between the sheets with putty. To do this, you must use a solution designed specifically for working with this material. Next, prime the surface prepared in this way with a product compatible with this material and the adhesive for installing tiles that you plan to use. The primer is applied in two layers by brush, roller or notched trowel to increase adhesion.
The scheme for laying tile products on drywall is the same as on a base prepared with plaster:
- apply glue to a section of the wall with an area of 0.7–1.0 m² using a notched trowel;
- We press the product to the surface with our hands with force, tapping it with a plastic or wooden hammer with a rubber nozzle to improve the quality of fastening;
- we use special plastic crosses to obtain smooth seams;
- we maintain the time specified by the manufacturer of the adhesive material for the cladding to dry completely;
- Finally, we rub the seams, which are subsequently coated with varnish intended for these purposes.
There is no need to rush during the work process. This may worsen the final result. We recommend taking a break for an hour after laying tiles on a small section of the wall (no more than four to five rows) to eliminate stress that occurs in the base.
Manufacturer's choice
Each manufacturer strives to advertise its product to as wide a mass of people as possible, while declaring its uniqueness and the best quality. To make the right choice, you should know both the advantages and disadvantages, and therefore we will consider several of the most popular manufacturers of gypsum plaster on the repair materials market. Volma is the first to appear on the podium. Its gypsum product called “Canvas” is distinguished by the fact that in addition to the fundamental component, the composition contains a large number of chemical additives and mineral modifiers. When choosing this product, we must not forget about the amount of layer applied to the wall. It should not exceed 60 mm. It will take about a week for the composition to dry completely.
Next in line is KNAUF. Name of the gypsum composition: “Rotband”. The quarries where the main component is extracted belong to the company itself. In addition to gypsum, the composition includes high quality polymer additives. The purpose of such additives is to extend the service life of the composition. The thickness of the KNAUF composition layer should not exceed 50 mm. Another advantage is the presence of additives that increase moisture resistance, and therefore those who completely refuse to use non-gypsum plasters use Rotband in bathrooms.
The main thing you should always pay attention to is the composition. A mixture with certain additives can be used in different situations and for different purposes.
Required Tools
To efficiently solve all the tasks, you need to purchase the following devices:
- Putty knife. It is useful for applying stone-like plaster, as well as for faster removal of old finishing material.
- Steel brush. Helps remove large dirt from the wall before plastering.
- Scraper. Relevant in situations where there is a need to remove problem areas of the old finish.
- Paint brush. Used for applying primer.
- Hammer. Ideal for tapping old plaster and knocking down finishes.
- Construction guides or beacons. Without these devices it is difficult to create a perfectly even coating.
- A small container for preparing a working solution.
- Construction mixer. This unit is designed for mixing the mixture. If you don't have a mixer, you can use the attachment of an electric drill.
- Trowel. The ideal tool for mixing, applying and then leveling the solution.
- Small grater. Used by craftsmen to give the surface an aesthetically attractive appearance.
- Rule. The tool is designed to check the evenness of the base and the alignment of corners.
- Half-grater. A universal device for applying and then rubbing plaster.
Important! To make it convenient to apply the solution, you should use a small shield made of wood or metal.
Basic set
Alternative - dry plaster
Often, drywall is called dry plaster; this material can also be used to level walls, the work time is reduced, there is no need to wait for the walls to dry, and you can freely, without increasing the cost, level very large differences in verticality and geometry. Which is better, drywall or plaster? There is no definite answer to this question; it all depends on the specific situation and the preferences of the owner. If in some areas the wall needs to be increased by 5 centimeters or more, then plasterboard has an advantage. If every centimeter of space matters in a cramped bathroom, plaster wins here. The possibility of sound insulation and insulation is an undeniable advantage of drywall. Based on all that has been said, it follows that traditional plaster is not always the optimal solution.
As you can see, this article is not a guide to plastering walls - it is a guide to determine the course of action. We will consider in more detail all types and methods of work in different variations in separate publications.