Surface Preparation Tools
Let's start with the fact that walls and other bases need preparation before plastering.
What to do:
- remove paint, wallpaper, and previous coating from the wall (in whole or in part);
- repair chips and cracks;
- remove stains;
- cut down the ledges;
- embroider seams in stone or brick masonry;
- make notches on the concrete;
- clean the surface from dust;
- prime.
Preparation for plastering also includes measuring work, installing beacons, reinforcing or filling shingles.
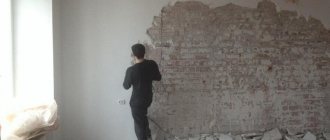
Old finishes are removed by hand or with power tools.
Hand tool.
From hand tools you will need:
- hammer (possibly a sledgehammer);
- ax (for cutting down sagging, making notches);
- long chisel (beating old plaster, making notches, cleaning masonry joints);
- scraper (for cleaning masonry joints from mortar);
- Troyanka, zubchatka (types of chisels with teeth on the blade);
- scraping (removing gypsum coatings where access is difficult with other tools);
- spatula (removing wallpaper, paint, loose thin layers of plaster);
- metal brush (cleaning masonry joints, cracks, scratching the surface of bricks, cleaning rust from plastered metal products);
- jointing (sampling mortar from masonry joints);
- cloth-based sandpaper (removing thin-layer mortar).
Of the hammers, which differ in weight and shape of the impact head, the most suitable for plastering work are:
- cam (up to 1.5 kg, wide impact surfaces) for striking a tooth, chisel or treble;
- bush hammer (weight of the toothed head is up to 1.5 kg, the shape of the teeth is pyramid-shaped) for making notches, removing paint coatings, sanding, cutting down small protrusions;
- plaster hammer (weight from 400 grams, the head is not symmetrical, one half with a striker, the other with a pick) for cutting down old plaster, making notches, filling shingles.
Power tools for preparing walls.
It is better to prepare large surfaces using power tools with replaceable attachments:
- hammer drill (for installing dowels, and with an attachment in the form of a wide chisel, suitable for beating old plaster);
- a grinding machine LSM, PShM or angle grinder (angle grinder), simply a grinder (useful for cutting old coating into squares);
- an electric drill with a bumper function;
- vacuum cleaner (to remove dust).
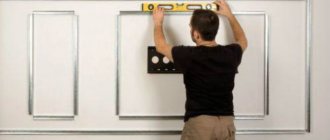
To carry out measurements and markings for placing beacons, use:
- plumb line (with cord);
- building level (bubble);
- roulette;
- squares (metal and wood);
- metal ruler;
- marker or pencil;
- long strip with a smooth side edge;
- nylon cord (useful for measuring and installing beacons).
Separately, it is necessary to mention the laser level, with the help of which marking, measurements, installation of beacons and quality control are performed faster and easier.
You may also need:
- a screwdriver or screwdriver for screwing in self-tapping screws before installing beacons or for taking measurements.
- scissors or a retractable construction knife (for cutting sickle tape, masking tape and other materials);
- Maklovitsa brush for wetting the surface, sweeping away dust, priming;
- roller (preferably foam) for applying primer.
Tools for plastering work, such as levels, hammers, and an angle grinder, are useful around the house and for other purposes. But there are tools that have long been used by plasterers directly for applying, leveling and forming mortars. We should talk about it in more detail.
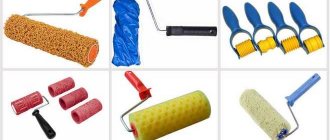
Paint roller
This is a tool used when working with paints and varnishes. It is also used for applying other decorative and protective coatings to surfaces. The roller is a tube with a bearing-type fastening, which is covered with a foam rubber coat. There are rollers with replaceable coats, which are fixed to the tube using special plugs. Fur coats can have different pile lengths and are made from different materials.
The rollers themselves vary in size depending on the application.
Large surfaces are treated with a large roller. This helps reduce material consumption. Small rollers allow you to reach hard-to-reach places. Share:
What tools are needed for plastering walls?
All tools for plastering work can be divided according to their functions:
- applying the plaster mixture;
- leveling the solution on the base,
- formation of figured surfaces,
- cleaning surfaces.
According to their purpose, they have a specific working surface or blade (made of metal, rubber, wood, plastic), and are also equipped with a comfortable wooden or plastic handle.
One of the oldest tools for applying plaster are spatulas. Depending on the location of the handle and the working body, blades are known to us under different names.
Trowel and trowel
A trowel (another name is a trowel) is used not only by plasterers, but also by masons. The handle is raised above the figured plate, can be parallel to it or located at a slight angle. This gives the plasterer the opportunity to conveniently scoop up more mortar, bring it to the spot, and place it in the corners. The most common plate shape is drop-shaped, but there are trowels with a triangular or other shaped plate.
A trowel is also called a spatula, which is not used to scoop up the solution, but only to spread it and shape it. The handle of such a spatula is located above the plate, which does not allow the trowel to scoop the solution from the container. The solution is applied to the working surface of this type of trowel with a spatula.
You should choose a trowel according to the type of work being performed. For applying the composition to the wall, a “drop” is preferable; for grouting, a special trowel, the plate of which has rounded corners, and the handle is located above it. Other selection criteria:
- rigidity of the plate (it needs to be fairly rigid and elastic);
- type of metal (stainless steel is better for decorative plasters);
- the quality of the weld seam securing the handle (the seam is continuous, without burns);
- the coloring of the handle should not stain your hands, the handle should not turn.
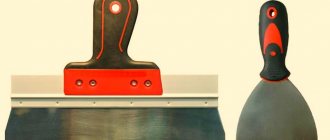
Putty knife
A spatula whose handle lies in the plane of the plate is called a spatula. The difference is not only in the position of the handle, but also in the shape, thickness, and material of the plate. The plate can be rubber, plastic or traditionally metal.
The width of the spatula plate can be different:
- narrow (starting from 2 cm);
- medium size;
- wide (up to 60 cm).
So-called Japanese spatulas are available for sale. The main difference between this tool for plastering walls is in the handle: the usual handle is replaced by a holder mounted on the blade edge. It is convenient to use a Japanese spatula to process curved surfaces, holding it in your hand and moving the tool in any direction. When working with such a spatula, the hand feels the material being processed most of all. Useful for plastering arches, niches, and places that are difficult to access.
To make grooves in adhesive solutions, notched spatulas are used. They are also useful when it is necessary to create conditions for strong adhesion of adjacent layers of solution to each other. The teeth of the cutting edge create (when moving the spatula through the solution) ribbed surfaces.
Angle spatulas are used to create right angles. They differ in the location of the handles. To measure and transfer angles, for example, when plastering window slopes, a small tool is used. You can make it yourself.
For “jewelry” work, for example, plastering small parts of complex shapes, a special spatula is used - a cutting blade.
When choosing a spatula, look at the evenness of the plate. If the blade can be leveled, then making the plate flat is a difficult task. Trapezoidal plates bend less. Plasterers use spatulas with a plate thickness of 1 mm. The handle, covered with ergonomic rubber, is more comfortable to use. You should choose a spatula whose handle is wider; it is more convenient to work with such a tool.
Falcon
Another long-used tool for plastering walls is the falcon. This is a shield made of planks (standard square side dimensions are 25 and 40 cm), in the middle of the rear plane of which a handle is installed perpendicularly. The other side of the shield is smooth. Modern falcons are made not only from wood, but also from metal or plastic.
The falcon is used for spreading the mortar, and also as a means for carrying a large volume of plaster mixture to the area to be plastered. The edge of the falcon's platform is flat, the solution is transferred from it to the wall in the same way as from a trowel (the falcon is placed at an angle to the wall and moved from bottom to top).
Plastering tools are universal. Different tools can do the same job and vice versa, which is often observed among master plasterers.
Plastering ladle
You can apply the plaster mixture to the base not only by spreading it, but also by throwing it on. A plaster ladle is used to apply semi-viscous spray or soil. This, of course, requires experience. The volume of the plaster ladle does not exceed a liter.
A hopper is used for mechanized plastering. The device requires a connection to a compressor. You can make a pneumatic bucket yourself from scrap materials.
Plaster grater
Leveling tools for plastering work are also varied. The simplest of the hand-made ones is a grater - a rectangular small board (flat or convex) up to 16 cm long with a handle on the back. Used for leveling or rubbing mortar. Modern graters are made of plastic or metal. More complex float designs make it possible to cover the working surface with felt, felt (it turns out to be a trowel for smoothing the plaster composition) or an abrasive mesh for grinding off unevenness.
A trowel is a tool for applying and leveling the solution. The length of the board can be up to 120 cm. The handle is made so that, if necessary, you can hold the grater with both hands. Can be made from various materials. When purchasing, check against the light to see how flat the working surface is and whether there are any nicks.
Rule
Another “long gauge” for leveling walls with your own hands is the rule. The modern rule is a lightweight (usually aluminum) rail with a trapezoidal or h-shaped profile. The length of the rule can be up to 3 m, with this length it is allowed to work with the rule together, but more often the rule is no longer than 2 m. The tool is used to cut and level the mixture when plastering on beacons or without them.
The working edge of the rule can be rounded (suitable for facade work) or sharp (used where special precision and quality of finishing are required). Trapezoidal rules are more durable, which allows you to work with cement compositions, h-shaped ones are used for light gypsum mixtures. An important characteristic of the rule is rigidity. When purchasing a trapezoidal tool, you can remove the end cap and see the stiffening ribs.
When choosing a tool, check the correctness of the geometry, the absence of flaws, the absence of yellowness and colored stains (signs of low-quality raw materials). If necessary, the rule can be made of wood. Take care of the rigidity of the rack and the geometry of the cutting edge. For plastering columns with entasis, a pattern rule is used.
To level mortars on curved surfaces and stretch out shaped profiles, various templates are used (a striking example is plastering of columns). They can be simple and swinging, when the profile board is able to rotate at a certain angle while being pulled. Templates are made individually, according to the shape of the design surface.
Paint brush
The brush is the most common tool used during various finishing operations.
Brushes are selected depending on the nature of the work performed, as well as taking into account the properties of the materials. Brushes can be made of either natural or artificial bristles. The latter are considered universal because they can be applied to any surface.
Paint brushes vary in shape. They can be flat or round. There are also such types of this tool as a radiator brush, a squeegee brush, as well as a macular brush and a fly brush. A flat paint brush is intended for painting open surfaces, a round one is used for joints and corners, a radiator brush is used mainly for painting hard-to-reach places (places where radiator pipes are connected). The squeegee brush is used when applying various types of primers, glue, and also during whitewashing.
It is best to apply primers, dispersion paints and lime mortars to large surfaces - walls, ceilings and floors - with a paint brush or a fly brush, which are intended for these purposes.
Tools for decorative plaster and its application
The most diverse means are used to decorate interiors and facades with plaster. To apply decorative plaster, use the same tools as for simple plaster. The determining factor here is the desired decorative effect. For example, the mixture for a fur coat can be applied by spraying or trimming, using a brush dipped into the solution, and also transferred to the wall with a long-haired roller.
By using conventional tools for plastering, but by changing the methods of use, surfaces of different textures are obtained. For example, by applying a trowel to a fresh mortar and lifting it slightly so that the mixture is pulled behind the tool, one texture is obtained when the blade is torn off, and another texture is obtained when it is torn off after some displacement to the side.
A variety of objects are used as plastering tools for decorative finishing:
- crumpled plastic bags;
- crumpled plastic film;
- spoons;
- combs;
- even ordinary chopsticks.
To form patterns use:
- figured rollers for decorative plaster,
- stencils,
- silicone matrices.
To imitate masonry (brick or stone), the seams are formed by scratching, for example, with the tip of a screwdriver, cutting using a self-made tin cutter, or jointing.
Some of the tools can be invented and made by yourself, for example, a shaped spatula can be cut from a polyethylene lid. Some tools can be made entirely or adapted from what is already at hand. For example, by making shaped “growths” from ropes on rollers. However, there are a number of decorative plasters that require special tools.
Venetian trowel
To perform a classic Venetian, you need a Venetian trowel.
The differences are as follows:
- plate material – high quality stainless steel;
- highly polished plate;
- chamfer on the cutting edge;
- rounded corners.
The requirements for the metal are determined by the inadmissibility of leaving black marks with the trowel during ironing. Polishing and rounded corners are necessary to create a mirror-smooth surface of thin-layer Venetian plaster. The presence of a chamfer is necessary for polishing, which is carried out by pressing a trowel along the surface of the finish. Rounding of the corners is required to prevent dragging of solution particles during wiring. The Venetian trowel is used to make plasters such as microcement, travertine, and apply paint that creates a silk effect.
Polishing stone
Classic Moroccan plaster is polished with a rather exotic tool - a polishing stone. Only rocks with a hardness of at least 7 on the Mohs scale are suitable. The stone should have a flat area and be comfortable to hold in the hand.
Decorative plaster coating is often coated with varnish, wax or colorful compounds. To apply these products, use brushes, rollers or a sponge. Brushes used in finishing work are no less varied than spatulas. The most commonly used type is maklovitsa.
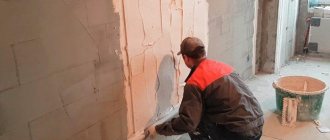
Hand plastering tools for applying plaster
Having prepared the room, they move on to the main stage of work. Some of the tools for plastering will be useful from the previous list, some will have to be added.
There are 2 known methods of pre-treatment:
- “Wet” plaster is a classic method of applying building mixtures.
- “Dry” wall covering with plasterboard, plywood or other panels.
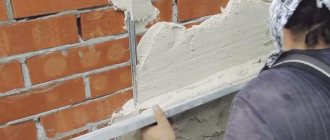
The main tool for leveling walls with plaster:
- Universal building level and plumb line (for quality control);
- Aluminum rule (a wide strip with a pointed angle for wide coverage of a wide area of the wall being processed);
- Plaster spatula;
- Trowel (a flat plastering tool with a pointed nose and a wooden handle);
- Scoop (to scoop up the dry mixture);
- Trowel (smooth “sole” with a parallel handle);
- Grater (to rub the surface) and grater;
- Falcon (flat with a vertical handle, convenient for working on the ceiling);
- Corner aligner;
- Beacon profiles (needed to level surfaces with large curvature, which is why walls are plastered).
For plastering, use the above-listed plasterer tools and solutions:
- Limestone (with sand);
- Lime-cement;
- Gypsum-lime (alabaster).
You will need a primer for pre-impregnation, which increases the adhesion or “adhesion” of smooth walls.
The primer increases the adhesion or “grip” of smooth walls.
Types and purpose
Specialized tools for plastering work and methods of applying the solution play an important role in the quality of work.
The distribution of the plaster mixture can be done with a float, trowel or trowel. They are all smooth, the way the handle is attached and the way they work are different.
Trowels have several varieties and differ in functionality:
- Triangular in shape with a rounded nose - trowel (mason's trowel);
- Trapezoidal (for finishing);
- Grout (for distributing the mixture);
- Serrated (to obtain parallel grooves);
- Narrow trowel;
- Corner (for high-quality processing of convex corners);
- Trowel for filling joints (the form provides a supply of mortar).
Each type involves a certain method of manipulation. It is rather a professional tool for plastering. For a beginner, it is enough to have a trowel, 1 universal (smooth) and a serrated trowel. You need a trowel, 2-3 spatulas and a grater, level the plaster on the wall using the rule.
The distribution of the plaster mixture can be done with a float, trowel or trowel.
What is needed to prepare the mixture
When describing the tools for performing plastering work, do not forget about the means for preparing the mixture. If the solution is prepared from a dry mixture, you can get by with a minimum of tools.
For mixing and mixing, a construction mixer and an attachment designed for mixing solutions are used. Small volumes of plaster dough can be mixed in a bucket with a spatula. Well, if the volumes of plaster are large, use a mortar mixer. For mixing the old fashioned way, take a shovel and a trough.
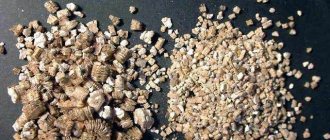
In the case of preparing the composition yourself, the components, for example, sand or lime paste, must be sifted or passed through a sieve so that lumps and large particles do not get into the solution. The mesh size of the sieve plays an important role when the granulometric composition of the filler is important for the plaster mortar. For example, for covering you need sand with grains no larger than 1.5 mm.
Auxiliary equipment requires measuring containers, as well as containers for the finished solution (plastic buckets or troughs).
What tools are needed for plastering work?
For high-quality finishing of walls and ceilings, theory and practice are important; you also need a suitable tool for plastering walls. Special devices are used to perform simple manipulations that leave “traces” on the surface in the form of a textured pattern. This is the whole secret of the process of plastering prepared walls with inimitable decor.
When purchasing new tools for plastering walls with your own hands, do not rush to work without skills. It is important to get used to them so that the movements are performed confidently, so you need to watch master classes and practice your skills on a training surface, for example, on a balcony or in a bathroom.
In order to save money during the construction of a private house or country house, many stages have to be completed independently. Having decided to take this step, you will have to master at least the basics of several construction specialties, and understand the tools for plastering work and their purpose.
Main varieties:
- Spatulas;
- Trowels;
- Graters;
- Falcon;
- Rule;
- Rollers;
- Brushes and Brushes;
- Corner aligner;
- Plasterer's grinding tool;
- Decorative finishing devices;
- Bucket and construction mixer - for preparing the mixture.
As a rule, a trowel, a falcon (for the ceiling) and spatulas for plastering walls of various shapes are a “gentleman’s set” for a novice master.
For high-quality finishing of walls and ceilings, theory and practice are important; you also need a suitable tool for plastering walls.
Accessories
Plastering work is performed not only from the floor. To plaster the top of the wall or apply the mixture to the ceiling, it is necessary to install auxiliary structures. Indoors it can be scaffolding, outdoors it can be scaffolding. Assistive devices must be comfortable and safe.
Conventional lamps are used to illuminate the workplace. To identify minor flaws, side lighting is used (spotlights mounted on tripods are often used).
Plaster solutions may contain substances harmful to health. For example, lime can corrode skin. When removing old plaster coating, a lot of dust is generated. Therefore, they plaster using personal protective equipment, for example, goggles, respirators, and protective gloves.
When planning repairs related to plastering, prepare tools for plastering work in advance. Then you will have the opportunity to choose the most convenient means without haste, and some of them may be found among friends. Convenient, reliable tools will make work more enjoyable. You will also receive a good quality finish, avoiding the frustration caused by inconvenient or defective “helpers”.
Necessary tool for preparatory work
The quality of work depends entirely on the availability of all the necessary tools. In the process of preparatory work you will need:
- A hatchet or plastering hammer with a pick. It is used to knock off protruding parts from the working surface. Also, with a hammer and pick, notches are made on it to increase the area of adhesion of the solution to the surface.
- Maklovitsa. The usual brush, only large. It is convenient for her to apply a deep penetration primer. The primer strengthens the top layer of the surface and increases adhesion.
- Plumb. They use it to hang the walls and find out how evenly the surface is plastered. Using a plumb line, the threads are pulled horizontally, vertically and diagonally. This allows you to determine the exact location of the beacons in one plane.
- Rack level. With its help, you can install beacons in a horizontal plane, for example, on the top of a slope or on the ceiling.
USEFUL INFORMATION: What is better and cheaper, to plaster the walls or cover them with plasterboard?
- Laser level. This device was invented for more “advanced” plasterers who value their time. It is simple to use, significantly speeds up and improves the process of marking and installing beacons.
- Square. With this device you can set up slope and corner beacons. Can be wooden or metal.
- Nylon thread. It is necessary for the correct installation of beacons.
Decorative finishing tools
Combining devices of different shapes expands your work possibilities. The technology for applying Venetian plaster involves the use of several types of spatula and a “trowel” of two types:
- Rectangular;
- Trapezoidal shape.
The technology for applying Venetian plaster involves the use of several types of spatula and trowel.
Removable blocks for rollers have the greatest capabilities:
- Structural rubber attachments - to form an unusual texture reminiscent of reptile or python skin;
- Screen type – for printing an ornament;
- From leather (smooth or crinkled, they create a semblance of a “living” surface);
- Made from textured wood;
- Plastic analogues of rubber;
- Pile and fabric samples;
- Porous and spongy nozzles made of polystyrene foam and foam rubber (used less frequently).
You can make attachments and devices yourself. Homemade plasterer tools and their purpose depend on the technology and the preferred pattern. Here the possibilities are practically unlimited. The design can be made using crumpled aluminum foil, rubber bands over foam rubber, scraps of plastic bags and corrugation.
Using decorative attachments on a roller makes it easier to work on drying plaster. Less often - a more liquid solution or a special composition with fillers on the finished surface.
Using decorative attachments on a roller makes it easier to work on drying plaster.
A bush hammer is a tool for plastering walls, reminiscent of a chop hammer. It is used to form chips for a “stone” texture and the effect of putty that has fallen off the brickwork. A chisel is also used for these purposes.
Using special stencils or prints, it is easy to extrude a special pattern that imitates “wild stone” and other natural surfaces. Sometimes a “reverse effect” is needed, since urban styles often use the semblance of unplastered walls.
Bush hammers are used to form chips for a “stone” texture and the effect of putty that has fallen off the brickwork.
Decorating methods largely depend on skill and professional experience, but a painter-plasterer cannot do without a good tool. Even for a beginner who has decided to perform the most labor-intensive part of the repair with his own hands for the first time, it is important to understand these nuances. It is recommended to stock up on a minimum set of professional tools and equipment for performing plastering and painting work.
Let’s summarize for those who decided to do their own repairs for the first time. With the help of mechanical devices, the work goes faster, but it is important to maintain the distance to the wall or ceiling and the rate at which the composition is thrown. The quality of work largely depends on the correctly selected devices used to apply plaster, level the surface and form a decorative coating.