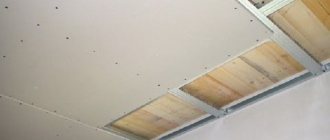
Puttying seams
Few people would like the prospect of living among bare walls made of nondescript gray or green plasterboard.
Therefore, after installation it must be prepared for subsequent finishing. If the owner of the premises is going to paint the walls or glue wallpaper on them, he will have to take a close look at the joints. To do this, you need to buy a primer, as well as gypsum putty and reinforcing mesh (serpyanka). Before you start work, you should make sure that all the screws with which the plasterboard was attached to the profiles are driven flush, and the sheets themselves are absolutely securely fastened. Places of non-original (cut) seams are treated with a primer. Some craftsmen additionally expand the joints, but this leads to an increase in the consumption of gypsum putty mixture. Next, prepare the solution, after which it is carefully applied using a spatula along the seam line and onto the screw heads. When sealing non-original joints, it is necessary to use reinforcing mesh. It is applied to the freshly smoothed solution using a spatula.
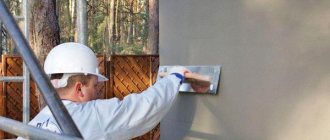
Right outer corners are closed using a special perforated corner, which is secured with mortar. The latter, regardless of its location - at a joint, a screw head or a corner seam - must be smoothed out and completely cover the metal. Laying the mortar in “waves” and “steps” is not allowed. After processing the joints, the entire surface of the plasterboard wall or ceiling is puttyed, or a special glue is applied onto which the wallpaper chosen by the owner of the room is glued.
If the technology for installing the frame, its sheathing and puttying of drywall has been followed, the walls or ceiling made from it will be visually indistinguishable from ordinary ones. Upon completion of the finishing cycle of finishing work, the owner of the premises will only have to enjoy the beauty of the new interior.
What is needed first
The quality of the final result will depend primarily on how high-quality the tool for working with drywall and profiles is, how complete the list of tools specified in the article corresponds to the set that you prepare before starting work. Of course, it is much easier and more convenient to carry out all the work with tools specially designed for it. For example, a hole for a socket box using a crown can be completed in a matter of seconds, while it can take half a working day to do the same job using a paint knife or other tool.
So, what will be needed for work:
For measurements
In order to carry out all the necessary measurements, without which there is no point in starting work, you will need the following:
- construction level, for large areas it is more convenient to use a laser device;
- a tape measure for taking measurements and, of course, a construction pencil or marker for applying all the necessary markings on the base surfaces before starting work;
- A cord is required to work with vertical and horizontal surfaces. You can make a plumb line from it or stretch it from wall to wall to control the level of the ceiling.
This is a general set of measuring and marking equipment that you cannot do without. You may also need a square or protractor, as well as a rule. It depends on where and what types of operations are to be performed.
One of the main stages of working with drywall is taking all the necessary measurements.
Profile cutting tools
The work of constructing structures from gypsum plasterboard involves cutting materials, which precedes their installation on the base surfaces. Here is a list of everything necessary for working with metal, that is, the profile from which the supporting frame is built:
- Metal scissors or grinder. Both are better. In the process of constructing the load-bearing frame of a future structure, be it a ceiling in a bedroom or a false wall, the bulk of the work falls on the construction of the load-bearing frame. In order to obtain the desired shape, it is constantly necessary to cut the required shapes from the base profiles. This is where these tools are needed.
- In order to give the cut profile the desired shape, you will also need a rubber mallet and pliers.
- In addition, when working with galvanized steel profiles, an accessory such as thick construction gloves is indispensable. They will protect your hands from damage and help avoid the formation of calluses.
Stock up on everything mentioned above, and working with your profile will not take much time and effort. Do not forget that you need to work slowly and carefully, along pre-marked lines. Then the result of your work will always be predictable.
Preparation of gypsum boards
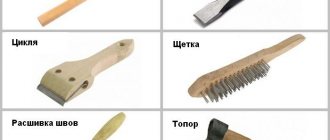
The basic tool for drywall work is much more extensive than it might seem at first glance. Let's talk about it in more detail:
- Painting knife. The basis for proper installation. Almost all operations with a sheet can be performed only with its help. It is best to take a knife with replaceable trapezoidal blades. They are denser and last longer. And the design of the knife itself should not raise questions. Since they will have to work a lot, choose a knife with a large and grippy handle, made of steel. Working with such a tool is easy and simple.
- A small hand saw will help you quickly and accurately tidy up excess plasterboard and make complex shapes. Perfectly complements the jigsaw.
- A jigsaw will definitely be needed if we are talking about a large amount of work. However, do not forget to use a respirator and construction glasses, as there will be a lot of dust. Despite this, such a tool can significantly save time and effort.
- Planer for drywall. There is a roughing plane and a plane for processing the edges of sheets. The tool is not always necessary, since in most cases a paint knife and abrasives are used, but for large volumes it is as useful as the jigsaw mentioned above.
- To give sheets of material the required shape, if we are talking about circles and other smooth lines, use a needle roller and water. The back side of the sheet is thoroughly pricked with a roller and moistened with plenty of water. After which the sheet can be bent as needed for the job. The main thing is not to overdo it with water, otherwise the plasterboard will begin to fall apart in your hands.
- Drill bits or so-called “ballerina” bits. These are two different tools, but they have the same functions. With their help, round holes are made on the canvas, for lamps or switches, for transfer cases or ventilation. It doesn't matter what may require a hole in the wall or ceiling. These tools will help you do it easily.
When choosing a molar knife, we advise you to immediately choose a high-quality knife, because... for most jobs you can only use it.
Here are the basic tools that are absolutely necessary for operations with drywall sheets. You can also add supports and hangers, which are used by builders in cases where it is necessary to mount sheets, for example, on the ceiling or it is necessary to fix the sheet before mounting it on the frame. Don't ignore these utility tools that you can collect from construction waste. They will help you do everything quickly and not get tired, because it is much more convenient to work when the gypsum board sheet does not need to be held suspended.
Needle roller for drywall
How to count the number of profiles
Knowing what type and type of profiles there are for drywall, their dimensions are not enough. It is necessary to calculate the quantity of each type. It will be easier to calculate if you draw a frame plan on a piece of paper, sign the names of the profiles, and put down the dimensions. This will not take much time, but will help you determine the quantity more accurately.
You need to have a clear idea of what the frame will look like
Calculation of the number of guides for one wall
If the walls are very uneven, you can level them using drywall. A parallel wall is erected, but set strictly according to the level. In this case, the calculation of the number of profiles for drywall will be as follows:
- Guides - PN. They are mounted around the perimeter. To find the footage of guide profiles for wall cladding, measure its length and height, add and multiply by 2. If there are windows/doors on the wall, the guide profile is mounted around the perimeter of these openings. To the resulting figure we add double the height of the opening and its width.
- Rack profiles for gypsum boards - SP. As already said, they are placed in increments of 60 cm. Moreover, the outer opening cannot be more than 60 cm. Even if 10 cm remains, an additional stand is installed. First, we count the number of racks: divide the length of the room by 60 cm, add one more - a corner one. For example, the length of the room is 4.75 meters. 475 cm / 60 cm = 7.91 pcs - this will be 8 racks + 1 corner, total - 9 pcs. Next, we look for the footage - multiply the found figure by the height of the room. We get the required length for the racks: 9 m * 3.2 m = 28.8 m.
- Jumpers. Rack profiles are used. They are placed in increments of 60-80 cm, but at the same time, the vertical joints of the plasterboard sheets should also fall on such a partition. Here you will have to count depending on the chosen step, and then add the found figure to the one calculated in the previous paragraph.
If all the walls in a room are covered with plasterboard, a similar calculation is carried out for each wall, then the results are summed up.
Number of profiles for plasterboard for suspended ceilings - PP and PNP
The calculation here is a little simpler: the frame is assembled “in a cage”, so it’s easier to calculate it. Otherwise the approach is the same as described above. So we think:
- The footage of PP profiles for suspended ceilings is equal to the perimeter of the ceiling. We measure the length and width of the room, add and multiply by 2. This will be the desired figure. For example: a suspended ceiling will be made in a room measuring 3*4 meters. Calculation of the footage of PP profiles: 3m + 4 m = 7 m, 7 m * 2 = 14 m. For this room you will need 14 meters of PP profile.
- PNP profile footage. It is better to place load-bearing profiles along a short wall. In this case, divide the size of the longer wall by 60 cm: 400 cm / 60 cm = 6.66 pcs, round up - 7 pcs. There is no need to add a corner post, since there will be a guide profile around the perimeter and the posts are tucked into it. The carriers from the PNP profile are located along the short side (in this example it is 3 meters), that is, the required length of this type of profile is 7 pieces * 3 m = 21 meters.
- Next, we count the number of PP profiles for partitions - 60 cm long sections that are installed between two adjacent load-bearing profiles. In this case, the partitions will be located along the long wall. Therefore, we consider this: 300 cm / 60 cm = 5 pcs, and the total length will be 5 pcs * 4 m = 20 m.
In total, for a suspended ceiling in a room measuring 3*4 meters you will need 14 m + 20 m = 34 m of PP profile, 21 meter of PNP profile.
Hand tools for assembling plasterboard structures
In addition to electric tools for working with drywall, you need to stock up on a set of hand tools. I'll list it.
- Screwdriver Set . Including Phillips and slotted screwdrivers;
- Construction knife with replaceable blades (for cutting drywall sheets);
- A long metal strip , preferably a crossbar, for marking and cutting GC sheets;
- Building level. Two types of levels are needed: in the form of a 1.5-2.0 meter long ruler and a laser level for marking structures horizontally and vertically. The laser level can be replaced with a set of hydraulic levels and a plumb line;
- Pencil;
- A tapping cord is useful for marking . It allows you to apply long, even marking lines to the wall, ceiling, floor;
- roughing rasp , for cleaning the edges of plasterboard sheets;
- Edge roughing plane , for creating edges on the edges of a sheet for painting work. You can do without it by trimming the edges of the sheets with a construction knife;
- Cutter . This is a special tool for fastening drywall profiles in a structure. It punches through two connected profiles and connects them using torn metal in the area of the punch. You can do without it by connecting the profiles with metal-to-metal screws.
- Metal scissors are a must for working with drywall;
- To bend sheets of drywall you need a special needle roller . It is used to roll and perforate a sheet of drywall to uniformly wet the gypsum layer and make bending the sheet easier.
Choosing drywall
Types of drywall, scope of application and their color markings.
Today there are 2 types of plasterboard sheets:
- GKL. They are ordinary plasterboard sheets for wall installation.
- GKLV. It is a moisture-resistant plasterboard, which is used in rooms where there is high humidity (bathroom, etc.).
- GKLVO. These are moisture-resistant and fire-resistant sheets, and the duration of exposure to fire depends on the manufacturer and brand of drywall.
The most common are:
- plasterboard, which has sheet dimensions of 2.5x1.2x0.125 meters;
- a rack profile with guides and dimensions of 2.8x2.7 cm and an arched one, used for constructing plasterboard arches.
To install plasterboard sheets with your own hands, you need the following tools:
Tools for installing drywall.
- Hammer. It is recommended to use a light and not very powerful tool (no more than 1 kW) and with an impact force of up to 5 kJ. It is preferable that there is a triple mode between switching (breaker, impact and drilling mode). Using this tool, you can not only drill the necessary holes, but also, using special attachments, you can make various mixtures for installation or putty work for cladding.
- Drill. It must be light weight, variable speed, since the construction of wall and partition profiles is based on a metal base.
- Screwdriver. For home use, you can get by with a small electric screwdriver or small electric drill. Frequent and professional use requires a high-quality screwdriver. The speed, quality and ease of work when installing walls, partitions and elements between them will depend on the characteristics and the chosen brand.
- Grinder or angle grinder for cladding. A lightweight and convenient small tool is required. You can purchase any inexpensive model.
- Electric jigsaw. Using it, you can cut out various intricate details from plasterboard; it is necessary when installing plasterboard sheets on a wooden profile. It is better to choose a convenient tool.
- Roulette. Needed almost everywhere. The most convenient and optimal sizes are a width of 1.9 to 2.5 cm and a length of 5 m. We recommend tape measures with a two-component or cut-off body, with a magnetic tuck.
- Metal scissors. Needed for cutting metal profiles. They must be of good quality, since the main part of the installation of a metal profile frame is carried out with their help. First of all, this applies to the installation of an ellipsoidal or round ceiling. Scissors have three types: straight, right and left, depending on their purpose and owner.
- Hammer. Should weigh about 300 g, have a durable and lightweight handle. The use of a carpenter's hammer is recommended.
- Drywall knife. Must have a segmented blade, preferably with a standard width of 1.8 cm. Drywall knives have retractable and screw blade stops or a locking system. It is recommended to purchase a knife that has a metal body and a metal rubberized handle, which makes it easier and more convenient to use.
- Level. Determines the quality and accuracy of work. When working with plasterboard sheets, various levels and hydraulic levels are usually used. It is recommended to purchase levels with a magnet or side magnetic tape, which will make it easier to install metal structures. If there is a considerable amount of work to be done in large rooms, it is recommended to purchase a laser level. The best option is to have a self-leveling laser level that has four functions (diagonal, horizontal, rotation and angle 45°C, 90°C).
We advise you to study - Features and rules of interior design in the shabby chic style.
It will not hurt to have a mounting belt, riveting pliers, a plumb line, rules and a drywall plane. Related tools include a tapping cord, a square, construction pencils and markers for marking, a cutter for fixing a metal structure, and many other tools that may be needed for specific work in a particular room.
https://youtube.com/watch?v=Xax0g8JeZeg
Processing drywall sheets
GCRs also require specific processing. It is unlikely that anyone will be so lucky that the entire frame will be covered with entire sheets. Most likely, the drywall will have to be cut, leveled, chamfered, etc.
- A jigsaw is the main tool for shaped cutting of drywall. With its help, you can make a wave, zigzag or any other geometric (and not only) figure from plasterboard, while the edge will be smooth and will not crumble.
- You can cut straight with a jigsaw or drywall knife. A paint knife will also work, the most important thing is that it is sharp and strong and can cut through thick cardboard. It is advisable to make the cut not by hand, but along the drawn line (it is even better to apply a ruler so that the knife goes straight).
USEFUL INFORMATION: Is it possible to paint drywall without prior putty?
- Edge and roughing planes will be needed for final processing of plasterboard blanks: leveling the edges, cleaning the edges, chamfering.
- You can make small holes for the wires using a drill with a special plasterboard bit.
- A needle roller for drywall is used in cases where the sheet needs to be given a curved shape, for example to create an arch. The plasterboard is generously moistened and rolled with a needle roller so that the moisture quickly saturates the surface and penetrates inside, and the drywall becomes pliable and does not break.
Drywall installation - what you need to know
Installation of drywall is carried out in several ways:
- Apply strong special glue to leveled surfaces. Next, you will need a finishing finish, for example, dry plaster. It is not recommended to use it to make wood surfaces even.
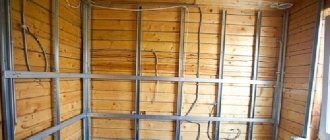
- On a pre-prepared frame. With a similar installation, it can also be used for wooden floors. The frame can be made of either metal or wood.
Wooden bases are cheaper, since only blocks of wood are required for execution. Metal ones are made from galvanized profiles, special hangers, and connecting elements. This is a more reliable and durable option.
Before starting installation, you should familiarize yourself with several rules:
- The joints of the sheets are placed strictly on the frame and fixed with self-tapping screws.
- The seams must be taped with joining tape.
- External corners are closed with special corners.
- Interior partitions are mounted in two parallel layers.
Manufacturers
Today the market is filled with a large number of manufacturers of construction tools. One of them is the Polish manufacturer Topex. This brand produces hand tools of fairly good quality and for relatively little money. Consumers are well familiar with this company.
The products of this brand are largely intended for non-professional use, but specialists often purchase them as well.
Another manufacturer of hand tools is the Canadian company Fit. This company has existed on the Russian market since 1999. During this time, it has established itself as a manufacturer of high-quality, reliable and inexpensive tools. Also among Fit products you can find consumables for power tools.
Since 2003, hand tools and equipment produced by the German company Matrix have appeared on the domestic market. The factories where these products are manufactured are located in China and Taiwan.
On the shelves you can find a large assortment of instruments made in Russia. Tools manufactured by domestic companies are not inferior in quality to imported ones, and the price can be several times lower. Among the Russian manufacturers are SMI LLC, Novosibirsk Instrumental OJSC, Metallist, SibrTech and others.
Among manufacturers of power tools intended for home use, .
Bosh tools have long proven themselves in the market. This company's product range includes more expensive professional tools. A distinctive feature of this instrument is the design of the body in blue. If the instrument is presented in green colors, it is intended for home use. Both types of equipment from this manufacturer are distinguished by high quality and reliability.
Interskol is a Russian manufacturer of power tools. The products of this brand are not only popular in their homeland, but are also exported abroad. The company appeared on the market 15 years ago and during this time has achieved good results. It is one of the top ten power tool manufacturers and has received international recognition.
A significant advantage of the company is the presence of a large number of service centers throughout Russia.
Special devices for working with drywall
There are special devices for working with drywall. Typically, they are used by professionals, but they are worth mentioning.
- Device for supporting sheets under the ceiling. The so-called “third hand”. Can be replaced with a long pole.
- Drywall transfer device
- A device for supporting sheets on vertical walls, also known as a mounting blade.
- This is all the hand tools you need for drywall work.
©Gipsokart.ru
Tool used when working with plasterboard without electricity
A tool used when working with plasterboard without electricity.
- An important tool for installing drywall is a bit. Very often, when working with plasterboard, a pinch occurs when screwing in a self-tapping screw. If the self-tapping screw goes through with its head, then the panel does not press. To prevent this from happening, you should purchase a bit with a limiter. Thanks to it, you will increase the speed and quality of installation work.
- Pliers are a necessary thing when working with plasterboard.
- Metal scissors. It is best to have two scissors. With long jaws - in order to cut the profile in accessible places, with curved short jaws - for those cases when it is difficult to get there first.
- A cutter is a device that makes holes in a profile.
- Pliers – connect profiles without the use of hardware fasteners.
- A needle roller is necessary so that you can bend a sheet of drywall (for making arches and other smooth boundaries). You only need to go over it on one side of the sheet. Next, use a brush to moisten it with water. Water passes into the gypsum board through the holes and it can be bent.
- Grab – used if you need to move the sheet alone.
- Cord - necessary in order to beat a number of profiles into one plane.
- Building level. You will need two of them, 1 m and 2 m long. It is advisable that there is a magnetic strip on it, then you do not need to hold it with your hands.
- A cutter is a necessary tool for professional work; it allows you to cut drywall into equal parts. Saves time. A disc cutter is indispensable if you need to cut narrow strips from a gypsum board sheet (as for slopes). No pre-marking required, it can cut on both sides at the same time. After cutting, a smooth end remains, which does not require further processing with a plane.
- Rasp - removes excess drywall at the edges of the sheet.
- Edge plane - chamfers the transverse edges of drywall. This increases the seam area. You can’t do without it, since proper processing of the edge of the sheet is necessary for subsequent high-quality puttying of drywall seams. It can be replaced with a painting knife.
- Small end plane - designed for processing the ends of gypsum boards. A very convenient and effective tool for adjusting and aligning the edges of drywall. Allows you to quickly replace worn blades. With its help, you can achieve the tightest fit of the ends of the main body to each other.
- Using a lift or spacer alone, you can easily lift a sheet of drywall to the ceiling or wall.
- A lever will be needed to raise the gypsum board from the floor level.
- Roulette. It is best to choose a longer model with magnets.
- Use a square to measure the required angles.
- A small hacksaw will be needed for curved cuts of HA.
- Knife – necessary for cutting and processing drywall. You will need a painting knife or a special one for working with plasterboard. The knife has a metal-reinforced blade that can be retracted when not needed. Replacement blades are sold separately. Using a knife, we cut the plasterboard on one side, break it and cut it off on the other side.
- You will need a hammer to hammer in the dowel nails.
- A dial saw is needed to make round holes of various diameters: for sockets, switches, for lamps. Sometimes she is mistakenly called a ballerina.
- A handle is a device used to carry two sheets of paper at once by two people.
- The knife-saw is used for shaped cutting of drywall, for example, to cut a hole for a socket or pipe. The principle of operation is quite simple: a hole is carefully made and cutting begins.
We advise you to study - Which construction vacuum cleaner to choose: device, types and selection criteria
This list of necessary tools can be expanded, or significantly reduced. It all depends on whether installation of gypsum boards is your professional occupation or whether there is simply a need to make home repairs.
Working with a profile
At the next stage, the frame is assembled from metal profiles. To work with them you will need electric and hand tools. Power tools you will need:
- The hammer drill is the “king of installation”. Without it, it is better not to start assembling the frame, since only it can punch the necessary holes in the walls and ceiling. To install the frame you will need to make a lot of mounting holes, so there is no need to save money. And there is also no need to try to replace a rotary hammer with an impact drill: its impact function is additional, it is not designed for heavy loads and can quickly fail.
USEFUL INFORMATION: How to make an arch with your own hands from plasterboard
- A drill may be needed for drilling. It all depends on the type and characteristics of the base.
- In most cases, profiles are connected to each other using metal screws. A screwdriver will help you screw them in quickly and easily.
To speed up the process, you can use a special attachment on a screwdriver to automatically feed self-tapping screws.
- A grinder (aka angle grinder) is necessary for cutting profile pieces. Its analogue can be a circular saw for metal.
There are a few more hand tools for drywall profiles:
- A hammer will be needed to drive dowels into mounting holes in the walls and on the ceiling and floor. You need to choose a comfortable and moderately heavy model. Usually good craftsmen even have several hammers at home.
- Metal shears are necessary for cutting profiles.
- A metal saw with a diamond blade can become an analogue of a grinder, if you don’t have one at hand; it can also cut profiles into pieces of the required length. But it will take much more effort and time, so for large volumes of work it is better to use a power tool.
- Cutters are used to connect profiles to each other, as well as to punch technological holes in profiles and partitions (for example, for laying wires). This tool for working with drywall is only gaining popularity.
- Using special pliers, you can connect 2 profiles with rivets. This method is also used infrequently, so an amateur home craftsman should not be puzzled by finding and purchasing such mites.
Pros and cons of using cutters
This type of instrument is not very popular yet. It’s difficult to name the reasons, because the thing is really good. Especially for those who install plasterboard systems, and for home craftsmen, this is also a necessary thing. What are the advantages:
- Fast and reliable connection of profiles. The speed of installation of the frame under drywall increases significantly. The principle of operation is simple: insert the parts to be connected between the jaws, squeeze the handles, move, repeat. And so on as many times as required. Punch for drywall profile. This is also what this instrument is called.
- No need to use fasteners. This saves time and money.
- The tool is hand-held, so no electricity is needed. You can work on any objects.
- There is no protrusion at the junction of the profiles. When mounted with rivets or self-tapping screws, the head protrudes above the surface of the profile. Self-tapping screws have more, rivets have less. This prevents the sheet of drywall from laying flat without bending. When using a cutter, the bends remain on the “wrong” side of the profile. The front is obtained without protrusions. The sheet lays flat, which reduces the time for putty and its consumption.
For installing drywall, the absence of protrusions is definitely a plus
Few of those who have tried to work as a cutter return to self-tapping screws. Although, I must say, there are some. Sometimes in difficult places, the connection is “grabbed” with a self-tapping screw, then a cutter is used, and the self-tapping screw is unscrewed. But these are those who like to play it safe. With some work skill, additional fixation is not required.
Flaws
Now about the cons. Using a plasterboard profile cutter really saves time. But the tool is manual and requires the application of muscle force. With large volumes of installation, namely structures made from profiles, fatigue quickly accumulates. And by the end of the working day, the speed of work drops. The better the tool, the less effort is required, but it is still needed. And this is a minus.
The second drawback is the difficulty of disassembling. To separate the two profiles, you need to bend the metal petals. It takes more time than when unscrewing screws. But less than when removing rivets. It seems that these are all the difficulties and disadvantages of working with a cutter.
Not everywhere you can crawl up and make a cut. Then you have to use screws and a screwdriver
There is another drawback, which is due to the shape of the working part. Some components - jumpers, clamps - are simply impossible to “reach” with a cutter. The punch won't fit in there. There are models with very large “windows”, but they are not very good for regular connections. For professionals, having several different models is normal, but for home use it is clearly overkill.
Self-tapping screws or notches
It has already been said that when using cutters the sheet lies flatter. And this is a clear plus in favor of the expanded connection. The second unconditional plus is saving time. The third is the lack of consumables.
The disadvantages of joining GK profiles with a cutter include insufficient fastening strength. Self-tapping screws are more reliable. Perhaps, but the strength of the frame is needed only until it is sheathed with gypsum boards. And it will be enough, even if you make only one fastener for each connection. But it’s up to you to decide which is better - a cutter or self-tapping screws.
Types and designs
The assortment of cutters in our stores is not so large, but in large construction stores you can see about a dozen different models. What are they? First, there are models for sheet metal (pictured below). They have a very small gap in the working part, which is also called a “window”. For sheet metal cutters, this window is only about a centimeter wide. Any metal will fit there, but the profile for drywall is only a guide (PN) or rack-mount (PS) with small shelves. And then there may be problems.
A cutter for a metal profile should have a larger “window” in the working part
If we talk about models for connecting drywall, they have a larger “window”. It is made in the form of a square, rectangle or with rounded corners. The larger the window, the easier it will be to fasten rack profiles with any shelf width. But then the size of the “head” increases, which is not always convenient. Professionals simply have several different tools, and for repairs and household use they choose something in between.
This is already a tool for professionals - with holes of different sizes and shapes
There are also different shapes of holes: rectangular, round, square. They come in different sizes. The thicker the metal, the larger the punch (or bit) required. There are models with replaceable punches, and there are rotary ones. For rotary or revolving ones (pictured above), the attachment is changed by turning a wheel with bits of different shapes and sizes. If you plan to work with sheet metal often, this is a good thing. For occasional use, such luxury is unnecessary.
We advise you to study - Repair and prevention of damage to laminate flooring
You can fasten profiles near the ceiling and floor with a regular tool, but it is more convenient to work with a special
There is also a cutter for metal profiles for convenient fastening of profiles under the ceiling or near the floor. Their handles are not a continuation of the working part, but are installed at an angle. Some (Ultra Profil EDMA) are at an angle of 90°, others are at 45°. This tool further speeds up the work when creating frames for suspended ceilings.
One-handed and two-handed and principle of operation
It is also worth remembering that there are one-handed and two-handed models. One-handed ones have a return spring that opens the handles after the tension is removed.
Working one-handed is far from easy. Especially on good profiles made of normal metal. So often one-handed ones are still operated with two hands. In this case, the procedure for working with the cutter for KG profiles is as follows:
How the cutter works: it pierces both profiles, bends the edges inward
- We set profiles by level.
- With your left hand we fix them in the desired position.
- Tool on the right. We bring its working part to the desired point, compress it until the bit hits the metal.
- We remove our left hand (the profiles are “held” by the cutter), and squeeze the handles with both hands.
Two-handed work is different in that the handles are at such a distance that you can’t even grab them with one hand. Well, they are also designed to connect thicker metal.
Tools for working with plasterboard
To accurately cut a plasterboard slab and straighten the end surfaces without crumbling the edges, the following devices and tools for cutting plasterboard will be useful.
Table for cutting gypsum boards
The lid of such a table is lattice and rests on two legs with stops. The sheet is placed on the lattice tabletop, fixed with clamps and, after marking with a pressure ruler, cut to the required size.
workbench
This table has a removable tabletop, which makes the table mobile. After removing the tabletop, the support frame folds compactly for transport. You can carry the workbench using special handle-loops attached to the support strap. Drywall is cut with a construction cutter or other tool described below. The first layer of cardboard in gypsum board is also cut with knives.
Cutters of different sizes
Cutters with a narrow blade and wide blades are used to cut strips of the required width from a gypsum plasterboard. The cutting is carried out on the table, the cutter discs cut the plasterboard on both sides. For convenience and safety of work, the cutters are equipped with a handle. A narrow cutter can be used to separate strips up to 12 cm wide; a wide cutter is needed to separate strips up to 65 cm wide. This tool can easily replace a regular sharp knife, so cutters are not used often.
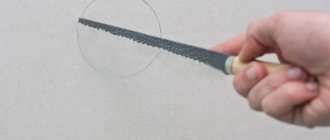
Hand saw
The fine teeth of a hand saw do not crush gypsum, so it is convenient to make rectangular or square holes in the slab. The width of the toothed blade should be the narrowest. An ordinary garden or carpenter's saw will not work - there are special hand hacksaws for working with drywall, which are sold in hardware stores.
Roughing and edging planer
A roughing plane is similar to a rasp - it is used to process the edges of drywall slabs. The cutting blade of the plane changes; a tension screw is used to fix and adjust the blade.
This drywall tool is used to trim the edge of the sheet to make a chamfer with an angle of 22.5˚ or 45˚ for subsequent plastering. Before creating chamfers, the end of the gypsum board is leveled with a roughing plane.
Circular cutter
An attachment for a drill or screwdriver, which is used to drill large holes in a gypsum plasterboard. The diameter of the cutter is ⌀ 75 mm, the holes are needed for mounting electrical sockets and switches. There are cutters of other diameters (for example, ⌀ 45 mm), and the holes from them are needed for other communication elements.
Ballerina
The tool is used for milling holes ⌀ 12-320 mm. The ballerina is a roller with a cutting edge made of a high-strength alloy in an aluminum body.
Needle roller
The device is used to pierce the cardboard of the sheet so that after wetting it can be bent. Bent surfaces are needed to create arches and similar elements with curved shapes. Piercing depth - 5-8 mm, ⌀ 2-3 mm. The pierced side of the drywall board will bend inward.
Metal scissors
The mechanism cuts profiles for the sheathing on which the drywall will be attached. If the work is one-time, then it is better to use scissors rather than a grinder or a hacksaw.
Types of batteries
Types and characteristics of batteries.
- Nickel-cadmium - used in household tools, designed for approximately 1000 charges. The disadvantage is the gradual decrease in capacity when charging an incompletely discharged battery (memory effect).
- Nickel-metal hydride - also used in household tools, designed for 500 charges, and have a memory effect. The last drawback can be eliminated by having a spare battery.
- Lithium-ion – do not have a memory effect; are considered more environmentally friendly, as they do not contain cadmium, which is harmful to humans; do not tolerate negative temperatures well.
There are also screwdrivers that can operate from the mains. However, their use when installing gypsum boards is not very convenient, since the work area is limited by the length of the cord and such a tool is heavier
However, if there is a lot of work, you can pay attention to such models
It is important that the tool you choose fits comfortably in your hand. A handle located at the center of gravity of the screwdriver is usually more convenient than a pistol-type handle
A handle located at the center of gravity of the screwdriver is usually more convenient than a pistol-type handle.
A screwdriver can be replaced with a drill. However, it is heavier and therefore not as comfortable to work with. In addition, the drill does not have a limiter.
Mistakes when working with drywall
In any type of construction work, strict adherence to technology is important. It is the latter that guarantees the quality and durability of the construction or repair result.
Unfortunately, quite often inexperienced craftsmen make serious mistakes when working with drywall, which ultimately lead to the most disastrous consequences. What exactly should be avoided when creating plasterboard structures in the interior?
- Violation of the installation technology of the profile structure
Perhaps the most common mistake when installing a frame under drywall is the discrepancy between the profiles used and their purpose. DC profiles cannot be installed instead of UW type profiles, etc. The same applies to fastenings and any other structural elements. Also, during installation, it is necessary to carefully monitor the quality of fastening of guides, transverse and, in particular, reinforcing profiles.
- Application of unforeseen profile cutting technologies
When installing a frame under drywall, the length of the metal profiles used will have to be adjusted one way or another. Under no circumstances should this be done using a circular saw. At high rotation speeds of the cutting disc, the profile will heat up and the galvanization at the cut site will burn out. In the future, this area will be susceptible to corrosion, which can ultimately lead to weakening and even destruction of the structure.
- Extension of profile walls
When the walls of a metal profile are unbent, its load-bearing capacity decreases, which leads to a violation of the integrity of the structure during cladding or, what is much worse, after finishing work is completed.
- Installation of gypsum boards with the back side facing out
The biggest mistake when creating plasterboard structures is to use the back side of the sheet instead of the front side. If the gypsum board is wall-based, this will lead to unevenness and mismatched edges when adjacent sheets meet. In the case of moisture-resistant drywall, the front part, specially protected from moisture and temperature changes, will not be able to perform its functions, which will lead to swelling of the gypsum and inevitable destruction of the structure in the future.
- Refusal of suspensions and deliberate weakening of the frame
When finishing complex surfaces, difficulties often arise with fixing the profile system
It is very important to understand that with the weight of one standard sheet being 30 kg and the installation of the frame being insufficiently reliable, the latter will soon fail. This can happen literally after finishing the drywall, that is, with the addition of additional weight of finishing materials
- Violation of the frame diagram
If the pitch of the profiles is chaotic, with too wide or, conversely, too narrow indentations from the walls and from each other, this will cause serious problems during installation and further operation of the structure. The latter can simply sag and the drywall can crack, which is unacceptable. In addition, more work will need to be done, of course, with additional material costs.
- Fastening gypsum boards “in a row”
The list of the most popular mistakes when installing drywall is installing sheets in one row. The result of this is unevenness at the joints that cannot be eliminated during finishing and the occurrence of seam cracks. To avoid this, it is strongly recommended to install the gypsum boards in a staggered manner.
Measuring tools for working with drywall
The work cannot be done without measuring tools for drywall. To avoid errors and inaccuracies, you need to accurately mark the sheet. The standard tools used for this are a tape measure, a building level, a corner, and a plumb line. But you cannot limit yourself to this set - there are many plasterboard structures, the assembly of which also uses other tools.
Metal tape measure
A flexible metal strip with markings in millimeters and/or inches in a plastic or metal case, the standard length of the tape measure is from 3 to 5 meters. But if necessary, you can purchase 10-15 meter tape measures
Building level
The level controls the deviation from the horizontal and/or vertical of the gypsum board sheet. The level body can be aluminum or made of metal alloys; ampoules with liquid are built into it, usually colored for better visual observation of the air bubble inside. Some levels are equipped with magnets that help secure the tool to a metal surface.
Metrostat
The sliding measuring tool has a scale and level, the average size of the tool is 3 m. The metrostat controls the horizontal and vertical positions of the plasterboard structure. The metrostat attachment helps to hold the drywall board vertically during installation.
Hydraulic level
This is a long silicone transparent hose, 10 or more meters long, into which water is poured so that the level can be checked at spaced positions of the structure. The hydraulic level is also convenient for transferring marks. The water level is designed for working with surfaces at height.
Laser level
The most convenient measuring tool for drywall is a laser level. The simplest linear plane builder (laser level) allows you to construct any projections of the future surface with great accuracy by intersecting rays.
Laser level with rotating head
In a rotating laser device, the beam rotates 360˚, which allows you to project surface points over the entire coverage. A rotating laser level is used in large areas where the use of other levels is impossible.
Square
A square (angle) is used when marking corner surfaces to obtain an accurate value of 90˚. Structurally, it is a metal ruler molded at an angle of 90˚ into a thick steel base.
How to choose the most durable components for gypsum boards
Due to its characteristics, gypsum plasterboard (GKL) has gained great popularity as a finishing material. It is used for wall cladding and when creating interior partitions.
Types of gypsum boards:
- Ordinary. It is used in rooms with normal temperatures and humidity.
- Moisture-resistant and water-resistant (GKLV). Designed for rooms with high humidity. Fungus and mold do not form on it.
- Fire resistant (GKLO). Necessary for areas where there is a high risk of fire. It is not used in everyday life, since the conventional version (gypsum plasterboard) meets all fire requirements.
The components for this material are selected very carefully. They must be durable and reliable.
Products of poor quality may cause structural failure. In terms of performance, the best solution would be galvanized steel fasteners. Such parts have good resistance to loads, corrosion and have a low price.
Mounting accessories
Let's look at the drywall installation tool together with the profile installation tool, since they are no different:
- Hammer or impact drill. They will help to install guide profiles to the base surfaces, which will subsequently serve as a support for the entire structure.
- Die cutter, or cutter. It is used to reliably connect profiles to each other without disturbing the geometry of the front side, which is simply necessary, since the quality of the finished coating depends on the evenness of the rough surface.
- Using a screwdriver, the gypsum board sheets will be attached to a frame made of profiles.
The cutter allows you to reliably connect profiles to each other without disturbing the geometry of the front side.
These are all the tools you will need to work with drywall. The list was not very large, but not small either. The main thing is to remember that the quality of the operations for constructing plasterboard structures will depend on the quality of the selected drywall tools. A set of tools is purchased once, and there is no need to save on it. Any master who is constantly engaged in installation work will tell you this.