In a private house, the issue of attic space arises acutely. Why waste useful space if you can turn it into a living room. It is not very difficult to equip an attic for living, as long as such a desire arises. This room is located under the attic and has a sloping ceiling, which significantly distinguishes it from other rooms.
Finishing an attic with plasterboard is a more difficult task than renovating an ordinary room, precisely because of the sloping ceilings. However, it is worth it, because the created room will not only be beautiful, but also completely livable.
What are the advantages and disadvantages of using gypsum boards?
After all, the attic can be covered with various materials, of which there are a huge variety. Why should you choose drywall?
- Environmentally friendly material is always preferable to something of dubious origin. A plaster core wrapped in thick cardboard, what could be harmful about that?
- Cheapness is also a powerful argument. Anyone can afford to buy enough plasterboard to convert an attic into living space.
- Despite the use of cardboard, this building material is fire resistant. It does not burn, but can only smolder.
- A plasterboard attic can be additionally insulated. This is possible due to the fact that plasterboard sheets are attached to the sheathing, forming a cavity into which thermal insulation materials can be inserted.
- You can also hide power cables and other communications under the casing.
- Sloping ceilings are very difficult to level with conventional materials, but with plasterboard the level will remain level.
There are certain nuances that may force you to abandon the use of gypsum boards when finishing the attic. The fragility of drywall is its Achilles heel. One blow is enough to break this material and render it unusable. Even a tightly screwed screw can lead to unwanted deformation.
Drywall should not be used in new homes. If the house can shrink, then the gypsum board will not withstand this and will be deformed.
Bringing large drywall into the attic is not very convenient. And if the material is cut in advance, it can result in a lot of waste. Increased humidity and dampness in the attic will cause the plaster to absorb it and swell, which is also extremely undesirable.
Design Features
Since the attic is, in fact, the roof of the house, in direct contact with the environment, it needs thermal insulation. Moreover, this thermal insulation must have good vapor permeability.
If you do not properly prepare the interior space of the attic, then finishing it with gypsum plasterboard will not bring the expected effect. The room will become damp, moldy and very hot during the daytime.
Note: Work on finishing the attic begins only after thermal insulation of all surfaces of the attic, installation of flooring, windows and doors.
The issue of materials and methods of insulation is decided on an individual basis, based on the characteristics of each individual house.
Considering the specifics of the room, it is best to use waterproof gypsum boards for cladding the ceiling. A good solution would be to use drywall, which combines both waterproof and fireproof qualities.
Considering the humidity of the room, it is necessary to think through the following questions in advance:
- Installation of sealed windows and doors to prevent rainwater from entering the attic. Fiberglass products are well suited for this.
- Possibility of heating the premises in winter. To do this, you can use a fireplace, autonomous heating radiators or air conditioning.
- To prevent air from stagnating in the room, natural or forced ventilation is necessary.
- For installation and fastening of gypsum boards, materials with anti-corrosion coating are used. Regular material may cause unwanted dark spots on the finish due to rust.
Taking into account the above features, a project for a plasterboard ceiling for the attic is drawn up.
Selection of drywall
It is wrong to think that covering an attic with plasterboard can be done using classic wall and ceiling plasterboard. You will have to use moisture-resistant materials for the reasons described above.
GKLV has a greenish color and has excellent moisture-resistant characteristics so that it can be used under a roof. Hydrophobic impregnation will do its job, and you won’t have to worry about high humidity. However, such sheets are very heavy, which is fraught with high loads on the ceiling frame.
| Drywall weight | ||||
| View | Sheet size (mm) | Thickness (mm) | Sheet weight (kg) | Weight 1 sq.m. (kg) |
| Wall | 1200x2000 | 12,5 | 22,32 | 9,3 |
| 1200x2500 | 27,9 | |||
| 1200x3000 | 33,48 | |||
| Moisture resistant | 1200x2000 | 12,5 | 24,24 | 10,1 |
| 1200x2500 | 30,3 | |||
| 1200x3000 | 36,3 | |||
| Moisture resistant ceiling | 1200x2000 | 9,5 | 24 | 10 |
| 1200x2500 | 30 | |||
| Ceiling | 1200x2000 | 9,5 | 17,5 | 7,3 |
| 1200x2500 | 21,9 | |||
| Arched | 1200x2500 | 6,5 | 18 | 6 |
| 1200x3000 | 21,6 | |||
| Fire resistant | 1200x2500 | 12,5 | 30,6 | 10,2 |
Everyone will have to independently look for a middle ground when choosing drywall.
Preparatory work
You can’t just go ahead and start carrying out repair work without prior preparation. It's not only about purchasing fasteners, but also about bringing the work surface into the desired shape. Preparation includes the following points:
- you need to make sure that the roof does not leak and does not have any defects. The best time to check this is in the fall, when it rains en masse;
- You can determine the humidity level in the attic in advance using a hygrometer. It is useless to do such a check in summer due to the intense heat. Perhaps the attic is made so well that there is no dampness. This will give you an idea of what kind of drywall to use;
- wooden beams must be treated with an antiseptic, if this has not already been done;
- Before covering the attic with plasterboard, you need to decide on places for sockets, lamps, ventilation, etc. After this, communications are laid out;
- we purchase consumables and tools: screws, glue, plasterboard, profiles or bars, screwdriver, metal scissors, building level, etc. The set of tools may vary depending on the specific case.
Sheets of drywall need to be brought into the room where repairs will be carried out for 1-2 days. The sheets adapt to local temperature and humidity, which means they will not deform after installation.
What to make the frame from
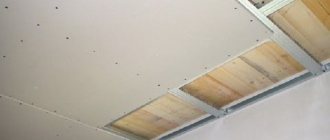
The most reliable and correct method for covering an attic with plasterboard is to use a special frame. However, in some cases the sheets can be attached directly to the inner roof sheathing. If the distance between the rafters does not exceed 60-70 cm, then you can safely attach drywall to them.
Fastening drywall to a wooden attic frame
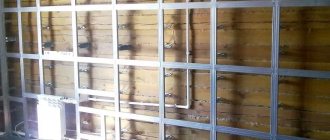
If the attic area is too large, the rafters are far from each other, or you plan to create an interior of a special shape, then you will have to create a frame. It is with its construction that the finishing of the attic with plasterboard begins.
The positive side of the renovation work is the fact that the attic space is made level, and there is no need to level the surfaces.
If you are making a wooden sheathing, then you need to find bars along the length of the room and attach them to the rafters. Then drywall is attached to these sheets with self-tapping screws. If you use a metal profile, then everything will be a little more complicated, but finishing the attic ceiling with plasterboard will be of better quality.
You can learn more about how to make markings for the ceiling in the video.
Installation of rafters
The rafters are installed during the roof assembly. They are part of the main sheathing and serve to strengthen the stability of the roof under the influence of external loads.
The rafter system consists of several elements:
- Mauerlat – timber with a section of 100x100, 150x150 mm. Preference is given to larch, pine, oak.
- Rafter leg. The section parameters are 100x150 mm or 100x200 mm. It is the main element of the system. Attached to the mauerlat and purlins. Durable timber is used. The connection by the posts forms a truss.
- Purlins: ridge, side. Serve to provide additional rigidity. The cross-section of such elements is 50x150 mm. or 50x200 mm.
- The stand is a vertical beam with a cross-section similar to the Mauerlat. It is attached along the center line of the gable roof, along the sides.
The pitch of the attic rafters is measured from 60 to 100 cm.
Plasterboard cladding of the attic floor in a wooden house can be carried out along the rafters. Attaching drywall to the rafters is carried out when the step between adjacent rafter elements is 60–75 cm. This cladding option is considered the fastest. In addition, you can save on additional profile products.
The thickness for drywall should be 25 mm. The rafters cannot be set level. In order to install drywall on the attic floor smoothly without cracks, it must have a high density.
Assembling a metal frame for cladding the attic
Let's look at an example of performing work on one sloping ceiling. The rest, if any, are done similarly. The attic is distinguished by its sloping ceiling, and the walls and even ceiling are the same as in a regular apartment.
To work, you will need a guide profile UD 27x28mm and CD 60x27mm. Attics are often larger in size than ordinary rooms, so the length of the guides may not be enough. A profile extension bracket will help solve this problem.
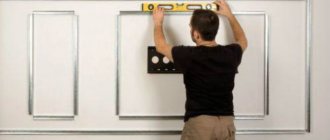
Along the sloping ceiling on adjacent walls you need to attach two guides. A distance of 5 cm from the ceiling will be enough. You can mark in advance to make it easier to attach the guides. Moreover, special measurements are not needed, because everything is already level.
Profiles 60x27 mm are inserted into the guides so that they run parallel to the floor. We lengthen them if the room is too large. The pitch between the profiles should be 60 cm. At the joints they are fastened together with small self-tapping screws. There must be profiles along the edges of the sloping ceiling, where it connects to the wall and to the straight ceiling.
The recommended pitch between profiles is 60 cm
To prevent the plasterboard ceiling in the attic from falling off, we need to secure the hanging profiles with hangers. The hangers are screwed to the ceiling in increments of 60 cm. Before attaching profiles to them, you need to make sure that there is no sagging anywhere and the ceiling will come out smooth. To do this, several threads are pulled across the profiles. The thread will show whether the profile is in the desired plane. After this, you can attach them to the hangers. The suspension ears are bent after installation so as not to interfere. Just don’t bend them too much; they may still be needed for laying insulation.
Insulation of the room
Before starting installation work, it is necessary to insulate the floor. The attic is a room under a roof, so it can be much colder than the rest of the house, especially in winter. Therefore, before covering with plasterboard sheets, the attic is insulated. Various materials can be used as insulation:
Foam plastic, cotton wool, film
- Styrofoam. It comes in different thicknesses: 20, 30, 40, 50 and 100 mm. The thickness of the foam sheets should be selected based on the temperature conditions of the region of residence, the ventilation of the walls and roof. Their installation is very easy, so you can handle the insulation quickly. We seal the gaps between the plates with polyurethane foam;
- mineral wool. It is also very often used for insulating attics. But it has certain disadvantages, among which carcinogenicity occupies a significant place. The dust that is generated during insulation is harmful to human health. Therefore, when working with mineral wool, you must adhere to safety measures. The thickness of mineral wool can be from 20 to 200 mm;
- vapor-permeable film. It should be used if there is damage to the roof or walls. You need to attach it in such a way that the rough side of the film faces you. This film simply needs to be stretched between the rafters and secured with a stapler. For stronger fixation, thin wooden beams should be used, which are nailed along the rafters.
It should be noted that foam plastic and mineral wool can also be used at the stage of installing the frame for plasterboard slabs. In such a situation, they are inserted into the frame and then covered with sheets. Note! During insulation, pay special attention to windows and doors, since this is where drafts most often occur due to poor-quality insulation. In any situation, it is necessary that there are no gaps in the insulation. To seal the gaps remaining after insulation, you need to use polyurethane foam (when insulating with polystyrene foam) or leftover insulation (when insulating with mineral wool). After installing it, it is recommended to stretch a vapor-permeable film over the insulation (with the rough side inward to move moisture towards the street). We fix the film using a stapler. You can also fix this film with your own hands after finishing the installation of the frame, before attaching the plasterboard boards.
Installing jumpers for additional rigidity
The ceiling frame is not ready yet, because it lacks rigidity. For this purpose, jumpers are installed (60 cm pitch) between the newly fixed profiles. For greater convenience, you can use special crab brackets, to which pre-cut jumpers will be attached. If you don’t want to endure additional waste, then you can go another way.
Scheme for attaching jumpers to the profile using crab brackets
The ceiling profiles are installed in such a way that nothing can be inserted into them from the side. There are two options to solve the problem:
- small pieces of guides are attached to the sides of the profile with self-tapping screws so that a jumper can be inserted into them;
- the jumper is made a little longer, and its ribs are cut off a little. The lintel, cut on both sides, easily fits onto the ceiling profile and is then screwed to it.
Jumper mounting options
Regardless of which method is chosen to install the jumpers, the installation will be of high quality and the frame will be rigid. In this case, finishing the attic with plasterboard will be successful. However, the roof still needs to be insulated and the frame sheathed.
Attaching drywall to the frame
The actual finishing of the attic with plasterboard is a simpler process than all the work that was carried out before.
It is recommended to install the sheets horizontally to make it easier to work with a sloping ceiling. They should be staggered so that the load is evenly distributed on the frame. Self-tapping screws 25 mm long will be just right.
Drywall is screwed with self-tapping screws in increments of 15-20 cm. It is attached to the guides, to the ceiling profile and to the lintels. Although this is not an ordinary ceiling, there is still a slope, which means the fixation must be reliable. In order for the self-tapping screws to hold the sheet better, they need to be screwed 1 mm below the level of the drywall. In this case, the sheet shell should not break through, otherwise such fastening will be useless.
Some people prefer to use two layers of gypsum board for reliability, but this makes no sense here. Thermal and sound insulation has already been laid, and a reinforced ceiling is not needed in the attic. The second layer will only create additional weight, and no one wants that.
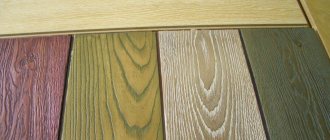
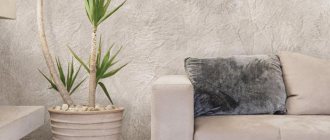
This completes the finishing of the attic with plasterboard, and all that remains is to carry out the final finishing of your choice. The main thing is to prime everything well and putty it well. The remaining parts of the attic are covered with plasterboard in the same way. There should be no problems with joining in the corners, despite the presence of a sloping ceiling.
Finishing touches on the attic floor
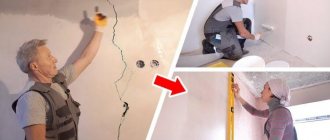
Before finishing, it is worth completing the main work: sealing the seams, hiding the heads of the hardware, strengthening the corners, priming and plastering the finished plasterboard walls and ceiling.
After puttying, the walls need to be sanded to remove excess putty and make the seams invisible. This way you can achieve a perfectly smooth wall surface. Instructions for puttingtying drywall joints are described in the article: https://homeli.ru/remont-i-otdelka/steny/kak-shpaklevat-styki-gipsokartona. We prime the surface so that the paint lays easily on the plasterboard walls and does not absorb it . At the very end, let the primer dry and begin gluing wallpaper or applying paint using a roller.