When a wooden ceiling is covered with plasterboard
In a frame house or building made of wood materials, the floors are made of beams. Heat or sound insulating materials are usually laid between them. A subfloor is laid on top of the floor beams, and a lining of different materials is arranged underneath to create a ceiling surface.
Moreover, there are two ways to sew up beam structures:
- slightly above the bottom edge of the load-bearing elements (in this case, the beams will be visible in the interior of the room);
- hem the ceiling below the beams and completely hide them behind the trim.
The first option is used if they want to make the room visually higher and interestingly play up the beams in the interior of the room. Some design styles involve the use of ceiling beams, so they are not specifically covered with trim.
The second option is chosen by those who want to get a flat and smooth ceiling surface without protruding load-bearing elements. As a result, you can make a ceiling in your house that will be no different from a traditional plastered surface. The easiest way is to make a plasterboard ceiling in a wooden house.
How to hem a ceiling on wooden beams
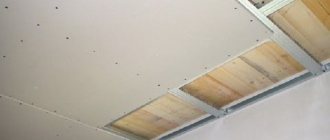
When using beams to decorate the ceiling, the finishing finish is laid on top of the beams or hemmed to the bars attached to their side surface. A vapor barrier is laid over the beams, floor joists are placed on top, and insulation is laid between them. A layer of waterproofing and floors are laid on top. In the case of hemming from below, insulation and sound insulation are laid between the beams.
A vapor barrier and a finished ceiling are hemmed underneath, and a waterproofing membrane and the floor of the upper floor or attic are placed on top. This method is used when the ceiling height is sufficient, when there is no need to save space. When completely lining the ceiling along the lower plane of the beams, you can create a flat ceiling using a counter-lattice.
To install it, you will need a 40x60 or 50x50 block or a profile for plasterboard.
- plastic is a fire hazard; it is undesirable to use it in rooms with stove heating;
- The material is fragile, chips and damage are possible.
- it is inexpensive;
- easy to process and allows you to create any designs, including curved ones;
- easily painted in any shade;
- the material breathes and does not contribute to the formation of condensation;
- goes well with any decoration.
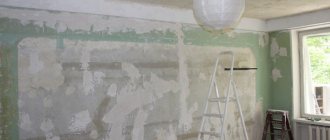
First of all, you will need to prepare the ceiling surface for work. We are considering installing the ceiling on a frame, so careful leveling and puttying will not be required. It is only necessary to clean off pieces of old plaster and treat the ceiling with a primer to protect it from the possible appearance of fungus and mold. You can install a suspended plasterboard ceiling with your own hands not only in a private wooden house, but also in an ordinary apartment. The main thing is to perform all stages efficiently.
Note! There must be a fastening element at the edge of the CD profile, since the UD profile itself cannot be attached to a wall or ceiling. In a wooden house, where the beams are located at a small distance from each other, you can use them as a frame for plasterboard sheets. But this is an extremely rare case
Often the distance between the beams is large and does not allow fastening the sheets in this way.
Therefore, additional sheathing is most often needed. To create it, you should use 30X40mm wooden beams. The lathing is carried out as follows:
Covering the frame with plasterboard
Attaching drywall to a metal structure begins with whole sheets. The sheets should be fixed with self-tapping screws in increments of 15–20 cm. The boundaries of the drywall should not lie on the same straight line.
Sheathed frame base with plasterboard
The screw heads are slightly screwed into the sheet of drywall so that they do not stick out on the surface. Do not overdo it - the drywall may crack and the surface of the sheet will be damaged.
It is better for two people to attach plasterboard to the ceiling, since the sheets are large and heavy.
The boundaries of the drywall should lie on the profiles. After sheathing with whole sheets, you need to start cutting out pieces to fill the remaining areas.
Installation of plasterboard sheets
Drywall is easy to cut:
- the sheet should be laid on a flat surface;
- draw on it the boundaries along which the sheet will be cut;
- a construction knife should be drawn along the line with slight pressure;
- pressing slightly on the edge of the plasterboard, the sheet will break;
- on the reverse side you need to carefully cut off the cardboard holding the two parts;
- the boundaries of the cut part are processed with a plane.
A 45 degree cut appears - a chamfer. Cutting drywall
After covering the frame with plasterboard, you can begin the next job of sealing the seams and further finishing.
We attach plasterboard to the ceiling
During the hemming process, it is best to use special self-tapping screws. They have a special thread shape that allows the material to be fixed as securely as possible. Drywall sheets should be cut to the required size before attaching them to the ceiling surface. This is done with a knife with a replaceable blade or an ordinary fine-toothed saw.
The step with which the sheets are attached to the profile is 20 centimeters, and in places of bends and corners it is slightly reduced. At the same time, screw in the screws in such a way as to slightly recess their heads into the material. Here you need to be extremely careful so as not to harm the material.
To avoid damage, you need to protect yourself with a special attachment that is installed on a screwdriver. It has a limiter that rests on the drywall. This will prevent you from over tightening the screw. Since the cap will be hidden, in the future these places will need to be treated with putty to level the surface of the ceiling.
Finishing drywall
The joints of the plasterboard structure are processed very carefully. The strength of the entire structure depends on this. If the joint is poorly processed, then a crack may occur and the drywall may become deformed.
- All joints on the ceiling are first cleaned of pieces of plaster and dust.
- The seams are coated with primer.
- The reinforcing tape can be ordinary, self-adhesive.
The self-adhesive should be placed on the joint exactly in the middle. Press the edges to the base. Reinforcing tape for gypsum board joints - If the tape is simple, then you need to apply a thin layer of putty and lay the tape on it, recessing it a little. Apply putty on top and leave to dry.
- Places of fasteners are sealed with putty.
Reinforcement of plasterboard joints - After drying, all joints and other places are rubbed down.
- The entire surface is covered with putty.
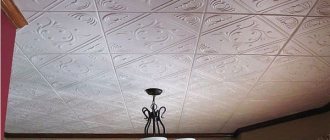
The ceiling is ready for further finishing with material. This could be painting, wallpapering or material. Applying decorative plaster or covering with liquid wallpaper.
Decorative plaster
You should not weigh down a plasterboard ceiling with decorative materials. They should be light, high quality and consistent with the overall interior of the room.
Puttying seams in drywall
Having completed the installation of plasterboard panels, you cannot immediately proceed to decorative work. The owner is first required to fill the seams remaining between the panels. A little putty is needed. The main thing is to rub it well, and then grind it over the applied composition. In this case, it will not protrude above the surface of the plasterboard sheathing.
It remains to carry out decorative work. Here the owner can choose what is best for him. This could be wallpaper, paint, ceiling tiles.
Preparatory work
This section includes work that should be done carefully, without haste. Because if you do superficial work, it will show its negative result during the installation of the structure.
- The ceiling should be cleared of old wallpaper.
The old covering should be removed from the ceiling - Remove the lighting fixtures and insulate the wire.
Wire sticking out of the ceiling - The inflated plaster must be removed from the surface.
If it falls after covering the gypsum board, it will weigh down the structure. Plasterboard sheets are not capable of supporting heavy loads. To weight the plasterboard structure with interior items, special fasteners are used. Removing old plaster - A depression will appear where the old plaster was removed.
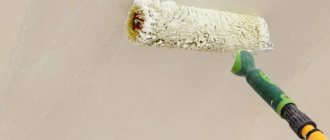
It should be treated with a primer and puttied with “Start”. The surface must be made as close as possible to a flat plane. Plastering the ceiling with “Standard” - The surface should be treated with primer and left to dry.
Priming the ceiling
You need to pay attention to the smallest nuances on the ceiling. If there are any protruding objects, stains of unknown origin, you need to get rid of everything
Stage-by-stage ceiling filing
Do-it-yourself ceiling lining with plasterboard occurs in several stages:
- preparation for work;
- marking;
- frame installation;
- installation of plasterboard sheets;
- final stage.
Preparing for work
The first step is to stock up on the necessary tools. To work you will need:
- UD-profile, or simply perimeter. It is attached to the walls where the drywall comes into contact with them;
- CD profile. The name of this type of profile is guide. It is mounted at the junction of two sheets of drywall;
- fastenings - required for hanging guide profiles. There are two types - pendants and spacers;
- connectors - fasten two guide profiles. Sometimes they are replaced with crabs (installed at the junction of 4 finishing sheets);
- dowel-nails - necessary for fastening the frame to the walls (for structural strength, metal ones would be the best option);
- self-tapping screws
Having selected the tools, you need to prepare the ceiling for the start of work: remove dust, dirt, etc., remove the chandeliers, leaving only the wiring. Having finished, we proceed to the next stage.
Before you begin installing a plasterboard ceiling, you must clean it of dirt, dust, and unnecessary elements.
Marking
We apply markings to the walls and ceiling. We draw a straight line that indicates the location of the perimeter.
To make the right line, you need:
- Determine the height of each corner.
- From the corner (opposite the smallest side) we measure down the interval by which the ceiling will fall.
- Leave a mark at the measured level on both sides of the corner.
- Draw a line to the next corner. To ensure that it is level, control it using a level.
- Draw the joining lines of the finishing sheets (they are used to determine the places where the drywall is fixed).
- Make notes on where the profiles are fastened.
If you plan to make a single-level ceiling, then mark the walls immediately. In another case, you can mark the next levels only after you have completed the previous one.
Frame installation
Before starting work, we check the correctness of the markings several times. Having made sure that everything is in order, we move on to forming and installing the frame.
To install the frame, you first need to calculate the required amount of material, as well as apply markings to the ceiling.
We fasten the UD profiles along the drawn lines. Fastening is done using dowel nails or self-tapping screws. Choose depending on the wall material (for wood use self-tapping screws, for concrete and brick - dowel-nails).
Next, we begin working with the guide profiles. To make the job easier, stretch the thread from one part of the room to another. This cord will indicate the exact horizontal height of the level for CD profiles.
We attach plumb lines or, if you use, crabs in the previously marked places. Next, you need to secure the guide profiles along the rope so that they barely touch the tensioned thread.
Telephone or Internet cables, heating pipes, computer networks, etc. we remove it from the place where the false wall will be located. Why is this necessary? The fact is that plasterboard structures, after they are installed, cannot be disassembled.
Installation of plasterboard sheets
The drywall is fixed to the profile in increments of 0.6 m. For this we need self-tapping screws approximately 25 mm long. We screw in the screws so that its head is in the top layer of drywall (if you push it too hard, you can break the thread).
It is also worth considering that if cut sheets of drywall are used, then they need to be cut so that the factory edges are used during installation, and homemade ones are discarded.
Final stage
After covering the ceiling with plasterboard, you need to putty the seams between the sheets, as well as near the screws. When you have finished with the putty, you are sure that everything is in order, you can level, sand and start painting.
After covering the ceiling with sheets of plasterboard, you need to putty the screw heads, as well as the seams.
Lining the ceiling with plasterboard - how to make repairs in the house with your own hands
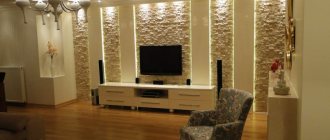
Lining the ceiling with plasterboard is a simple and effective way to renovate an apartment with your own hands. The material is lightweight and easy to work with, which allows you to create a variety of configurations of suspended structures. It will not affect the health of residents in any way because it is made from environmentally friendly products.
Another advantage of a suspended ceiling is that electrical wiring, pipes, and ventilation ducts are hidden in it. The room loses a little height, but in a modern apartment this is almost unnoticeable. There is an opportunity to get rid of chandeliers hanging overhead and collecting dust. Instead, they install recessed lamps or lay LED strip.
It looks modern and beautiful. GKL slabs are attached to the frame and it seems that a wooden house is an ideal building for installing a plasterboard ceiling. It is much easier to make lathing in it than in a room with floors made of concrete slabs. This is true, but provided that some nuances are taken into account.
Wood is very mobile, it moves over time and cracks form. The following will provide tips on how to take this feature into account in order to perform the installation correctly. There are six types of plasterboard, but only ceiling plasterboard is used for ceilings.
Its difference from a regular wall one is in thickness: 9.5 mm versus 12.5 mm. Due to this difference of 25%, the weight is lighter, which creates additional convenience for work. In addition, the material has acquired greater flexibility, which is required to create multi-level structures: they make waves, arcs, and curved elements.
The filing technology is simple and, after studying the step-by-step instructions, even a person who has never done anything like this can do it.
Puttying a plasterboard ceiling
Applying putty to plasterboard sheets can be called the completion of the installation of a false ceiling. At this stage, two types of putty are used. The first type is a starting mixture, used mainly for leveling surfaces. This putty is characterized by a coarse-grained structure. The second type is finishing putty; after treating plasterboard sheets with this composition, the surface becomes perfectly smooth. Therefore, the final leveling mixture has a fine-grained structure.
In construction stores, putty is presented in a wide range and from different manufacturers. Among the large number of materials, the following types of putty are popular:
- Uniflot is a universal material presented in the form of a dry mixture. Can be used for leveling surfaces and for finishing.
- The finishing putty has a fine-grained structure, is resistant to high humidity, and is used for finishing plasterboard ceilings.
- Universal putty "Shitrok" is a ready-to-use wet leveling mixture. The main application is surface finishing.
- Belsilk T-32 is based on a material made on the basis of white cement. In most cases, it is used to level the surface of walls and ceilings.
When using dry mixes, you need to add a small amount of water. Each manufacturer indicates on the packaging its own proportions for preparation, although there are no fundamental differences in this process.
You can prepare wet putty as follows:
- Take 1 kg of dry mixture.
- Add approximately 2 liters of water.
- Mix thoroughly, trying to obtain a homogeneous, viscous and thick mass.
To apply the putty, use a rubber or metal spatula. During the work, they try to fill as much as possible all the cracks, crevices and gaps with the working composition. To obtain a high-quality result, it is necessary to press the mixture into the crack or gap and compact it well with a working tool. It is also necessary to mask the places where the plasterboard sheet is attached, trying to completely cover the head of the fastening element with a layer of putty.
At the end of the process, you need to wait some time so that the putty can dry thoroughly.
The final steps involve sanding the surface using sandpaper or a special sanding mesh. The abrasive material must be firmly fixed on a special grater or in a plastic holder.
It is worth noting that sanding a plasterboard ceiling may not be necessary if a suspended or suspended ceiling structure is installed as a finishing touch. In this case, the hemmed structure is completely covered with a suspended or suspended ceiling.
Characteristics of finishing material
Among the many materials intended for interior decoration, plasterboard is in great demand. This is explained by its excellent properties. The main one is creating a perfectly flat surface.
The advantages of finishing material include:
- light weight;
- ease of installation work;
- excellent soundproofing and energy-saving qualities;
- environmental friendliness;
- the possibility of “invisible” placement of communications (electrical wiring, pipes, etc.);
- no odor;
- fire safety (due to the moisture content in the gypsum and the absence of air between the cardboard and the gypsum);
- low cost;
- installation of ceiling structures and decorative elements of any complexity.
During installation, the sheets can be bent and cut without any problems. Simple and shaped holes of any size and shape can be drilled into the material.
Drywall is pleasant to work with for another reason.
In fact, being a dry plaster, it allows you to avoid preparing a wet working solution for installation work. And this does not lead to the appearance of excess dirt and debris.
The result will be simply excellent. Thanks to the ability to absorb moisture and release it on hot days, a plasterboard false ceiling creates a favorable microclimate in living rooms.
The technology of covering the ceiling with plasterboard consists of the following stages:
- preparatory stage;
- frame devices;
- installation of sheets;
- puttying works.
Disadvantages of plasterboard compared to suspended ceilings
- Significantly higher labor costs and installation time
- The need for puttying and grinding, which creates an overload of harmful dust
- Inability to perform high-quality painting without experience
- Potential possibility of cracks (due to installation or construction errors)
- If your neighbors flood you, repairs will cost a lot of money and a lot of time
- The need to purchase and deliver a large number of different building materials
If, after reading this, you have not yet changed your mind about making a plasterboard ceiling, we wish you good luck and let’s go.
Types of drywall
Drywall is a thin layer of modified gypsum between two layers of construction paper. The material, of course, is not particularly durable, but it is simply irreplaceable for arranging interior interiors: flexible, unusually light, easy to install and allowing for almost any type of finishing - from painting to tiling.
There are several types of material based on its resistance to external factors.
Regular is the same plasterboard that is mainly used for finishing living rooms and offices. In addition to the above positive properties, it has good vapor permeability, so it is ideally suited for work in an apartment or private house, but only for rooms where the humidity does not reach high levels. The photo shows a suspended plasterboard ceiling.
Conventional material is divided into wall and ceiling, the latter being thinner and lighter.
- Waterproof - they can be used to line the ceiling in the bathroom, toilet, kitchen, that is, in a room with high levels of humidity and temperature changes. It costs a little more.
- Fire resistant - plasterboard is not flammable, but the material in this category can also withstand contact with an open flame. In a private house it is rarely used, mainly when it is necessary to hem the fireplace portal.
- Fire and moisture resistant is a special drywall designed for enterprises.
Features of arranging a false ceiling on floor beams
Installing the structure on floor beams has one rather important advantage - there is no need to prepare the foundation. Fitting a rough ceiling on wooden beams is quite simple
The hemming material in this case is edged and unedged boards. If additional insulation of the upper floor is necessary, heat-insulating material is placed in the space between the ceiling beams.
Most often, false ceilings are created to level the base surface, for its thermal insulation and sound insulation.
In this case, the following can be used as insulation:
- Styrofoam.
- Glass wool.
- Mineral wool.
- Some bulk materials, such as expanded clay or sawdust.
Bulk thermal insulation materials are most often used to insulate the ceiling in a bathhouse or utility room. In this case, the ceiling inside the room is first hemmed, then insulation is poured from the attic or upper floor. The hemming material is pre-treated with protective agents, including antiseptics and fire retardants. This will prevent the proliferation of harmful microorganisms and extend the life of the false ceiling.
Basic installation steps
Any false ceiling can be assembled and installed with your own hands. If you don’t set yourself the goal of assembling something very complex and intricate, then anyone who has minimal experience with tools can handle it.
To do this, you will need a certain set of necessary tools, not including materials:
- Screwdriver
- Hammer or drill with impact mechanism
- Hacksaw for metal
- Pencil or marker
- Marking cord
- Construction and hydraulic level
- Hammer
Materials must be purchased that are suitable for the selected ceiling design option. For gypsum boards, you need to buy sheets of material with a reserve, for wooden planes - wooden planks, and so on. All structures have one thing in common - a frame base.
Aluminum profiles or wooden blocks are best suited for it. You will need to purchase guides and ceiling profiles, and you will need bars with a cross-section of 30X30 mm. You can take wooden parts that have a different cross-section, depending on the required design.
In addition to the parts from which the frame will be made, you will need to stock up on screws and dowels to attach the base to the ceiling. When all this has been acquired, you can begin work on constructing a new ceiling. Depending on the type of coating chosen, some steps may differ, but the main ones will be as follows:
- Marking the base
- Assembly and fastening of the frame
- Installation of covering elements
- Finishing
There is no point in going into detail at all stages, since each type of material has its own specialized instructions for installation and finishing. Here, only the processes as a whole are described in order to understand what you will have to face when installing such a ceiling.
Ceiling installation
Let's start creating a frame for future finishing. Its installation begins from the perimeter.
- Set the UD profile to the baseline. It must be fixed with dowels with a plastic or metal sleeve, which are best suited for concrete and brick walls.
- To make it easier to secure the guides, you can connect the profiles with a thread along the entire perimeter of the room. You can also use a cord for this. Thus, we get a level.
- Next, we begin to install the hangers along the grid drawn on the ceiling. They must first be bent, and only then attached to special hangers. The profile is connected either with connectors or crabs.
So, the frame is ready for covering with plasterboard sheets.
Measuring and marking
The next step is to measure the entire perimeter of the ceiling and apply markings. After measuring the ceiling, you can calculate the required amount of material and start purchasing it. It should be noted:
- material should be taken with a small margin;
- the plasterboard structure will be durable, high-quality and beautiful if the materials are purchased from the same brand.
Marking a false ceiling
The markup is as follows:
- You should measure the height of the room at each corner.
- The smallest dimension (lowest point) is found.
- In this corner, 10 cm is marked from the ceiling down.
Marking for the ceiling - Now this point should be placed in all other corners. In the other three corners it can be 12 cm, 8 cm. We must make sure that the point lies on the same plane. It is best to measure from the floor.
- All marked points must be connected. You will get a quadrilateral. This will be the future ceiling.
- The fastening points for the guide profile are placed on these lines.
The distance between them will be 25–30 cm. Attaching the guide profiles - On the ceiling you need to draw strictly perpendicular lines from the wall drawings.
The distance between them is 60 cm. The attachment points of the suspensions are marked on these lines. The distance between future suspensions should be 30–40 cm. They should not go along the same line. The suspensions are staggered. Fastening direct hangers with anchor wedges
After the markings have been made, the next step is to install the frame.
Ceiling markings
It must be performed in order to correctly orient the frame of the future suspended ceiling. Properly marked overlap will allow you to achieve a high-quality result. Only professional specialists with many years of practice behind them can begin installing the ceiling without preliminary marking. Beginning masters should not skip this point and pay special attention to it.
Marking is done by drawing lines both on the ceiling and on the walls.
- Draw a baseline around the entire perimeter of the room. It will be the main level of the future ceiling structure. The distance that must be retreated from the base floor to the future finishing is determined by the presence of communications that need to be hidden. The most optimal size is considered to be 10 centimeters. To make the line as even as possible, you need to use a laser level for marking.
- Next we move on to marking the grid on the ceiling. First you need to draw lines that serve as a guide for attaching the longitudinal profiles, after which we move on to calculating the places where they intersect with the transverse guides.
How to hem a ceiling with insulation
Beam preparation
Before hemming the ceiling with the selected material, prepare the base base. And, if there are no difficulties with slab floors, then beams require a more careful approach:
- Furniture is removed from the premises and electrical wiring is turned off;
- remove the previous finish from the ceiling surface, knock down the plaster;
- dismantle the slatted sheathing, remove the insulation layer;
- beams are cleaned of debris and mold and treated with antiseptics.
The evenness of the beams is checked using a laser level. If there are differences, they are eliminated. If the ceiling is completely sewn up on the bottom side, it is leveled using a counter-lattice. To do this, use timber with a cross section of 40x60 mm or profiles for gypsum plasterboard. A vapor barrier layer is mounted on the bottom side of the beams, which is attached to a construction stapler. The film is overlapped.
Insulation 100-150 mm thick is laid in the space between the beams.
If the niches between the beams are not completely sewn up, then a wooden beam is secured on both sides of the load-bearing elements with self-tapping screws so that it is located at the same level as the beams. A vapor barrier is installed from the floor of the upper floor or attic. The cladding is fixed to the bars, and on the second floor a floor made of boards is laid.
Installation of the binder
When the preparatory stages are completed, the installation of hydro- and vapor barriers is completed, they proceed to the decorative cladding of the ceiling surface.
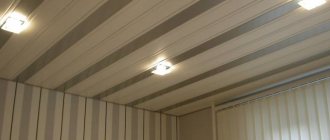
An accessible way for self-implementation would be filing with boards:
- First, measure and cut the boards to the required length. The cut is made with a jigsaw from the reverse side so that the edges are smooth;
- the board is screwed with self-tapping screws or nailed to the counter-lattice;
- if lining is used, it is fastened using the tongue-and-groove principle; plastic panels are also mounted;
- when the entire ceiling is covered, the seams between the walls and the cladding are covered with decorative skirting boards.
Fastening the material and its types
Drywall can be hemmed to a wooden ceiling in one of several ways.
On a ceiling hemmed to the beams
The structure of a false ceiling is represented by a horizontal plane made of different types of boards, mounted from below to the beam ceiling.
Finishing gypsum plasterboard on such a surface without a pre-installed frame or sheathing is permissible when the ceiling is flat and has no flaws or slopes.
Installation of plasterboard sheets is carried out using standard self-tapping screws from 32 to 51 mm long in a checkerboard pattern. It turns out that the corners of adjacent sheets will not touch each other. The screw caps should be recessed into the gypsum board by a millimeter.
On wooden sheathing
The ceiling in a wooden house is also hemmed to the beam structure. But then you will need to install the sheathing. You will need a beam 40*50 mm.
The procedure will be as follows:
- Attach the timber to the beams using long self-tapping screws. The depth of penetration of the self-tapping screw into the beam should not be less than 5 cm.
- The step between the beams that make up the sheathing should not exceed 50 cm. If possible, reduce the distance to 40 cm.
- For perfect levelness, use a building level. To adjust the height, place plywood or wooden pieces under the beams, which will act as adjustable hangers.
On a note! If there is a large distance between the beams and the mounted sheathing, it is better to use special profile hangers. They're inexpensive, so they won't break your budget. But the design will be more reliable.
- If you did everything correctly, the sheathing will coincide with the joints of the two sheets of drywall.
- Now fasten the ceiling gypsum board in such a way that the junctions of adjacent sheets fall on the beam.
For galvanized profiles
GKL ceilings in a wooden building with beamed ceilings can be hemmed onto a lathing made of galvanized CD profile, the dimensions of which are 60x27 mm. A UD profile is installed on the wall surfaces in a perimeter position.
To fix it to the beams, hangers are used.
The sheathing must be assembled as follows:
- Along the perimeter of the room on the wall surface, using a level, draw a base line, and attach a guide profile to it.
- Suspensions are attached to the beams at the same distance. For each, use two self-tapping screws 45 mm long.
- The edges of the CD profile are carefully inserted into the guide bar and secured with hangers.
- To ensure that the sheathing is in one plane, nylon threads are pulled between perpendicular beams.
- Each profile strip is lowered to the threads using hangers and secured with nine-millimeter screws (four pieces each). Those parts of the hangers that remain free are bent upward, higher than the base of the plasterboard ceiling.
- From CD profile scraps, transverse inserts are installed at the junction of adjacent sheets of material.
- The gypsum boards are mounted as indicated in the previous methods.
Plasterboard material for ceiling
For false ceilings, chipboard, fiberboard, and plasterboard sheets are used. GCRs have many advantages over other building materials, which is why plasterboard is used for do-it-yourself false ceilings. In the production of plasterboard, all standards for environmental friendliness of the material are met; it does not contain toxic materials and also has a perfectly smooth surface. Due to their light weight, plasterboard sheets are used in the technology of creating partitions, multi-level ceilings, niches and countertops.
GK-Sheets
Drywall has varieties that allow it to be used in the bathroom, on the balcony, in production workshops, in floor leveling and outdoors.
What kind of drywall is required for a false ceiling?
Types of drywall
Drywall from the Knauf brand differs from other products in its strength, durability, and quality. The following sheets are suitable for false ceilings:
- Fireproof plasterboard. Red color.
- Waterproof green plasterboard.
- Common sheets of material are gray sheets.
Each type of drywall has a number of advantages and one disadvantage - the fragility of the material.
Hole in drywall
To create a rigid frame, you need to purchase a galvanized profile. It creates reliability and does not corrode the metal.
Installing a plasterboard ceiling
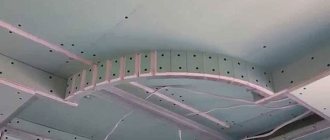
Assembling the frame on the ceiling
The frame for a plasterboard ceiling is assembled from special profiles, which are made of galvanized steel.
Profiles for frame
For the frame we will need:
- UD profile is a starting profile that is mounted around the perimeter of the room on the walls and is used as a base for the ceiling.
- CD profile is the main profile that is suspended from the ceiling and rests on the starting profile with its edges. Drywall sheets are attached to the bottom plane of the main profile.
- Suspensions are metal plates that are fixed to the ceiling and hold the frame elements at a certain distance from the ceiling.
We will also definitely need dowels and screws for fastening.
We assemble the frame like this:
Attaching the starting profile
- We attach the starting UD profile along the intended line.
- We attach the hangers to the ceiling according to the markings, bending them vertically down.
- We fix the main profiles on hangers using self-tapping screws. We insert the ends of the profiles into the groove of the starting profile and fasten them using metal screws.
- If you need to increase the length of the profile, you can use special longitudinal connectors. For cross-connection of profiles at an angle of 90 0, cross-shaped “crab” connectors should be used.
At each stage, we control the location of the frame elements using a level.
Also, at the stage of installing the frame, it is necessary to lay wiring to connect the built-in lamps. We lay the wiring in special plastic boxes or pipes - this way we will reliably protect it from damage and moisture.
Frame with cladding elements
Frame covering
The next stage of work, which includes finishing the ceiling with plasterboard with your own hands, is securing the plasterboard sheets to the frame.
We sheathe the frame like this:
- Before finishing the frame with plasterboard, we measure the dimensions of the room and cut the plasterboard sheets to the required size. Drywall is cut quite simply - with a knife or a saw with fine teeth.
- We apply the cut sheet of drywall to the frame so that the edge of the sheet falls on the main profile. We fasten the sheet of drywall using self-tapping screws, twisting them so that the cap is slightly recessed.
- We try to place the sheets in such a way that the seams between them do not coincide.
After the frame is sheathed, all that remains is to putty the ceiling and perform the finishing touches.
Installation of false ceiling
For a high-quality solution to the question of how to make a false ceiling, experts recommend following a certain sequence of actions:
- First of all, it is necessary to prepare the hemming material. At this stage, the lumber is treated with an antiseptic composition to protect against fungus and mold, as well as an agent that prevents the material from igniting. After treatment, the boards are dried well in natural conditions.
- At the second stage, the finished lumber is brought into the room where installation work will be carried out. If you have equipment for lifting loads, you can immediately lift all the material up and lay it on the floor beams. But it is better to use this method if the building is under construction.
- The fastening of the hemming material begins from one of the walls. 2-3 boards are placed perpendicular to the beams and secured to them using nails or self-tapping screws. Accordingly, use a hammer or screwdriver. The boards can be placed close to each other or with a small gap. This depends on the type of insulation used or if it is necessary to save hemming material.
- Next, the thermal insulation material is laid. The openings between the floor beams are filled with polystyrene foam or mineral wool.
- The entire ceiling area is hemmed in this order.
This is interesting: Projects of a bathhouse with a terrace and houses: we paint them in order
Description of false ceiling
The top floor of a building almost always consists of several layers, and each layer that completely covers the base ceiling can be considered a false ceiling. However, many home craftsmen mistakenly believe that any suspended structure can be called a suspended ceiling.
Suspended and false ceilings differ significantly from each other. A suspended ceiling is a suspended system located at a certain distance from the base ceiling. In turn, false ceilings are tightly attached to the main surface. This is the main difference between these structures.
As for the design features, some differences can also be identified here. A suspended ceiling is a collapsible structure, which can be of a pass-through or non-pass-through type. In the first case, communications located inside the suspension system have free access. The second option for this purpose involves dismantling some sections, since the structure is part of a ceiling with the possible placement of utility networks.
When installing a suspended ceiling, certain requirements must be observed. In particular we are talking about the following:
- If the total weight of the structure does not exceed 10 kg, the base floor need not be reinforced.
- To install structures whose weight does not exceed 20 kg, you can create an additional sheathing from wooden bars or a metal profile.
- For a suspended ceiling with a total weight of more than 20 kg, it is recommended to install additional load-bearing structures in the fastening area.
Tips from professional builders
Not everyone knows how to properly line a ceiling with plasterboard, so you should take into account the advice of real professionals:
- Marking: to facilitate this process, you can do the following: put marks at eye level, measure the same height up, the ends of the lines will be there.
- Hemming: When hemming the ceiling, do not forget to take into account the fact that the frame must be given time to adapt to moisture and heat conditions.
- Final work: after the putty has dried, it must be sanded to avoid unevenness.
- Cutting drywall: make a cut line and, using a utility knife and a strip (acts like a ruler), cut the top layer, and then simply break it. Sand the broken areas with sandpaper.
- Hemming: Before you start hemming the ceiling, remove the chamfers, this will make the puttying stage easier.
- Levelness: During each step, keep a close eye on the level of levelness.
- Self-tapping screws: to avoid sinking the screws into the sheet, use a special bit with a limiter. This will make the process safer and more efficient.
- Fastening: if one of the ends of the guide profile is inserted into the perimeter, clamped with self-tapping screws, then the fastening process will become much easier.
- Marking: if it is difficult to understand how to mark correctly, watch the video for an example.
Lining a ceiling with plasterboard with your own hands does not require any special construction skills. It's a very simple process.
To line the ceiling in an apartment, choose regular plasterboard - this will reduce costs, but the quality will remain at the highest level. The main thing is to select the right tools for the job and carry out the markings very carefully. Follow the filing rules described above. Then you won't have any problems.
The only downside may be the operating time, depending on the size of the home and the number of workers. A trio would be ideal, but you can handle everything alone.
Stage 3. Attach the profile
If there are no height differences on the ceiling, it is flat and you do not need additional insulation or you installed it from the outside, you can do without installing a frame. You will need to additionally buy a construction adhesive mixture, but you will save on the profile, dowels and screws.
In this case, it is enough to carefully treat the sheets or surface (depending on the selected adhesive) and press the drywall tightly, holding it for the time specified in the instructions. For greater strength, we recommend that you secure the structure with a drill and self-tapping screws. However, keep in mind that the coating must be absolutely even, otherwise the lopsided finish will disappoint you.
The advantages of this method include the absence of concealment of height, speed and ease of operation. Remember that you need to carefully adjust the sheets to each other so that there are no gaps.
If you are not sure that the coating is smooth enough, you want to hide communications or lay an additional layer of insulation, you will need a profile frame. To better understand the process, we recommend that you watch a video with a detailed explanation.
Please note that nails are not the best choice for a wooden house. It is better to use self-tapping screws - they have a higher holding capacity and do not slip out of the wood.
Ceiling fasteners must be attached to the marked areas. Be extremely careful - they take on the entire weight of the structure, and therefore negligence can create an emergency situation.
Already on them, using dowels, construction metal profiles are installed, which form the frame. Be sure to secure the joints with crabs. Regularly check the design for compliance with the markings, otherwise you risk getting misaligned.
Important nuance: In concrete or brick houses, the frame is mounted close to the wall. This is unacceptable in wooden ones.
Since wood tends to dry out, it is necessary to leave about a centimeter to be able to move the plasterboard ceiling a little if necessary. To do this, it is necessary to attach the profiles directly to the end part of the fasteners. The cracks can be sealed with decorative skirting boards.
If necessary, you can lay insulation directly between the frame cells. You can read more about them here.
Having sequentially mounted the supporting structure starting from the highest point of the ceiling (if it has an uneven height), you can proceed to the main stage.