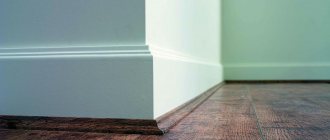
Upon completion of renovation work on a home or any other room, the question of choosing a plinth arises. The stores offer a wide range of skirting boards in terms of material, design and functionality. The plinth performs not only a decorative function - it is a connecting element between the floor and the wall, so it must perform its function efficiently, taking into account the operating conditions.
What types of floor skirting boards there are, their advantages and disadvantages, as well as installation methods will be discussed in the article.
Purpose of the plinth
The importance of this structural element in a modern apartment is quite great. It performs several functions:
- Hides the damper joint between the floor and the wall.
- Gives the room a finished look.
- Allows you to hide electrical wiring or other wires.
- Protects the bottom of wallpaper or other wall covering from dust, dirt and moisture.
- Protects the space under the floor covering from moisture penetration.
If you decide to do without this element, you will be very mistaken and over time you will realize that it is necessary. After all, open areas in a room look unsightly, and wet cleaning damages the wallpaper and allows water to seep under the floor covering.
It is a mandatory element when laying many types of flooring:
- Parquet and engineered boards.
- Laminate.
- Solid board.
- Carpet.
- Linoleum.
An exception when its use is not required is the junction of floor and wall tiles. It is also not used when finishing with natural stone. The need to use skirting boards is dictated primarily by aesthetic considerations. It also allows you to solve some practical problems.
Functional purpose of skirting boards
Installing skirting boards brings the finishing to its logical conclusion. An interior element has a decorative value: it ennobles the room, improves its perception and makes the environment more aesthetically pleasing. The planks reinforce the floor and ceiling coverings. The edges of wallpaper, linoleum and carpet, and laminate boards are also hidden under the baseboard. Without skirting boards, you cannot install floating floors, which expand and contract with temperature changes. Planks hide imperfections, roughness, holes, and ugly crooked joints. With their help, the finish is protected from water ingress and protected from mechanical damage at the edges and joints. Preventing deformation and wear of coatings is another aspect of the functional benefits of skirting boards. In addition, you will be able to save money on the edging of the room, because the structure of the material is simple and understandable, and anyone who knows how to use power tools can install the structure.
Using a plinth makes it possible to:
- Close the gap between the edge of the flooring and the beginning of the wall.
- Press down the floor covering around the perimeter.
- Protect the wall from getting wet when using a mop to clean the floor.
- Hidden electrical wiring.
Installing a plinth allows you to hide the sloppy edge of the floor covering that matches the perimeter line of the walls. Often, when laying a floor, its edges should not rest against the wall to maintain the possibility of linear expansion in the event of changes in humidity or temperature. The presence of a plinth allows you to close such a gap.
Equipping the corners of baseboards also helps with cleaning. In particular, it protects the wall surface from impacts from the vacuum cleaner nozzle and prevents it from getting wet from the mop during wet cleaning. Using a skirting board allows you to fix the floor covering. In particular, this applies to carpet and linoleum, which in small rooms are not glued to the subfloor.
Often, using a plinth, hidden installation of electrical cables is carried out. It may have a cable channel specifically for this purpose. Floor sockets are produced under skirting boards, which significantly expands the options for their use.
Factors influencing the choice of skirting boards
The main rule when selecting the size of skirting boards is visual correspondence. Each element should be separate and at the same time intelligently complement all the others, look harmonious and not stray from the overall concept. The size of the floor plinth is selected based on:
- Volume and height of the room;
- Stylistic orientation of the room/apartment;
- Personal preferences (the owner of the property has the right to do as he wants);
- Quality of repair.
The volume and height of the room must be related to the height and width of the floor plank. We must not forget about the style chosen in the interior. For classics, pompous decorative elements are preferable - taller and wider than average; for high-tech or minimalism - more sophisticated ones. You can also rely on your own vision. And one more point – the quality of repairs. The decorative element is designed to completely cover the gap between the wall and the floor. If it is large (either by a professional or you have neglected the repair rules), you will have to look for a plinth that will be a little wider.
What types of skirting boards are there?
When going to the store for skirting boards, you need to take into account the type of future flooring and the overall interior of the room. Flooring products are made from different materials.
The most common types are the following.
Plastic
They are well suited for carpet, laminate and linoleum flooring. The products are resistant to chemical compounds, durable, but at sub-zero temperatures they become brittle and crumble.
Plastic elements have an unpleasant odor, which, however, disappears over time. They are light in weight, have excellent thermal insulation properties and are resistant to dampness. In addition, they cut perfectly, and when heated they take the required shape.
Foamed PVC products
They are used for the same types of coatings as plastic elements.
They resemble wooden ones in shape, but on the reverse side they have recesses for wires and a mounting channel. These skirting boards are attached to the wall using adhesive tape.
Wooden
Serve for framing parquet and wooden floors. They are made from solid wood - pine, ash, cherry or oak. They are much more expensive in price than all the others, but they are environmentally friendly and durable.
The wooden elements are fastened with nails or self-tapping screws, while the caps are slightly recessed into the body of the baseboard.
Before painting a wooden product with varnish, the fastening points are sealed with putty to match the wood.
From MDF
Mainly used for laminate and linoleum. They are environmentally friendly and come in many colors. They have a cavity at the bottom for wires.
Such elements are fastened in a hidden way using hook brackets. The latter are installed using self-tapping screws around the perimeter of the room, and then the baseboards themselves are put on them. Fastening with glue is possible.
Ceramic
Such materials are ideal only for floor tiles. Most often they come in a set with tiles. They are fastened with a special glue, which is used when laying ceramic products.
Polyethylene tape
Manufactured specifically for rooms with high humidity.
Such products are resistant to water and can take any shape. Secured using sealant.
Aluminum
They are used extremely rarely - mainly in rooms where designers use high-tech style in the interior.
Advantages and disadvantages of wooden skirting boards
The traditional option for finishing the floor is a plinth made of wood:
- Oak;
- Pines;
- Beech;
- Ate.
Modern manufacturers produce a wide range of floor decor models that can be safely recommended to various segments of the population - from cheap budget options to expensive luxury ones, but their shapes are different. Most often, the lower part tapers, and the profile height reaches 60 mm.
Among the advantages of wooden skirting boards, the following should be highlighted:
- High strength;
- Beautiful appearance, noble appearance;
- Environmental friendliness;
- Durability.
Among the disadvantages it should be noted:
- Designed mainly for expensive interiors, they are not cheap;
- Installed once;
- Repeated installation/disassembly requires special skills so as not to damage the material;
- There are no recesses for masking cables;
- Requires additional finishing to match the final finish.
Veneered plinth
Unlike pure wood, this material is more in demand, as it costs much less. At the same time, you can imitate, for example, a valuable type of wood and create a unique interior.
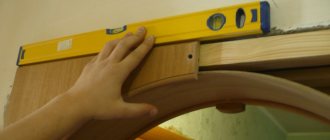
Installation methods and features
There is a hidden method using clips and an option with fastening through the baseboard itself. For planks with shaped stripes inside, there is a method that involves mounting them on guides. In all cases, the main task is to tightly connect the baseboard and the wall. In this sense, it is better to choose products with rubberized edges. Hardware is selected with large flat heads, especially for straight baseboards. Protruding accessories will simply spoil the decorative qualities of the material. Before installing the plinth, it doesn’t hurt to assemble the cables into one or more bundles, depending on the presence and structure of the internal cavities. The wires gathered together will pass more easily through the channel in the strip or the groove in the wall. You will need point fastenings, double-sided tape and film. To cut the baseboard, use a saw or a utility knife.
Parts of the plinth should extend into the additional elements by 2-3 mm.
Using clips
The method is based on the use of 2 types of fasteners: clips as separate plates and a long panel that matches the length of the baseboard. The long clamp will act as a cable channel. First, clips are attached to the wall, and then the extended panel is snapped onto them. After this, the plinth is installed. The technique is only suitable for smooth walls without distortion or roughness, otherwise the baseboard will then fly off the fastening. The work algorithm consists of five stages. First of all, markings are applied: points for installing clips are indicated. Using a laser level, draw a horizontal line through the marks. The clips themselves are installed in a straight line at the required points. If cables are to be laid, they are guided through the fastening elements and secured with double-sided tape or plastic ties. After this, the oblong panel and plinth are fixed.
Fastening through the baseboard using dowels/screws
This is a more universal method, and it is also suitable for uneven walls. The idea is to simply attach to the surface through holes. Moreover, if the shape of the plinth allows, then it will be possible to run cables over the connections and then hide them with a long plug. The beginning of the work looks like this: the plinth is applied to the wall, leveled and pressed. The plank is secured with masking tape to keep it stationary. Then the locations for the holes are determined. In this work, metal drills from 3 to 4 mm are used. Holes are made near the corners and evenly in the resulting gap. Maintain a step of approximately 35-40 cm, maximum 50. At this stage, they are sometimes limited to marks. The holes are selected for fasteners: for dowels, drills are chosen that are a millimeter wider than the fastener, and for self-tapping screws, 1-2 mm thinner. After this, additional elements are placed on the plinth and fasteners begin to be inserted.
Ideal hardware parameters:
- length - 25-40 mm;
- diameter - 4-5 mm.
Types of floor polyurethane skirting boards
Floor polyurethane skirting boards are divided into the following main types:
- Tall or, as it is also called, wide.
High skirting boards fit perfectly into any interior, but their use is especially appropriate with a ceiling height of 3 meters.
- Flexible (the second name is soft).
This type of floor plinths is used to frame radius columns, semicircular cavities, etc. This is where another name came from – radius plinth. With its help, you can create a contour with a radius of up to 25 cm, and more if you wet it a little with water.
- Self-adhesive - on the back surface of such a plinth there is an adhesive tape, similar to double-sided tape, which fixes the product quite tightly.
- Hidden - this type of skirting boards is located in line with the wall, it does not stick out at all, does not accumulate dust behind itself and looks great in any interior.
- Connelly - designed for more convenient installation of linoleum or other soft floor coverings on the wall when laying.
- Electrical or plinth with cable duct.
This plinth will easily accommodate numerous wires that are vital for your home, moreover, it will make them completely invisible to the eyes of others.
Main types: advantages and disadvantages
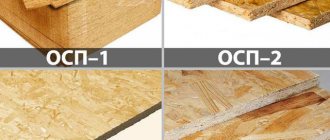
Depending on the place of use, there are floor, ceiling, wall and furniture skirting boards. Ceilings are sometimes made part of tension level structures. Among manufacturing materials, preference is given to wood, plastics, stone, ceramics and flexible options. Wooden ones are made from planed boards, cork, LDF, MDF and liquid wood. Plastic ones are made from duropolymer, polyurethane, polystyrene and polyvinyl chloride (PVC). Wood is a classic solution, but among all the options, MDF is mainly suitable, since the material is resistant to moisture, temperature contrasts and is relatively cheap. Plastic products, in turn, are resistant to various types of influences, as well as the formation of fungus and mold. Their weaknesses are their tendency to darken and lack of strength. The stone is distinguished by its reliability and decorative qualities. Like flexible products, stone options are rarely budget-friendly. Flexible ones, in turn, are used for rooms with complex shapes.
Before purchasing products for different surfaces and furniture, you should decide on the full color scheme.
Ceramic
Ceramic skirting boards are used in bathrooms and kitchens. Special borders are used to decorate plumbing fixtures and surfaces. Mixed materials with the addition of strengthening compounds have a minimum of weak points. Modified ceramics are made hard and durable. In other words, tensile strength is added to compressive strength. As a result, the bathroom “receives” an impact-resistant lining that is easy to clean and practically does not react to strong chemicals. The structure of ceramics copes with temperature fluctuations and high humidity, and does not deform from the inside or outside. They note high levels of hygiene and environmental friendliness. The material is easy to clean, does not absorb dirt and contains natural ingredients. There are practically no downsides, but you should remember that ordinary products often crack after impacts.
Types of ceramic skirting boards:
- angular;
- frieze for tiles;
- pencil.
For installation you will need:
- pliers;
- level;
- sealant;
- putty knife;
- liquid Nails.
Skirting board with cable channel
The product is a strip made of any material with a groove for placing cables and electrical wires. Most often, such skirting boards are made of PVC: hard or foam. Among modern models, the option with a cable channel has become the most common. Improved modifications with a removable part have appeared on sale: to facilitate finishing and routing of wires. The inside of the plinth is usually divided into 2 or 3 separate channels. The emergence of a new type of skirting boards solved several problems at once. Now you don’t need to trench the walls and attach wires to the finish. The positive qualities include high versatility. The peculiarity of the structure does not in any way interfere with the use of different materials. There are also fasteners for hidden installation of products with a cable channel on sale. The flexible options also have a cavity for wires.
Polyurethane
Polyurethane is the result of technological development. The products filling the market are valued for their pleasant appearance and environmental friendliness. Some modifications are able to maintain their qualities for more than 30 years. Despite its external similarity to some other materials, polyurethane has a high level of strength: scratches do not appear on the products. Clean the baseboards with light movements of a rag or sponge, with or without detergent. Polyurethane has the ability to bend, so the material is used in finishing rounded surfaces with sinuous or smooth lines. On top of everything else, it is easy to install. Buyers choose products from a variety of options of different colors, patterns, and textures. At the same time, polyurethane strips are inferior to polyethylene ones that are similar in structure: due to their high cost and heavy weight.
Plastic
Plastic products are being used more and more often, which at the same time reduces the percentage of wooden ones. Plastic skirting boards have already taken the first position in popularity. Prices for products are the most powerful argument, also taking into account the quality of the material and its modern appearance. Plastic skirting boards do not deform and are not “afraid” of unfavorable external factors: dryness, humidity, ultraviolet radiation, heat, cold, fungus. At the same time, aggressive chemical compounds affect the material more actively. The properties of plastic allow it to be mounted several times. The manufacturing technology itself is also considered a strength. Manufacturers usually produce profiled options for different needs. There is always a cavity in the plastic strip for cables and wires. Due to its short service life, the material still did not become the only option. Craftsmen also note low impact strength.
From MDF
MDF planks contain fine wood fractions, veneer or its imitation, urea resins and lignin. The reliability of the connection of wood chips is ensured by vacuum pressing. Buyers have access to a large selection of colors and shapes, options that imitate different materials. MDF can withstand the destructive effects of chemicals that harm plastic products and some types of wood. Skirting boards made from MDF sheets are processed and installed quickly and without complications, and after installation they do not require special care. The material retains its color even with regular exposure to sunlight. Negative factors have virtually no effect on the service life. At the same time, mechanical stress affects MDF skirting boards to a greater extent than wood, chipboard and similar materials. The overall strength rating is also not a strong point.
Metal
Popular materials:
- Aluminum.
- Brass.
- Stainless steel.
Metal products are produced for a variety of purposes. They are used in industrial facilities, non-residential premises, halls and shopping centers, in expensive interiors with urban accents. Metal skirting boards are sometimes decorated with lighting to create a harmonious combination of bright color and metallic texture. The metal coating is coated to make the product decorative. Thus, aluminum skirting boards are painted with powder enamel or anodizing. In turn, brass strips and fillets are not covered with additional layers, including protective ones. At the same time, some finishing materials contain a surface film to imitate the shades and texture of wood. Most metal products can withstand chemical and physical-mechanical influences. Buyers have access to a wide range of sizes. All advantages are counterbalanced by the complexity of processing, slight variability in appearance, and price.
Veneered or veneered
Veneered (veneered) plinth is made of two components: a block and a veneer covering on the front side. Veneer is formed from a thin section of expensive wood. Conifers are often chosen for the base: pine and spruce. The front surface is treated with compounds to improve decorative properties. Large skirting boards are made from hardwood: cherry, beech, oak or ash. The key advantage of all veneered options is price. The buyer receives savings on natural material with an attractive appearance. The resistance to fading of veneered skirting boards is no lower than that of ordinary wooden ones. At the same time, the coating will be vulnerable to impact and compression. Like other wooden products, veneered ones are mounted with a lot of manipulation, and only on fasteners. Glue and sealants will not work. Hardware is not manufactured for a specific product.
Wood
Wood products in this sense have always occupied the first positions, because baseboards are a kind of addition to furniture. They are matched to the floor, walls or furniture elements based on color and texture. The planks are screwed with ordinary self-tapping screws. Wood is completely safe for human health - it is a reliable and environmentally friendly material. Despite the relative vulnerability of the top layer, wood skirting boards are generally durable and resistant to mechanical stress. With high-quality processing and proper care, products last for decades and remain relevant. Manufacturers of wooden skirting boards often adhere to high pricing policies, and this is the first on the list of disadvantages. Ordinary wood is largely exposed to external factors such as temperature, humidity, and ultraviolet radiation. Decorative options are worthy competition for stone skirting boards.
Aluminum
This type of metal is popular due to its light weight combined with strength. Aluminum skirting boards last for decades without visible changes. The metal has pronounced anti-corrosion properties and resistance to external influences of any nature. Wear resistance promotes the use of aluminum in hallways and corridors. Among all moisture-resistant materials, it is most suitable for bathrooms and shower rooms, unheated technical rooms. The natural color of aluminum fillets is combined with modern styles and fashionable trends in design. The use of such skirting boards is limited by their high cost. Resistance to the external environment does not remove the ban on the use of aggressive cleaning agents and abrasives. Low or average quality aluminum may darken. For this case, special detergents are provided.
Stainless steel
Stainless steel skirting boards have a polished or satin surface. The first subtype has mirror properties, and is used in a high-tech design interior - with a lot of glass and reflective elements. Satin versions are obtained after fine abrasive grinding of the profile, as a result of which the reflective qualities are enhanced. The products usually come with their own molded mounting hardware. At the same time, sealant or glue is used during installation. Stainless steel baseboards usually have indentations to disguise unevenness. In addition to being resistant to corrosion, stainless steel easily withstands impacts and pressure and does not scratch. Stainless steel strips are easy to install, and their service life is almost unlimited. At the same time, among all types of skirting boards they are the most expensive after stone options.
Possible sizes of floor wide skirting boards made of polyurethane
Wide floor skirting boards, like narrow ones, are mainly produced in lengths of 2.5 meters; this was not just invented. Thanks to this length, they can be transported much easier than, for example, longer ones.
The height of wide skirting boards can differ radically, i.e. Skirting boards from 7 centimeters up to 15 are considered wide. You can make them even wider to order.
Of course, skirting boards wider than 15 centimeters are installed in very large rooms; they will not fit harmoniously into a standard room.
Depending on the height of the ceiling in the room, you should select floor skirting boards as follows:
- More than three meters of ceilings - baseboards of 10 centimeters and above.
- Exactly 2.5 meters ceiling - baseboards 7-8 centimeters.
- Ceiling height from 2.5 to 3 meters - wide plinth 9-10 centimeters.
Using these tips, you can easily create a complete and harmonious look in any room of any size. Just when going to the store, don’t forget about the clips and plugs, as well as the rotating and connecting elements for the outer/inner corners.
Size range
The range of parts from many manufacturers contains almost the same sizes. Therefore, if a non-standard option is required, it is advisable to manufacture to order, which is not acceptable for all materials.
Length
The length of the plinth installed on the floor covering may vary depending on the material of manufacture. There is a standard option, which is 200 cm or 250 cm.
- The wooden planks are 200 cm long. Larger sizes may cause twisting, so carefully inspect the parts.
- Elements made of PVC and polyurethane come in 2 m and 2.5 m, which makes their use most convenient.
- Parts 3 m long are less common. They are suitable for large rooms because they create the least number of joints.
All skirting boards have a standard length of 2 - 2.5 m, the only exception is thin polyurethane, which can be sold in rolls
On a note! It is advisable to check the availability of products in hardware stores in order to correctly calculate the required quantity.
Width
The width of the floor plinth can be different: from 3 cm to 15 and even 25 cm. Recommendations to make the right choice:
- Thin elements are suitable for small rooms. When matching them to the color of the walls, they will create a visual increase in space.
- Wide parts from 7–8 cm are ideal for spacious rooms with high ceilings.
- For other cases, it is better to use strips with a width of 5 to 7 cm.
Correctly selected plinth height allows you to achieve the best decorative effect.
Based on the wealth of types and sizes, the plinth must be chosen with special care, because it can miraculously transform the entire interior.
How to choose a plinth for the floor
If you decide to buy a polyurethane baseboard for the floor, then you must take the choice of this finishing material very seriously. You should take into account the color of the flooring, the texture and shades in which the walls and furniture are decorated. The size of the product must be selected based on the colors in which the walls are painted.
Choosing the color of the baseboard
When choosing a plinth with a finished decorative surface, the choice of its color is of great importance. It should match the interior. In this case, the shade must correspond to various decorative elements:
- Wall.
- Doors.
- Floor covering.
Most often, they choose the option of combining the color of the baseboard with the color of the door. It looks the most versatile. However, achieving a complete match in tone is extremely difficult, since doors and baseboards are produced by different manufacturers. The easiest way to combine flooring with baseboards. These materials are produced by the same manufacturer specifically in the same color.
The most common colors of floor skirting boards
Wide polyurethane floor skirting boards are most often available in the following colors and tones:
- Transparent - there are both fully and partially transparent options with built-in lighting; such skirting boards are also called “LED strip”.
- White are the most common baseboards. They add gloss and chic to any, even the most fastidious and unusual interior.
- Gray is an excellent option for a home made in the English style. At the same time elegant and restrained in a European way.
- Black ones are a rare type of floor skirting boards, but if you see them somewhere, you will undoubtedly want to reproduce what you saw at home.
- For painting - this type is suitable for those people whose interior is distinguished by unusual colors, which cannot be matched with the help of ordinary skirting boards sold on the market.
It's time to figure out the installation of floor skirting boards. Read below to see how this is done.
Skirting dimensions
The length of a plinth made of any material is almost always 2.5 m. Special connecting elements are used to join the planks. There are especially many of them for the installation of plastic skirting boards, when working with which it is impossible to do without connecting elements.
Skirting boards differ in width and thickness. The narrowest ones are usually PVC products, and they stick out strongly from the wall. This can be a significant drawback, for example, when installing a sliding door. In this case, the protruding plinth will be on the trajectory of its movement.
The actual width, also known as the height of the plinth, is usually 6-30 cm. Most often, products with a width of 10-12 cm are used. Higher ones do not always look appropriate. The thickness of the plinth is a fairly important selection parameter, especially if you need to close a large gap between the floor covering and the wall. For example, for laminate it is recommended to make a gap of at least 10 mm. Very thin skirting boards will not hide it.
How to calculate the required plinth footage
You can find out the exact amount of materials after doing your own calculations or using specialized calculators. The initial data indicates the total perimeter, that is, the total length of the walls of all rooms (L). The width of all openings (B) is added to them: the size of the interior ones is multiplied by 2, the size of the entrance ones is left unchanged. As a result, the required length of the plinth is obtained. To find out the exact number of individual parts, you will need to enter all of the above indicators. As a result, the calculator will give the result with the number of plinths in pieces, and along with it the remainder in meters. This is true for floor skirting boards. The length of the upper planks is calculated by adding the perimeters of all rooms at ceiling level, rounding to a larger value and adding an additional 1 meter for each room. The number of products is determined by dividing the increased indicator by the length of one plinth.
The advantages of polyurethane skirting boards
The biggest advantage of plastic profiles is their stylistic diversity. Thus, you can easily choose suitable options for various interiors. This can largely be explained by excellent technical characteristics, including:
- resistance to various factors and long service life. When handled with care, this finishing material can maintain an attractive appearance for many years. At the same time, it does not change its characteristics under moisture, and also does not absorb odors and is easy to clean. Polyurethane floor plinth can be freely installed in the bathroom, since it fully retains its properties even at high humidity;
- simplicity and ease of installation. Due to the excellent plastic characteristics of the material, its installation does not require much effort and can be done independently.
Fitting and cutting these products is very easy and does not require much time. In addition, this procedure does not require the use of special tools. All manipulations are easily carried out using a regular knife. This finishing material can be painted using conventional paint: water-based, acrylic, etc.;
A large number of positive qualities indicate that this material is in particular demand among buyers.
Characteristics
Flexible polyurethane skirting boards are produced by Orac Decor as part of the Orac Axxent and Fundamentals collections. The profile elements have a standard length of 200 cm with a variable height according to the article. The permissible bending radius depends on the model. So, for SX105F it is 30 cm, for SX165F - 40 cm. The front surface of the skirting boards is smooth, primed and painted white. On the back side there are channels for hidden wiring and grooves for quick application of assembly adhesive.
Durability
Even after several decades of use, polyurethane skirting boards will retain their original appearance, because such elements are not exposed to the negative effects of fungi, mold and high humidity. Skirting boards can be installed in a bathroom or shower room without fear that the appearance of the products may deteriorate . In addition, polyurethane does not absorb various odors, like, for example, natural wood, which is why it is often used for kitchen finishing.
Polyurethane plinth retains its original appearance for 20-30 years
Easy installation
To install polyurethane skirting boards, you do not need any special skills or tools. Anyone who has never encountered repair work before will be able to cope with this task. Even installation of flexible products will not take much time.
Possibility of painting the product
If desired, polyurethane skirting boards can be painted in any color so that the product harmonizes with the interior of the room. This greatly simplifies the process of choosing a plinth, because in the end you can simply repaint it.
Wide variety of shapes
Polyurethane can take on different shapes and change shape, so if you need non-standard skirting boards, then this material is best suited.
Flexible type of skirting boards
Note! Despite the large number of advantages, polyurethane skirting boards have one significant drawback - the high cost of the product. Therefore, if your budget for finishing work is limited, then you need to look for budget models.
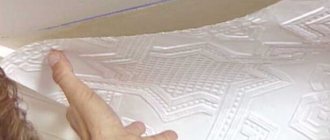
General information about ceiling skirting boards
The joints between walls and ceilings also require decorative covering. For these purposes, various types of ceiling plinths and fillets are used. Let's see what kind of ceiling plinths there are:
- profile made of polyvinyl chloride (PVC) is a budget option for a simple interior;
- a polyurethane profile is a durable and flexible coating that is resistant to moisture and temperature changes. Is a reliable decorative element;
- profile made of polystyrene and expanded polystyrene (foam) - has a matte and smooth surface, this material embodies the most sophisticated design fantasies. However, it is very fragile;
- natural wood profile is the elite of decorative skirting boards. Despite their high cost, they are in great consumer demand;
- A plaster profile is an elegant decoration for true art connoisseurs. It fits very well into any interior.
Installation methods
The baseboards can be fastened with glue, with special latches, or simply through self-tapping screws or nails. Typically, scarves require installation of an overhead type. That is, they are simply applied to the wall and secured.
Hidden-mounted skirting boards are a relatively new phenomenon. They serve a decorative function and do not hide the technological gap between the floor covering and the wall, so it must fit closely to it. A niche is prepared in the wall for such a plinth, and it is mounted into it. As a result, the plank is flush with the wall.
How to attach wide polyurethane floor skirting boards?
Installation of polyurethane floor skirting boards most often comes down to gluing them to the surface of the walls adjacent to the floor. Installation in “legal” places is easy to do with your own hands. Follow the step-by-step instructions and you will succeed:
- We measure and cut the necessary pieces with or without a miter box.
- We buy glue for polyurethane skirting boards, preferably white. White is more convenient because during installation its residues will come out and you can use it to fill the remaining cracks quite unnoticeably.
- We evenly distribute the glue on the back surface of the plinth, carefully covering all the grooves and special recesses, as well as the ends.
- We install the baseboards in their places, pressing them tightly. For a more secure fixation, you can use masking tape. After the glue has completely dried, simply remove it.
- We coat small cracks with white silicone sealant and, if desired, paint the polyurethane baseboard.
Next, we suggest watching a video that reveals some of the secrets of correctly installing polyurethane floor skirting boards. Enjoy watching! That's all - now you know how to glue wide baseboards yourself. Next, we will tell you how to trim floor skirting boards correctly.
Wide polyurethane baseboards on the floor in the interiors of various rooms
Wide floor skirting boards are used in completely different rooms of the home. Craftsmen even manage to use them to frame kitchen countertops and suspended ceilings. Yes, yes, you heard right - they “manage.”
But today we are interested in options for using floor plinths in the interior, photos of installation examples of which in various rooms are given below:
- For bathtubs, polyurethane baseboards cope well with high humidity in the bathroom and create an aesthetic appearance.
- The kitchen - this room, like the bathroom, is also characterized by increased temperature conditions and high traffic. Polyurethane skirting boards can withstand all these “illnesses” perfectly and look great for many years.
- Corridor/hallway - most often, wide baseboards are used in hallways with a large area, because... in a small corridor they will look out of place.
- Living room - wide skirting boards in white or gray are perfect for this room.
- Hall – the interior of a hall of any size definitely cannot be spoiled with the help of wide baseboards. You can clearly see this for yourself.
- The bedroom is everyone’s favorite relaxation room, framed by a wide plinth; it looks rich and tempting.
- Children's room - a wide plinth in a children's room can easily become a canvas for drawing, of course, parents will not like this very much, but what can't be tolerated for the sake of your favorite tomboys.
Calculation of ceiling and floor skirting boards
Skirting for floor
Behind the apparent simplicity lies an inevitable error in the calculation when they forget to include in the calculation places that are invisible at first glance, such as:
- doorways;
- arches;
- niches;
- other hard-to-reach places.
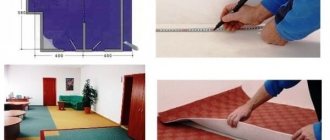
Using examples, we will look at how the calculation should be performed, and using them as a guide, you can easily make the necessary calculations yourself.
1 way. To quickly calculate, we will need a calculator. First, let's find the perimeter of the room. We measure the length of the walls and add up the indicators. One plinth element has its own standard length, depending on the model. Having chosen the profile model and found out the length, we proceed to the calculation. For example, if a room has a perimeter of 21 meters and a baseboard length of 2.5 meters, then 21 should be divided by 2.5. In our case, it will be 8.4 - this is how many elements will be needed to finish the entire perimeter. The fractional number is rounded up, that is, up to 9 planks of 2.5 meters each.
Method 2. It also happens that the profile is sold in the form of a long strip, and it is possible to cut the plinth right in the store into pieces of the required length. But it’s still worth cutting the material with a small margin (about 5 cm), so that when installing the profile on site, it won’t turn out that the plinth is not long enough.
Flexible plinth requires special attention during transportation. It may become easily deformed if shipped at temperatures higher than recommended. And wooden and veneered skirting boards can easily be scratched if delivered carelessly. Polyurethane ones need to be protected from chipping. However, plastic panels also require careful transportation, although any of the blocks can be replaced without any problems.
Ceiling plinth
The molding for the ceiling should cover the lower part of the wall well in order to hide possible stains; this is important for all types of baseboards. The advice is especially relevant if the walls are painted with light-colored paint.
You need to choose the material depending on the area of the room where the fillets will be attached. It is important to remember that the higher the ceiling and the larger the room, the wider the cornices should be. A narrow baguette can look poor and be completely lost against the background of the interior of a large room.
There are indicators developed by the experience of specialists that will help determine the parameters of the ceiling plinth.
- If the ceiling height is up to 2.5 meters, and the room area is from 15 to 23 m2, then the fillet width is recommended up to 9 cm.
- If the ceiling height is 2.7 meters and the area is from 15 to 23 m2, then the width of the plinth can vary from 9 to 14 cm. A room with an area of 23 m2 requires finishing with a profile with a width of 15 to 21 cm.
- The ceiling height is from 3 m and higher, and the area is from 15 to 23 m2, then the width of the baguette is allowed from 15 to 21 cm. Accordingly, the larger the area of the room, the wider and more complex the decorative baguette can be.
Just as when calculating the baseboard for the floor, the number of baguette strips is determined if the perimeter of the room is divided by the length of the strip. If the result is a fractional number, it should be rounded up. Typically the length of the ceiling plinth is 2 m.
Installation is quite simple, you just need to be careful and attentive at the stage of cutting the material, and also make sure that the baguette does not accidentally break. Then additional difficulties arise in eliminating the resulting defects. Therefore, experts recommend purchasing an extra panel in reserve. Most models of ceiling plinths are inexpensive, so purchasing an extra part will not burden your budget.
When do you need a plinth on the stairs?
From an aesthetic point of view, the plinth for steps is of paramount importance, since it not only helps to visually separate horizontal and vertical planes. It also simply covers the interface between the treads and the wall, and protects the latter from dirt that gets on them during wet cleaning.
All stairs adjacent to the walls need framing - regardless of the material of manufacture. True, design matters.
Note: There is no need for a plinth only when the steps of a metal or wooden staircase rest on a bowstring, which in itself is quite decorative. But the connections are not visible, since the step is attached to a secret groove in the bowstring, and everything looks neat from the outside. Look at the photo and see for yourself.
If there is no structural string, then to decorate the joint you can make a false pole, cut out the abutment strips from smooth bars or floor plinths, or use a ready-made wall plinth for stairs from the manufacturer.
Moldings
Molded products are used during finishing for external and internal work. The moldings can be coated with varnish, drying oil or paint.
The whole range!
| Wooden casing | |||||
| Name of product | Profile | Size | Price | Photo | Unit change |
| Extra spliced wooden casing. needles | oval | 70x2200 mm | 150 rub. | PC. | |
| 90x2200 mm | 180 rub. | ||||
| flat | 40x2200 mm | 108 rub. | |||
| 50x2200 mm | 119 rub. | ||||
| 60x2200 mm | 143 rub. | ||||
| 60x3000 mm | 195 rub. | ||||
| 70x2200 mm | 150 rub. | ||||
| 70x3000 mm | 204 rub. | ||||
| 80x2200 mm | 163 rub. | ||||
| 80x3000 mm | 222 rub. | ||||
| 90x2200 mm | 180 rub. | ||||
| 90x3000 mm | 246 rub. | ||||
| 100x2200 mm | 198 rub. | ||||
| 100x3000 mm | 270 rub. | ||||
| 120x2200 mm | 271 rub. | ||||
| 120x3000 mm | 369 rub. | ||||
| 140x2200 mm | 359 rub. | ||||
| figured | 70x2200 mm | 158 rub. | |||
| 75×2200 mm | 172 rub. | ||||
| 80x2200 mm | 176 rub. | ||||
| 90x2200 mm | 198 rub. | ||||
| 100x2200 mm | 218 rub. | ||||
| 120x2200 mm | 295 rub. | ||||
| Wooden layout | |||||
| Name of product | Material | Size | Price | Photo | Unit change |
| Wooden layout Extra spliced. flat | needles | 5x20x3000 mm | 69 rub. | PC. | |
| 5x30x2500 mm | 73 rub. | ||||
| 5x30x3000 mm | 87 rub. | ||||
| 5x40x1000 mm PROMOTION | 31 rub. | ||||
| 5x40x2500 mm | 78 rub. | ||||
| 5x50x3000 mm | 93 rub. | ||||
| Wooden layout Extra spliced. oval | needles | 5x30x2500 mm | 73 rub. | ||
| 5x40x2500 mm | 78 rub. | ||||
| Wooden layout Extra spliced. curly | needles | 5x20x3000 mm | 69 rub. | PC. | |
| 5x30x3000 mm | 87 rub. | ||||
| 5x40x2500 mm | 78 rub. | ||||
| 5x40x3000 mm | 93 rub. | ||||
| Wooden layout 1 Solid grade. flat | needles | 5x50x3000 mm | 51 rub. | PC. | |
| Wooden plinth | |||||
| Name of product | Material | Size | Price | Photo | Unit change |
| The Extra fillet is spliced. | needles | 20x3000 mm | 72 rub. | PC. | |
| 25x3000 mm | 87 rub. | ||||
| 30x3000 mm | 105 rub. | ||||
| 43×3000 mm | 138 rub. | ||||
| Europlinth-boot Extra spliced. | needles | 50x2200 mm | 130 rub. | PC. | |
| 50x3000 mm | 177 rub. | ||||
| 60x3000 mm | 195 rub. | ||||
| 70x3000 mm | 225 rub. | ||||
| 80x2200 mm | 187 rub. | ||||
| Wooden plinth Extra spliced. | needles | 25x2500 mm | 85 rub. | PC. | |
| 25x3000 mm | 102 rub. | ||||
| 30x3000 mm | 123 rub. | ||||
| 35x2500 mm | 103 rub. | ||||
| 35x3000 mm | 123 rub. | PC. | |||
| 45x2500 mm | 113 rub. | ||||
| 45x3000 mm | 135 rub. | PC. | |||
| 55x3000 mm | 171 rub. | PC. | |||
| Wooden plinth Extra solid. | needles | 35x2700 mm | 73 rub. | PC. | |
| 50x2500 mm | 83 rub. | PC. | |||
| Wooden plinth 1 Grade solid. | needles | 35x3000 mm | 60 rub. | PC. | |
| 45x3000 mm | 69 rub. | ||||
| 55x3000 mm | 81 rub. | ||||
| Wooden corner | |||||
| Name of product | Material | Size | Price | Photo | Unit change |
| Wooden corner extra spliced. | needles | 20x20x3000 mm | 102 rub. | PC. | |
| 30x30x3000 mm | 123 rub. | ||||
| 40x40x3000 mm | 138 rub. | ||||
| 50x50x3000 mm | 156 rub. | ||||
| 50x70x2500 mm | 130 rub. | ||||
| 60x60x3000 mm | 258 rub. | ||||
| 70x70x3000 mm | 378 rub. | ||||
| 80x80x3000 mm | 498 rub. | ||||
| Wooden bead | |||||
| Name of product | Material | Size | Price | Photo | Unit change |
| Extra spliced wooden glazing bead. window | needles | 10x10x1000 mm | 10 rub. | PC. | |
| 10x10x1200 mm | 12 rub. | ||||
| 10x10x2200 mm | 22 rub. | ||||
| 10x10x2300 mm | 23 rub. | ||||
| 10x10x2500 mm | 25 rub. | ||||
| 10x10x2700 mm | 27 rub. | ||||
| 10x10x2900 mm | 29 rub. | ||||
| 10x10x3000 mm | 30 rub. | ||||
| 10x15x2500 mm | 43 rub. | ||||
| 10x15x2700 mm | 46 rub. | ||||
| 10x15x3000 mm | 51 rub. | ||||
| Wooden bead extra spliced. door | needles | 15x15x3000 mm | 57 rub. | ||
| 15x20x2000 mm | 40 rub. | ||||
| 15x20x3000 mm | 60 rub. | ||||
| 20x20x2000 mm | 54 rub. | ||||
| 20x20x2500 mm | 68 rub. | ||||
| 20x20x3000 mm | 81 rub. | ||||
You can find out about the availability of goods in stock by calling:
+7, +7,
Call and pick up at the warehouse!
Order in the online store:
Order in the online store
Bar, board, lath - see the “Planed Products” tab
Why do you need a floor plinth and why is plastic more profitable?
First of all, skirting boards hold the floor covering at specified parameters, preventing them from deforming under external influences. They also give the room a complete and neat look, hiding all the imperfections in the geometry of the room, as well as technical details (wiring of various communications).
The characteristics of plastic floor skirting boards are:
- smooth surface that is not afraid of exposure to detergents;
- ease of installation and durability in operation;
- no additional processing before installation;
- resistance to rotting and corrosion;
- no negative reaction to temperature changes and humidity;
- the presence of cable channels for wires;
- wide color palette;
- the presence of rubber edgings, which are simply irreplaceable for tiled floors, as they allow you to hide unevenness and prevent condensation from settling on the walls.
Plastic skirting boards are much more durable than natural materials, and modern models are presented in such a variety that a person ignorant of design will not even be able to distinguish what kind of coating he sees.
In appearance, the plinth can completely imitate natural wood or tiles, and at the same time remain impact-resistant plastic. It is also important that such an interior element will cost much less, will be easy to use and will last much longer than natural materials.
PVC skirting boards are made from polyvinylchoride using extrusion. The result is a flexible, but resistant to any type of external influence strip.
We recommend other articles:
How to choose a plinth
In a hardware store, PVC, wooden and other skirting boards are presented in the form of two-meter strips. After calculations, the cornice can be cut to size directly in the store according to the calculated dimensions. This method will allow you to get by with a minimum of waste. But in order to ensure that errors in dimensions are avoided, it is recommended to cut each plank 50-70 mm longer. The spare length will come in handy when cutting skirting boards in place. Before purchasing and cutting baguettes, discuss all the details of installation with the consultants of a store or online resource, since skirting boards can be sold in different lengths, widths, thicknesses, from different materials and with different patterns and reliefs.
Source
Selection tips
Tips for choosing floor and ceiling plinths:
- First of all, you need to calculate the perimeter of the walls of the room, so that when you go to the store and select the model you like, you can accurately calculate the required number of planks.
- The finishing profile must be in harmony with the structure and color of the floor covering; it can be the same color or differ by one tone.
- For a small room, a floor and ceiling profile with a thickness of less than 50 mm is suitable.
- To make the room seem wider, the profile must match the color of the finishing floor covering.
- To make the room seem taller, we select moldings to match the color of the walls, but if the walls are not plain, then choose a strip to match the color of the floor.
- To install furniture close to the walls, we choose a profile of minimum thickness, but keep in mind that several cables will not fit into a narrow channel.
General recommendations
The choice of products for decorating the floor or ceiling should be made at the renovation planning stage.
Our improvised instructions will help you with this, which contains several universal tips:
- The plinth itself is rarely an independent decorative detail - the exception here would be plaster ceiling molding or carved wood panels. Therefore, it must be selected in such a way that it does not catch the eye, but at the same time harmonizes with the finish and emphasizes it as favorably as possible.
Photos of thin floor panels
- Products whose height is significantly greater than their width are usually installed on the floor. This is due to the fact that the protruding base of the plinth takes up useful space on the floor. In addition, very often such finishing makes it difficult to install furniture close to the walls.
READ MORE: Procedure for laying clinker tiles - video and photo guide
Note! If there is no need to lay hidden wiring, then you can use either a mini plinth 20x12 5 mm, or a flat edging profile 16 mm thick (mentioned above).
- Unlike floor models, ceiling models are usually made symmetrical (60 by 60 mm plinths and panels of a similar configuration with a different size are widely used in decoration).
Typical ceiling fillet profile
And yet, it is worth choosing the dimensions and configuration of the panels for finishing in accordance with the characteristics of the room in which it will be installed.
Here experts recommend following these rules:
- In low rooms with a small area, it is worth installing low baseboards both along the floor and at the top of the wall. Large panels will visually “steal” part of the space, which is extremely undesirable in a cramped room.
This solution is only suitable for rooms with a high ceiling.
Advice! Hidden wiring in cable channels will have to be abandoned. In such a situation, it is better to make grooves in advance and lay communications through the thickness of the wall.
- The higher the ceiling and the larger the area, the larger the finishing elements should be. At the same time, a plinth 100 mm high is far from the limit: sometimes panels of 250-300 mm are installed in both the lower and upper parts of the wall.
- Tall flat panels have other advantages: by matching the product to the color of the trim, we can visually raise the ceiling, and if the piece matches the color of the floor, the tall room will become more proportional.
Advice! In such situations, a combination of baseboard and wall border looks great. A flat panel installed at a short distance from the molding looks very advantageous and is a visual continuation of the finish.
Combination of fillet with wide wall border
- Another advantage of a large, but at the same time symmetrical plinth is that it well masks all the unevenness of the wall. So if the joint line between the walls and the ceiling in your apartment is far from ideal, the best way to hide this defect would be to install a ceiling fillet with a large height and a horizontal part of at least 50 - 70 mm.
General recommendations
Types of plastic skirting boards
Plastic floor plinth can be of the following varieties:
- ordinary;
- flexible;
- with cable channel;
- with a flexible (rubberized) edge;
- for painting.
Let's take a closer look at each variety.
Flexible PVC skirting board
If it is necessary to design columns, curved walls, roundings, a problem arises - it is problematic to use ordinary rigid planks - you have to cut them into small segments and join them using connecting elements. It takes a lot of time, the money is expensive, and the look is far from ideal, since it still turns out to be a broken line, not a smooth curve.
This is how rounded walls are decorated with standard plinths and plastics
In such cases, it is better to use a flexible baseboard. The term “flexible” is relative. In its normal state it is rigid, but bends well only when the temperature rises. Before installation on curved surfaces, it is heated with a construction hairdryer to 60-70°C, bent into the shape required and secured.
Flexible plastic floor plinth can be bent with a small radiusEasy to design a columnSmall width, color can be chosen
After cooling, it will acquire its original rigidity. They can easily decorate a column, for example, not to mention a smooth curve.
With soft edge
Plastic floor plinth is the most elastic of these products. If necessary, it can be pulled so that it fits even against an uneven wall. But it is possible to achieve complete adherence to an uneven wall without the slightest cracks only if its upper edge is made elastic - rubber.
The rubberized edge makes it possible to avoid even the slightest cracks
The elastic edge has the same color, although it is made of plastic material. Due to its high elasticity, it bends around even the slightest irregularities, leaving no cracks or gaps.
With cable channel
In a modern home there is more and more equipment and wires going to it. One of the most convenient and cheapest ways to conceal cables throughout an apartment or house is to install a plastic floor plinth with a cable duct.
A cable channel is a specially formed recess/cavity along the entire length of the baseboard. Several wires are laid in this recess - television, telephone, computer cables. There are two types:
- With a molded recess in the body of the baseboard itself and a removable decorative strip. First, the plinth is installed, then the cables are laid in the recess, and then the strip is closed. This is a plastic floor plinth with a molded recess for cable routing.
- It consists of two parts - a plastic/metal mounting strip, which is a cable channel, and a decorative plastic cover. The bar has molded cavities for laying the cable. It is mounted on the wall, the cable is laid in it, after which the plastic part - actually, the baseboard - snaps onto this strip.
This plinth with cable channels consists of two parts
The number of cables to be laid depends on the size of the cavities in them. There is more space in models of the second type - with a separately mounted cable channel. But the capabilities of the first type can be expanded by placing wires in the cavities above and below the molded channel. The difficulty is that access to them will be difficult - they are located under the baseboard. To get to them, you will have to dismantle it. Therefore, it is advisable to lay wires here that rarely require maintenance - television, Internet, etc.
For painting
There is a plastic floor plinth made of foamed PVC. Due to the use of porous material, the surface can be painted. A good option if you need a non-standard color scheme. After all, the range of colors is still limited, but this way you can choose the desired shade.
Non-standard solution - plastic floor plinth made of foamed PVC for painting
History of skirting boards
No one knows exactly where this decorative element came from, but what is certain is that it was a very long time ago (thousands of years ago).
Previously, they were used to prevent cold air from entering the house, and even then many tried to decorate these boards by cutting out patterns. Around the 16th century, when people acquired special machines, they were able to reach a new level of production and began making skirting boards from a variety of wood species. At the beginning of the 18th century in France, plinth became a luxury item. It was made from ivory, tortoiseshell, copper and other exotic materials, but these are all relics of the past and now people began to use more modest materials.
Choosing the length of the skirting board
The length of the floor plinth is a universal value. During the installation process, you will need to cut the elements and adjust them to the dimensions of the apartment. To find the right number of planks, do a little calculation:
- Measure the length of all the walls in the room;
- Add up the results;
- Measure the length of door and arch openings;
- Subtract the second value from the first;
- Divide the final figure by the length of 1 plinth and find their total number. Round the result up.
You can always use an online calculator or take measurements and provide them to the seller. He will determine the required amount himself. If you want to cover large areas without joints, choose the maximum possible length of the planks or ask to cut off areas of arbitrary size.
Installation components
Before starting work, you need to take care of purchasing additional elements for installation: internal and external corners, side plugs (right and left are supplied in pairs), connecting elements for joining two strips of the product. To do this, you need to calculate the number of internal and external corners in the room, as well as the number of necessary connecting elements (this is not difficult to do if you know the standard length of the product and the length of each wall). You will need plugs in places where the plinth joins doors or elements that will interfere with installation. It is better to buy all these elements with a small margin.
To install you will need the following tool:
- Drill.
- Screwdriver (or screwdriver).
- Roulette.
- Pencil.
- Construction knife or hacksaw for metal.
Advice. When cutting a plastic product with a cable channel, cut off the main part and the decorative panel separately.
For any installation method, you must first check the color of each baseboard strip. Even within the same package, the shade may vary. Planks of a darker shade are installed directly against the light, so the difference between the planks will be almost invisible.
Choosing the width of the plinth
The minimum width of the baseboard for the floor is one and a half centimeters. This is exactly the gap that needs to be created between the linoleum/laminate/parquet and the walls to compensate for the expansion of the materials. Otherwise, the already known rule applies - the higher the walls (ceiling), the larger the width of the plinth. And here it is also necessary to take into account the area of the room, using planks in the color of the floor or ceiling.
Remember also that the more floor space the elements occupy, the less floor space remains after installing the furniture (a gap remains), plus such an element made of wood or other hard materials is not suitable for fixing to uneven walls.
Table No. 1. General dimensions of floor plinths (from different materials)
Length (m)
Height (cm)
Width(cm)
2-6 (up to 50 m – flexible skirting boards, in rolls)
1.9-23
1.5-2.5
How to attach a wooden baseboard to studs
Installation on parquet studs (small nails) is used to fix solid wood varieties. The small head of the fastener allows for careful installation, leaving minimal holes in the panel.
Installation of wooden skirting boards using this method is carried out using a pneumatic gun. First, the panels are prepared using the method described above: sawn at an angle.
After this, the planks are laid in place and secured with pins. If the caps are noticeable, push them deeper using a hammer. Cover the holes from the caps with putty.
Colors of baseboards with cable duct.
Types of skirting boards
There is essentially no point in arguing about the color ranges in which the manufacturer produces its skirting boards with cable duct!
It’s just that the manufacturer produces them in the colors in which linoleum and parquet manufacturers produce their products! He seems to adapt to them!
The main color line, the one in which it is most often taken, is “Cherry” or “Oak board” (oak with a plank slope).
Well, there are 16 main, most common colors of baseboards with cable duct:
- Beech;
- Oak;
- Ash;
- Cherry;
- Red tree;
- Maple;
- Nut;
- Alder;
- Mahogany;
- Rustic;
- Pine;
- Mocha;
- Rosso;
- White;
- Black;
- Marble;
As you can see, most of the colors of the skirting boards imitate the shades of trees, but the manufacturer also did not miss the standard colors, as well as the color in the rhythm of marble. In general, one thing is clear to me personally: - You can choose any color of skirting board with a cable channel to match your finish. Moreover, in addition to the primary colors, there are also additional shades to them. I will show you all this in the photo below!
Colors of baseboards with cable duct
DIY installation of plastic skirting boards
As mentioned above, plastic skirting boards are quite easy to install yourself, and this can be done in several ways.
Tip: Before installing a plastic floor plinth, you should calculate the required amount of material. The perimeter of the room minus the doorways is measured with a tape measure, the resulting number is divided by the length of one plank and rounded up. It’s also worth adding 10% for trimming and don’t forget about plugs and connectors.
Method 1 – Using screws/self-tapping screws
This method is best suited for fastening products with a cable channel, since the caps of the fasteners will be hidden, and the connection itself will be reliable and will not become loose if access to the wires is necessary.
How to nail a plastic baseboard with self-tapping screws - sequence of actions. Tip: It is better to cut the baseboard with a hacksaw for metal, using a miter box. Before this, the channel cable strip must be removed and cut separately.
Installation should begin from the corner of the longest wall. The plinth with the cable channel plug removed should be placed close to the wall with a distance from the corner equal to the width of the plinth. After that, using a hammer drill with a drill of the required size, holes are drilled in the wall through the baseboard every 30 cm.
Tip: To prevent the plastic from cracking, you can first pierce it in the right places with an awl. If self-tapping screws are used, dowels are inserted into the holes
Then you should remove the bar, clean the mounted surfaces from dust and hammer plastic plugs into the drilled holes.
Sequence of fastening plastic skirting boards
After that, you need to put the plinth back on the wall, putting a plug-connector on one edge, and fasten it with screws or self-tapping screws. Repeat this action in the same way for each strip, after which you can put the cable channel cover back.
Necessary indentations during installation Tip: If the length of the plank is less than the length of the wall, then when installing the plinth at the junction with the next one, you must put on a plastic connecting element.
Let's see how to nail plastic skirting boards (video) with your own hands correctly:
https://youtube.com/watch?v=57_FprgPPjM%3F
Method 2 – On the mounting plate
PVC skirting board with hidden fastening system
Mounting on a mounting strip is suitable for wide products, including those with a hidden cable channel - in this case, the fasteners are not visible from the outside, and to access the wiring it is enough to remove the upper decorative part of the frame.
The plank should be attached to the wall in the place of intended installation and marks with a pencil should be made through the holes in it for installing screws.
How to attach a plastic skirting board to a mounting strip
After removing the plank, holes are made in the wall using a hammer drill. Then the plank is put back and dowels are inserted into the holes through it. The element is fixed to the wall with self-tapping screws or dowel nails.
Tip: Easier methods of fastening are with double-sided adhesive tape or liquid nails. In these cases, either tape or glue is applied to the back of the plank, after which the fastener is simply pressed against the wall. Hidden fastener can be glued
After installing the hidden fastening system, the skirting board is simply placed over it and pressed until it clicks.
Place the wires in the cable channel and snap the outer bar into place.
If fastening clips are used instead of a mounting strip, they should be attached to the wall with self-tapping screws (see above) in increments of 30 cm. If the wall is uneven, the spacing should be reduced.
Clips allow you to both remove the baseboard and install it back
Method 3 – Liquid nails
Installing plastic skirting boards using liquid nails glue is the easiest and fastest installation method, since there is no need to drill into the walls. But such fastening has a significant disadvantage - difficult dismantling, during which the planks can be damaged.
Before installing the plinth, the walls should be leveled as much as possible, which will ensure better adhesion. It is also worth attaching all the framing elements to the wall and making sure they fit tightly.
The glue can be applied in two ways:
- On the wall - drops every 3-5 cm.
- On the baseboard - in drops or a strip on the side adjacent to the wall.
How to apply glue correctly
Since installation starts from the corner, you need to glue the inner corner cap to one edge of the plinth, and the end cap to the other. This will greatly simplify the work, and the result will be more accurate.
This video will help you secure the corners correctly:
https://youtube.com/watch?v=wu06TslO2F4%3F
The plinth should be pressed tightly against the wall and fixed for a minute so that the glue sets. After this, you can begin installing the next plank.
You need to install it carefully so that the glue does not spoil the finish.
Types of plastic skirting boards
There are three types of plastic panels:
- For carpet.
- For linoleum.
- Universal.
The carpet plinth is similar to the letter G: with its flat side it is pressed against the wall, and with its base it presses down the covering. A piece of carpet is inserted into the outer groove and glued with double-sided tape. This solution looks very beautiful - the plinth looks like it is made of the same material that lies on the floor.
This is what a carpet plinth looks like
A linoleum panel is a classic plinth made of foamed PVC, which is simply screwed or glued to the wall. The third option is suitable for all types of coatings. It has rubberized edges, due to which it is pressed tightly against tiles, parquet, laminate, and linoleum.
You can also divide this material according to manufacturing technology:
- Hard. It is made from foamed polyvinyl chloride. The panel is characterized by good elasticity, but at the same time high fragility. It can burst even with slight pressure or impact.
- Hard hollow. This option has a built-in channel, due to its complex shape it is quite durable and can withstand high loads. But this material has one drawback - low quality workmanship. It is usually used in offices, utility rooms or for low-cost renovations. The length of the plastic plinth allows the effective use of hollow panels on straight surfaces.
- Semi-rigid. This is the best option for finishing a room: semi-rigid plinth has a wide range of colors and different textures. Panels made of this plastic bend well; they can be used to “wrap” semicircular protrusions or even out all the unevenness.
Installing plastic skirting boards on the floor with your own hands
How to install a plastic floor plinth? There are several ways:
- using special fasteners,
- using self-tapping screws or dowel nails,
- using liquid nails.
Installation of skirting boards without cable duct using special fasteners
- Mark places for fastenings in the wall. Leave a distance between the fasteners of 30-50 centimeters, and no more than 10 centimeters from the corner.
- Drill holes in the marked places to a depth of no more than 3-4 centimeters.
- Insert the plastic dowel into the drilled holes.
- Secure the fastenings with screws around the entire perimeter of the room.
- Place the inner corner onto the baseboard. It will be more reliable to glue it with plastic glue.
- Install the floor plinth starting from the inner corner of the room.
- Snap the baseboard into the fasteners.
- Place the joint on the end of the installed baseboard.
- Slide the inner or outer corner onto the second baseboard strip.
- Place the corner in the opposite corner.
- Measure the length to the joint and cut the strip.
- Insert first into the joint and then into the corner of the room and snap the baseboard into place.
- Continue further trimming and installation around the perimeter using the necessary fittings.
The advantages of this method include:
- easy dismantling,
- easy re-installation,
- there are no traces of fasteners on the surface of the plinth.
The disadvantages include:
- repeated installation does not provide quality - the plinth is either not fastened at all, or is not fastened tightly,
- Requires perfectly smooth wall and floor surfaces.
Fastening a plastic plinth with a cable duct using self-tapping screws or dowel nails
- Remove the cable channel strip in the baseboard.
- Drill holes in it every 30-50 cm, and no more than 10 cm from the corner with a drill with a diameter of 6 mm.
- Place the inner corner onto the baseboard. It will be more reliable to glue it with plastic glue.
- Place the plinth from the corner and mark the holes in the wall.
- Drill holes in the marked areas to a depth of no more than 4 centimeters.
- Attach the baseboard and insert the plastic dowels into the drilled holes.
- Screw it with screws or drive dowel nails into the holes along the entire length.
- Place the joint on the end of the installed baseboard.
- Slide the inner or outer corner onto the second baseboard strip.
- Place the corner in the opposite corner.
- Measure the length to the joint and cut the strip.
- Insert first into the joint and then into the corner of the room and continue further marking, drilling and fastening.
- Continue trimming and installation around the perimeter using the necessary fittings.
- Insert the required cable and close the cable channel cover.
Fastening a plastic baseboard without a cable duct using self-tapping screws
The result does not look very presentable, but the quality is the most reliable.
- Drill holes in the profile of the floor plinth (hole diameter 2-3 mm, distance between holes 40-50 cm).
- Make a cone-shaped recess in the hole; the easiest way to do this is with a countersink or a large drill (based on the width of the screw head). The cone will help hide the caps.
- Start installing skirting boards from the corner. Press the plinth against the wall and place marks through the holes (it is best to make marks with a very finely sharpened pencil).
- Drill holes at the marks (drill diameter 6 mm).
- Insert dowels into the wall.
- Place the baseboard against the wall and tighten the screws. But at the same time it should not be pressed or wrinkled.
- Repeat these steps for the next sections around the perimeter.
- Cover the screw caps with plastic plugs, inserting them tightly into the screw cap. For extra security, glue them. Match the color of the plugs to the color of the baseboard.
Installing plastic skirting boards using liquid nails
This job does not require any drilling or messy work. First, carefully install the fittings and the plinth cut to size without glue, and then glue them using liquid nails to the selected places, after priming the strip of painted wall with a deep penetration primer.
The disadvantages of this method are:
- impossibility of reuse,
- installation quality requirement.
What sizes of skirting boards are suitable for the floor - examples of choice for different rooms
When renovating, many homeowners pay little attention to such a process as installing floor skirting boards, which is not as simple a process as it might seem at first glance. There are often cases when the visual perception of a room is deteriorated because the sizes of the baseboards for the floor are incorrectly selected, and there is also a color discrepancy between them and the surrounding interior objects.
We install plastic skirting according to all the rules
The plastic analogue of a wooden product does not have the problems of necessary adjustment of joints and sawing. In this case, installing accessories will help hide the uneven ends: plugs, corners, connections. And a special groove on the front side, into which the coating tape is inserted, ensures a strong connection and evens out the color scheme, creating a single background
When installing plastic skirting boards, you should pay attention to the following features:
- The wall to which the plinth is attached must be level, then the fastening will be strong.
- The baseboard itself can be attached to it either with “liquid nails” or using a clip for hidden installation.
- Hidden parts of metal fastening clips are fixed on the walls with dowel screws at a distance of 40-50 cm from each other.
- At the fixation point, opposite the hidden part, a plinth is installed. By lightly pressing the clip mount, its back side falls into the groove and snaps into place. In this case, the integral structure of the plinth is not disturbed; if necessary, it can always be dismantled and replaced with a new one.
Correct installation of plastic skirting boards allows you not only to hide the necessary thermal seam, but also makes the finishing accessory an important part of the overall interior of the room. And new models are also appearing on the building materials market. Curvilinear plinths are very relevant: their installation is possible due to the property of acquiring the necessary bending shape of columns and walls
Curvilinear plinths are very relevant: their installation is possible due to the property of acquiring the necessary bending shape of columns and walls
And new models are also appearing on the building materials market. Curvilinear plinths are very relevant: their installation is possible due to the property of acquiring the necessary bending shape of columns and walls.
There are many methods, guides, tips and recommendations for installation technologies for various types of skirting boards. In this article, we tried to summarize the simplest and most accessible ones.