Install the arch yourself
Thanks to its convenient design, installing the arch yourself will not be any problem. By purchasing interior arches, you save both on expensive doors and on installation, which can often cost even more than the door model itself. You will learn more about how to install a door arch from the sections below, which describe arch installation in detail.
Required Tools
To install the arch you will need ordinary tools that are found in almost every home. No specialized equipment is required for this. You will need:
- Clamps;
- Wood hacksaw;
- Self-tapping screws and dowels;
- Screwdriver;
- Hammer;
- Masking tape;
- Level and roulette;
- Stationery knife.
As you can see, most likely you have all the tools necessary for installation.
Preparing for installation
First, you need to measure the dimensions of the doorway, and also determine the curvature of the floor using a level. Ideally, the floor should be completely flat, and the arch should be ideal for your doorway. This will help avoid unpleasant surprises during installation. After you have made all the necessary measurements, you need to bring the purchased arch to the required dimensions. To do this, it will be enough to simply saw off the excess length of the expander.
Assembly
Many people do not know how to install an arch. It's quite simple. Mark the arch on the wall. After the preparatory activities, you need to drill additional holes in the purchased model for the self-tapping screws with which the arch will be secured to the wall. Then assemble the arch using dowels and glue. The arch is ready for installation.
How to install an arch in a doorway
Sequentially, on both sides, secure the arch to the doorway. However, you must carefully ensure that the arched elements are opposite each other. Do not allow the structure to warp. Fasten the arch to the wall with screws or dowels. After the arch itself is installed, you need to proceed to installing the platbands, inter-pillar plates and the racks themselves. First of all, an inter-pillar plate is inserted into the already installed arch. Carefully insert it from the bottom up; if the plate does not fit, it is better to lower it down and try inserting it again. Do not attempt to install forcibly. After installation, saw off the excess length. Now you need to install the racks; connecting elements are used for this. The racks themselves are attached to the arch. First, install the rack on one side, insert the interstitial plate into it, and then cover it with a second rack on the other side. The posts and inter-post elements must be cut to the required size before installation. The next step is to secure the racks with self-tapping screws to the wall and cover the fastening points with special covers. The arch is ready.
Types of arches
Interior arch in Art Nouveau style
Before you begin installing the arch, you need to choose a suitable design option. They differ from each other in the design of the upper part.
Modern
Such an arch looks like a fragment of a circle with a small bending radius. Due to its shape, the design is suitable for implementation not only in private houses with high ceilings, but also in city-standard apartments. But there is a limitation: the room must be at least 2.5 m.
Classical
Classic wooden arch
There are two options for defining this architectural element. The first is based only on the type of top. The arch of a classic arch should look like a semicircle, the radius of which is half the width of the opening where the structure is located. Based on this definition, any arch of this shape can be called classical, even one whose material or surface design does not at all fit with the classical style. The second option is based on the interior features. The design should be made in the style of classicism, with stucco patterns on the platbands and columns in the Ionic, Corinthian or Doric style. The shape and dimensions of the upper part may differ from the given strict canons. Before installing the arch, you need to check that the ceiling height in the house is at least 3 meters.
Romantic
An opening with this design has symmetrically rounded corners. The top of the arch is in a position parallel to the plane of the floor. The corner radius may vary. Since the vault has a small height, installation of an interior arch of this type is possible in any room, even with a low ceiling.
Ellipsoidal
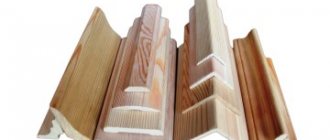
Free-form arches made of wood and plastic.
In many ways, this form is similar to the previous one, but the curvature in this case is more pronounced, due to which the vaulted part is slightly higher. To use it, the opening must have sufficient width (although the height may be small).
free
The homeowner can implement a more sophisticated arched design to his liking. You will need to think over the shape, take measurements and prepare a configuration drawing indicating the dimensions of its components.
Where is the best place to install arches?
The arch makes the room brighter. This is due to the lack of doors, which even in the open position take up space. If the rooms between which there is a passage are dark, the arch is made with lighting from spotlights or LED strip.
The passage in a designer style is designed by:
- Between the corridor and the living room. The arch has standard doorway dimensions or is wide - decorated in a style that emphasizes the interior of the room.
- Between the hallway or living room and the kitchen. The structure is mounted with lighting, which acts as additional lighting in the evening.
- Arch in a studio apartment. The room where all the functional spaces are located is separated from the kitchen by a bar counter and an arched passage.
- Private country house. Here arched passages are placed not only from the living room to the kitchen, but also between rooms.
- Decorative arch. Installed to highlight the design. This is a niche designed in an arched shape, a small delimitation of space into zones in one room. They also install semi-arches, which, on one side, have a vertical column, and at the top are connected to the ceiling into a single sheet.
Attention! Arched openings are not made between the living room and the recreation room, as well as into the children's room.
Installation of a wooden arch
A wooden arch is the most prestigious, durable and beautiful. The material is distinguished not only by its excellent qualities, but also by its heavy weight.
The difficulty lies in the precision of manufacturing the curved arch and the difficulty of its subsequent correction if necessary. The racks must be strengthened more carefully.
The shape and design must be carefully measured so that changes in the opening are minimal. Installation is carried out using the fixation method in an already finished opening. This allows you to hide minor flaws in the decoration of adjacent walls.
More often, the vault consists of several parts, which are assembled into a single whole and held together with special glue. It is secured in the opening with mounting foam or liquid nails. After fixing the arch, the side posts are installed. The correctness of the exhibition is checked by the level. The width of the opening should be the same throughout its entire height.
If wooden beams are used in the opening, the arch and posts can be screwed or nailed to them. The heads of nails and screws are covered with decorative moldings and trims.
Sometimes the entry points of the fasteners are covered with wood putty, and after it dries, they are sanded. After this, finishing and decoration are carried out.
How to install an arch in a doorway?
Arches made of different materials have their own installation methods. Structures made of natural wood require certain skills in working with wood, while plasterboard structures require accuracy, evenness, and step-by-step work. Arched openings are assembled from MDF quickly, independently, without the involvement of craftsmen.
Installation with hidden fasteners
This method is used to install an MDF arch. There is a certain sequence for this:
- the finished arch set is disassembled into parts, connected in the correct order and glued together;
- first, make the first side, then the second;
- the finished MDF arch is inserted into the doorway and raised slightly;
- after leveling, the structure is fixed with a clamp;
- the end parts are coated with glue;
- the remaining parts are also coated with glue and installed on the sides of the opening.
Attention! If the width is non-standard, then the kit includes decorative inserts. For widths greater than 1 meter, arch extenders are used.
Manufacturers produce ready-made sets of arches, installed both by the company’s craftsmen and independently. To fix the elements of the kit, “liquid nails” or PVA are used.
Installing a prefabricated arch in the usual way
The installation of a finished interior arch is carried out by measuring the width, thickness, and height of the opening. For non-standard dimensions, when assembling the top of the structure, inserts are made in the middle. They are mounted with protruding “chops” into prepared holes. After selecting the desired size, the half with the decorative insert is left separately from the other half - then vertical inserts are attached to them.
Materials for making an arch
MDF is less susceptible to shrinkage and deformation than wood.
Arched structures are made from different types of materials. They are selected in accordance with the features of the interior and the purpose of the room.
Tree
A wooden structure will make the room more comfortable and is well suited for interiors where this material is actively used. It can be varnished, emphasizing the natural texture, or faced with stone or cork. The main difficulty when installing an arch of this type is the creation of a curved arch: wood is not a material that bends easily and holds such a shape. The solution is to assemble a structure from several fragments, cut out separately and connected with special glue. If there are wooden beams in the opening, the arch and supports are often nailed to them. The caps of the fastening elements can be covered with platbands or other decorative details.
MDF or fiberboard
Figured arch made of plasterboard
These materials are more flexible than natural wood. It is practiced to shape a thin sheet of MDF and then glue the parts together. Special sheets of increased flexibility with transverse holes 0.8 cm thick are also suitable. First, a frame is created from a metal profile or wood blocks, which is then installed in the opening. After this, it is sheathed. Self-tapping screws are used for fastening.
Drywall
This is a material of mixed composition: a gypsum-based mixture is laid between two layers of cardboard. It is produced in sheets that are easy to cut and install. Thanks to its flexibility and lightness, it is also suitable for arches of complex shapes. The method of operation is the same as in the case of MDF: coating elements cut into blanks are attached to a mounted frame made of metal profiles (aluminum is most often used).
It is also possible to assemble the arch from plastic profiles. On sale you can find ready-made sets of elements from which it is easy to assemble a structure at home. The packaging usually provides step-by-step instructions for assembling it.
Necessary tools and materials for installation
To create an arched passage you need not only material, but also a tool:
- metal scissors;
- construction knife, set of blades;
- screwdriver;
- jigsaw;
- level, plumb line, tape measure, pencil.
The materials are:
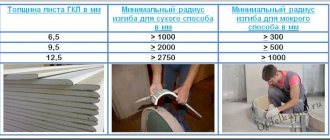
- plasterboard (9.5 mm) or arched KNAUF;
- MDF;
- PVC plates, polystyrene foam.
The most common type for creating a passage is gypsum board. For it you need to assemble a metal base from profiles.
Drywall
The most popular option is the construction of an interior plasterboard arch. It can be created either as an independent element or as part of a complex composition inside a plasterboard partition. This material allows you to create any design, and therefore there is no need to limit yourself to standard options. Not only asymmetrical vaults are available here, but also their smooth transition into another wall design element.
Drywall bends easily, so it can be given any shape. To do this, you need to moisten the material and make cuts on one side along the cardboard.
Installation of plasterboard arches is carried out using an aluminum frame made of different types of profiles. This includes guides and posts, as well as various connectors and adapters. For curved arched vaults, a special profile is used or its alternative is a self-cut post.
Stages of installation of a simple arched plasterboard structure
In order to install a plasterboard arch with your own hands, you need to secure the guide profiles in the opening and screw the rack elements to them with self-tapping screws. Sheets of plasterboard of the appropriate shape and size are screwed onto self-tapping screws on top of the frame. The inner part of the arch in the opening is formed from a bent thin sheet of plasterboard. Next, all joints are puttied and the interior partition is finished, including the opening.
Additionally, you can frame the arch opening with platbands if we are talking about a standard form. Otherwise, you can supplement the structure with lighting, and all the wires can be hidden inside the structure.
It is difficult to say which option is better to choose, since each person has his own taste and priorities. Be sure to consider all options before you begin installing the arch.
Standard Installation Instructions
Despite the large selection of materials, independent production consists of general rules and step-by-step design. By following the stages of work, you can avoid mistakes that will lead to a short service life of the structure.
Preparing the vault
To prepare, you need profiles and levels. The profiles are fixed to the base with dowels. First, a frame is mounted on both sides of the opening, describing the top of the future structure.
After this stage, a metal profile bent into a regular arc is attached at the required distance - its sides are cut. Stiffening ribs are fixed between the bent profiles at a distance of 20-25 cm.
Attention! All fixed elements are checked with a level, and the strength and rigidity of the frame is also taken into account.
Arch arch installation
The arcs of the arch are made according to a pre-prepared template. It can be made on plywood or paper. An arc cut from the material is attached on both sides to the frame base with self-tapping screws.
For evenness, craftsmen use another method, in addition to the template. A curved profile is attached to the prepared cut material from the back side.
Preparing the side parts
The side part is equal to the distance between the arcs. Depending on the material used, it is bent. For gypsum plasterboard there are 2 methods of bending the sheet - dry and wet. The finished curved panel is placed between the arches in the opening. The part has dimensions equal to the arch of the structure.
Mounting the interior arch post
A plasterboard structure requires a metal frame onto which the rack elements are attached. Other materials are attached to a frame base or glue.
To make an element, the required distance is from the edge of the arc to the bottom. The resulting length is measured on the material and cut. You will need 2 front parts and a strip between them.
All fixed elements must be checked with a level not only vertically, but also the evenness between the left and right parts.
The final moment of installation
The last step is to cover the joints with decorative molding. If the structure is made of gypsum plasterboard, all joints are reinforced, and the fastening points are covered with joint putty. It is necessary to cover the structure with a primer and finishing putty. After drying and rubbing, they decorate (paste, paint).
The arched design is easy to assemble if you purchase it as a complete set. However, it has a number of nuances when installed independently. The evenness of the arch is beauty and sophistication.
Main types of arched structures
Despite the apparent diversity of arched systems, they all have a common shape, although designers are constantly making changes, limited only by their own imagination. But in practice, there are the following types of arches , depending on the stylization of the general repair:
- an arch of a classic shape, which is a regular arc;
- arched composition in a modernist style with a raised vault at the top;
- romantic rectangular design with rounded corners;
- ellipsoidal arch;
- free form arched composition.
When choosing a suitable arch shape, you need to take into account the width and height of the doorway, and the architectural composition of the building. This is primarily due to the reduction in the opening in the wall and, as a consequence, the passage between adjacent rooms. Based on this, an ellipsoidal arch ; it is better to frame a high door window with a composition in a classical style. Well, to fully understand the process, it is better to watch a video of creating arched systems.
Decorating arches with different materials
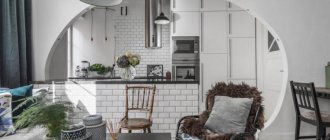
Wallpapering
To make the walls and arch match each other, cover the structure with wallpaper: it can have an interesting texture or pattern. You can also choose wallpaper to paint, then you can figure out what color to decorate the structure yourself. This is one of the cheapest and simplest options, which has a significant disadvantage: in the corners of the arch, the wallpaper can tear or rub off. Therefore, it is better to always have a spare roll.
Photo: yerbamateassociation.org
Decorative plaster
Using plaster you can create a very interesting and unusual texture. Additionally, such an arch can be decorated with decorative carved elements, while installing spotlights that will favorably emphasize the relief of the structure.
Photo: yerbamateassociation.org
Decorative rock
This type of design is much cheaper than decorating an arch with natural stone, especially since decorative stone is easier to work with. For city apartments with a lack of free space, this option is perfect. Decorative stone comes in a wide variety of colors and shapes, so you're sure to find something for yourself.
Photo: smalldesignideas.com
Varnish finish
It is better to combine this method with some other method, for example with decorative plaster. Cover the embossed surface with glossy varnish and it will become much more attractive. If the varnish is tinted, you will get a raised glossy surface of a certain color.
Photo: designsponge.com
Coloring
This is probably the easiest way to design interior arches. All you need is to buy the paint you like and decorate the arch with it. Moreover, the paint may not be the usual glossy or matte, but with an interesting effect, for example metallic. The arch can be painted either in the color of the main interior or, conversely, in an accent shade that will attract attention.
Photo: designsponge.com
Mosaic
With the help of mosaics, you can create interesting visual effects: if you use a material with a reflective surface and additionally install spotlights, there will be a real doomsday in the room. Also use mosaics made of ceramics, glass, stone and other materials.
Photo: smalldesignideas.com
What types of arches are there?
Arches differ in both shape and dimensions. You should rely on the interior style that is celebrated in the apartment or house. Most often this is a classic, but variations may vary.
Translated from Latin, the word “arch” means bend, and this is how we present the classic version of this structure
Types of arches:
The elliptical arch is very similar to the modern style, only with smooth transitions. And the semi-arch on one side is made like a portal, and on the other it is of an arbitrary shape. All that remains is to choose the appropriate option that will harmonize with the interior.