Setting up a doorway in a load-bearing wall is not an easy task if you decide to do the work from scratch. It is not always possible to break through a new passage, because this may damage the structure of the house as a whole. Let's look at what needs to be taken into account in this case and how to cope with this task in certain conditions.
A doorway in a load-bearing wall requires mandatory reinforcement
Working with reinforced concrete wall
Concrete walls are made load-bearing.
Therefore, how to make an opening in such a reinforced concrete wall so as not to destroy the building is indicated in the regulatory documents. It is important to make the correct calculation of the reinforcing frame. It’s better not to do this kind of work yourself to avoid unpleasant consequences.
Such changes to the supporting structure require special permission. It is necessary to submit a work plan and drawings of the future redevelopment of the premises. Even the smallest nuances are taken into account in the documents. Only in this case can you count on approval of the work by the architectural organization. After receiving permission, you can begin work.
First, the future passage is marked. Moreover, it should be done on both sides of the wall. To ensure that the lines coincide, grooves are drilled in the corners of the wall and, starting from them, marking lines are drawn. Then holes are drilled around the perimeter of the opening, in increments of 30 mm.
For processing concrete walls, it is advisable to have diamond saws. They handle concrete surfaces easily. Without them, such work will take a lot of time and become labor-intensive.
The opening is framed in the broken wall. For this, a metal channel is used. You can install corners that are pre-welded to each other.
Channel reinforcement of the opening
Creating an opening - features
So, now it’s time for the most important thing, and therefore we’ll look at everything step by step to make it clearer how to do everything yourself.
Preparatory stage - strengthening the future opening
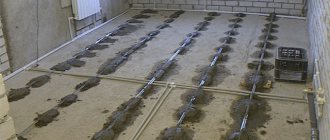
A number of construction works to change the design of load-bearing walls are carried out strictly according to the project that is approved, as well as honoring the design features of the building. The main task in the project is to ensure that the integrity of the structure is preserved after a new passage is moved or made. Before starting work, the structure of the planned opening should be strengthened in advance. To do this, you need to use a wall chaser to cut grooves along the entire perimeter of the passage in order to then lay the reinforcement (channels). It is worth considering that the grooves should not be through - these are recesses for reinforcing type elements. The cross-section of the channel must be individually calculated taking into account the structural characteristics of the house.
Please note that the channels should be placed in the recesses, which are made using a wall chaser, on both sides of the side partition. In order to accurately match the location of the bookmark, markings should be made on the wall in advance for the planned passage. You will drill through holes along it and transfer the pattern to the second side of the walls.
The channels that will be used to strengthen the structure should first be cut to the required length, taking into account the height and width of the planned opening. You will need two pairs for the sides of the opening, as well as two pairs for the bottom and top. On each pair, you need to make holes in advance through which you will fasten the channels using self-anchors or studs. The distance between the holes should be calculated independently.
Next, you need to install the side pairs in the grooves one by one. Through the holes made in the pairs of channels, it is necessary to drill a partition for hardware for fastening. Tighten the pairs using a fastener. It is important that everything is tightened well, so use power tools or at least available materials. After the vertical channels are installed, the operation must be repeated, but for horizontal fastenings. The screeds should be welded on both sides of the future opening, and then you will have the preliminary strengthening of the opening ready.
The main task is cutting load-bearing walls
After the preparatory stage is completed and the walls are strengthened, you can begin to break through a new opening. The complexity of the work will largely depend only on the material used to make the walls. Brickwork is the easiest to remove because it is done row by row.
With a concrete wall, there will be more difficulties during dismantling work, because there is reinforcement inside:
- Most often, a hand saw with diamond blades is used to cut a wall opening. At the site of the new opening, markings should be applied to divide the passage into several blocks. According to the markings, using an electric tool, make slits on both sides of the walls, and the depth on each side should be 15 cm. Then, one by one, remove layer by layer from the opening, and during dismantling work you often have to additionally use a hammer drill.
- When cutting an opening using a wall saw, the depth of the cut will reach up to 0.6 meters, but when used, you will need access to running water to cool the tool and wash away dust and concrete chips.
- Sometimes the thickness of the walls of a building can be very large, especially if it is necessary to cut an opening in the façade or foundation part. In this case, it is best to use a rope installation, which can quickly cut through monolithic or concrete blocks of any thickness.
- You can make an opening in a load-bearing wall in another way. To do this, drill holes using a diamond drill according to the markings, and then just saw the cut fragment into pieces and remove the pieces from the opening.
- Modern electric tools for cutting an opening in a load-bearing wall make it possible to complete the work in a short time, as well as with minimal dust and noise.
And now let's look at what needs to be done at the very end.
The final stage is strengthening the structure
An opening cut into a load-bearing wall requires final reinforcement using civil engineering and welding work.
The work is carried out in several steps:
- Add welding to all parts of the channels that were not accessible before dismantling.
- Pairs of channels from different sides must be connected using transverse steel plates with a width of no more than 5 cm and a thickness of at least 0.4 cm.
- A metal mesh should be welded onto the channel, and plaster will be applied over it.
- When the work is completed, the required “changes” should be recorded and put into operation.
- To complete the work with the documents, the selection committee will draw up an act, and the document must be certified by the BTI, the foremen (who performed the work) and the organization that accepted the facility into operation.
Now you know how to make an opening, and its cost will depend on how large it will be, as well as on the finishing materials. You can do everything yourself to reduce costs.
Pusher
The purpose of this device is to move the cuticle and form the nail hole with perfect precision.
Equipped with two work surfaces:
- a beveled or flat spatula for tucking in cuticles and preparing nails for extensions;
- a sharp cutter that removes burrs, frayed edges, dirt and other defects.
A good master should have a whole set of pushers, since the width of the blade depends on the width of the client’s nail plate.
All other selection criteria are the same:
- high alloy steel;
- screw-down sides;
- the presence of threads or grooves on the handle;
- good balancing when sharpening;
- thin, sharp, but at the same time safe edge of the blade.
Squeeze the shoulder blade with your fingers; if blood appears, it is better to abandon this model. Next you need to run it over your palm - no unpleasant sensations, roughness, or nicks should be felt.
Brick wall
So, after checking the project on the drawings, you can get down to business directly. Since brick walls are one of the most common options for partitions in a house, you should consider the technology of creating an opening in them first.
The main feature of punching an opening in a brick wall is that the contours of the upper part must coincide with the joints in the masonry. It is not allowed to cut the brick lengthwise. After the work is completed, the jumper is installed. The same principle is observed when creating a doorway in a building made of foam blocks.
Let's consider the order of work. First, you need to check the position of the future opening on the plan with real conditions and adjust the general plan if necessary. For ease of work, boundaries are marked on the wall made of foam blocks. Since all the bricks are connected to each other, any incorrect force can lead to damage to the integrity of the entire masonry. That is why you first need to cut out the outlines of the structure.
Dust-free cutting of openings is carried out using special equipment with a diamond blade, equipped with a construction vacuum cleaner to collect dust. If you do not have a specialized tool at your disposal, you can use a grinder. After marking the contours, further work is carried out using a sledgehammer.
Very often, when doing work with your own hands, you may encounter the problem of load distribution. To minimize risks, you can first cut through only the upper part of the opening, perform strengthening work and then continue. Temporary side supports are also sometimes installed, especially when it comes to load-bearing walls made of foam blocks.
To properly distribute the load when punching an opening, jumpers are used
How to properly make a doorway in a brick or foam block wall with your own hands is now clear, but what to do when remodeling an apartment in a panel high-rise building?
Operating procedure
The legal side of the issue is a separate topic. From a practical point of view, something more interesting is how a passage is cut in the wall depending on its material.
Preparation stage
Home redevelopment begins with this.
- Drawing up a diagram. It is advisable to inquire whether openings were made in the apartments on the floor below/above. It is optimal if they are located equally. By the way, this will make obtaining permission somewhat easier. During the design process, the parameters of the door are also taken into account, and therefore the appropriate model should be looked at in advance. Otherwise, you will have to further expand/narrow the opening, and this is extra work.
- Cleaning the base. Before you start cutting through the wall, you need to assess its condition. If signs of rot are visible, then you will have to do treatment, impregnation with special agents. In addition, it will become clear what will be needed during the work. Making an opening in a load-bearing wall with only a set of household tools at hand will definitely not work.
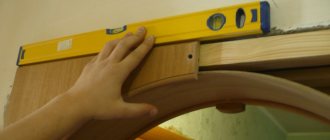
- Surface marking. This is necessary in order to obtain the correct geometry of the opening, without bevels or curvatures of its end parts. This is especially true for thick walls; It is in this case that significant errors are inevitable, since you will have to cut into the material alternately from both sides.
After drawing the contour along its perimeter, maintaining the exact direction of the cutting tool (perpendicular to the base), through holes are drilled (at what distance is decided on the spot). Based on them, a similar outline is drawn on the back side of the wall.
Arrangement of the opening
- Installation of supports. The feasibility of this is determined by local specifics. But logs (sleepers, beams) installed vertically in the area of the working area relieve the wall, and the load on it is reduced.
- Floor covering protection. Dust is not as bad as heavy fragments. When making a doorway in a panel house, you need to be prepared for large pieces of concrete with protruding reinforcement to fall off. Therefore, plastic film will not save the floor. It is advisable to cover it with rubber strips, thick fabric, etc. Chipboard slabs/sheets, plywood, boards will do.
- Removing material. At the first stage, you should mark the contour with an insert of a disk on both sides of the opening. After that, break it into segments and cut them out one by one. If we are talking about masonry, then it is even simpler - it is dismantled in rows.
How can I reduce it?
The opening in the wall does not always need to be enlarged; sometimes, on the contrary, it is increased. This is done to install a door or window of a smaller size, or if an excess section has been cut off.
The easiest option is to use a beam.
Sequencing:
- Using a plane, the timber is adjusted to the desired size. The final workpiece should not protrude beyond the edge of the wall. The surface is sanded so that the putty fits better on it.
- To attach the blanks to the wall, holes are drilled in them. Anchors and bolts are used to secure the posts and lintels.
- The gaps are filled with construction foam. Small cracks are filled with putty.
- When the structure is installed, it is impregnated with a primer and lined with a suitable material.
It must be taken into account that the sash will be regularly subjected to dynamic loads. Therefore, there should not be a large distance between the fastening steps.
In addition to timber, the opening can be reduced using materials such as:
- Drywall. To install it, you will need to assemble a frame based on an aluminum profile. Drywall sheets are fixed with self-tapping screws.
- Foam blocks. They are easy to work with; they are used mainly in houses with thick walls. The blocks on the sides of the opening are placed in columns on top of each other, and the lintel is made of timber.
- Bricks. For this type of masonry, it is recommended to make the lintel from metal corners.
Any of the listed materials can be used to narrow the opening in a concrete wall.
Strengthening the opening
Please note that the manufacture of openings in the load-bearing walls of apartment buildings is permitted, but only subject to the approval of the reconstruction and approval of the project to comply with technical conditions. One of the mandatory requirements in such cases is to strengthen the opening to restore the load-bearing capacity of critical structures
And although it is not necessary to develop a project for the reconstruction of a private house, strengthening must still be carried out.
It is made with angle steel, the width of the shelf being at least 1/4 of the wall thickness. The upper crossbar is inserted into a pre-made cut. Along the plane of the wall, sections of steel strip are welded to it, which are fastened with a through or anchor fastening into the wall pillar at least 20 cm from the top of the opening. The length of the horizontal jumper must be at least one third greater than the width of the manufactured passage on each side. Once the top rail is installed, vertical cuts can be made to remove the core. After this, the corners of the lintel are fastened together with inserts made of steel strip, butt-welded to the corner. In the same way, the side edges are strengthened by installing the corners in the support of the lintel.
In some cases, when the dimensions of the opening exceed normal ones, as happens when two rooms are combined, it is reinforced not with rolled materials, but with frame structures and trusses. After this, the strengthening system is sheathed with gypsum board, due to which it is possible to completely conceal the metal structures without disturbing the interior.
Gain
The embedded jumper is only a safety support. To strengthen the opening in the load-bearing wall, a channel is built in from brick. The workpiece is taken 60 cm larger than the width of the opening. Windows 30 cm deep are cut out at the ends of the walls for a new lintel. If the masonry is thick, then two channels are placed on both sides of the partition. All voids are sealed with concrete mortar.
To strengthen the opening in the load-bearing wall of a panel house, a lintel from a channel or I-beam is cut in in a similar way. Vertical posts are installed on both sides of the aisle. The result is an opening framed by a U-shaped channel structure. The posts are welded to the lintel using electric welding.
If a project is being developed to strengthen an opening in a load-bearing wall, where it is planned to cut out an arch, a mandatory trim is constructed on the sides. The supports are placed regardless of the wall material. The upper lintel is made of bent channel. The metal elements of the arched vault are welded together.
Changing the size, location or new cutting of an opening in the main wall of a building is considered redevelopment. You cannot begin work without obtaining permits.
Coordination of openings in load-bearing walls
The construction or expansion of the opening must be carried out in accordance with all standards, with the permission of the relevant authorities. When a decision is made on redevelopment, different indicators are taken into account:
- the floor on which the redevelopment is being carried out (the higher the floor, the less the load on the wall);
- year the house was built;
- the width of the opening and its placement (joint of slabs, distance to external walls);
- condition of the walls in the room.
Redevelopment can be carried out by organizations that have permission to carry out such work. Recently, people are increasingly remodeling buildings, expanding old openings in walls, and installing new ones. Diamond cutting is the leader in dismantling robots. Using cutting elements, concrete thicker than 60 cm is cut. The waterjet cutting method is the most environmentally friendly and safe. Oxygen lance drilling is effective, but requires certain training and skills, and there is a risk of burns.
Responsibility
Sometimes apartment owners break through new doors in the load-bearing walls of panel houses without prior approval and registration of this procedure. If such illegal redevelopment in an apartment is subsequently discovered, the property owners will certainly be fined. You will most likely have to pay a small amount for an unauthorized doorway in a load-bearing wall, including a panel house. However, if the housing commission reveals that changes made to the apartment’s layout have caused weakening of the house’s structures, the owners will be obliged to return everything to its place. That is, money for repairs in this case will be wasted.
Moreover, it may turn out that the owner of the apartment will not be able to properly correct the consequences of his rash actions on his own. In this case, he will have to contact the organization that was involved in the design and construction of the house. Builders may charge a very large sum for restoring the wall or refuse to do this work altogether. In the latter case, the apartment can even be put up for auction by law.
General technology
Making an opening is a responsible technological operation associated with the risk of destruction of building structures and danger to life and health. Therefore, all work should be performed in strict accordance with the regulations. The process of cutting the opening itself consists of three stages:
- Marking, and, if necessary, coordination and approval of the redevelopment plan.
- Direct dismantling of part of the building structure.
- Strengthening the opening when it comes to working with a main wall.
A professional approach involves the use of special wall-cutting equipment, but you can make an opening yourself, using only hand tools: a hammer drill, an angle grinder and additional equipment for them, it is also advisable to have a construction vacuum cleaner. The process will be more labor-intensive, but with the right approach, you can achieve a neat design of the perimeter, subsequently spending a minimum of effort on finishing.
How to make a doorway in a wall
Hello dear reader of the StroyDom blog.
It may be necessary to break through a new doorway when combining two rooms into one, to optimize the layout, etc. This is not difficult to do, the main thing is to legally approve the redevelopment before starting work; you can learn how to arrange this from this article.
After approval and obtaining permission for redevelopment, you can begin work.
How to make a hole in a wall
To do any work efficiently and quickly, you need to be well prepared.
Preparatory work
Punching an opening is quite a dusty job, so you should take care of special equipment in advance. clothes:
- gloves;
- respirator;
- protective glasses.
To collect garbage you will need strong bags. When breaking through the wall, it can be moistened with water - this will reduce the amount of dust. If floor repairs are not planned in the room where the wall will be broken through, it is better to immediately cover it with boards to avoid damage.
Tools needed to punch through a doorway:
tape measure; grinder; diamond discs; hammer drill; various attachments for the hammer drill; chisel; sledgehammer.
Attention: you must work with a sledgehammer carefully. Because the goal of the work is a neat opening, and not a dilapidated wall
Video: Opening in a load-bearing wall. Cutting concrete and strengthening the opening for an arch, portal, interior door.
Making a hole in a brick wall
First, the brick wall is cleaned of wallpaper and plaster. Then, using a tape measure and a pencil, the future opening is marked. After this, a reinforcing jumper is made on top. This is necessary to ensure that the wall does not burst or collapse. The jumper is made from a corner measuring at least 35 mm. Two corners are cut 30 - 40 cm longer than the opening.
Using a grinder with a diamond blade, the top of the opening is cut on both sides of the wall. They cut 15 - 20 cm more than the width of the future doorway, cutting depth = the size of the corner (shelf), thickness = the thickness of the corner. After this, the corners are inserted into the cut made, securing them with anchor pins and filling the cracks with cement mortar.
Now you can begin dismantling the brick wall. You can quickly and efficiently remove an unwanted area using a diamond saw. However, not everyone can afford such pleasure. Therefore, a grinder, a hammer drill or a sledgehammer with a chisel is most often used.
Using a grinder, a cut is made along the marked lines of the doorway as far as the diameter of the diamond blade allows. Then, using a hammer drill or a sledgehammer with a chisel, the brick is gradually removed. After removing all unnecessary bricks, you need to finish the lintel. To do this, both corners must be welded together from the bottom.
If for some reason welding is not possible, they can be fastened with metal plates. The plates and corner are drilled and secured together with powerful metal screws. The opening in the brick wall is almost ready, all that remains is to refine it and you can insert the door.
How to make a doorway in a concrete wall
Most often, concrete walls are load-bearing. And if this is the case, then it is better to entrust this work to specialists who can correctly calculate the design features of the reinforcing frame and strapping. When creating a new opening in a concrete wall, markings are made, just as in the first case.
After which this marking must be transferred to the other side. This can be done by drilling holes in the corners and along the lines of the future opening with a hammer drill. Then, using a drill with a diameter of 10 - 12 mm, we make holes around the entire perimeter, every 3 - 4 cm.
Concrete walls are much stronger than brick walls, so without a diamond saw the work will be long and hard. After the doorway has been broken through, you need to make a frame from a metal channel or corners welded together.
In conclusion, I would like to remind you once again that any changes to the design features of an apartment, especially for apartment buildings, can be made only with permission obtained from government authorities.
See you on the pages of the site. Good luck to you and warmth to your home.
Questions, additions or suggestions can be written on the Question-Answer page.
Watch the video: How to cut concrete without dust yourself (redevelopment)
Source
stroyka37.ru
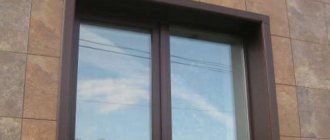
Finish options
At the final stage, the punched and reinforced opening must, of course, be given an aesthetic appearance. After the corner frame is installed in place, all voids between it and the panel wall should be sealed with cement mortar.
Sometimes ordinary interior doors are installed in new openings in apartments. But quite often they are simply left uncovered. There are only two options for finishing such openings:
- standard - without design changes;
- arched - with configuration changes.
In the first case, the opening is usually finished using white or wood-look PVC panels or plaster. Both methods allow you to make the wall quite aesthetically pleasing.
Arched openings in the load-bearing walls of a panel house (as well as in non-load-bearing ones) are usually installed in rooms when gypsum plasterboard is used to decorate them. In such sheets, the top of the opening is cut in the form of an arc. From below, this curved section is hemmed with a bent strip of gypsum board.
Special cases
These include situations when you need to put an entrance door in the place of a former window. Such doors are usually heavy and require fastening to anchors or embedded parts in the doorway.
The window sill block is easy to demolish; there is no need to install a lintel for this.
After this, the opening is strengthened with corners in the same way as is done when installing one in a wall, and the door is installed on this fastening. To avoid damage during finishing, you can cover the canvas and the visible part of the box with plastic film and masking tape.
Before installing a doorway in a brick wall, if you no longer need it, knock out some of the bricks from the alignment or drive reinforcing bars into the wall.
This way you will ensure the necessary dressing and avoid cracks. There is no need to strengthen the masonry: there is a lintel above the former door. If there is a shortage of material, you can make a six-row well masonry and put construction waste inside. The blocked opening can be plastered within a day.
Expanding the opening in the wall
Technologically simpler option. Initially, determine the length of the lintel located above the doorway. After this, the possible width of the opening is calculated. The lintel must rest on the masonry by at least 500 mm. If this condition cannot be met, a vertical groove is initially cut along the side of the wall from which it is planned to be expanded. After this, a vertical support (channel) is installed in the groove, which should rest tightly against the lower edge of the lintel. Similarly, fix the vertical support on the other side of the wall. They are pulled together or welded together. Only after this work begins on drilling and cutting out the wall to widen the opening.
Carrying out work on the installation of a doorway is physically difficult and very dusty work. It is recommended to do it yourself only on non-load-bearing (interior) walls made of bricks or blocks.
When constructing an opening in the foundation and basement, the proximity of the ground should be taken into account, so this case has its own characteristics. More details about this in the article: how to make an opening in the foundation.
When should this not be done?
The law does not prohibit increasing their size, but not always and not in every place. It depends on the characteristics of a particular house.
Thoughtless demolition and expansion of structures can lead to load redistribution and collapse of the building.
So, the opening in a load-bearing concrete wall can be increased by no more than 10 cm (5 cm on each side). In partitions this figure may be higher, but upcoming changes need to be agreed upon. The work must be carried out by professional organizations that have permission and a license.
During the work, utility networks and communications should not be affected. In a private house, regulatory authorities cannot prohibit widening the doorway. However, this does not mean that work can be carried out without taking into account the structural features. Like any other house, a private building is also subject to destruction.
Where can I do it?
Depending on the function performed, walls in city apartments can be:
- bearing;
- non-load-bearing.
Openings are allowed in both of these types of enclosing structures. Load-bearing walls in an apartment perform a very important task - they support the floor slabs of the floor above. The law allows openings in them, but not in all places. Punching through such enclosing structures is possible only if this procedure does not weaken the building structures. If the opening in the load-bearing wall of a panel house is made incorrectly, this will certainly affect the performance characteristics and service life of the entire high-rise building. For such illegal redevelopment, apartment owners are punishable by a fine.
Punching an opening in a non-load-bearing wall, of course, cannot lead to any sad consequences for the building’s structures. However, such an operation is still officially considered a redevelopment and, accordingly, requires registration. In this case, changes will definitely need to be made to the apartment layout. That is, remove blocked doors from the drawing and mark new ones.
The correct option for strengthening a doorway in a panel house
The work has its own characteristics in each specific case.
The best option is to strengthen the opening using metal structures, which are a frame in the shape of the letter U with a lintel and racks made of corners and an emphasis on a sheet of steel to properly distribute the load. Strengthening with mortar is carried out between the metal reinforcing elements and the concrete base. The metal structure is attached to the floor slabs and the wall using reinforcement. In a situation where the opening is cut close to the outer wall slab, the area between the wall and the opening must be reinforced. Metal reinforcement elements (horizontal and vertical) are connected at the corners by welding, and the metal structure itself is treated with an anti-corrosion compound and plastered with cement-sand mortar over a mesh. However, in practice, careless craftsmen or homeowners themselves make a lot of mistakes, which will be reflected in a number of problems in the future. Let's look at the most common of them.
The most common mistakes when reinforcing a doorway
Incorrect channel installation
Reinforcement with a channel does not always provide a complete fit to the edges of the doorway. After such incorrect reinforcement, voids form between the opening and the U-shaped frame, and the frame does not take on the load that it should.
This is interesting! In some cases, the use of a channel is allowed, but only if all cavities under the ready-made reinforcement in the area where the channels adjoin and the joint under the load-bearing wall are filled with self-expanding cement.
Using low-quality material for steel reinforcement corners
This situation arises both when there is a basic lack of knowledge about the materials used, and when builders want to save money by buying a cheaper base: the thinner the metal, the less it weighs and costs.
Helpful information! A steel angle with dimensions of 100x63x8 and support plates with a thickness of 10-12 mm are considered standard.
No support plates
This is the most common problem with amplification equipment. Meanwhile, you cannot place the steel angle directly on the floor slabs.
Embedding metal structural elements into the wall
With this option, the edges of the wall become thinner, taking on the entire load. It will no longer be possible to securely fasten the frame in such a wall.
Use of reinforcement technologies applicable only to brick walls
This is a gross violation. With this type of work, careless builders do not cut out, but drill and knock out an opening in the wall, almost completely destroying the lintel above the opening.
Remember! It is unacceptable to use a hammer drill and a sledgehammer when equipping and strengthening openings in panel-type houses! All work must be carried out using diamond cutting, which does not place load on supporting structures.
As can be seen from the above, such a seemingly simple job has a lot of nuances, so it is worth turning to professionals in their field when equipping and strengthening doorways.
Features of load-bearing walls
Load-bearing walls take the load from the floor and roof slabs. Partial dismantling without installing a supporting structure will cause cracks to appear. Failure to take measures in time will lead to the collapse of the building.
You can independently determine where load-bearing walls and partitions are located according to the plan. In the registration certificate for housing, they are indicated by thick lines. In the absence of documentation, the main walls are determined visually by their increased thickness. Usually they are located at the junction of apartments with each other and with a flight of stairs.
Wall penetration technologies
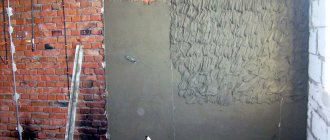
All work begins with complete cleaning of the surface from unnecessary wallpaper and a layer of plaster. Next, the procedure for punching an opening in a brick wall is as follows:
- Mark the future hole using a tape measure.
- Use a grinder to make cuts along the marked lines. The depth of the cuts depends on the selected diameter of the diamond blade.
- The next step is to strengthen the opening in the brick wall to prevent collapse. This is done with jumpers in the shape of a corner, the side length of which is 3.5 cm. Then, when cutting a hole, two corners are cut off in the wall; they should be 35–40 cm larger than the opening.
- We take the grinder in our hands again and cut through the upper border. But the slot should be 16–20 cm shorter than the planned width. We insert the corners into the previously created slot and attach them with anchor pins.
- Now fill the hole with cement mortar, wait until it hardens and start cutting an opening in the brick wall. Here again you will need a grinder with a new diamond blade, but you can get by with a hammer drill or even an ordinary sledgehammer in combination with a chisel.
- Working carefully, gradually remove all the brick. Having finished cutting the brick wall in this way, proceed to modifying the metal lintel - weld two corners together along the bottom side. Instead of welding, you can simply use iron plates and screws.
Having made an opening in the concrete wall, tidy up its boundaries, and you can put the door in place.
Required tools and materials
As soon as permission is received from the housing commission, you can begin to actually break through the wall. It is better, of course, to entrust this work to specialists. But if you want to make an opening in the wall, guided by the recommendations given by the engineer, you can do it yourself. The regulations do not prohibit this in any case.
However, of course, you need to make an opening in the wall of a panel house with your own hands in strict compliance with all the required technologies.
You can, of course, make an opening in a panel wall the old fashioned way. That is, use a hammer drill, a hammer and a sledgehammer for this purpose. But it’s still better to spend a little money and purchase special equipment for diamond cutting to perform such work. When using such a tool, the cut along the entire contour of the opening will be perfectly smooth, which will save money and effort on its finishing.
In addition, the tools you will need to prepare are:
- roulette;
- level;
- construction square.
Materials you will need:
- cement and sand;
- putty;
- paint grater;
- anchor;
- dye.
A little about brick walls
Making an opening is easier when using special tools
Punching openings in walls is quite a responsible matter, and one should not approach it lightly. First of all, you need to understand what kind of walls there are according to the functions they perform and their technical features.
Without this, creating an opening in a brick wall can result in completely unexpected and very unpleasant surprises.
All walls in the apartment are divided into:
- Load-bearing (also known as supporting, capital). Load-bearing walls, in fact, serve as supports - interfloor slabs rest on them, so breaking them or moving them is strictly prohibited - this can lead to the destruction of the entire building. Due to the heavy load placed on them, the load-bearing walls are the thickest in the house, at least 1.5 bricks (38 cm) thick.
- Semi-supporting. This type of wall is not supporting, but takes on part of the load of the floors. Semi-load-bearing walls are thus a transitional option between load-bearing and partition structures. They can be 1 – 1.5 bricks thick (25 – 38 cm).
- Non-load-bearing. Such walls are also called partitions and do not perform load-bearing functions. Their main purpose is to zoning the interior space of the apartment into separate rooms. They are usually laid out half a brick thick - 12 cm.
How to determine a load-bearing wall in a brick house?
The most basic way to determine the supporting wall is to familiarize yourself with the floor plan of the living space. Such a plan must be included in the registration certificate or house register. To understand diagrams and drawings, you need to have some drawing skills. Experience in construction would be helpful. Then you can easily distinguish a supporting wall from a regular partition.
Typically, interior walls are no more than 18 centimeters thick. The smallest thickness of the supporting wall is 38 centimeters - a masonry of three bricks . Four-brick masonry is possible, which forms a wall 51 centimeters thick. Often the thickness of the walls in brick houses is 64 centimeters - five-brick masonry (Fig. 6).
If the plan could not be found, then you should use the general rules for determining load-bearing walls in a house:
- if the walls face the street, we can definitely say that they are supporting;
- walls shared with neighbors;
- wall thickness more than 380 mm, as mentioned earlier;
- walls facing the landing.
Why aerated concrete cracks - reasons
Common reasons for the formation of defects in aerated concrete masonry include:
- non-compliance with masonry technology;
- shrinkage of the house;
- non-compliance with proportions when preparing the solution;
- the use of defective block stone or binding materials that have expired.
This also includes weak and heterogeneous soils, which begin to destroy the foundation, as a result this affects the walls. If the depth of the foundation is insufficient, then cracks may also appear after some time.
Vertical
Most often, vertical cracks appear on masonry made of aerated concrete blocks. They can be wide at the bottom and narrow at the top, and vice versa. The cracks may radiate and branch, and they may be “hairline”—so thin that they are barely noticeable.
There are several reasons for this type of defect to appear:
- foundation subsidence;
- excessive pressure of the floor slab on the wall;
- shallow foundation depth;
- absence of expansion joint between different parts of the building.
Subsidence of the foundation may occur if a house made of aerated concrete is built in a swampy area or in an area of severe soil freezing. To prevent this from happening, it is necessary to conduct soil tests before construction, as well as examine the surrounding area. Cracks can be repaired, but it is not a fact that the problem will not reoccur in a few years.
Despite the fact that aerated blocks are a fairly light material, if their density is selected incorrectly, cracks may appear. This means that the floor slab is putting too much pressure on the wall. As a result, the house begins to gradually sink and vertical defects appear. Acceptable norms for supporting a floor slab on walls made of different materials are presented in SNiP.
The shallow depth of the foundation also affects the further operation of the house. The minimum indicators are 50 cm from the planned surface of the territory, but in each case these figures will be different. The indicator depends on the groundwater level and the degree of soil freezing.
Horizontal
If defects in the horizontal direction are noticeable on the walls, then there are several explanations for this:
- Poor quality gas block. When selling in stores, sellers can advise different things in order to quickly sell “stale” goods.
You should not fall for such tricks and choose a stone “at a discount” in order to save money.It is better to give preference to trusted manufacturers who sell directly from the factory.
Then the risks of getting a low-quality stone that will not survive the winter are minimized.
- Invalid block class selection. Load-bearing walls must be made of block grade D500-D600. Its strength should be class B2.5, B3.5–5. If you choose a gas block with lower performance, then there is a high probability of getting horizontal defects over time. The thing is that blocks with a lower density and grade are not adapted to high loads.
- Laying on incorrectly prepared or low-quality mortar. It is recommended to prepare the adhesive composition or cement-sand mortar only in full compliance with the instructions and proportions. If you add more water, the mixture will become too liquid and will not be able to provide the proper strength characteristics in the overall masonry. If the solution is excessively thick, then when applied to the stone, it will set quickly, not allowing time for adjustment.
- The weight of the floors is too high. In this case, the cracks have a horizontal direction, but look like arcs.
- If horizontal cracks form above the window opening, the reason is the insufficient strength of the ceiling above the window, which cannot withstand the load.
Microcracks
Small cracks form for the following reasons:
- non-autoclaved aerated concrete was selected;
- the time for normalizing the temperature of the material was not maintained;
- incorrect production of blocks;
- lack of leveling of the gas block with a float;
- improper reinforcement of masonry;
- incorrectly installed jumpers.
Often microcracks appear where the reinforcing belt has not been installed. For example, floor slabs were laid on stone, the walls cracked due to the disproportionate load on them. If an armored belt had been made during the laying, this would not have happened.
How to build a client base and find clients for a beginning lash maker?
Beginners are often frightened by the lack of clients. But if you have undergone good training, purchased quality materials and set up your workplace, you are off to a good start. Be patient and take action.
Invite friends and good acquaintances as “guinea pigs”
Pay attention to groups on social networks similar to “Looking for Models,” where novice artists offer their services for a small price (and sometimes for free)
Do your first jobs for advertising on social networks and photography. Advertising with reposts of your first clients, announcing all kinds of promotions and competitions is the easiest and most effective way of promotion.
Be sure to attach photographs of your work to your posts, information about the cost of services, what materials you use and where you are located. If you have never encountered social media management before, watch how your colleagues do it.
If you are sure that the profession of a leashmaker is created just for you, go for it, learn, create and achieve success. You will definitely succeed!
This training may be right for you:
- 10 Best Eyelash Extension Courses in Moscow
- Best Eyelash Extension Courses in St. Petersburg from 999 Rubles
- Best Lashmaker Training Courses in Moscow
- Best Lashmaker Training Courses in St. Petersburg
- 10 Best Training Courses for Eyebrow and Eyelash Lamination in St. Petersburg
- Best Eyelash Botox Training Courses in St. Petersburg
- Best Eyelash and Eyebrow Lamination Courses in Moscow
Proven eyelash lamination courses in your city: Yekaterinburg, Krasnodar, Nizhny Novgorod, Kirov, Novosibirsk, Voronezh, Krasnoyarsk, Chelyabinsk.
- How to Become a Makeup Artist from Scratch? 9 Simple Tips on How to Master Makeup at Home
- How to Become Sexy and Attractive? 5 Secrets on How to Love Yourself and Discover Your Sexuality
- Where should I send my child? 10 Children's Activities, Sections and Courses That Will Suit Your Child
- How to Get a Job Without Experience? 3 Proven Advice from an HR Specialist That Will Lead You to Your Dream Position
- How to Sell a Product? 6 Simple Rules for Taking Clothing Photos That Sell