Laying wiring and installing sockets
Regardless of the technology used during gating, upon completion of the work, the actions are performed exactly the same.
When the groove for the wiring is completely ready, before you start fixing the cable in the grooves, you need to clean it from dust using an industrial vacuum cleaner or a broom and treat it with a primer.
Laying cables into the wall is another rather complicated technological process that requires attention.
There are two ways to secure wires in a groove: by laying them in a pipe or simply by laying them in a groove and fixing them with plaster, putty or plaster.
When laying wires in cable channels, a pipe is first placed in the groove, and a wire attached to a rigid wire is pulled through it to the location of switches and sockets.
The wires laid to the socket boxes are cut, leaving 10-15 cm in reserve for threading into the socket hole.
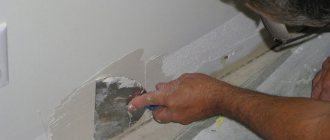
How to seal the groove under the wiring? The same materials that are planned to be used for further finishing of the wall - putty, plaster, plaster or any other building mixtures.
The most convenient and rational way to install sockets is to combine them in one frame in blocks, which allows you to significantly save space and give the technical corner in the room an aesthetic appearance. A single block can accommodate not only electrical outlets, but also connectors for a modem, home phone, and cable TV. After cutting for the sockets, routing all the wires around the room and sealing the grooves, the blocks, pre-connected to each other, are installed on special latches in pre-drilled holes.
The holes for the blocks are made solid with gaps between them of up to 1 mm, the central partitions are dismantled. The metal frames and frames of the sockets are pressed against each other as tightly as possible.
Upon completion of the wall finishing (painting, wallpapering), plastic frames of the sockets are attached, hiding possible shortcomings and flaws in the decorative elements.
When installing a distribution board into the wall, the grooves are arranged in a rectangular shape. The depth, height, and width of the hole are selected to match the dimensions of the shield, taking into account a small margin. After installing the housing, the shield is fixed inside the wall with gypsum mortar.
Tools and materials for work
The first thing you need to know is the arsenal of necessary tools. To seal the groove for the wiring you will need:
- small and large spatulas;
- deep penetration primer;
- paint brush for priming;
- solution for sealing grooves.
The question immediately arises: how to seal the grooves with wiring? Both putty and cement mortar are suitable for this purpose. There isn't much difference. There are some nuances. When working with cement mortar, you need to add PVA glue to it. Then the mixture for sealing the grooves will dry faster, become more tenacious and easier to work with. As for the putty, it should not be finishing, since the recommended layer can be from 2 to 3 mm. Starter gypsum plaster will help to seal a groove in a concrete wall. The layer thickness can be from 7 to 8 cm. This is just right for a groove.
Note! If you have the right tools and materials, even a non-professional can quickly and easily deal with sealing grooves.
When everything is prepared, you can consider the theoretical part of the work.
Side of the law
From the point of view of legislative acts, if the owner of the apartment independently trenched the wall and this caused cracks, deformations and other damage to the supporting structures, he is held responsible for these damages. All repairs carried out by the management or maintenance organization of the house will be carried out at the expense of the culprit.
When cutting grooves in partitions by third-party specialists hired by the owner, damage to the structures will be compensated at the expense of the performers or the employing organization
Standards for wall gating
The main regulatory document regulating the gating process is SNiP 3.05.06-85. According to it, the channels cut into the wall must meet the following requirements:
- Horizontal grooves should have a depth of no more than 25 mm, a width of no more than 20 mm, and a length of no more than 300 mm. In this case, the distance from the channel made in the concrete to the floor slab should not be less than 150 mm.
- Vertical grooves, unlike horizontal ones, can be of any size. A few restrictions for them are compliance with the following distances: 100 mm - to window openings and corners, at least 400 mm to gas pipelines.
It is also not allowed to lay these channels in concrete structures that damage the reinforcement frame or mortgages.
How to work better
Wall chipping is a dusty job. To prevent dust from getting into other rooms, the doors are covered with a damp cloth and carefully closed. The fabric can be hung on both sides. To prevent dust from entering the respiratory tract, it is necessary to use a respirator. A regular gauze bandage can only help if you use a chisel and hammer. With this method of making a groove, there is not much dust. In all other cases, a respirator is desirable.
In addition to dust, during gating, pieces of wall, plaster, mortar, etc. fly off in all directions. You need to protect your hands and face. We put gloves on our hands and fasten the sleeves. It is better to protect your face with a transparent shield. In extreme cases, you can wear glasses. It’s better not to start work without them.
How to cover the grooves
After laying the cable in the grooves, they are covered with a solution so that the electrical wiring is completely hidden. This option is acceptable for brick houses and slab buildings. For wooden houses made of logs and timber, this method is undesirable, as it is a fire hazard. It is better to cover the grooves with the same solution that will be used for plastering. In a new building without finishing, use cement plaster. It will securely secure wires in concrete, aerated concrete or brick walls.
So, let’s look at the sequence in which I seal the grooves after laying the wiring:
- The channel is first cleared of dust using a vacuum cleaner or a wide brush. Remove large debris with a brush first.
- Before laying the cable, they must be primed with a wide brush, otherwise, due to poor adhesion of the solution, cracking and loss of the solution may occur.
- To prevent the wall from absorbing moisture from the solution, it is moistened before puttying.
- Gypsum or cement-sand plaster is spread along the entire length of the channel. Alabaster should not be used for these purposes - it sets too quickly, forming lumps on the wall. The solution should be thick, this is not a fine finish, smoothness is not really needed here. Try to fill in any gaps when hiding the wire.
- A spatula is carried along the distribution, removing excess mixture.
Main process
After carrying out the preparatory work, you need to check that the cable does not protrude above the surface, that is, it is recessed along its entire length. In places where it is not recessed enough, you will have to use a grinder or a hammer drill to make the groove deeper. The best way to check is to use a spatula along the wall.
The sealing of grooves for electrical wiring is carried out using the following technology:
- Dilute alabaster or building plaster as indicated on the package. Remember that this fixation mixture hardens very quickly, so it is better to dilute it in small portions and quickly apply spot fixation with a small spatula. Fastening in this way should be carried out on the walls and on the floor, at a distance of about 1 meter, and in the flow it is recommended to apply every 50, or even 30 cm. The better the cable products are fixed in the wall with alabaster, the easier it is to carry out further work on sealing the grooves.
- After the plaster has set and securely holds the wires, the main plaster is mixed. Each type has its own layer thickness limits. When sealing grooves with Rotband, this thickness should be no more than 50 mm. If it is necessary to apply a thicker layer, then this must be done in several stages.
- The thick plaster mixture is applied immediately with a small spatula perpendicular to the cable and the groove in which it is embedded, and then leveled wide until the level of the entire surface coincides with the sealed groove. All unnecessary excess is removed.
- If the wall will be painted after this, then one of the materials is used: reinforcing tape, sickle tape, construction bandage, fiberglass strips. She applies it when there is not yet a completely flat surface, since another layer of plaster will be applied on top of it.
- After the sealed and leveled surface where the groove with the cable was has completely dried, the priming process is repeated. Sometimes it may happen that the plaster shrinks a little, it’s okay - this is normal, you need to apply an additional layer of putty. If, on the contrary, convex places appear, you need to rub such places with coarse sandpaper or a special grater.
- The last stage is finishing putty work to level the walls. If ceramic tiles are applied after sealing, then these finishing works are not necessary.
Finally, we recommend watching a video that clearly shows how to seal grooves in a wall with electrical wiring:
Now you know how to seal a groove with your own hands. We hope the tips provided were useful to you and helped you complete all the work yourself!
It will be useful to read:
- How to groove walls for wiring
- How to make a wall chaser with your own hands
- How to mark walls for electrical wiring
With the advent of current conductors “clad” in a plastic sheath, it became possible to hide the wires in an array of wall enclosures.
Walls freed from hanging cords now have the ability to look aesthetically pleasing. To make hidden cable wiring, you must first cut grooves (channels) in the vertical fences of the premises.
Sealing the grooves is the final operation for installing hidden wiring. We will tell you how best to do this in this article.
What problems may arise when wiring is hidden?
Our readers recommend! To save on electricity bills, our readers recommend the 'Electricity Saving Box'. Monthly payments will be 30-50% less than they were before using the saver. It removes the reactive component from the network, resulting in a reduction in load and, as a consequence, current consumption. Electrical appliances consume less electricity and costs are reduced.
Many apartment owners who independently renovate their abode believe that installing ditches for wiring and sealing them is a very simple process. It can be easily carried out without any knowledge or skills. But, as practice shows, making such recesses and filling them is not such an easy job.
Poor quality and incorrect sealing of grooves with your own hands can lead to many problems. This is especially true for the solution falling out of the ditch. It is also possible for the surface to crack and even gouge. But the main thing is that few people know what exactly needs to be used to seal the grooves.
The best way to seal: the best materials
The choice of material to fill the groove after laying the wire or cable is a matter of personal taste. For example, builders use a mixture of sand and cement (3:1 ratio) to weigh down the putty. At the same time, this mixture is quite plastic. Craftsmen recommend alabaster mixed with PVA glue - the mixture is plastic, has increased stickiness, and hardens slowly.
The cheapest and most common material is a mixture of cement and sand, the heaviest and most durable mortar. The density of the solution can be adjusted. Often builders use gypsum mortar
It is important to remember that plaster requires quick hands. The material hardens within a maximum of five minutes
To create strength, the gypsum solution is thickened.
There is no point in using gypsum that has already hardened, because... there will be no strong adhesion to the surface of the groove. A neat, finished look will be given to the wall by putty on plasterboard, the advantage of which is that it does not need to be mixed in certain proportions, just dilute the powder with water.
To seal grooves in walls, a durable and moisture-resistant material is required. Which solution to prefer is chosen by the master himself, focusing on cost, his own experience and ease of use. The main thing is a careful and responsible approach to wall gating.
How to seal the groove under the wiring
So, you have replaced the wiring or installed an additional outlet (about this work, read the article on how to replace the wiring in an apartment with your own hands). Now it is necessary to seal the groove and carry out finishing work. In order for the chosen finish, whether it be wallpaper or paint, to lie smoothly, you need to carry out the work of sealing the grooves correctly. To do this, let's first decide on the tools.
Tools
The tools you will need are a large and small spatula, a narrow brush, a soil mixture, and plaster with mortar.
Stage 1. Primer
“Construction and Repair” strongly recommends not to neglect this stage. In general, consider that it is mandatory, since the absence of a primer will lead to poor bonding, and subsequently cracking of the plaster and its falling off.
Therefore, before sealing the groove under the wiring, it must be thoroughly primed. Not only the groove itself can be primed, but also a small area around it, because subsequently the plaster will extend into these places.
In this case, you need to prime not the standard method, when the brush is wetted in the solution and coated, but literally pour the primer over the area of the groove. This is done with a brush, thoroughly spraying the primer solution along the groove. The presence of wires in it should not confuse you.
Do not regret that a significant amount of primer will be used up; a well-made and sealed groove will serve you for several decades. (On the process of cutting the grooves themselves, see our tips on How to make a groove for wiring).
Stage 2. Fixing the wires
At this stage, spot fixation of the wiring is carried out with plaster. This is done at a distance of 1 m from each other. The work must be completed quickly, because... The plaster will harden within 5 minutes. So dilute in small portions.
Our advice is not to use alabaster. It is very inconvenient to work with, it dries out quickly and often this inconvenience significantly affects the quality of the final result. Half a minute of delay, and now the fixation is carried out with a hardening material, which means it will quickly crumble. So choose plaster.
Stage 3. Closing the groove
At this stage, we first choose what to seal the groove under the wiring. For sealing work, a gypsum solution is taken. Like Rothband. It dries in about 20 minutes, unlike regular plaster. The work is carried out with a spatula, but the method of application must be specific.
- Gypsum plaster should be thicker than usual.
- It should be applied from the center in a herringbone pattern. Alternately directing the “strokes” to one or the other edge of the groove. This method gives better adhesion of the plaster material to the surface. If there is a hole, then the solution must be applied around the perimeter perpendicular to the edge, and then the center is filled.
- Remove excess solution using a trowel, holding it at an angle of 90°. Those. excess solution will have to collect on the back of the iron, where the handle is. Under no circumstances should it be laid flat so that the solution does not smear and a lump forms. Movements should be zigzag.
- If you have to fill a hole that is larger in size than the trowel, then you need to use the rule. The principle is the same, right angle to the surface, zigzag movements from the center to the edge.
- First, a small distance of the groove, for example 1 meter, is filled with the solution, then 2-3 removals of the excess are done with a trowel. And so on.
At this point, the sealing of the groove is considered complete. Good luck and inspiration in your renovation.
How to seal grooves
To seal the grooves, the following can be used: alabaster, cement mortar or putty. There are many types of putties, but not all of them are suitable for this job. It is unacceptable to use finishing putties, which are intended for final finishing of walls with a layer thickness of several millimeters.
It is necessary to use putties designed for sealing cracks and seams in walls, for example, fugenfüller.
The main condition for good quality groove sealing is that the work must be performed in several stages. First, fill the groove to 0.7 - 0.8 of its volume. The putty is applied with a spatula, carefully filling all voids.
After the putty has completely hardened (the first layer of fugenfüller in the groove should be kept for at least 2 - 3 days), the groove is filled so that there is space left in it for applying the finishing putty (approximately 2 - 3 mm).
It must be taken into account that significantly more putty can be placed in the groove than when used for other types of work. Therefore, the hardening time of a sealed groove is often many times longer than the hardening time of putty when used to seal cracks and seams.
If you apply finishing putty over putty that has not completely dried in the groove, this will inevitably lead to the appearance of cracks. Finishing putties, after hardening, do not allow moisture to pass through them well. And as a result of uneven hardening of different putties in contact, mechanical stresses arise, which, ultimately, can significantly reduce the quality of all plastering and painting work. This is especially evident on walls that are being prepared for painting without wallpapering them.
If you try to seal a groove in one pass, drawing the level of putty along the surface of the wall, then after it dries, a bump will form along the groove - putties intended for sealing cracks and seams expand when hardening. Otherwise, after sealing the cracks, instead of a homogeneous wall structure, the same cracks will remain in it, only of a smaller thickness.
When using alabaster or cement plaster to seal the grooves, the quality of the groove sealing is lower. But in damp and unheated rooms, cement plaster must be used.
Oxidation of wire connections
When plastering, a huge amount of water is used. And if the electrician is done before, then moisture may well reach the junctions of the copper cable cores in the socket boxes. Subsequently, this will lead to oxidation and destruction of contacts, and may result in their burnout.
There are many ways to seal the junction box to prevent moisture and wet solution from getting there, but not all of them help.
The cheapest and most accessible is sealing with ordinary masking tape.
Another simple method is to make end caps from cardboard boxes. Take a crown to match the diameter of the socket box and cut yourself as many covers as necessary.
In this case, it is better to insert 2 pieces at once into the socket box itself. You can also make such plugs from sandwich panels.
Wiring methods
Professionals consider the best option to install grooves, which will act as a place for laying the cable. The grooves are a channel into which the wiring is laid. After this, the cable channel is covered with a solution.
The peculiarity of this wiring option is that it is completely hidden in the wall. This creates a hidden gasket. Of course, this option is used mainly in brick and monolithic houses. In frames and log houses, this method is extremely undesirable, as it poses a fire hazard.
If the house has walls made of a frame covered with plasterboard, then it is better to use them for laying the cable. In this case, there is no need to install ditches, since the wiring is laid directly in the void of the wall.
This is interesting: Installing a distribution box in concrete - video, instructions, photos
Features of laying grooves for electrical wiring
Strobe in concrete for electrical wiring
Different materials behave differently when chipped. The most difficulties arise when making grooves in concrete walls; in this case, wall chasers and hammer drills are used. If we are talking about a brick wall, you can do without gouging with a trench; the cables are attached to the wall with dowels.
If it is necessary to pre-place the wiring in a metal casing, horizontal gouging of the channels is carried out using a grinder or chisel. Brick walls, if they split, do so at the seam. This is due to the fact that cement mortar is more pliable and softer than brick.
Basic rules and features of gating:
- The depth of vertical trenches should not exceed 1/3 of the wall thickness.
- The recesses are carried out strictly horizontally or strictly vertically; tilts are permissible only if there are uneven slabs of the house.
- The depth of horizontal grooves should not be more than 1/6 of the thickness of the ceiling.
Grooving for wiring in walls: features of work on different surfaces
Different surfaces behave differently when grating. The most difficult thing is to make a groove in concrete - here you cannot do without a hammer drill or wall chaser! If you need to conduct wiring in a wooden wall (a relatively soft and pliable material), the lines are marked with a grinder, and the grooves are laid with a hammer and chisel.
Recesses in porous concrete are made with a special tool (wall chaser). If the wall is brick, you can do without gouging out grooves by attaching the wiring with dowels.
If it is necessary to place the cable in a metal casing, horizontal grooves are carried out with a chisel or grinder. Owners of a hammer drill with a “drill” or “pike” type attachment can use it. Brick walls, if possible, are grooved along the seam, since the cement mortar is softer and more pliable than the brick itself.
Simple rules for gating:
- Vertical grooves should not be deeper than one third of the total wall thickness.
- Horizontal grooves are made with a depth of less than one-sixth of the wall thickness.
- The grooves are drawn in a straight line, parallel to the floor line; they should not intersect. This requirement is based on common sense - if the groove is too deep, the strength of the wall will deteriorate. If the grooves intersect, the solidity of the wall suffers.
- The grooves are drawn either strictly vertically or strictly horizontally; tilting is permissible only on indirect walls.
Most manuals and instructions indicate that gating of load-bearing structures is prohibited!
Load-bearing walls of a panel house
Before gating, you need to determine the type and design of the wall Load-bearing walls
Supporting vertical structures carry the bulk of the weight of the floors or roof above. Depending on their location, they may have openings for windows and balcony doors.
Load-bearing wall panels consist of the following layers:
- The outer layer is a huge mass of high-strength concrete grade M400 that evenly covers the reinforcement frame.
- The reinforcement frame is a mesh that occupies most of the volume of the panel and gives it strength and rigidity. The material for such a frame is reinforcement rods with a diameter of 12-14 mm, connected to each other using a special flexible and corrosion-resistant steel wire.
- The protective layer is a thin layer of concrete of the same grade as the outer covering frame made of reinforcement on the inner side of the panel facing the living space. It has a thickness of 10-20 mm and serves to protect the reinforcement frame from damage.
- The inner finishing layer is poured using easily processable finishing solutions. It has a thickness of 15 to 20 mm and is used for various repair work.
In many modern panels, between the outer layer with reinforcing mesh and the inner finishing layer there is a layer of insulation - stone or basalt wool.
Building regulations strictly prohibit the following panel house structures:
- ceiling or floor slabs,
- crossbar.
Inside the floor slabs there are ready-made oblong cavities through which wiring can be pulled. There is no point in cutting the crossbars, since they will still be covered with decorative trim, under which electrical wires can be placed.
How to determine a load-bearing wall
Load-bearing walls include the following structures:
- facing the street or landing, into the entrance;
- separating two neighboring apartments;
- located perpendicular to the floor slabs;
- having a thickness of at least 20 cm, excluding finishing layers of plaster and putty.
All other wall structures are classified as partitions.
When determining load-bearing walls in an apartment, I also take into account what project this residential building belongs to. Panel houses of the 1-464 series have not only external but also internal load-bearing walls, while houses of the 1-335 series are characterized only by external panels.
Is it possible to groove load-bearing walls and ceilings?
According to all currently existing rules and building codes, regulations and legislative documents in the field of construction, laying grooves in load-bearing walls and interfloor floor slabs with a large number of voids is prohibited.
It is prohibited to tap load-bearing walls in a monolithic house for wiring or other communications. The same applies to the ceiling, since it consists of floor slabs. If the wall is not load-bearing, gating can be done in it without any restrictions.
Grilling walls made of aerated concrete and brick
Aerated concrete is very durable, so using a chisel and hammer to work with it can hardly be called a reasonable solution. To the question - how to groove a concrete wall - we can answer: it is best to use a wall chaser. It will allow you to cut a groove in the wall for wiring without dust, with minimal time and labor costs. But if you, like most ordinary owners, do not have such an opportunity, use a hammer drill or grinder.
Brick is the most convenient material for this work. The mixture of cement and sand, which is used to connect the elements of a brick wall, can be easily knocked out even with a chisel and a hammer, so arranging a horizontal groove does not take much time. But punching a vertical groove will be more difficult, since in this case you will have to work directly with the bricks.
Sealing grooves under pipes
Putting grooves in the wall under pipes is done in the same way, however, instead of construction gypsum, polyurethane foam can be used to secure the pipes, and the pipes themselves are insulated using a shell made of polyurethane foam or polystyrene foam. Thermal insulation of the pipes will prevent the growth of microbes, and the foam will securely fix the pipes in the groove. In general, the whole process looks like this: the grooves are cleaned of dust and primed, insulated pipes are installed, then they are fixed with foam, and after that they are covered with gypsum mortar.
Hidden wiring device
Diagram of the approximate location of wiring in the apartment.
The layout of the electrification of the premises depends on the location of electricity consumers in the rooms. The specifics of supplying wires to a particular location of switches and sockets must correspond to the purpose of the room.
Kitchen
Place the switch at a comfortable level
The overhead lighting switch is placed near the entrance at a height of 60 cm from the floor. This position is comfortable for a person of average height. Residents can change this setting based on their individual needs. This also applies to the electrical outlet for the refrigerator.
Considering the kitchen work table area, the height of the sockets above the surface of the apron can be about 15 - 20 cm.
Often, kitchen owners hang a TV and microwave on the wall.
Sockets are placed in such a way that they are not visible from behind the housings of the devices.
For a TV, an additional groove is punched for the antenna cable.
The block, consisting of a power outlet and an antenna connector, will not be visible behind the body of the household appliance. This will eliminate the appearance of hanging wires.
Bedroom
We will not repeat the overhead light switch. It will be very convenient for spouses to place the connection points for electrical appliances on the sides of the double bed at the head of the bed.
It is convenient to place an electric point for a vacuum cleaner on the wall at a height of 20 cm from the floor.
Living room
If the owners decide to decorate the living room interior with an accent wall, then they will need to think about the location of sockets for illuminating various wall elements.
Bathroom and toilet
The space of these rooms is constantly exposed to high humidity.
Connection points for hair dryers, washing machines, and internal ventilation switches must be located outside the area of direct moisture.
Utility rooms
All of the above requirements for the location of electrical connection points also apply to corridors, storage rooms and glazed balconies and loggias.
Methods and technology of gating
Grooving walls for wiring is usually done at the very early stage of repairs, since the process generates a large amount of cement or brick dust.
When preparing for work, you should, if possible, remove or carefully cover household appliances and furniture from the room, prepare bags for garbage and dust, it is advisable to purchase or rent a construction vacuum cleaner.
There are several ways to tap walls for wiring with your own hands.
Using a hammer and chisel
For simplicity, the process is performed in several stages.
First, using a chisel, the recesses along the edges of the future groove are marked. The chisel is placed across the furrow and driven into the wall with sharp blows of the hammer. The top layer is removed according to the markings, and the groove itself is deepened by 2.5 cm along its entire length.
Carrying out work in this way is impossible when gating concrete due to the high hardness of the material.
Hammering with a hammer drill
When using a hammer drill, work begins with marking the wall. To make a groove you will need a shovel and a small drill.
Along the entire length of the wiring route, holes 2.5 cm deep are drilled with a distance of 1-1.5 cm from each other. Then a groove is hollowed out along the finished holes using a spatula. In this case, the blade is installed along the applied markings, since when installed transversely, too large pieces of the wall will break off.
The use of a hammer drill has its undeniable advantages:
- work is performed with high precision and maximum speed;
- When done carefully, the required geometric dimensions of the groove are strictly observed.
Grinding with a grinder
To install grooves for electrical wiring, you will need a diamond-coated disk, unlike conventional nozzles, which allows you to easily and quickly perform work on a brick or concrete wall.
As in previous methods, the necessary markings are first applied. Two parallel lines are drawn along it, with an interval between them corresponding to the required width of the groove. Between the cuts to the required depth, a groove is knocked out using any suitable method, using a hammer drill or chisel.
Using a grinder makes it much easier to make cuts for grooves, but a lot of dust is generated during sawing. It is recommended to remove items from the room or cover them with plastic wrap, and use an industrial vacuum cleaner to collect small waste.
Application of wall chaser
The wall chaser is specially designed for making grooves and is used mainly by professionals. The wall chaser looks similar to a grinder, but its design provides a pair of connectors for installing diamond discs, with an adjustable distance between them. The tool is also equipped with an adjustable casing, ensuring precise compliance with the required depth.
When performing work with a wall chaser, a minimal amount of dust is generated, and the process itself does not take much time. Once parallel cuts are made along the edges, excess material is removed from the groove using a chisel or hammer drill.
The main disadvantage of using a wall chaser is its high cost, when the tool is used only to perform one specialized job. To drill walls for wiring with your own hands for small amounts of work, it is better to use a grinder or hammer drill available in almost every home.
How to fill a hole after gating
To cover the hole you will need a trowel, a container for mixing the solution, a spatula, a brush, and a spray bottle. Work on walls made of different materials differs.
In a concrete wall
At the beginning of work, the inner walls of the groove, the hole itself and the surface around it are abundantly moistened with water using:
- spray bottle;
- wide brush;
- sponge or piece of foam rubber.
The groove in the concrete wall is primed, then sealed with mortar, which is applied with quick, wide strokes crosswise: from bottom to top to the right - from bottom to top to the left. After the initial hardening of the mixture, excess should be removed with an iron spatula. Movements with the spatula should be soft and stroking.
The tool is pressed tightly against the wall. After the putty has dried, the surface is puttied. For the mixture to dry completely, you need to wait 6-12 hours.
In a brick wall
Chipping a brick wall is characterized by the presence of a large amount of dust, which is first removed with a long and narrow brush. The surface is abundantly wetted with water. Accordingly, the master will need more primer and more careful application.
Seal the furrows with gypsum mortar or alabaster. If the groove is deep, it is permissible to use fragments of bricks immersed in cement mortar, with which the groove is filled. Then the voids and cavities are carefully filled with gypsum or cement mortar using a trowel.
In the monolith
Covering a groove in a monolithic wall is similar to working in a concrete wall.
The groove in the monolithic wall is filled with a mixture of high viscosity. The solution is driven into the grooves as tightly as possible.
If necessary, the solution is applied in several stages, i.e. the master waits for one layer to dry completely, then applies the next one, and so on until the recess is filled. The surface is leveled with a spatula.
How to plaster a groove?
Creating a high-quality interior is directly related to the organization of technological holes and seams.
It is worth noting that the need to lay additional communications arises quite often not only at the stage of construction of the structure itself, but also during redevelopment, creation of an additional heating circuit or electrical wiring branch.
In addition, water and sewer pipes also require adequate placement. For laying communications that are relatively small in diameter, such as thin water pipes and electrical cables, wall gating is used. Of course, after all communications have been laid, these technological niches must be closed.
Otherwise, not only will it be impossible to create an attractive finish, but there will also be an additional potential danger of damage to the relevant communications and unpleasant consequences from exposed electrical wires . That is why, and also due to the established installation standards of the relevant systems.
In general, there is nothing particularly complicated about plastering walls. It is enough just to understand the basic principles of closing the relevant technological niches in order to fully guarantee their safety and reliability throughout the entire period.
To carry out the work in accordance with all the rules, to ensure its quality, reliability and durability, you will need certain high-quality materials and a set of basic tools for interior decoration.
In particular, spatulas will not be superfluous. It is better to take at least two types of tools - wide and narrow. In addition, you will need a primer, a brush, some plaster and mortar.
When carrying out construction and finishing work, specialists always know that a primer must first be applied to any surface in order to ensure a sufficient degree of adhesion and reliability of fastening of subsequent emission solutions and compositions. This allows you to avoid the appearance of possible cracks and shedding of the plaster, and separation of the base itself.
The pipes always contain a fairly large amount of dust and small cement debris, which is the result of cutting a concrete wall. They can prevent the plaster from sticking the first time. That is why, at the beginning, the primer is applied with a large narrow brush, which ensures the penetration of the composition into all hard-to-reach places and potholes.
To ensure that the wiring does not move during the application of the base composition and remains directly in the groove itself, it is necessary to secure it in separate areas using construction plaster. This composition hardens extremely quickly, so it needs to be prepared to a minimum.
The wiring is fixed at intervals of approximately every meter in areas with even distribution. If necessary, in the case of turns or bends, the securing segments more often.
Typically, grooves are sealed using gypsum mortar. The technology is extremely simple and accessible. In fact, the gypsum solution is directly pressed into the groove using a spatula, which has already been pre-primed.
In principle, there is nothing complicated in this process, but to ensure maximum quality it is necessary to follow certain rules. The basis is the correct mixing of the solution itself . In order for the solution to adhere to both inner walls, it is applied crosswise. This ensures adhesion to each wall.
In addition, in order to eliminate possible internal deformations of the bulk of the plaster, it is better to remove the mortar at a right angle, rather than flat. It is necessary to exclude the possibility of the solution being drawn behind the spatula. To make the finish much more accurate, removing excess solution with proper application is enough only once or a couple of times.
The advantage of gypsum grout is very rapid drying and curing. However, this also imposes certain restrictions on the implementation of work.
The solution itself in this case is only suitable for 5 minutes, during which it must be completely used on the corresponding wall segment . If you find that the solution has already begun to set, it is no longer suitable for use and must be replaced with a fresh one.
You can cover the grooves in which thin pipes run using the same scheme. Typically, instead of building gypsum, polyurethane foam is used for basic fastening of passing communications. This allows for more uniform and high-quality fastening of large-diameter in technological niches.
In addition, it is advisable to carry out additional insulation of pipes using foam or polystyrene liners. In general, the technology involves cleaning the grooves from dust, priming, laying insulation, and fixing the structure with foam. After this, the niche is covered with gypsum mortar using the previous technology.
Tools for wall chiselling
When doing home renovations, many are faced with the question of how to tap a concrete wall for wiring with their own hands. There are various tools for this, which will be specifically discussed below.
Hammer and chisel - ideal partners
This work is carried out in separate stages. First you need to use a chisel one or two times the width of the spire to mark the edges of the groove. Then, placing the point across the groove, you need to knock out a small piece of the wall in depth. Then you can proceed in two ways - first remove the entire top layer of the intended recess and only then knock out the depth of the groove, or “dig” deeper to the end after every centimeter of the top layer removed.
Hammer. He's a hammer drill
To perform gating with this tool, you need three attachments - two drills of different lengths and a spatula. First you need to drill holes 2.5 cm deep along the entire length of the intended line. They should be evenly spaced at a distance of 1-1.5 cm from each other. Then, replacing the drill with a blade, walk along the furrow from point to point, forming a continuous groove. You can work with a hammer drill quickly and cleanly. And after the work is completed, you will get a highway of the given depth and width. And the unattractive appearance can later be masked with putty.
Universal grinder
In order to use an angle grinder for slitting, it needs a diamond disc. High-quality cutting with such a disc is particularly precise and in the process does not leave any chips or cracks on the working material. An important factor is also the reduction of noise levels.
First you need to make parallel cuts, which will be clear boundaries of the future groove. The width between them must correspond to the standard dimensions necessary for laying the cable. Then, using a chisel or hammer drill, deepen the furrow to the desired size. The differences between the previous methods are essentially minimal. However, the edges of the grooves turn out smooth
This is very important when damage to the wall material needs to be reduced to “zero”. But, it should be taken into account that the grinder produces a lot of dust, which in a short time can cover the entire room
To avoid this, you can involve a person with a construction (not household!) vacuum cleaner, who will hold the suction pipe close to the source of dust.
Wall chaser, or how to groove a wall for wiring without dust
The wall chaser is a tool that has absorbed and modified all the advantages of the angle grinder necessary for cutting grooves in the wall. It has two diamond wheels, the distances of which can be adjusted, depending on the required furrow dimensions. A special powerful casing covers both circles from above by more than half. And when the circles enter the wall, this casing, completely adjacent to the wall, isolates the cutting space. And the resulting dust is drawn out through the provided outlet for the vacuum cleaner. After cutting the edges, you still have to remove the excess material with a puncher. However, the edges will be perfectly smooth and without excess dust. The main disadvantage is the price of the tool, which will be too high for home use.
Restoring a plasterboard wall
Holes in walls made of this material are the most common
Unlike brick and concrete walls, plasterboard walls are quite fragile and are very often damaged precisely because of the carelessness of the apartment owners
Make sure you have all the necessary tools and materials at hand. You will need:
- Self-tapping screws, you will need about 8 of them.
- Appropriate sized drywall.
- A plank of wood, or in the case of a large hole in drywall, two pieces of wood.
- Sandpaper.
- A piece of reinforcing mesh.
- Hacksaw.
- Putty.
- Pencil and triangle ruler.
- Electric drill with attachments (will be used as a mixer and for tightening screws).
When you have prepared all the necessary materials and tools, you can proceed directly to fixing the problem. To fix a hole in a gypsum board wall, you need to act according to the algorithm:
- outline the location of future repairs in the form of a rectangle, using a ruler and pencil. Make sure that the outlined border has perfectly smooth edges;
- Now we take a hacksaw and cut a hole along the outlined lines in order to remove all the damaged material. Boundaries should be strictly respected;
- take measurements of the wooden board and make sure that it is slightly narrower and longer than the hole in the wall. Such proportions are needed so that the board can fit through the resulting hole. For ease of working with the board, you need to screw a reliable screw into its center, which will be used as a handle;
- a board of a suitable size must be inserted into the hole itself, pressed against the inside of the drywall and secured by screwing in four self-tapping screws. After all this, the screw handle must be removed;
- from a sheet of plasterboard you need to cut a piece identical to the hole in the wall and lay it directly into it. To obtain perfectly smooth edges, first cut the top layer of the sheet, then its bottom layer. After this, simply break the plaster middle;
- This piece of drywall must be attached to the board installed there, and the caps of the screws must be completely recessed into the drywall. Fastenings are required in two places diagonally;
- The next step will be to putty the edges of the patch or any resulting irregularities. Place a reinforcing mesh on top of the putty and then rub it directly into the putty. This action will fill all the resulting flaws and irregularities;
- let the material dry and sand it with sandpaper;
- Apply a second layer of putty, which will be the finishing coat. This action should not be ignored, since the finishing layer of putty is needed to consolidate the result of the repair;
- after this layer has completely dried, sand it again with the same sandpaper;
- That’s it, the hole is sealed, now you should disguise it, depending on how this wall of your apartment is finished.
Now you clearly know how to seal a hole in the wall, in what sequence to carry out all repair work, depending on the size of the hole formed and the material from which the apartment wall is made. Armed with all the necessary knowledge, you can safely begin repairs without involving professionals in the process, which will save you not only money, but also your precious time. Believe in your strength and you will definitely succeed!
What solution to seal the grooves with?
To seal the grooves in which the electrical wiring is located, there is no single solution used by craftsmen. Here is a list of building mixtures that they prefer:
- Gypsum plaster. It is used in damp areas to seal very deep and medium-sized grooves. Complete drying time is about a day.
- Among ready-made mixtures, Rotband, Osnovit and Volma are widely popular. However, in comparison, the first of them has excellent quality at a lower price.
- Gypsum glue type Perlfix.
- If the wall is being prepared for facing tiles, then it can be sealed with the same tile adhesive or cement mortar.
- Cement-sand based plaster mortar.
The main thing is that the wiring is completely insulated and without insulated twists. It is not recommended to seal the grooves with sealant or polyurethane foam. It is used to seal cracks and holes in the walls, and when the cable heats up, the foam can catch fire or melt, and the sealant only serves to seal the elements.
How to fill holes in a concrete wall?
Over time, holes or cracks may appear in any walls.
The occurrence of such defects is considered commonplace. Very often they can appear during the installation and repair of heating systems, air conditioners, as a result of rearranging furniture and much more. When preparing surfaces for further finishing, it is necessary to beat off old and unnecessary plaster, so chipped fragments are possible that will need to be restored. In addition, cracks sooner or later appear on any concrete during operation. You can come up with many ways to disguise damaged areas: cover it with a painting, cover it with wallpaper, and much more. But this will not solve the problem itself - the hole will remain. In order to repair defects in the wall, you do not need the help of craftsmen; everyone can do it all on their own.
Fixing the electrical cable in the groove
When the groove is ready, you can start laying the electrical cable, but now the question arises - how to fix the cable in the groove?
2.1 Fixing the cable in the groove using a special dowel clamp:
In the groove itself, we drill holes at intervals of 40-50 cm with a drill bit with a diameter of 6 mm, and then we put the dowel-clamp on the cable and insert it into the drilled hole.
Initially, having laid the cable in the groove, “problem” areas will be visible where the cable protrudes outward; first of all, it needs to be fixed there
Also, instead of a dowel clamp, you can use ties, but always with a hole for a self-tapping screw, as in the photo below:
2.2 Fixing the cable in the groove using homemade fasteners:
To fix the cable, I made small plates from the remnants of the gypsum board profile and drilled holes in them, and then also using a dowel-nail (you can use a simple dowel and self-tapping screw) to fix the cable. The whole process is shown in the photo below:
Step 1
— We use metal scissors and a piece of profile for gypsum plasterboard:
Step 2
— Cut small plates:
Step 3
— Drill holes in the plates:
Step 4
— Using a 6 mm diameter drill, we make holes inside the groove and install the dowel:
Step 5
— Using a self-tapping screw and a plate, fix the cable in the groove:
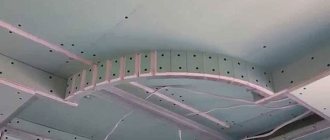
Laying wires in grooves
Lay the cable in a dust-free channel
Before placing the electrical wiring into the grooves, the channels are cleaned with a vacuum cleaner. Then, using a brush or spray gun, the inner surface of the channels is treated with a primer.
To seal the groove with your own hands, you need to fix the laid wires in the channel.
Long grooves will not be able to temporarily hold the wire in place. Fix the wiring with alabaster. Thanks to its rapid hardening, alabaster almost instantly secures the wire in the channel.
The dry powder is diluted to obtain a paste-like mass. Using small pieces of paste, the electrical conductors are secured in the grooves. After this, they proceed directly to sealing the channels with laid electrical wiring.