All experienced craftsmen and even beginners understand why putty is used in repairs. Thanks to it, the wall becomes smooth, the surface has no defects, cracks or differences. This is an ideal basis for further finishing work. However, many doubt whether it is possible to lay tiles on a putty wall? After all, ceramics is an expensive material. Therefore, finishing using tiles must be approached with special care.
Requirements for laying tiles
There are different opinions on whether putty is required or not. However, there are several positive aspects of holding such an event. For example, the quality of adhesion to the surface improves. The surface will be protected from microorganisms (fungus, mold), ceramic tiles will last much longer.
But, before starting work, it is important to understand whether the surface meets all the requirements for laying tiles. They are as follows:
- High level of strength. No cracks, weak spots or peeling plaster. Only a dry wall.
- Excellent penetrating performance.
- Smooth surface, without protrusions, chips and other defects.
If you approach the work responsibly, the finishing layer will serve well, the putty walls will be smooth, and the tiles will not fall off in a few months. Is it necessary to putty the wall? No, many people skip this stage because it is a waste of time and effort. And the tiles hold up well on plaster. However, as practice has shown, with preparation it is possible to improve both the decorative qualities of the material and its service life.
And so that all the work is not in vain, you need to choose high-quality putty material. What is needed for this?
Minimum plaster thickness
The thickness of the plaster is no less important than the nature of the solution and the condition of the wall on which it is applied. If it is insufficient, it will not be possible to fully level the surface. Excessive thickening is a waste of money on materials and the risk of the mortar slipping or peeling off the wall.
In this article we will look at different options for layer sizes characteristic of aerated concrete, concrete, brick, wood, plasterboard and insulated walls. Also here are figures for SNiP standards for plastering work.
- Optimal plaster thickness
- Finishing brick, concrete and aerated concrete walls
- Finishing of wooden and plasterboard surfaces, as well as insulated
- What thickness of plaster should be for different compositions?
In this article we will look at different options for layer sizes characteristic of aerated concrete, concrete, brick, wood, plasterboard and insulated walls. Also here are figures for SNiP standards for plastering work.
When is reinforcing mesh needed?
In some cases, during plastering work, builders install a special reinforcing mesh made of metal or plastic wire. By analogy with reinforced concrete structures, it is designed to resist tensile loads that can occur due to temperature changes and transfer of deformations of the load-bearing wall to the outer finishing layer.
The mesh helps increase adhesion, i.e. improves the adhesion of materials, prevents cracking and delamination. In addition, the use of fittings minimizes the consequences of possible technology violations, for example, non-compliance with temperature and humidity conditions.
For finishing up to 50 mm thick, the use of mesh is optional and directly depends on the client’s requirements and the allocated budget. If this indicator is exceeded, most professionals prefer to install it, despite the fact that this requirement is not in the current SNiP 3.04.01–87.
Companies that create building mixtures conduct a series of tests on their products and have a developed quality control system. As experts, they include a list of recommendations with their products that clarify general ideas about finishing mixtures.
Requirements for putty and its choice
According to experts, it is better to lay the tiles on a prepared layer. There are several indicators by which you can determine whether the putty is suitable for the base or not. They are as follows:
- Protection from moisture. Most often, tiles are used in wet rooms, due to their protection from moisture. This is the bathroom, kitchen, corridor. Accordingly, the putty layer must also withstand such moisture and sudden temperature changes. Otherwise, the layer will begin to collapse. Gypsum-based putty is no longer suitable; it has no moisture protection. Therefore, the best option is polymer mixtures or cement-based ones.
- The putty should provide better adhesion. Wallpaper or paint have minimal weight and, accordingly, practically do not load the wall. The tile weighs a lot, so the thickness of the putty layer and its adhesion quality should be enough to hold both the tile and adhere well to the base of the wall. Polymer compounds have shown themselves to be the best in this regard.
- Compatibility of the type of putty with the material from which the walls are made. For cellular concrete (aerated concrete, foam concrete), it is recommended to use compositions based on cement, silicone and silicate. Acrylic is suitable for brick and concrete. The packaging indicates for which surfaces the composition is used.
- Application area depending on climate. Tiles can be used to decorate both indoor and outdoor spaces. Putty is also divided into: internal and external. The second type is more expensive, but can withstand the negative influence of the external environment.
- To level the walls and obtain the required thickness, not one, but several layers of putty are made. The first is the starting one, it serves to level the surfaces. The second allows you to fill large irregularities. The third is the finish, which makes the surface ideal for further processing.
When the surface is made with large differences, the number of layers can be increased. But it is best to use plaster for this.
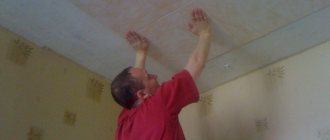
Often, to level walls for installing tiles, they resort to using plasterboard. In this case, it is enough to fill the seams and joints between the sheets and apply 1-2 layers of putty to the entire surface.
Drying time
Regarding the period of time required for complete hardening, much depends on the type of putty and tile adhesive used. As a rule, the plastering itself dries completely within 24 hours after application in a dry environment. As for tiling, everything here can take up to several days. In this case, partial drying occurs several hours after application.
Important. It is necessary to lay the devices in parts, since in its raw form the glue has a greater mass than subsequently when partially or completely hardened.
Surface preparation
Thanks to such measures, you can make the walls ideal for further work. The tile will hold up well. The walls will be strong and stable, adhesion will improve, and the surface will be smooth and free of defects.
The set of measures to prepare walls for puttying and applying tiles includes:
- Preparation of tools and materials. A set of spatulas, containers for mixing putty and glue, primer, roller and paint brush, etc.
- Preparing the premises. If it is residential, all furniture is removed, accessories, doors, windows and floors are protected from damage and dirt, since the work will be wet.
- Removing the old finishing layer. Wallpaper, painting, whitewashing, old tiles - all this must be removed using available means.
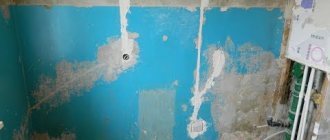
- The condition of the wall is assessed. The peeling plaster must be removed. The cracks expand and are sealed with putty or plaster. When leveling a wall is required, depending on the differences, the ideal method is chosen to obtain the best result.
- The surface should be smooth and clean. Dust and debris from construction are removed from it. And if the surface is too smooth, then notches should be made on it with an axe, grinder or knife.
- The final stage of surface preparation before puttying under tiles is priming. The main task is to apply the primer to the surface using a roller and brush. The entire surface is processed without gaps. Hard-to-reach places are coated with a narrow brush.
Subsequent work can only be carried out after the primer layer has dried. It all depends on the brand used. The packaging indicates how long it will take to dry. This completes the preparation.
The procedure for puttingty under ceramics
Sometimes plastering the walls under the tiles is a sufficient measure of preparation for further manipulations. And the logical conclusion is if you ask the question: is it necessary to putty the walls before laying the finishing slabs? It is necessary if a similar degree of preparation is chosen, and the wall allows you to get by with it. To comply with the technology, the putty must have a number of characteristics, and the set of works must be carried out in strict accordance with construction GOSTs.
Is it possible to glue tiles to putty walls? This can be resolved if, before laying the tiles, you study all the factors and come to the conclusion that putty can be used in a particular situation. But then you will have to strictly adhere to the sequence of the technological process:
How to putty walls under tiles
First you need to prepare the selected putty. If it is a gypsum-based mixture, then it is mixed with water in a container according to the instructions on the package. Polymer mixtures are sold immediately in finished form. All you have to do is open them and get to work.
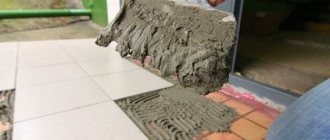
Puttying technology requires two spatulas: narrow and wide. Using a narrow spatula, apply the composition from the bucket onto a wide one. Next, using progressive movements, starting from the corner, the putty is applied to the wall. When applying the first layer, you don’t need to think about its maximum evenness, it’s the starting layer. The main task is to cover the entire surface, but at the same time not forgetting about the evenness and thickness of the layer. It can reach a maximum of 5 mm. Otherwise, both the putty and the tiles applied to it will simply fall off.
The next layer is applied after the first has dried. But, it is recommended to additionally treat the wall with a primer after each of them. Subsequent layers are applied in a perpendicular position relative to the previous one. The finish is made as thin as possible. However, if we are talking about further gluing of tiles, then it is not necessary.
All activities to prepare the wall surface are not just a waste of time and effort. This is an investment in the future. After all, tile is an expensive finishing material, so its installation must be approached responsibly. Putty will protect the surface from fungus and mold, improve adhesion to the surface and extend the service life of the tile. Externally, the tile will look flawless, you just need to give it a little attention and effort. But everyone must decide for themselves whether surfaces need to be puttied or not.
We recommend the article: How to properly putty a wall.
Will the tiles stick to putty?
Putty is used to level surfaces when mechanical methods do not give the desired result. And the evenness of the wall and the absence of defects are the main conditions that must be met when laying tiles.
Properly executed putty will ensure reliable adhesion of the tile to the surface. It will stick firmly to the wall and will last for decades.
Preliminary preparation before tiling work
For tiled masonry, the main thing is to properly prepare the working base.
After the preparatory work, the base should be:
- Durable enough. Walls whose surface is susceptible to cracking, wetness, and crumbling will not be able to hold fairly heavy finishing material. The tiles will begin to fall off from such a surface after some time. Peeling coating must always be completely removed.
- Have excellent adhesion. It is necessary to ensure good adhesion of the surface to the tile adhesive mixture. As a result of poor adhesion, the finishing material will fall off the wall.
- As smooth as possible, without significant defects. Making high-quality tiles on a curved wall is not very easy. And if you lay the material, repeating all the curves found on the surface, the coating will not look aesthetically pleasing. Plus, tiles on an uneven surface will not last long.
That is, if you do not adhere to the correct technology for preparing surfaces for tiling work, then the results of the final finishing are unlikely to please you with their appearance.
It is necessary to understand that it will no longer be possible to reinstall the originally used tiles at a high quality level. And if you buy new finishing material, then such repairs will cost a pretty penny. Therefore, it is recommended that preparatory work be carried out immediately in accordance with technological standards. It is much cheaper, and it is much easier to glue such finishing material onto a flat wall, and the result is of the highest quality.
Leveling is carried out in various ways, for example, using plaster or plasterboard. These materials are most often used when it is necessary to eliminate significant unevenness and large defects on surfaces.
When the walls are relatively smooth and have small errors, then it is quite possible to get by with putty work. But, is it possible to lay tiles on a putty surface?