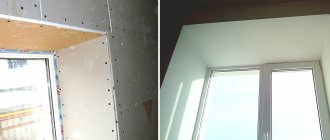
Drywall is the most common material used for interior decoration. Its environmental friendliness, ease of installation and perfectly smooth surfaces have won the recognition of many consumers. In order not to spoil the material and not to spend a lot of time on repair work, it is important to know how to properly line the ceiling with plasterboard.
Fastening the material and its types
Drywall can be hemmed to a wooden ceiling in one of several ways.
On a ceiling hemmed to the beams
The structure of a false ceiling is represented by a horizontal plane made of different types of boards, mounted from below to the beam ceiling.
Finishing gypsum plasterboard on such a surface without a pre-installed frame or sheathing is permissible when the ceiling is flat and has no flaws or slopes.
Installation of plasterboard sheets is carried out using standard self-tapping screws from 32 to 51 mm long in a checkerboard pattern. It turns out that the corners of adjacent sheets will not touch each other. The screw caps should be recessed into the gypsum board by a millimeter.
On wooden sheathing
The ceiling in a wooden house is also hemmed to the beam structure. But then you will need to install the sheathing. You will need a beam 40*50 mm.
The procedure will be as follows:
- Attach the timber to the beams using long self-tapping screws. The depth of penetration of the self-tapping screw into the beam should not be less than 5 cm.
- The step between the beams that make up the sheathing should not exceed 50 cm. If possible, reduce the distance to 40 cm.
- For perfect levelness, use a building level. To adjust the height, place plywood or wooden pieces under the beams, which will act as adjustable hangers.
On a note! If there is a large distance between the beams and the mounted sheathing, it is better to use special profile hangers. They're inexpensive, so they won't break your budget. But the design will be more reliable.
- If you did everything correctly, the sheathing will coincide with the joints of the two sheets of drywall.
- Now fasten the ceiling gypsum board in such a way that the junctions of adjacent sheets fall on the beam.
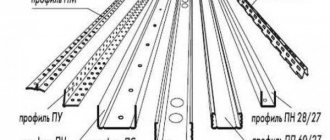
For galvanized profiles
GKL ceilings in a wooden building with beamed ceilings can be hemmed onto a lathing made of galvanized CD profile, the dimensions of which are 60x27 mm. A UD profile is installed on the wall surfaces in a perimeter position.
To fix it to the beams, hangers are used.
The sheathing must be assembled as follows:
- Along the perimeter of the room on the wall surface, using a level, draw a base line, and attach a guide profile to it.
- Suspensions are attached to the beams at the same distance. For each, use two self-tapping screws 45 mm long.
- The edges of the CD profile are carefully inserted into the guide bar and secured with hangers.
- To ensure that the sheathing is in one plane, nylon threads are pulled between perpendicular beams.
- Each profile strip is lowered to the threads using hangers and secured with nine-millimeter screws (four pieces each). Those parts of the hangers that remain free are bent upward, higher than the base of the plasterboard ceiling.
- From CD profile scraps, transverse inserts are installed at the junction of adjacent sheets of material.
- The gypsum boards are mounted as indicated in the previous methods.
It's time for disguise
Upon completion of the assembly of the frame like a box or full sheathing, it is necessary to begin covering it with plasterboard sheets. Sheathing a frame or box requires the same procedure. It’s just that in the second case it will take much less time. And here it is fashionable to cope on your own, without an assistant. We fasten the sheets as follows:
Screwing in self-tapping screws
- we apply a whole sheet to the frame, placing it so that it rests on three profiles or wooden beams;
- We fasten the gypsum board using self-tapping screws. The frequency of their screwing is approximately 20-25 cm;
- on adjacent sheets, the screwing step should alternate, creating a “chessboard” pattern. This, again, will prevent cracks from appearing in the material;
- When all the solid sheets have been installed, we mount the pieces. We cut them with a special knife.
If you have assembled a box and want to make hidden lighting on it, then in the right places the sheet of drywall should protrude in relation to the metal profile at the distance required to place the lighting fixture. Often LED strips of different colors are used here. After this, all that remains is to putty the mounted surface using standard technology and give it its final appearance. As you can see, there are several ways to cover ceiling beams with plasterboard. The main thing is to strictly follow the technology of installing the material on a wooden base and in the end you will get an excellent, smooth ceiling without cracks. With the help of plasterboard sheets, you can even turn an old attic in your country house into a chic and modern room. Believe in yourself and just follow the instructions - the result will be excellent!
Overview of arched profiles for installation of plasterboard structures
How to properly attach plasterboard sheets to wooden beams
Finishing a wooden ceiling with plasterboard
In this case, the frame for the ceiling is first installed, then the plasterboard sheathing is attached. However, there are a couple of nuances here:
- Many people prefer to twist gypsum board sheets directly to the beams, but in this case there may be inconvenience with laying insulation. The gap between adjacent beams is also of great importance. If it exceeds 50 cm, it will not be possible to mount the sheets to the beams.
- As a way out, you can install a sheathing of 40*50 cm timber, where you can lay mineral wool. And make a frame from metal profiles on top. The beam is fixed in increments of 50 cm.
Before assembling the sheathing, a layer of vapor barrier must be attached to the supporting beams. For these purposes, it is better to use a construction stapler.
Important! In wooden structures, when attaching profiles, it is permissible to use special screws, and never nails.
The frame is assembled as follows:
- Draw a horizontal line around the perimeter of the room, identifying the bottom corner in the room.
- Screw the hangers and fix the ceiling profile to them.
- Leave a gap of 1 cm between the wall surface and the profile.
- Install the guide from the end of the ceiling profile.
- Fix the crossbars with crabs.
At the last stage, sheathe the gypsum board frame.
Material for wooden frame
For the sheathing, use a lath made of coniferous wood of construction quality. Main requirements for the material:
- The lumber must be evenly dried. As a rule, this is achieved by natural drying, without the use of vacuum dryers. The humidity percentage should be no more than 13-15%.
Photo of a two-tier sheathing on the ceiling
- Dropping knots are not allowed. It is advisable to also cut out living knots, since when they shrink, they deform the lath.
- For the frame, a rail calibrated in thickness is used. This is an important condition, since otherwise aligning the guides in the plane will become unreasonably labor-intensive.
- Depending on the area of the ceiling and the weight of the structure, the thickness of the guide bars should be at least 30 mm. They can be different in width, there is no fundamental significance here. The width of the supporting bars must ensure the joint of the plasterboard sheets, so calibrated slats of 30x70 mm are used for them.
Single level wooden frame
Important! Uniaxial sheathing consists of only load-bearing calibrated slats.
- The lumber must undergo acclimatization. You cannot immediately begin installing the lathing on the ceiling. The timber is cured for two weeks. During this time, the humidity level of the material and the room is balanced. This will prevent deformation of the frame and the appearance of cracks on the ceiling.
- After acclimatization, the lumber is treated with drying oil or impregnation with an antiseptic.
To fasten the timber to the base, dowels with long self-tapping screws, U-shaped hangers, and adjustable spring hangers with a fastening eye are used.
Frameless fastening of gypsum boards to the ceiling
With this approach to work, first you will have to carefully prepare the rough ceiling: eliminate all flaws, putty and treat the surface with a primer.
Next, start attaching the sheets according to this pattern:
- Mark the points of future fastenings on the ceiling surface.
- Attach the sheet, drill it at 8 points.
- Remove the gypsum board and make holes in the ceiling through small holes, where you insert dowels or wood chips.
- At the holes, glue small pieces of foam rubber to all sheets, which will act as adjustable springs.
- Screw each sheet to the ceiling with screws. Adjust the horizon with a level or level.
- At a distance of 3 mm from the head of each screw, drill holes with a diameter of 5 mm, which are filled with mounting foam. It will fix the material more reliably.
- After the foam has hardened, remove the screws and fill the holes.
You can move on to finishing.
Preparing the working base
Before installing a plasterboard ceiling, do not level the base. It is enough to perform a series of actions.
- Clean and putty any crumbling areas of the ceiling .
- Lay new and bring into working order existing communications that will be hidden by drywall.
- Cover the base with a moisture-resistant primer. If they work with a wooden frame, it is impregnated with fire retardants to increase fire safety .
After preparing the base of the ceiling, mark it.
First, set the level for plasterboard sheathing. For this:
- in each corner of the room, measure the distance from floor to ceiling;
- choose the lowest value and retreat down another 5-8 cm;
- in these places they put marks and screw in screws (not completely);
- pull the paint cord over the fasteners and check the horizontal level with a building level;
- Use a painter's cord to mark the height of the plasterboard sheathing on the walls.
After this, the places for attaching the hangers are marked on the working base. They are located equidistant from each other. Marking with a paint cord helps maintain distances .
Useful: Expanded clay: main characteristics and production features
Fastening gypsum boards to the ceiling using mastic
This is not the most commonly used method and with its help you will not be able to create a multi-level structure, as well as hide electrical wires and communication systems under it. But in some cases, gypsum mastic can be a good solution.
The main thing is to follow the important rules:
- Cut the sheets into several equal parts for ease of fastening.
- Apply mastic in small portions, first at the edge of the sheet, then in the middle.
- Before starting work, carefully prepare the rough ceiling.
Fastening drywall sheets
After installing the frame, the question naturally arises of how to properly sheathe the ceiling with plasterboard. The answer to this is the following scheme of work.
- The sheet material is processed with an edge plane. In the future, this makes it easier to process gypsum board joints.
- Attach drywall to the frame using self-tapping screws. The edges of the sheets are located in the middle of the profiles. There is a groove there for orientation.
- Make holes for lighting fixtures.
- GKL joints are puttied.
Please note: a compensation gap is left around the perimeter of the room - between the cladding and the walls. This is necessary so that when the temperature and humidity conditions in the room change, the drywall expands without consequences in the form of deformations.
How to hem a ceiling with plasterboard
You can install a suspended plasterboard ceiling with your own hands not only in a private wooden house, but also in an ordinary apartment. The main thing is to perform all stages efficiently.
Preparing for work
First of all, you will need to prepare the ceiling surface for work. We are considering installing the ceiling on a frame, so careful leveling and puttying will not be required. It is only necessary to clean off pieces of old plaster and treat the ceiling with a primer to protect it from the possible appearance of fungus and mold.
Draw a preliminary drawing of the future ceiling on a piece of paper. This will make it easier for you to navigate when applying markings to the ceiling.
Marking
It is as follows:
- Find the lowest level in the room and mark a dot with a pencil.
- Using a building level, place points in the remaining corners to determine the perimeter, focusing on the first mark.
- Now you need to mark with upholstery cord in the form of a horizontal straight line along the entire perimeter.
- Next, transfer the drawing from the paper to the ceiling, mark the places where the pendants and lamps will be attached.
Installation of a metal profile frame
It starts with installing the guides. They are placed exactly along the line that outlines the perimeter of the room. The whole process looks like this:
- Using a drill, drill holes in the profile, attach it to the wall, and place marks on the wall surface.
- Using a hammer drill, punch holes for fastening the guides in the walls, and fix the profiles with self-tapping screws every 25 cm.
- Mount hangers for supporting metal profiles according to the marks on the ceiling. The distance between them is 60 cm.
- Place the supporting profiles so that they are at the junctions of two sheets (distance 60-100 cm).
- To ensure that the ceiling is even, use the tip with nylon thread. And level the profile using hangers according to its level.
- Secure the guides to the self-tapping screws.
- Install the supporting profiles in a perpendicular direction using “crabs”.
Installation of plasterboard sheets
Before installation, drywall should lie for several days at room temperature.
The sheets must be fastened in a checkerboard pattern, starting from the corner of the room with self-tapping screws.
After the last sheet of gypsum board is screwed to the ceiling, use a knife to trim off all the irregularities.
Finishing the false ceiling
This stage of work includes preparing the plasterboard surface for further painting, decorating with wallpaper or plaster. It includes:
- Putty
- Grinding
- Primer
We have already talked about the rules for preparing the ceiling for painting. In this case, the process will be similar.
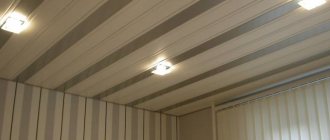
Plasterboard ceiling beams
A ceiling beam is a structural or decorative element of the interior of a country house, country cottage or apartment in a high-rise building. Structural beams support the floors, and decorative beams decorate the room, creating a certain architectural style: Provence, classic Victorian, loft. Combination beams combine both functions. The material is wood, polyurethane or plasterboard. Everyone has positive and negative properties. The question often arises - how to make a plasterboard beam on the ceiling with your own hands.
Practical advice
Benefits of drywall
GCR is used more often than others when repairing ceilings, due to its advantages:
- Environmentally friendly.
- Availability.
- Ability to pass air.
- Possibility of choosing material taking into account specific conditions.
How to properly hem ceilings with plasterboard: useful tips
To properly install gypsum board ceilings, you must follow a few simple rules:
- Do not place the material on its edge, place it only in a horizontal position, since gypsum plasterboard can easily become deformed.
- If you are puzzled by the question of how to line a plasterboard ceiling in a room where there is often high humidity, use material marked moisture-resistant.
- To create shaped elements, purchase regular plasterboard, it is more flexible.
- For curly cutting of drywall, use a special tool - a jigsaw. If the line is straight, there is no need to cut the sheet, it breaks easily.
We hope that our recommendations will help you in your work.
What is drywall and what types does it come in?
Gypsum building board, in common parlance “gypsum board”, in the professional environment “gypsum” is a sheet building material consisting of two layers of cardboard and a pressed gypsum core. It is clear that these materials are 100% environmentally friendly. Drywall is a smooth, cheap and, importantly for many, “clean” material. This means that when installing it, a minimum of dirt appears, unlike good old plaster. Plaster comes in different sizes, colors, thicknesses, and with different types of edges.
Moisture-resistant gypsum board Gyproc
The most popular sizes
- 2500×1200 mm - standard
- 3000×1200 mm – long
- 1500×600 mm – small format
Most common thickness
- 9.5 mm – for curved structures
- 12.5 mm - standard
- 15 mm – strong
Types of drywall
- regular (gypsum plasterboard) – light gray
- moisture resistant (GKLV) – gray-green
- fire-resistant (GKLO) – gray-pinkish color
Basic types of edges.
- PLUK – Knauf
- PRO - Gyproc
Comparison of PRO and PLUK edges
We will consider the most common option - regular plasterboard 2500x1200x12.5 mm from the Gyproc brand with PRO edge. Many ignorant people sew 9.5 mm plasterboard onto the ceiling, saying it’s lighter, and even call it ceiling. These are not masters, but dumb lizards. This can be easily proven by opening any technical sheet of any major drywall manufacturer:
Proof
Ceiling, yeah. It’s exactly 12.5 mm that goes to the ceiling, that’s a fact. As for moisture-resistant sheets, they will, of course, be more stable than ordinary sheets, but they are still much more expensive, and therefore it makes sense to use them only for their intended purpose, that is, in wet rooms. Fire-resistant - we don’t need them at all, and you won’t find them anywhere))
Calculation of material quantity
Before starting calculations, you should draw a plan for the future structure, which is especially important when you plan to make a ceiling with several levels.
Example plan.
Calculation of the required amount of materials begins with determining the perimeter of the room, for which you should add the width and length of the room and multiply by 2. For example, (3+6) x 2 = 18 m. Therefore, the guide profile for a single-level ceiling will require 18 m.
The ceiling profile is attached in increments of 600 mm. To calculate the required amount of profile , you need to divide the distance in mm by 600 mm, for example, 3000 / 600 = 5. If the number turns out to be uneven, it is rounded up. If each line is equal to the length of the profile, then the number of required profiles is 5; if the length is less, then it is necessary to perform calculations taking into account the installation of additional sections.
To calculate the hangers, it is necessary to take into account that they are attached in increments of 500 mm. It turns out: 3000 / 500 x 5 = 30 pieces. To determine the number of gypsum boards, it is necessary to divide the area of the room by the area of one sheet. For example, 18 sq.m/3 sq.m. = 6 sheets.
The number of transverse reinforcements is calculated based on the number of sheet joints. The number of crabs will be equal to the number of profile intersections. To attach drywall, you will need 30 mm self-tapping screws, 25 pieces are required for one sheet, respectively, for 5 sheets - 125 screws.
The guides are fastened with 50 mm dowels in 600 mm increments, which means you will need 60 dowels (18,000 / 300). The hangers are mounted on anchor bolts; one anchor bolt is required to attach one hanger.
The ceiling profile is attached to the suspension with 4 15 mm screws, respectively, you will need 30 x 4 = 120 pieces.
Why drywall?
There are many options for finishing the ceiling surface in the hall: here are popular stretched fabrics, and classic whitewashing or painting, which still remain in the shadow of common solutions, but concrete structures with longitudinal wooden beams are rapidly gaining momentum. However, drywall is the optimal material today.
- elementary processing;
- installation accessible even for a non-specialist;
- creation of a unique multi-level design;
- masking of all ventilation communications;
- affordable price all types of drywall;
- the possibility of quick and “painless” partial repairs;
- environmentally friendly material with good fire-fighting properties;
- large space for organizing a lighting scenario in the room.
Heat and sound insulation
A suspended ceiling is great for organizing additional soundproofing of a room, which is especially important in the bedroom when there are restless tenants living in the apartment above, or there is a technical floor above the room.
The soundproofing layer is made of rolled or sheet mineral material, which is recommended to be secured to the profile using special “fungi”.