When starting to renovate your home, be it a city apartment or a house in the countryside, everyone understands that the most difficult stage will be finishing the ceiling. Modern companies specializing in apartment renovation offer a wide variety of options for this: finishing with ceiling tiles or wallpaper, suspended or suspended ceilings, etc. But not every householder can afford their services. Therefore, do-it-yourself ceiling repair remains relevant.
Until recently, this type of ceiling finishing, such as whitewashing with chalk or lime mortar, was especially popular. But with the development of new repair technologies, this method is used less and less. This is due to the fact that, despite its low cost and the harmonious combination of a snow-white ceiling with any type of interior, many are not satisfied with the complexity of the preparatory work. In addition, the whitened surface quickly becomes dirty and loses its attractive appearance.
Today, painting the ceiling with water-based paint continues to be one of the most popular methods of finishing it. Unlike whitewash, the surface painted with it retains its aesthetic appearance for a longer time. In addition, it allows for quick and easy maintenance of the ceiling surface.
This is one of the cheapest repair methods. In terms of its composition, this paint is a suspension based on polymer particles and pigment substances dissolved in water. Its peculiarity is that after application to the surface, intense evaporation of water occurs, and the polymers form a coating with high resistance to moisture. Water-based paint is an environmentally friendly material that does not cause allergic reactions or negative effects on the human body.
Why paint a foam ceiling?
Many people are concerned about the question of whether it is possible to paint foam ceiling tiles.
Not only is it possible, but it is necessary! Although it all depends on the type of tile. It is produced in two versions - with a laminated surface and for painting. Laminated tiles do not need to be painted immediately after gluing. It retains its original color for several years and can be washed carefully with a soft cloth. But over time, the coating fades and becomes stained. Then the ceiling has to be either refinished or painted.
Laminated ceiling tiles do not require painting
Paintable tiles must be painted.
- A layer of paint will protect the foam from moisture and mechanical damage, strengthen the surface structure, and extend the service life of the finish.
- Unlike laminated tiles, “bare” foam cannot be properly washed. Dirt easily penetrates into its pores, and the ceiling looks unkempt. This problem is especially acute in the kitchen, where grease constantly settles on the surface. And paints with water-repellent properties are easy to wash.
Foam tiles for painting require mandatory painting
Another reason to paint a foam ceiling is decorative. With the help of painting, it is easy to give the ceiling any desired color so that it fits organically into the interior and emphasizes its overall style. You can also restore a decent look to yellowed and dirty tiles.
Paint selection
If you decide to paint the ceiling over the old layer of material, then you will have to face the question of choosing the appropriate option. For such work, different paints are used. Each type has its own advantages and a number of disadvantages.
Acrylic
Perhaps this type of paint is the most popular. It is good because it is highly resistant to all kinds of dirt and dries quickly. So you can safely use this material, for example, in the kitchen, where working with food is not always neat.
This paint also withstands high humidity well. If there is any contamination on the painted surface, it can be easily removed with a damp cloth or napkin without fear of the paint cracking.
Acrylic paint can be easily applied to a variety of surfaces. It fits well on metal, wood, plastic, and even on already plastered substrates.
Painting with acrylic is also good because it perfectly hides minor surface imperfections. Textured paint can mask small cracks or places where pieces of the coating have already fallen off.
It is also pleasantly pleasing that such a coating dries quickly and retains its color for a long time. Even if you paint the ceiling in a room where it will constantly be exposed to sunlight, the paint will not fade or fade immediately. However, there is one caveat: when choosing this type of paint, remember that the color of the coating applied to the ceiling will be slightly different from the one you see on the package, because the material immediately darkens. This cannot be called such a big drawback, because there are a lot of colors, and you can always find exactly the shade that will suit you in the end.
Latex
There are several other types of paints that are suitable for ceilings. One of the most expensive options is latex. This paint is ideal for painting the ceiling over the old layer. The fact is that it perfectly masks defects and microcracks on any surface. You can easily wash or brush a ceiling painted with this material.
Silicant
Cracks (up to two millimeters) can also be masked by silicate paint. However, it is more expensive than most analogues.
This is a coating that is used for profile finishing of walls and ceilings in industrial premises - for example, in warehouses. This paint is based on liquid glass. This coating works best on a concrete or stone surface.
Preliminary preparation and treatment of the ceiling
Before you start painting with water-based emulsion, the ceiling needs to be prepared for subsequent work.
To get a positive result, do not paint the ceiling with water-based emulsion over the old layer. It must be removed with a spatula using an alkaline detergent, and then rinse the ceiling with clean water and allow to dry.
To simplify the task, use this simple technique:
- Wet the ceiling with plenty of water (you can use a spray bottle or foam roller for this).
- After half an hour, repeat the procedure. The old coating will be thoroughly saturated with moisture.
- The next step is to create a draft in the room. Open all windows and doors, and bulges form on the surface of the ceiling. You can easily remove such a soaked layer of old coating with a spatula.
After such pre-treatment, errors may become noticeable on the ceiling surface. They are quite easy to eliminate: open all the cracks and treat them with finishing putty. After it dries, the surface should be rubbed with sandpaper, and the dust should be wiped off with a damp cloth or vacuumed.
When preparing the ceiling for painting, it may be necessary to eliminate minor errors
Now start priming the ceiling. Use a deep penetration primer for this. When it dries, paint can be applied to the surface.
An overly uneven surface with potholes and multi-level tile joints indicates the need for major repairs.
The main stage of painting
Painting tools
To perform high-quality painting of the ceiling with paint based on water emulsion, you will need:
- paint brush for painting butt joints between the wall and ceiling, as well as corners;
- a narrow brush for making corrections;
- fur, long-haired roller,
- paint tray,
- ribbed surface for even distribution of paint over the surface of the roller.
Coloring rules
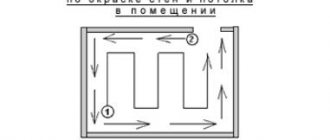
just like when whitewashing with chalk, it is better to apply the first layer of paint parallel to the rays of light from the window, and the second - parallel to the window frame
Many people do not know how to paint a ceiling with water-based paint correctly. In most cases, they do not take into account the direction of the light flux and many other nuances during painting work. Therefore, the painted surface turns out uneven, with stripes from the passage of a brush or roller, with lighter or darker spots. To prevent this from happening to you, follow these rules.
- You should always start painting from the corners and joints between the wall and the ceiling. In this case, the farthest corner relative to the front door is painted first. To do this, wet a wide paint brush halfway in the paint, then squeeze it out slightly to remove excess. A passage is made along the entire perimeter, 3 to 5 cm wide. Thanks to this, during further painting with a roller, the junction of the ceiling and the walls, as well as the corners, will not be damaged.
- The main whitewashing of the ceiling with water-based paint is done with a roller. It is applied in three passes, regardless of what type of paint is chosen. In this case, the very first pass of paint is carried out parallel to the rays of light incident from the window. The second is in a direction perpendicular to it. The latter should always be directed towards the window.
- Each subsequent painting is carried out only on the well-dried previous layer. This requires from 8 to 12 hours.
Painting technology
- In a tray filled with paint, moisten the roller and rub it three or four times over the rough surface. This will allow the paint to spread evenly across the roller.
- Make the first pass on the ceiling section. Starting from the corner on the left side of the wall opposite the window.
- The roller must be moved from left to right. Then change direction. In this case, you need to ensure that the paint is applied in an even layer, without visible transitions. You can also move the roller using W-shaped movements.
- The following technique will help remove excess applied paint: when there is no more paint left on the roller, pass it over the painted surface. It will absorb all the excess.
- While painting, use a directed bright beam of light to check the quality of the paint.
- Using a new roller during the last painting will ensure a uniform surface.
- Until the paint has completely dried, no drafts are allowed in the room. It is advisable to protect the painted surface from direct sunlight. This will prevent stains from appearing. Do not try to dry the painted surface with electrical appliances.
Features of painting a plastered surface
The ceiling to which plaster has been applied can be painted using a special spray gun or a regular vacuum cleaner. They provide high-quality, uniform distribution of paint on the plastered ceiling surface. At the same time, it lays down in a thin, even layer. It is best to paint using a spray gun over a primer that has already been applied with a roller or brush.
If, when painting the ceiling with water-based paint, all the technology was strictly followed, then the result will delight you with the beauty and uniformity of the surface.
Types of water emulsion. Where is the best place to buy?
In order to ultimately get the desired effect from coloring, you need to choose the right type. Paint is divided into the following types: glossy, semi-gloss, matte and semi-gloss. The difference between matte paints and glossy paints is the difficulty of washing them. Matte paints have the property of masking small surface defects that would be noticeable on a glossy finish. Therefore, it is better to choose semi-matte or semi-gloss mixtures.
Another important point is that you need to buy water-based paint in a store where the paint is kept warm. If the paint has been frozen at least once, it means that its structure is damaged, and when it thaws it will not be restored. This means that such paint has become unsuitable for use.
Advice! To paint the ceiling, buy special ceiling paint. This paint will not drip, fits perfectly on the surface and has excellent adhesion.
Selection of materials and tools
This stage is considered the most important. The quality and service life of the future surface depend on the correct selection of tools and consumables.
It is important to make purchases in large chain hypermarkets or branded stores; there are a lot of fakes sold in the markets
Necessary tool
- The main painting tool used for working with water-based emulsion is a roller. To finish the ceiling, it is better to choose a product with a medium-wool coat - this way the paint will not splatter on the sides, but at the same time, the color of the base will overlap without spots or streaks. The height of the cylinder for faster operation should be 18–25 cm.
- Then you need to pick up one or two brushes for painting corners or hard-to-reach places, for example, behind ventilation ducts or pipes. A brush no wider than 8 cm is best. You can also use an angled roller. You should buy a container for paint; it may be called a paint tray or tray, or a cuvette. The flat part of the bottom of the container should be corrugated so that it is convenient to squeeze out excess paint from the tool.
- In addition, you need to purchase fine-grain sandpaper, masking tape (ordinary tape will do) and plastic wrap. It is recommended to take care in advance of the availability of protective clothing, gloves, headgear and glasses. So that when painting the ceiling with water-based paint with your own hands you can control the quality of the surface, you need to prepare a powerful lamp and a pole to raise it to the ceiling.
- If you have a stepladder at hand, you can use it, but you should not purchase it specifically. You can buy a telescopic tube for a roller or use tables, cabinets and other furniture as a stand. All small interior items should be removed from the room, and floors and bulky furniture should be covered with film.
How to choose paint
To paint ceilings with water-based paint yourself, you can use the following types of material:
- Polyvinyl acetate compounds. The cheapest type of coatings. Surfaces coated with this paint should not be wetted with water.
- Latex. They are considered one of the highest quality. With their help you can obtain strong and durable coatings. The price of materials is also quite high.
- Acrylic. The most common type. They have a good combination of price and quality.
- Silicate. Compositions with the addition of liquid glass are most often used for painting stone or plastered surfaces. Can be used both indoors and outdoors.
- Silicone. They have good hiding power, vapor permeability and a long service life, but their high cost makes them less popular than acrylic paints.
Acrylic compositions are considered the most durable, PVA is the cheapest, for new buildings you need to take latex, universal acrylate ones are suitable everywhere, but they are expensive.
When choosing a material for painting, you need to listen to the advice of the seller, but it is also recommended to carefully read the label. The manufacturer indicates the following information on it:
- Type of work. This can be internal or external work on bases made of various materials.
- Paint consumption. Based on this indicator, you can approximately calculate the total amount of material, but it is better to add 10%.
- Covering power. The number of layers required to completely cover the old color depends on this indicator.
- Resistant to abrasion or moisture. The material may only be suitable for dry operating conditions in the absence of mechanical stress. A little more expensive are paints that can withstand mechanical stress. They are followed by materials that, after drying, do not dissolve with water, and the most expensive are dirt-repellent paints.
All water-based paints are white, color is added later, but the entire volume must be tinted, otherwise there will be stains
It is also important to consider the type of finished coating:
- Matte. They are difficult to clean, but visually increase the height of ceilings and mask minor defects.
- Glossy. More resistant to abrasion and easy to clean, but does not hide defects.
- Semi-matte. A compromise between the two above types.
Silicone or silicate paint
Do-it-yourself whitewashing of the ceiling with water-based paint can be done using a silicone compound. It contains silicone resins. The cost of production is somewhat high, but the mixtures are suitable for mineral coatings and can mask cracks up to 2 mm. With the help of silicone paints, it is possible to create a vapor-permeable coating, so the paint can be used on damp surfaces, as well as substrates that are exposed to moisture. After applying the composition, you can forget about the occurrence of fungus for a long time.
Silicate paint is a solution consisting of an aqueous composition, colored pigments and liquid glass. After drying, the ceiling will acquire the qualities of vapor permeability and resistance to external influences. These coatings are ready to last for 20 years.
Key points in painting the ceiling
When carrying out surface painting work, it is advisable to use water-soluble paint. This dye has no harmful odor and can be easily cleaned only with water. This paint is applied in a uniform, thin layer to the ceiling surface. This significantly improves the appearance of the ceiling.
The advantages of water-based dye are:
- no harmful artificial additives;
- absence of an antipathetic odor characteristic of other compositions;
- high design characteristics.
Types of water-based dyes:
- containing acrylic;
- with silicate;
- silicone based;
- mineral based.
It is impossible to wash off the acrylic coating with water after it has completely hardened, since the composition includes glue and latex for a strong connection with the surface. Acrylic gives the paint strength, latex makes it waterproof.
Acrylic water-based paint creates a highly durable surface
The water-based base dries quickly, unlike oil paint, which is a plus. A good choice for painting bathrooms or kitchens is silicone water-based paint. It tolerates low and high temperatures well: you can clean a surface painted with it more than 5,000 times with a regular brush.
Surface preparation
Before opening a can of paint, it is worth preparing the room and the ceiling itself (see What color to paint the ceiling: design options).
Preparing the room will come down to taking out what can be taken out and covering everything else. The ideal material for protecting against paint drops is polyethylene film. But preparing the surface of the ceiling will be much more hassle:
Let's start by removing the peeling plaster. In addition, if the ceiling is affected by fungus, all darkened areas of the plaster must be cleaned down to the concrete base. For this operation we will arm ourselves with a steel spatula.
During major renovations, all old plaster from the walls and ceiling is often completely removed.
By the way, any liquid containing chlorine can be used to destroy the fungus. For example, the domestic detergent Belizna. However, unlike a special primer, it will not provide long-term protection against mold (see Fungus on the ceiling: control and prevention).
- After the ceiling has dried, it’s time for penetrating primer. It will strengthen the surface and improve the adhesion of the putty to it (see How to putty a plasterboard ceiling with your own hands).
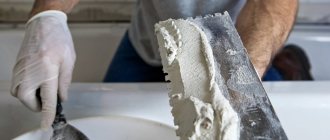
- All irregularities are carefully filled with starting putty. After drying, it is sanded with a coarse sanding mesh. You can do this manually; however, a sander will speed up the procedure many times over.
Sanding the ceiling by hand is possible, but very tedious.
- The next stage is the final putty of the entire surface. It is best to apply it in two as thin layers as possible, allowing each layer to dry completely; tool - a wide steel spatula. Then - fine sanding with a fine mesh or sandpaper.
- After this stage, the surface is re-primed (see Do I need to prime the ceiling before painting: different types of surfaces). In addition to, again, maximum surface strength and better paint adhesion, the primer will reduce its consumption. Do not doubt the economic rationale for this operation: primer is much cheaper than high-quality paint.
The surface is in perfect condition and completely ready for painting. However, streaks during painting appear not only due to unevenness of its surface.
Features of the kitchen area
To understand which paint is best to paint the ceiling in the kitchen, you need to understand the peculiarities of the processes taking place in this room. In the kitchen, we prepare food using frying, boiling, baking at high temperatures, and other methods of processing food using large amounts of water and thermal heating. All this contributes to the fact that during work the dishes and surrounding surfaces become dirty.
That is why, when deciding which paint is best to paint the ceiling in the kitchen, you should take into account the following features of the room:
- Soot and fat released during frying often settle on surrounding surfaces, including the ceiling. This dirt is very difficult to wash off with ordinary water, so the coating must be resistant to detergents and intense friction.
- Water vapor released during cooking increases the humidity in the kitchen and settles as condensation on all surfaces. In this regard, when painting the ceiling in the kitchen, it is better to choose moisture-resistant compounds.
- While cooking, the temperature in the kitchen rises, and a window open for ventilation creates a movement of cold and warm air flows in the room. The best paint for a kitchen ceiling is one that will withstand sudden temperature changes without cracking or peeling off from the base.
- When deciding what to paint the ceiling in the kitchen, consider the ease of repairing the surface. It is good if the coating can be tinted in a certain place without visible areas of layering of the coloring composition and color differences.
Correct selection of roller
This is one of the main issues in repair work on painting ceilings with water-based paint. Experts solve this problem unambiguously: the roller must have long and soft natural bristles.
Table. types of rollers.
| Roller | Positive properties | Flaws |
| Fur or velor | Good quality tool for painting. Captures the optimal amount of paint. | The price is higher than for similar foam and nylon tools. |
| Paint roller | The paint is absorbed inside, so you less often have to dip the tool. | When you press the tool hard, the paint comes out. This is not always acceptable. |
| Long pile roller | A metal thread is woven into the pile of the roller, which helps protect its deformation. | High price. |
| Roller with relief | Leaves a pronounced pattern on the coating. | Can only be used for patterned painting. |
| Foam rubber | Used to protect indoor pipes. | Does not paint the surface very smoothly. |
| Terry | Used for application with synthetic paints. Low price. | There are no significant ones. |
Popular types of relief rollers and features of their use
In general, rollers come in three main sizes:
- small – up to 100 mm;
- medium size from 100 to 200 mm;
- large – more than 300 mm.
Medium in shape - this is the most common type of instrument. Large rollers are used on large surfaces. When painting, rollers with long piles should be squeezed well. A very important point: make sure that the pile does not fall off! Paint rollers are often equipped with a special semicircular cone to protect the artist from paint splashes. This is especially convenient when working with high ceilings. The roller is sometimes accompanied by a special container or tray for paint (ditch). In this case, the lint almost does not fall off it.
Additional recommendations
When painting the ceiling, it is recommended to hang an energy-saving light bulb of maximum brightness in the room. The light it emits will help you see all, even small, defects and correct them in a timely manner.
The results of labor should be viewed from different angles, determining the quality and density of coloring.
The main thing in this matter is to do everything systematically, without long breaks (apart from waiting for the materials to dry), but also without unnecessary haste - and you will achieve the desired result.
How to paint a ceiling with water-based emulsion with your own hands
Each of the water-based paints has instructions for use on the can. The operating procedure is described there. Some compositions just need to be stirred well before use: undissolved polymers may settle at the bottom of the jar. Some formulations require dilution. The amount of water added is also specified in the instructions and depends on the application method. For spray guns, the dilution is stronger; when using a roller, thicker formulations are required.
Paint tray makes the job easier
When diluting the emulsion with water, add it in small portions. Stir thoroughly and try on a surface area. If the paint goes on evenly and almost completely covers the base, you can paint.
It is more convenient to pour the paint into a special container with a tray and a ribbed platform. You can use a regular basin and a clean piece of oilcloth spread nearby. It's not as convenient, but less expensive.
Which roller to choose
A roller for painting the ceiling with water-based emulsion is needed with dense short pile. You need to examine him carefully. The pile should “sit” firmly and under no circumstances should it “climb out”, even if you pull on it. Then inspect how the seam is made. Under no circumstances should he stand out. It must be difficult to find. It is best if it is made obliquely.
Rollers for painting the ceiling with water-based emulsion
Pay maximum attention to choosing a roller: the quality of painting - the absence of stripes on the ceiling - largely depends on how good a tool you have chosen. It is more convenient to whiten the ceiling with water-based emulsion not from a stepladder, but from the floor. To do this, the roller is placed on a long handle and secured well.
How to paint without streaks
To avoid streaks on the ceiling, painting the ceiling with water-based paint should be completed no later than in 20 minutes. Immediately after application, water begins to actively absorb/evaporate and stripes appear at the junction of the dried and “fresh” paint. Therefore, it is advisable to prepare the room. It is necessary to turn off (wrap up) the heating radiators and prevent a draft. It is also advisable to wash the floor immediately before whitewashing; even if you work during the day, turn on the lighting, this will allow you to better control the quality of the paint. Afterwards you can start working.
Ready-to-use water-based paint is poured into a container, a roller is dipped into it, then rolled well over the site, achieving uniform distribution over the entire surface. When the roller has a uniform color, they begin to paint.
The corners are painted first with a brush. After applying a little paint, take a small roller and roll it out well. Then they begin to paint the main surface. The first layer is applied parallel to the window, the second - perpendicular.
You need to stand so that you look at the area to be painted at an angle. This will give you a good look at how evenly the paint has spread, as well as where you have already painted and where you haven't. Move systematically, without jumping from one piece to another.
It is more convenient to paint from the floor, and to do this, the roller must be attached to a long but light handle
The width of the strip painted at a time is slightly larger than the width of the roller. After wetting the roller, place it approximately in the middle of the strip. Quickly roll the paint in both directions from one wall to the other. Don't waste a lot of time: you don't have much of it. On average, the water emulsion dries in 10-20 seconds. If you didn’t have time to apply the strip next to it before, the border will be clearly visible, which you won’t get rid of. Having distributed the paint more or less evenly over the strip, dip the roller into the paint and roll it out again from the middle of the ceiling. At the same time, go beyond the already painted strip by about 10 cm. All this at a good pace without stops and smoke breaks. The edges of the painted strip should not dry out. In general, these are all the rules.
After applying the first coat of paint, some areas may not be painted as well. You need to wait for it to dry completely and paint it a second time. This should already be enough to obtain a flat surface. If even after the third layer of water-based paint you still have streaks and stains on the ceiling, you will have to redo it again. It is necessary to level the surface with sandpaper, prime it again and paint again.
What color
The easiest way to achieve perfect evenness is to use “snow-white” paint. All pigments clearly highlight even small irregularities, so the process of puttying the ceiling should be given maximum attention or use an acrylic or silicone-based water-based emulsion.
Types of water-based paints
All produced water-based compositions can be divided into 3 categories:
- Mineral. The basis of such paints is cement or lime. They are used for facade work and are not suitable for painting residential premises.
- Silicate. The main component of silicate compositions is liquid glass. These paints are not used when painting bathrooms and rooms with high humidity, but they can be used in dry rooms with plastered or concrete ceilings.
- Acrylic-latex. Acrylic, which is part of the paint, helps the painted surface dry quickly. Latex gives the coating elasticity, strength and resistance to cracking. The presence of low-toxic resins allows you to make the ceiling matte or glossy.
The advantages of these compositions:
- they don't smell;
- do not emit toxic substances;
- using pigments they are tinted to the desired color;
- dry quickly;
- dissolves in water;
- after drying, they form a thin but durable film that is not damaged by high humidity, temperature changes and treatment with detergents;
- they can be used to paint any surface - concrete, plaster, paintable wallpaper;
- belong to the category of budget paints and varnishes.