Work order:
At first I wanted to paint it like this without removing the door, then I realized that it would be inconvenient. So I took a risk. and took it off. It turned out not to be difficult. True, worries about how to put them back on were present until the last moment. In the end, I also screwed it myself; I didn’t have the patience to wait for my husband))).
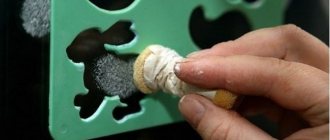
I pulled out the built-in lights and wrapped them in a suspended state with masking tape. The same tape was used to protect the walls on the sides of the cabinet, the floor, and the mirrors on the doors. Prepared the workplace. I decided to paint it. on the bed)))! I covered it carefully with polyethylene. And I have never regretted this choice. The bed was large and high, everything fit, there was no need to bend over and crawl on all fours. I prepared approximately equal stacks of books and wrapped them in cling film. They are needed as substrates so that the doors can be lifted and painted as if suspended; the painted edges will not come into contact with a flat surface.
Stage 2.
I sanded all surfaces that needed to be painted. It is necessary to sand lightly, without fanaticism, with the finest sandpaper. Light circular movements. Purpose: to create roughness without removing the laminated layer. If there are dents and scratches, they should be filled with putty at this stage. After sanding, thoroughly wipe all surfaces with degreaser. It will remove dirt, grease marks, and everything that can disrupt the adhesion of the primer and paint.
Stage 3.
Primer. I went through hard-to-reach places with a brush, and the rest with a roller. A thick layer is absolutely not necessary; it must be covered with primer without drips and in a thin layer. Uneven coloring is not a problem, but there should be no gaps. I didn’t prime the rattan inserts; the paint applied well to them anyway.
How to update an old cabinet?
In any home, the closet occupies a very important place. It is a pity that over time it loses its original appearance: the appearance of cracks and faded paint make it unattractive, it goes out of fashion and looks out of date. We have to think about his future fate.
There are at least two ways out of this situation:
- buying new furniture;
- updating an old closet.
With your own hands you can give your wardrobe a new life, turn it into a unique object, while saving significant money.
How to restore?
Any antique cabinet requires a little restoration, which will significantly improve its appearance.
You can restore the wardrobe yourself if you use the advice of experts:
- A metal brush is used to treat decayed wood, after which the dead tissue is removed.
- The fine dust formed in this case is washed off under running water.
- Sometimes there are holes from nails, some unevenness and cracks in the wooden elements of the cabinet. All this must be cleaned with a spatula. It is necessary to apply several thin layers of putty to match the wood. Each layer must dry before applying the next.
- Then dry all layers in fresh air for 1-2 days. Do not dry wood in the sun.
- Sometimes there are metal parts in furniture that have become covered with rust over time; such places should be treated with a special solution.
- The restored surface can then be painted or decorated at your discretion.
- A self-adhesive film that imitates wood, stone, or metal is perfect.
Selection of self-adhesive film
To choose a self-adhesive film for decorating an old cabinet, you need to familiarize yourself with the properties and characteristics of this coating, pay attention to the structure, base material, type of surface, decorative design and purpose.
All films are based on polyester, propylene and polyvinyl chloride. Additionally, plasticizers, stabilizers, pigments, paper, natural and synthetic fabrics can be added.
Self-adhesive film consists of three main parts:
- The surface is made from paper, polymer film or metallized foil.
- Acrylic or rubber adhesive base.
- Protective backing made of siliconized paper. Retains the adhesive side of the film and peels off before gluing.
There are calendered films that can stretch under the influence of high temperatures and shrink during the cooling process. They are best used to cover cabinets with even, smooth fronts. If you need to decorate rough or corrugated facades with self-adhesive film, or hide existing protrusions, preference is given to injection molded materials.
The surface fabric differs in structure, it can be:
| Single layer: | All the constituent components, including resins, plasticizers, stabilizers and pigments, are mixed together and formed into a thin film by hot roll rolling or extrusion. |
| Double layer: | It is produced by applying polyvinyl chloride resin to a fabric or paper base. The result is a plastic material. Its technical characteristics are slightly lower than those of a single-layer one. |
If all quality characteristics affect durability and scope of application, then the appearance of the furniture depends on the type of surface. The following types are distinguished:
- Glossy film – has high reflectivity. It can be used to cover the façade in dark and small rooms.
- Matte – has a soft surface. The canvas is used in good lighting.
- Mirror.
- Transparent coating - excellent for treating glass elements in facades.
- Holographic material.
When choosing, take into account the size of the parts that will be pasted over. You need to purchase the most suitable roll of film to avoid a lot of waste. The length can be 2 and 15 m, the width is 45, 67.5, 90 cm.
How to paint?
A cabinet that has gone out of fashion, but is still quite strong and will last for many years, can simply be repainted. In this simple way, a new design of cabinets, chests of drawers and any other old furniture is created. In this case, we are talking not only about giving freshness to dull surfaces, but also about completely replacing the color scheme, which will add originality to the product. Painting is the most common option for updating an old item. Despite its simplicity, it is necessary to approach this process correctly. For a long-lasting result, you must first prepare the furniture walls.
Below is a step-by-step master class.
It will help you to carry out high-quality and competent painting at home:
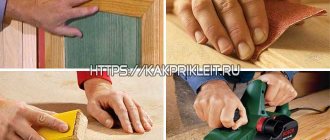
- it is important to first clean the surfaces of paint residues: one layer will easily remove the sanding disc; special brushes can handle several layers as an attachment;
- all walls, doors and other parts must be sanded manually or using a tool;
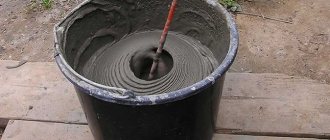
- leveling occurs by applying a primer or putty to hide defects that have arisen during many years of use;
- you need to wait until the leveling layer has completely dried, and after that you can start painting;
- To apply a layer of paint on all sides, take a brush, roller or sponge; however, it is faster to use a spray gun or spray gun. With this method, the paint is applied under pressure, so the doors, shelves and walls inside the cabinet are well painted;
- As a rule, several layers of paint are applied. This ensures rich color and good surface preservation. It is better to paint the cabinet with acrylic, alkyd enamel or other high-quality paint;
- the paint must be allowed to dry completely, after which a layer of varnish can be applied. It makes the cabinet look glossy and shiny. If you prefer a matte surface, you can skip varnishing. However, the use of this coating has a protective function, prevents abrasion and gives the tone greater depth. You can use not only glossy, but also matte and silky finishes.
Decoupage
Decoupage is a fairly simple, always relevant and excellent result decoration method. The possibilities when decorating using this method are limited solely by the imagination of the master. There are several types of decoupage that have their own characteristics. To decorate furniture with any of them, you will need the following tools:
- Special napkins, glossy cutouts, printed interesting pictures, lace, photographs. There is no need to prepare all of the specified elements at once; you need to choose the most suitable ones for the implementation of the planned decor.
- Decoupage glue or regular PVA.
- Scissors.
- A small sponge or paint roller to smooth the surface.
- Cloth or sponge to remove excess glue while working.
- Varnish coating.
- Brushes.
- Primer.
- Acrylic paints.
Now it’s worth taking a closer look at the methods of decoupage.
You can put a picture like this on the table
Decorating a closet in a modern style
Classical
It involves gluing a picture to the surface of furniture and coating it with varnish. You can decorate stools, tables, bedside tables, chests of drawers, and cabinets in a similar way. The work includes several stages, which are described in the table.
| Actions | Tools |
| Removing old paint from furniture surfaces | Spatula, sandpaper |
| Coloring | Acrylic paint, primer |
| Preparing images (cutting out the desired design and separating the top layer) | Scissors, napkins |
| Sticking Images | Glue |
| Making the surface even | Roller or soft brush |
| Removing glue residue | Cloth or sponge |
After completing the described steps, the product must be dried and varnished. You may need to add some smoothness using fine sandpaper.
You can decorate furniture in different ways
Dresser decoration option
You can stick pictures of flowers on the chest of drawers
Reverse decoupage
This method is great for transforming transparent furniture. These could be cabinet doors with inserts or glass tables. The drawing will be fixed on the reverse side. To decorate furniture using this method, you must perform the following work:
| Actions | Tools |
| Preparing images (soaking) | It is better to use bright magazine clippings or printed pictures. |
| Surface cleaning | Spatula, cleaning products, degreaser |
| Coating the front side of pictures with glue | PVA |
| Gluing and smoothing designs | Roller or soft brush |
| Consolidation | Clear nail polish |
Decopatch
The method, which takes longer to complete, is not as easy to implement as the previous ones, but the result is worth it. It consists of assembling a composition from different elements glued end to end.
The cabinet can be painted, a new color will update its condition
You can put glass on the table
This method is well suited for transforming chests of drawers and bedside tables. It includes the following steps:
| Actions | Tools |
| Cleaning a piece of old furniture | Sandpaper, spatulas |
| Surface treatment | Primer |
| Preparing pictures | Selected Images |
| Coating the treated surface with glue | PVA |
| Gluing the pieces | Soft brush |
| Removing excess PVA | Cloth or sponge |
After drying, apply two layers of varnish.
Decoupage allows you not only to update old furniture, hide its flaws, but also make new interior items unique.
Furniture can be aged, it will look unusual in the interior
Restoring chairs is very simple, just paint and decorate them
The chest of drawers can be decorated
Decor
If you decide to keep and decorate an old cabinet with your own hands, you can decorate it in different ways. There are many techniques that are used for decoration.
Decorative plaster
This is a rather complex decoration option. First, a product covered with old paint must be treated with sandpaper. Using a stencil, it is necessary to apply decorative plaster to the volumetric elements on the cabinet facades. The stencil itself must be removed before the plaster dries. Then the uneven parts are smoothed using a spatula. Finished decorative elements are varnished or painted; gilding or antique patina is possible.
Photo printing
A sliding wardrobe or just an old wardrobe can be greatly updated with photographs or photo wallpaper. Any photographs are enlarged using large format printing in a printing house. The surface is decorated with a panel or a collage of photographs, most often these are sliding wardrobes with smooth doors. However, the service of such printing is expensive, so a budget option is often used - photo wallpaper, which is sold in any repair store. Choose a wide variety of themes - nature, beautiful cities, animals and much more. If you use starch-based glue, you can later change the boring pattern.
Stained glass film
You can decorate an outdated piece of furniture yourself without having any special skills. It’s very easy to stick stained glass film, which is fashionable this season, onto the glass cabinet door. This will add presentability to old furniture. In addition to its decorative function, the film protects the glass from impact and scratches. Removing the film is very simple, and this decorative technique looks very impressive, because the imitation is as close as possible to real stained glass.
New fittings
There are no trifles in the decorating process. Every designer knows that 40% of the success of any interior is details and accessories. In this case, you can transform the cabinet beyond recognition by changing all the fittings on it. New pens are important.
Restoration in Art Deco style
Art Deco gained its greatest popularity at the end of the twentieth century. The characteristic features of this design are luxury, shine, and high cost of finishing materials. The colors of the interior and furniture are predominantly white, black, and gold. Accenting with purple, red, green and brown colors is allowed. Black and white portraits of famous people of the past would be appropriate here. This style is inherent in the gangster layers.
Stylish dark purple wardrobe with golden elements
In DIY furniture design, this direction can be expressed in different ways. Regarding cabinets and chests of drawers, these can be either plain facades and panels painted with acrylic paint in one or two colors, or decorated furniture using decoupage.
Decoupage napkins or film are a universal and practical way to give the interior and furniture a creative look. Its shapes, patterns, colors, prints are widely represented in paint stores. In Art Deco, these could be the same faces of the bandits of the past, or, as has become very fashionable, the figure of the unforgettable Marilyn Monroe.
First, the entire cabinet is painted in primary colors. To make the borders clear, use masking tape.
Then the panels are decorated using decoupage technique
The final stage is applying a protective layer of varnish
It would be interesting to use a special varnish that has crackle properties when covering decoupaged furniture facades.
A pattern made from mosaics with your own hands will look original. To do this, you need to have several unnecessary porcelain or ceramic plates, mostly black and white and gold. The plates are broken into small pieces, and then assembled into a pattern or figure using a stencil. The resulting fresco is filled with epoxy resin or plastered with tiled plaster to match the color of the interior.
Pieces of tiles are an excellent material for original decor.
Furniture fittings, small parts, as well as the slatted frame are painted with gold acrylic paint.
Chic cabinet decor with seashells attached to the prepared surface with hot glue
Useful tips
It’s a pity if you have to throw away old but high-quality furniture, especially wooden ones. But such products can be updated and used for more than one year. To choose the right decoration method, it is important to take into account the material and degree of wear of the old cabinet.
Natural wood
Previously, wooden furniture was made of very high quality. Before updating, remove dust with a dry cloth. Then check the fasteners and if they are broken, they need to be repaired or replaced. It would be nice to treat the inside of the cabinet with an antibacterial agent; a more budget-friendly option is simple vinegar. It will destroy the unpleasant odor.
Then the choice of decoration method is made.
- Toning. First, all surfaces are leveled using wood putty, matched to the color of the cabinet. After the layer has dried, uneven areas are sanded with sandpaper. Treated and even surfaces are treated with a special structuring tinting for wood. Choose a decorative tinting color darker than the original shade of the cabinet. This treatment will completely transform the appearance of the product.
- Aging. Furniture made from natural wood can be “aged”. The antique-worn effect of the cabinet surface is achieved as follows: light wood tone is painted in any dark shade depending on the color palette of the room. Then, after the paint has completely dried, you need to rub several fragments with a candle, after which light paint is applied, for example, beige, white, cream. When the second painted layer is rubbed with sandpaper, abrasions will be visible through some light areas. which are darker. When decorating a dark cabinet, make craquelures. To do this, apply craquelure varnish to the surface. After it dries, small cracks form, which are highlighted using dry pigment or oil paint of the desired shade.
Source: dekoriko.ru
Painting polished furniture
Interior items made from natural wood and coated with a polished layer can be given an unusual look using cabinet paint. An old product, refined in a modern design, will become the central element of the room and give the room a special charm.
How to paint a cabinet or decorate a wardrobe:
- For work use acrylic paint with a matte effect.
- To degrease the base, use acetone or white spirit.
- To apply paint you need brushes, and for decoration you need new pens.
- Old fittings are removed from the cabinet, shelves and drawers are taken out.
- All surfaces are treated with a sanding machine.
- Coarse and fine-grained sandpaper is selected for the tool.
- If there are large chips on the surface, they need to be puttied.
- Treat the furniture with white spirit or acetone and dry it.
- How to paint a cabinet - Apply a thin base coat of paint.
- After drying, rub over with fine-grained paper.
- Remove dust with a dry cloth, apply the next layer and dry.
- Rub again and apply another layer until the desired effect is achieved.
Using this method, you can transform an old polished cabinet into original vintage furniture that will decorate a classic interior. The fittings are screwed into their original places.
For exclusive work, you can use not full painting, but dot painting - a pattern is applied to the furniture facades with a marker and the design is drawn with acrylic paint.
How to paint an old cabinet with your own hands
Furniture is one of those interior items that are purchased with the expectation of long service. There is no need to throw away used furnishings if, after repairing the cabinet, drawers and fronts, they no longer fit the interior or simply require updating. If the structure is strong and functionally satisfactory, it is enough to know how to paint an old cabinet with your own hands so that it can serve again and delight you with its appearance.
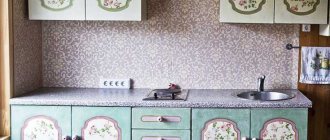
Wallpaper decoration
An original solution for updating kitchen drawers is to use wallpaper for decoration. If part of the kitchen wall is covered with wallpaper, then you can take the remains of it for decoration. If the kitchen walls are completely tiled, then to decorate the cabinets it is advisable to choose wallpaper with a fine pattern and shade that is in harmony with the finishing tiles. If kitchen cabinets have glass doors, then wallpaper is glued to the back of the drawers and laid out on the shelves. Showing your imagination, you can also use the pattern on the wallpaper to decorate cabinet doors. To maintain strength and moisture resistance, the wallpaper can be coated with acrylic varnish.
What you need for painting
The most time-consuming and financially consuming process is preparing an old cabinet for painting. You may need:
- Sandpaper of different grits for sanding the top coat for better adhesion to the paint, a sponge and a brush for removing dust.
- Metal brushes for brushing if the cabinet is made of solid wood and the goal is to make the wood texture more expressive before painting.
- Grinding machine for automating sanding and brushing. By the way, you can use a screwdriver or drill with special attachments for this.
- A heat gun and a scraper/trowel if the old cabinet has been painted in the past.
- Wood putty for filling holes and irregularities, spatula.
- Solvent, primer, paint tray, masking tape, gloves and other protective items (apron, goggles, respirator, etc.).
- Narrow and wide brushes for painting, foam or velor rollers. Ideally, a spray gun.
Before the advent of chalk paints, acrylic-based compositions were most in demand. Acrylic paints have many advantages: they are diluted with water and mix easily, dry quickly, do not have a strong odor and are resistant to abrasion. Optimal for painting cabinets in children's rooms, bedrooms and kitchens.
To comply with safety precautions, painting should be done in the fresh air or in a well-ventilated area, away from flammable objects and potential sources of fire.