Vintage style is in demand not only among modern fashionistas in clothing and jewelry, but also in designer interiors. The antique furnishings create a special coziness and romance. Craquelure on furniture is a good solution for those craftsmen who themselves want to give a touch of time to a standard chest of drawers or an ordinary mirror, turning it into a wonderful vintage item.
What is craquelure
This technique appeared in the 18th century; French masters were the first to use it. Today, by applying artificially created cracks to the surface of a product, an exquisite aging effect is created. This increases the artistic value of things and gives the items a special charm and individuality.
The technical side of the process involves the application of two paint layers of contrasting colors, between which a special varnish is applied, which dries and forms small cracks on the surface.
A different decorative result is always created, which is influenced by:
- composition density;
- length and shape of strokes;
- layer thickness.
The effect is enhanced by the use of patina, rubbing in bitumen, and powders of metallic shades.
Preparing the wall surface
If repair work is carried out in a new building, then putty is applied to the surface to level the wall. If the walls already have a coating, then the old material is removed and existing defects are corrected with plaster. If you have paint that adheres well, you can leave it. After cleaning the old wall finishes, they are cleaned of dust and dirt, puttied, and primed.
If repair work is carried out in a new building, then putty is applied to the surface to level the wall.
What to prepare the working composition from at home
Making craquelure with your own hands is not so difficult, the main thing is to purchase the necessary materials and be patient. It is not necessary to look for sets of varnishes in specialized art stores.
You can transform a faceless object using ordinary products and substances:
- gelatin;
- egg white;
- PVA glue;
- egg shells.
Ordinary products and substances for cleaning or washing will help in cases where it is not possible to buy a craquelure set.
After experimenting a little, they determine which tactic to choose if you want to create a wonderful thing in the shabby chic style from a boring chair or table.
From gelatin
It is quite easy to make craquelure varnish with your own hands from ordinary food gelatin.
Instructions for making and applying craquelure:
- 1 tbsp. l. Pour the powder into 1 glass of warm water.
- Leave to swell for a short period of time.
- Heat the composition in a water bath until all lumps are completely dissolved and a homogeneous consistency is obtained.
- Cool well.
- Apply an even layer to the area previously painted in the desired color.
- Wait until it dries.
- Then cover with another shade.
- Dry with a hairdryer.
The resulting network of cracks can be easily washed off if you are not satisfied with the result - this is a great opportunity for beginners to practice. Gelatin will never acquire the hardness necessary for the practical use of things in everyday life, so decorated areas must be varnished after thorough drying.
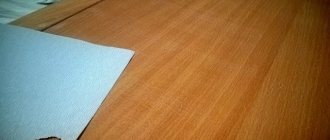
From gel
This method is interesting because it is convenient for application to fabric. If woven material is chosen as the base, then the bottom tint layer is optional.
Features of the method:
- The washing gel is picked up with a brush or sponge and applied to the surface in even strokes.
- Then the sponge is covered with a layer of liquid acrylic paint.
- Drying of the gel causes cracking of the top painted layer.
- Varnish after thorough drying.
Do not rub the layers or press hard on the sponge. On fabric and wood, the gel is absorbed and dries faster. Decorating glass and plastic will require some skill.
From egg white
This option is suitable when you need to artificially age a large area on furniture or even a wall. The surface is first painted and dried well.
Procedure:
- Fresh raw eggs are carefully separated into white and yolk.
- Using a wide brush, without shaking to avoid the appearance of bubbles, spread the protein onto the prepared object.
- Allow to dry without using a hair dryer or direct bright sun.
- Apply a contrasting shade on top carefully, ensuring even application.
- Varnish when the cracks are completely dry and hard.
The method is simple and cheap, so needlewomen often use it. It should be taken into account that the protein cracks into a fine, fine mesh, creating a uniform tone.
Using vinegar
The simplest method, based on the interaction of a fresh layer of paint and table vinegar.
The following algorithm helps to obtain wide ragged cracks:
- A dry and clean object is painted with acrylic enamel.
- After the first layer has thoroughly dried, a contrasting shade is applied.
- With a sponge dipped in table vinegar, lightly and chaotically hit the freshly painted surface.
- Make sure that the cover cracks evenly and beautifully.
It is best to hold such an event in the fresh air, on an open terrace or balcony. In a room, the smell of vinegar will then take quite a long time to dissipate.
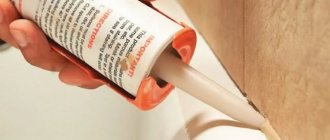
Application of two-component varnish
The principle of working with this tool is labor-intensive, but the effort expended is worth it, the result is excellent. The wall itself is painted in the chosen color, after which a universal varnish is applied to the dry wall. After a few hours, the procedure is repeated. Then treat the wall with finishing plaster or paint.
The decorated surface dries within 24 hours, using a hairdryer, the cracks will be more prominent and deeper. Grouting should be done after the top layer has dried. Dark shades of oil paint, gold powder, and colored dry pastels are suitable for this. Rub the product into the cracks with a soft sponge. Excess is removed with a rag soaked in vegetable oil. The finished surface is wiped with a dry cloth and a protective varnish is applied.
Decoration of large premises
The decorative surface can be smooth or embossed. You can apply textured paint. The technique is individual, but there are similarities:
- The plaster layer should not be more than 4 mm. For water-based paint, 1 mm is enough, otherwise it will be difficult to avoid the formation of smudges.
- Cracks are the main finishing elements; there is no need to create an additional bright texture. Experts recommend leaving small layers or shagreen.
- You need to work quickly and join the sections before the finishing layer hardens. Leveling the solution and creating texture should take no more than 15 minutes. When painting walls, the maximum pause is 3 minutes; if longer, the paint will pull together behind the brush.
Uniqueness of the drawing
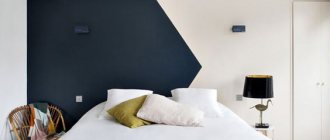
Ideal for the bedroom
Features of creating craquelure
The technique is complex because the method of applying the working substance, the quality of the brushes and the drying method affect the final result.
Technical recommendations should be carefully followed:
- make strokes evenly, with the same pressure, without going over the previous ones;
- use only synthetic brushes in your work;
- do not create deliberately even movements of the same type, so that the surface cracks naturally chaotically, and not with the same artificially created mesh;
- layers should be as uniform and even as possible;
- do not pass the brush or sponge several times over the same place;
- try to smoothly smooth out the crackle transitions into the main tone or beautifully design the borders.
It should be taken into account that some construction paints will not crack, unlike artistic paints. If you have no experience working with purchased enamel, you need to make a test version on an unnecessary piece of a suitable texture. Metallics do not crack at all - they cannot be used as a top coat, only as a base.
When choosing a way to decorate an item, be sure to imagine the finished result. If all the elements are in harmony with each other, and the details complement each other favorably, feel free to experiment. Coat one-component craquelures with varnish not on water, since acrylic will ruin the work, clouding the cracks and laying down more and more unevenly each time.
Advantages and disadvantages
Decorative plaster based on craquelure has positive and negative characteristics. This should be understood by those who decide to use it in their home. Advantages:
- High aesthetic appeal. Craquelure differs from other decorative materials. The walls will be original. There are no identical patterns, since small cracks form randomly.
- Long service life.
- Wide range of surfaces. The varnish adheres well to concrete, plaster, brick, plaster, cardboard, and other materials.
- Moisture resistance. The material is resistant to the development of pathogenic microorganisms and mold.
- Environmental Safety.
- Variability of coverage. For maximum design aesthetics, the surface can be additionally painted or varnished.
Living room decor
We must not forget about the shortcomings, which also affect the final quality of the repair:
- High price. This drawback is not related to the actual cost of the varnish, but to the fact that you will have to pay a large sum for the work of a real master.
- Difficult to apply. Craquelure is difficult to work with. To create a unique design you will have to invite a specialist or do a little training yourself.
How to do it yourself
Do-it-yourself craquelure on the walls is an economical option that allows you to highlight beautiful classic furniture or furnishings in the “country” spirit. You need to use water-soluble acrylic enamel in two colors and craquelure varnish. The walls are pre-primed, and the finished result is covered with wax, a protective matte composition.
Required tools and materials
To decorate small items and small areas, you don’t need to purchase a lot of tools.
Most often it is enough to prepare:
- synthetic brush of the required width;
- sponge or piece of foam rubber;
- rubber gloves to protect hands;
- containers of various sizes;
- hairdryer
If you need to treat a large area, then you can also use a paint spatula, which will speed up the process. The choice of materials depends on the method preferred.
In art stores you can buy:
- oil paints, acrylic paints;
- gum arabic;
- decorative bitumen;
- kits for one-component or two-component craquelure;
- special protective substance.
Washing gel is sold in almost any hardware supermarket.
In construction stores you can also find everything that will make something not only beautiful, but also functional:
- acrylic enamel;
- coloring pigments;
- water-based and non-water-based varnish;
- primer for walls or wood;
- PVA glue.
One-step
Crackle is obtained by spontaneous cracking of the drying composition, which is applied between two layers of paint. An important point is the ability to choose the right time to apply the shade on top. So that it has time to form a beautiful pattern, they begin to paint when the varnish is not completely dry and slightly sticks to the finger when pressed lightly. If you do it late, there will be no effect.
Process order:
- Product primer.
- Painting to match the color of the cracks.
- Varnishing.
- Drying.
- Coloring in the main shade.
The principle is this: the thicker the layer, the larger the cracks.
Two-step
In stores for artists, they sell kits for creating crackle in two phases: first, one composition is applied - hardening, then a second - causing the first to crack. This is the most convenient way.
But if you have shellac and gum arabic at home, then things can be easily transformed by following these instructions:
- Degrease the cleaned surface.
- Cover with two layers of acrylic varnish.
- Apply shellac evenly and carefully, dry it, but not completely.
- Rub gum arabic on top, which will crack when it dries into a crust.
- The cracks are filled with colored powder and bitumen.
Be sure to apply a protective coating.
For PVA glue
The item that is about to be processed is first thoroughly washed and wiped.
Algorithm of actions:
- It is better to buy thick glue, for example, for wood.
- Paint the product, preferably in two layers.
- Distribute the glue evenly so that the base does not show through.
- Wait until the PVA sets into a thin but durable film.
- Apply the desired shade on top using acrylic enamel.
- Blow dry immediately.
After a few hours, you can do decoupage with a napkin. A final protective coating is required.
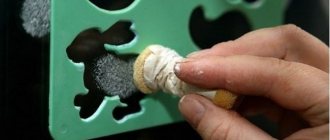
From eggshell
An easy and fun method. To work you will need shells and glue.
Sequencing:
- The area for decoration is degreased.
- PVA is applied in small areas, not allowing it to dry.
- Pieces of shell are glued onto the smeared area, matching them by size or color, like a mosaic.
- The finished product is dried and varnished.
In this way, entire paintings or panels are assembled by gluing napkins with beautiful scenes on top. The shells are easy to pick up with tweezers; they are broken in advance to the required size and sorted.
Description of dextrin
If you decide to use the technology described above, then you should know what dextrin is. This is heat-treated starch, based on corn or potato substrate. Dextrin today is quite common in many sectors of the national economy. It is often used in the manufacture of adhesives for bags and labels, adhesive paper tape, as well as in the production of food containers. Among other things, this material is used in the light and food industries.
Recommendations
Before the process, the workplace must be prepared: the table is covered with oilcloth or old newspapers, and good, comfortable lighting is turned on.
Basic recommendations:
- Preliminarily carry out wet cleaning of the room, not allowing dust to spoil the work;
- remove excess glue with an old rag;
- When using a hairdryer, do not turn on the air flow too hot, it is better to set it to a warm setting;
- Wash your brushes with laundry soap after use.
An apron will help protect clothes and skin from accidental splashes. Once you've finished decorating, ventilate the room and close all paint cans.
Necessary materials
To perform crackle plaster you will need the following materials:
- base paint that will show through cracks;
- craquelure varnish, 100 g of varnish is required for 1 m² of wall;
- textured plaster for decoration;
- dye (acrylic or latex);
- decorative wax;
- special grout for cracks;
- transparent fixing varnish;
- primer, etc.
Coating care
The peculiarity of the craquelure coating is that it is easy to damage. You can care for it with a damp cloth, no more than once a week. The use of aggressive chemicals and hard brushes is not recommended.
If you adhere to the coating technology, then decorative plaster on the craquelure surface is not very difficult. It is quite possible to do it yourself, giving the room an original look and a unique atmosphere. To ensure that the coating blends harmoniously with the interior, the craquelure technique can also be applied to furniture.