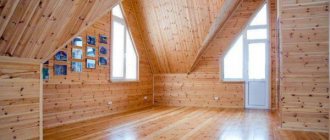
Stages of thermal insulation of a wall
In order for the work process to proceed quickly and properly, you should prepare the necessary tools.
This will significantly speed up the work on protecting the walls with insulation. The following materials will be required:
- plasterboard sheets;
- self-adhesive tape;
- insulation;
- membrane to ensure maximum vapor barrier;
- screws, nails;
- hammer, screwdriver, hacksaw;
- yardstick;
- metal profiles or wooden slats for constructing the frame;
- fastening materials.
For 1 sheet you need approximately 30 pieces of self-tapping screws. It is best to buy screws 20 mm long.
As for the manufacture of the frame, the profile must be taken of 2 types: marked CD and UD. The length is selected based on the size of the room.
Frame design
It consists of drawing the perimeter and thinking through how the frame will be positioned on the wall. A simple pencil and a building level are enough.
Preparation:
- surface cleaning;
- smooth out all the unevenness and fill up the cracks and depressions;
- drying with a heater or blow dryer;
- getting rid of mold and mildew.
Sometimes it is necessary to treat the walls with a special waterproofing putty to prevent the occurrence of dampness. First, the layer is applied vertically, then horizontally.
Frame construction
Installation of a frame from profiles for plasterboard
You need to mount the frame according to pre-made marks. To avoid contact of the metal structure with the wall, a tape prepared in advance is glued to the base of the profile. The frame parts are fastened to the wall using self-tapping screws and dowels.
Before laying the insulator, the surface is prepared in advance. Weak areas of plaster are removed or restored. To eliminate the possibility of the formation of fungus and mold, it is necessary to treat with a primer and an antiseptic.
Sheets of plasterboard are installed on a frame made of metal or wood. A metal frame will last significantly longer than one made of timber.
In the area where batteries are located, where installing thermal insulation is difficult, penofol can be used.
You can make a frame from bars under drywall
Assembling the frame begins with the installation of guides created from the UD profile. The slats are mounted on the ceiling and floor with a distance of 50-60 mm from the walls. A section of the rack profile is inserted into the guides. The ends are fixed using small self-tapping screws (“fleas”). The edges of the hangers are folded from the sides and connected to the slats. The pitch between the profiles must be observed so that there are 3-4 slats per sheet.
To improve the rigidity of the structure, it is necessary to make transverse bridges from the CD profile. The profile is cut so that its length overlaps the adjacent slats by half. Use metal scissors to cut off the shelves. Then the blanks are fixed with fleas onto the frame.
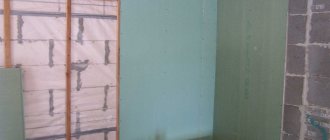
Vapor barrier device
Penofol is often used as a vapor barrier. Before attaching it, you need to make sure that the side of the material with foil is facing inside the room.
As for the vapor barrier material, which has a rough surface, its uneven side should also be directed into the room.
Insulation
The insulation should be cut using a special knife.
The insulation should be cut into pieces, the size of which should match the parameters of the frame cells.
If you use foam plastic as a thermal insulation material, then it should be attached with special glue prepared with the addition of water. Each piece should fit tightly to the surface. If gaps appear between the parts, they are filled with polyurethane foam. After the glue has dried, the foam is fixed with dowel umbrellas. Dowels should be placed in the corners of the sheet and one in the center.
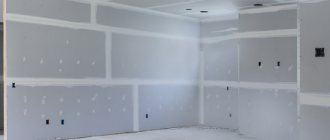
After laying the internal thermal insulation, they begin to sheathe the frame with sheets of plasterboard.
When the screw is screwed in, its head should sink slightly, by 1-1.5 mm, but without tearing the cardboard. To make fixing easier, it is better to buy bits with a limiter.
After the walls are completely covered with plasterboard sheets, the surface is finished in any usual way. Insulated walls can also be covered with wallpaper or painted.
How is installation done?
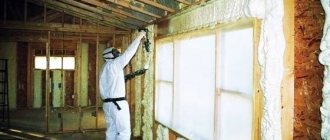
Don’t be alarmed, the installation of insulation has already been done independently by a variety of people. There is a proven step-by-step scheme that will allow you to make durable and reliable insulation. To begin with, the technology for laying insulation requires some precautions - the work should be carried out in:
- respirator;
- glasses;
- cap or hat;
- hood;
- You should always wear gloves on your hands;
- After completing the work, the clothes are washed separately from the rest.
It is not difficult to follow these rules, but they will raise the level of comfort and safety in the work being carried out to the limit. Let us note that many people ignore the use of a respirator, which is a big mistake - there is something to breathe in, and then you will need to seek help from a doctor, and it is difficult to imagine what this can lead to. The key instructions for laying insulation on walls are the following sequence of actions:
- We start by very carefully foaming all the seams and cracks, of which there are usually a very large number on the outer sides of the walls. Polyurethane foam is perfect for this and is easy to use, so you will be satisfied with the result;
- Next, we must take care that the insulation fits very tightly to the heated part of the house and fills all the space inside the frame. If there are any voids along the edges of the wooden frame, everything is corrected, even if this place is made of small cut pieces of insulation;
- then we check that the edges of the insulation do not wrinkle inward - everything must be strictly parallel;
- we check all connections - the insulation is laid end-to-end, even a small gap is a huge loss in the quality of insulation. If the insulation is laid in several layers, this is done as when laying bricks: a new layer overlaps the previous joint;
- Next, you need to take care of placing the insulation even behind the junction box, behind wires and other elements - there should be no gaps or gaps at all;
If you acted carefully and responsibly, you will need to cover the insulation with the material that you chose for this, but this is a completely different task, it has its own subtleties and rules - the insulation for your home is completed and a comfortable winter awaits you.
Characteristics of drywall
Drywall is a sheet finishing material consisting of gypsum and paper. Designed for covering wall and ceiling surfaces on rigid wooden or metal frames.
Depending on the type, the thickness of the panel varies from 6 to 12 mm. At the same time, the average thermal conductivity of the product is 0.35 W/m°C (for brickwork 0.64-0.81 W/m°C) which, of course, is not bad for finishing, but is too low for a heat insulator.
For example, the heat transfer resistance of a twelve-millimeter sheet is only 0.0042 m2 °C/W out of 3.28 m2 °C/W, which is recommended by SNiP for walls in the Moscow region. It turns out that plasterboard is useless as a wall insulation, it is even less suitable for thermal protection of the ceiling, and yet it invariably participates in the composition of the thermal insulation cake.
The fact is that although it won’t be possible to insulate a wall with plasterboard, you can easily use it as a container for mineral wool or expanded polystyrene, you just need to mount the frame at the required distance from the wall and fill the entire resulting space with insulation.
At first glance it’s not difficult, right? But this matter also has its own nuances. Read more about this further.
Step-by-step insulation with plasterboard (video)
When installing additional insulation, they should fit comfortably between the main wall and the plasterboard structure. To install rolled thermal insulation materials or better secure the slabs, it is recommended to glue them to the main wall or use special umbrella dowels. They differ from standard ones with a large cap.
To prevent moisture from accumulating in the insulation and losing its properties, it is covered with a special vapor barrier membrane. This material will be a barrier to warm air that leaves the room through sheets of drywall. Next, the plasterboard sheets are attached to the structure using self-tapping screws. Quite often, wooden rather than metal fasteners are used, because they have lower thermal conductivity. However, wood also has a disadvantage - it becomes deformed over time.
After installing the drywall, further finishing of the room is carried out. Following the processing of drywall, which we wrote about earlier, wallpaper, tiles, decorative stone or other finishing materials are glued to the walls.
Technology of thermal insulation of walls with plasterboard from the inside
The technology of insulating the walls of a room with plasterboard from the inside does not require special training of workers or expensive equipment. General construction skills and a universal tool are enough.
Tools and materials
During the work you will need:
- guides (metal profiles or wooden bars);
- gypsum boards;
- insulation in slabs or rolls;
- double sided tape;
- vapor barrier membrane;
- screws, dowels and other fasteners;
- anti-mold agents;
- putty;
- drill;
- screwdriver;
- hand tool.
The floor in the room must be cleared of debris and foreign objects.
Design
At this stage, the type of insulation, gypsum board and guides is selected.
If you are insulating a kitchen or bathroom, you should choose moisture-resistant plasterboard. For the boiler room, it is recommended to use fire-resistant.
Wooden guides are cheaper, but they are at risk of drying out and deforming in the event of temperature changes. The metal profile does not have such disadvantages. The number of guides is calculated based on a standard step of 60 cm.
When calculating the volume of materials purchased, a 5% reserve should be made in case of damage to gypsum boards and for cutting complex elements of walls and ceilings.
Stages of work execution
At the first stage, it is necessary to perform a number of preparatory work:
- clean the walls from dirt and mortar drips;
- dismantle all protruding objects: fasteners, remnants of fittings, sockets, lamps, etc.;
- fill all cracks and irregularities;
- treat with a composition against fungus and mold;
- dry the surface.
Next, marking work begins. Use a plumb line or a laser rangefinder and a chop cord
special attention should be paid to:
- parallelism of the marking of the mounting points of the guides;
- marking in corners and junctions of building structures: arches, window and door openings, columns, bay windows, ceiling beams.
After marking, they proceed to the installation of frame guides.
- The starting profile is glued to the floor using double-sided tape; the adhesive tape will improve sound insulation and protect against drafts;
- vertical profiles are attached to the starting strip with metal screws, and to the wall with screws on dowels.
The process of insulating walls with plasterboard
A very important stage is laying insulation into the guides. The quality of insulation will directly depend on the accuracy of the work:
- insulation sheets are placed in the guides from bottom to top;
- they should fit between the profiles without gaps, with some effort;
- the sheets are additionally attached to the wall with adhesive or disc-shaped dowels;
- All cracks and gaps must be tightly filled with scraps of material or sealed with foam.
Now it's time to install a vapor barrier:
- penofol is mounted with foil inside the room;
- The vapor barrier membrane is attached with the rough side inward; double-sided tape is used for installation.
And the final stage is the installation of drywall sheets. They are mounted horizontally, from bottom to top. Before screwing the sheet to the guides, you need to use markings and a level to make sure that it is positioned strictly horizontally. After the first layer is secured along all the guides, the next one is installed on top of it. Here you also need to ensure that the position is horizontal and that the gaps between the sheets are minimal.
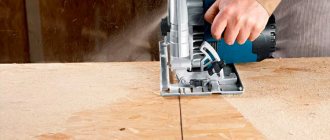
As a rule, the size of the room does not allow installing only whole sheets of drywall. Pieces have to be mounted in corners and under the ceiling. Drywall should be cut on the floor, in a horizontal position, on a flat surface. It is enough to cut through the top layer of paper with a mounting knife. Now the cut piece can be broken off along the cut line.
Upon completion of installation, all joints between the sheets should be thoroughly puttied. After the composition has dried, it is leveled with fine sandpaper, achieving a completely flat surface of the wall or ceiling.
Now the surface of the insulated wall is ready for final finishing. Two main types are used:
- wallpaper;
- water-based paint.
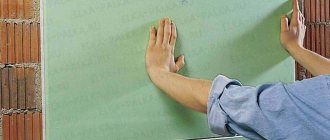
When insulating rooms with high humidity with plasterboard, moisture-resistant types of plasterboard with special hydrophobic and antifungal impregnations are used. These panels are easy to distinguish: they are painted green. In wet rooms it is also necessary to arrange supply and exhaust ventilation to prevent air stagnation and mold formation.
Insulation with frame
The procedure for choosing this installation method will be as follows:
- The wall surface undergoes minimal processing: poorly adhering elements of the old coating are removed.
- The frame is marked: a strip is drawn on the ceiling, then using a plumb line it is transferred to the floor. These are the guide attachment lines. The location of the vertical posts is marked on the wall in 60 cm increments.
- The guides are secured with dowels. The fastening step is 25–30 cm.
- Vertical elements are mounted. They are screwed to the guides with metal screws. The deviation is adjusted using direct hangers located every 50–60 cm. The position of the racks is checked with a building level.
- Glue the penoplex to the wall in the same way as with the frameless method. The insulation boards are rolled with a roller with needles, and an adhesive solution is applied. Then they are tightly inserted between the vertical posts and pressed for 40–60 seconds.
Advice. Pieces of insulation are placed in the metal profile to prevent heat transfer through the studs. Another option is to fill them with foam.
- Sheets of drywall, if necessary, are cut into the required fragments. Docking of gypsum boards occurs strictly on racks. Fixation is carried out with self-tapping screws in increments of 25–30 cm. In order not to damage the surface of the drywall during installation, a special bit is placed on the screwdriver, limiting the depth of screw tightening. You can find it in construction stores.
- The seams are sealed using reinforcing tape and putty. After grouting, the entire wall is covered with two layers of a special primer for drywall. The second layer is applied after the first has dried.
Thus, it is quite possible to insulate the walls of an apartment from the inside using penoplex and plasterboard with your own hands. If you do everything correctly and carefully, the desired effect will definitely be achieved. The process can be seen in detail in the following video. And if you have any questions during the work, ask them in the comments.
Popular thermal insulators for interior work
Nowadays, internal insulation of brick walls can be carried out using different methods, which is why it is so important to correctly choose the most suitable material for these purposes, taking into account the characteristics of the given structure. The material is selected taking into account its fire resistance, thermal conductivity and density
These indicators affect the weight of the material and the thickness of the insulation. And the service life largely depends on the strength of the material.
The material is selected taking into account its fire resistance, thermal conductivity and density. These indicators affect the weight of the material and the thickness of the insulation. And the duration of operation largely depends on the strength of the material.
The most popular insulation materials include:
- Expanded clay. This insulation is added to the base, after which a monolithic frame is formed from it;
- Mineral wool. This insulation has good moisture absorption, so it allows you to insulate the house from the inside. Glass wool, which is also used as insulation, is one of the varieties of mineral wool;
- Warm plaster. This material is a universal insulation material because it can be used both inside the house and for facade work. The insulation retains heat well, but it is a heavy material, so it is used only in houses with a reinforced foundation;
- Cellulose wool. This material retains heat well, has excellent absorbency, but is subject to mechanical stress; experts recommend this insulation for interior work;
- Cork insulation. The positive characteristics of the material include its ability to retain heat well, however, it is flammable;
- Styrofoam. The reasonable price and the ability to use this material for both interior and facade work have made it popular. However, this insulation has disadvantages: it does not “breathe” and releases harmful compounds during the ignition process.
Less popular insulation materials are: extruded polystyrene foam, penofol, penoplex, polyurethane foam and penoizol.
Criteria for choosing material, requirements for insulation, which is better
When choosing insulation of walls inside a brick house, first of all, it is necessary to take into account the thermal insulation properties of the material. In addition, the most significant characteristic of the material is vapor permeability.
The following actions will help prevent contact of freezing brick wall surfaces with steam:
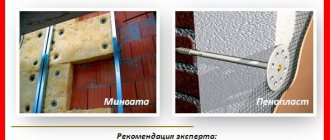
- Wall cladding with a polymer heat insulator such as extruded polystyrene foam, sprayed polyurethane foam, high-density foam or penofol.
- Use of mineral wool insulation material.
- Applying a thick layer of heat-insulating plaster.
When planning to insulate your home, you should also consider the method of installing the heat insulator.
When choosing insulation of walls inside a brick house, first of all, it is necessary to take into account the thermal insulation properties of the material.
Choosing insulation
Polystyrene foam, mineral wool, and penoplex are used as heat-insulating materials.
- Polystyrene foam is an artificial material. It is characterized by average hygroscopicity, thermal conductivity and density. Without special additives it is highly flammable. They are used to insulate external walls, balconies, and basement floors.
- Mineral wool is a time-tested material. It is characterized by high hygroscopicity and an average degree of thermal conductivity. Rarely used as insulation under drywall for interior spaces.
- Penoplex is a modern material obtained by thermal processing of foam plastic. It is characterized by low hygroscopicity and thermal conductivity. Has high density. Thanks to special additives, it practically does not burn. They insulate apartments, balconies, and basement floors.
The optimal insulation for interior work is penoplex.
Isolation stages
First you need to clean the wall. At the same time, do not just listen to the advice: cleaning-drying-washing. This, of course, is hassle-free, but, unfortunately, not everything. The more thoroughly the work surface is prepared, the better the result will be.
Related article: Wild grapes on the balcony: growing them correctly
You need to make sure that no moisture gets on the wall. It is this factor that will allow you not to worry about the condition of the base under the insulation for quite a decent time.
After cleaning, saturate the walls with antiseptics or fire retardants - special impregnating solutions. (This kind of work must be done with wood!)
The wall needs to be leveled if it has significant bumps, and also pay attention to ensure that there are no gaps or cracks. Because all this will allow heat to pass through, preventing the insulation from performing its task
Frame construction
Many thermal insulation materials can be glued directly on site. However, do not forget that you still need to mount the outer sheets. Therefore, to do this, you need to make a supporting frame, on the slats of which the drywall itself can then be fixed.
Traditionally, the frame is mounted from wood, however, in my opinion, there are two significant disadvantages:
- The weight of the constructed frame can be quite decent. Provided that the walls are made of cellular concrete, serious difficulties with fastening may arise.
- The frame is made taking into account the technical characteristics of the selected insulation. The design again turns out to be extremely heavy and only adds to the problem.
Therefore, experts advise buying profiles specifically for laying under drywall; this will save time and effort. The best option is galvanizing. Profiles made of this material can even be cut with scissors.
When attaching profiles, you need to look at the dimensions of the drywall sheets. The profiles themselves can be mounted both horizontally and vertically. Before laying the profiles, you need to stick a special tape on the frame. This will have a good effect on sealing the joints, reduce heat transfer and can help avoid deformation of the slats.
You need to control the alignment vertically and horizontally, this will guarantee a flat surface.
Laying insulation
When you already have a frame, you can lay the material in the resulting “cells”. Installation details depend on the type of insulation you have chosen. If you are working with foam plastic, then do not forget about fixing it with dowels.
At this stage, I advise you to watch a video that will provide specifics specifically for your material.
Related article: Curtains for a high-tech kitchen: rules for creating an image
Laying vapor barrier material
Vapor barrier material protects against moisture accumulation in unnecessary places. Typically, a vapor barrier is a film coated with foil. The shiny side should be facing the interior wall of the apartment. The vapor barrier sheets must be overlapped. For greater guarantee, seal the joints with metallized tape.
Sheathing with plasterboard
After the stage of laying the vapor barrier is completed, you can begin covering with plasterboard. It is made with self-tapping screws. The joints of the sheets must be puttied, then treated with sandpaper and covered with some kind of paint and varnish composition or glued with tape. This will help prevent the putty from cracking.
A few recommendations so that you have an idea of some of the nuances.
When choosing insulation materials for drywall, be sure to pay attention to their dimensions so as not to waste time cutting and adjusting something again. There should be as few joints as possible. This will keep the apartment warm. If communication lines pass along the wall, please note that the insulation must be under them. To ensure that the natural air circulation in the room is not disrupted, leave a small gap between the frame slats and the insulation.
In conclusion, I will say that insulating walls with plasterboard has many advantages. This is not only preservation of heat in your home, but also good sound insulation, which is important if you live near a railway, noisy street or tram line. Anyone can carry out such insulation on their own; it is important to be patient and attentive.
In conclusion, I will say that insulating walls with plasterboard has many advantages.
This not only preserves heat in your home, but also good sound insulation, which is important if you live near a railway, noisy street or tram line
Anyone can carry out such insulation on their own; it is important to be patient and attentive.
Conclusion
Insulating the walls of an apartment from the inside with plasterboard can easily be called a process that will help maintain heat in the apartment and eliminate all kinds of drafts and other troubles.
Also, if the insulation process is carried out competently and taking into account all the requirements, you can eliminate unnecessary financial costs for the purchase of additional heaters and other equipment. In the video presented in this article you will find additional information on this topic.
Of course, it should be noted that in order to achieve a high level of thermal insulation of an apartment, along with plasterboard insulation, it is also necessary to insulate plastic windows and insulate the loggia (see more in the article How to insulate a loggia and what is required for this). Such an integrated approach to the process will help create the most comfortable living conditions in the house, a real “homely” atmosphere of comfort.
Materials used for internal insulation
Materials used in the internal insulation of a house must meet certain requirements:
- Firstly, they must have low thermal conductivity in order to fulfill their main function - insulation.
- Secondly, these materials must meet fire safety requirements for premises.
- Thirdly, the material, alone or in combination with the mounting structure, must provide the required mechanical strength.
- And finally, all materials used indoors must be environmentally friendly and not release any chemicals into the surrounding air that adversely affect the health of living beings.
Insulating walls from the inside using putty
Using “fungi” the insulation is attached to the wall
This type of insulation, together with other work, will be more difficult than insulation under drywall, but nevertheless it can be done. In general, insulating walls with foam plastic with your own hands, without the help of professionals, is quite affordable if it is carried out according to the given instructions. When insulating with foam plastic under putty, two options are possible. We will look at them without video.
Option one
The wall needs to be plastered according to the beacons. This means that it will be absolutely flat. We attach foam sheets to the dried and primed plaster. To do this, either tile adhesive or mounting adhesive for drywall is applied to the sheet at five points (in the corners and in the center), and the sheet is carefully glued to the wall.
Mounting foam to the wall
After this, the material is fixed with screws for fastening. We use 5 fungi for one sheet of foam plastic, with the same arrangement as the glue - in the corners and in the center. With this insulation option, the rules and requirements for installation are almost the same as for tiles. Sheets should be placed on the wall, keeping them as flat as possible. We cover the joints with putty. If it's not clear what we're talking about, watch the video showing how to install tiles on a wall.
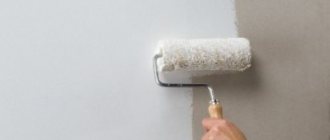
After the putty has dried, apply a layer of primer and also let it dry. Now we need to putty the wall. This is where all the mistakes that we made when aligning the foam sheets on a plane will be reflected. It was not for nothing that we said that the requirements for installing insulation in this case are almost the same as for tiles. This determines how smooth the wall on which the insulation is attached will be.
Putty is done as usual. First, the starting putty, then, after the starting putty has dried, the finishing putty and, finally, painting the wall.
Option two
This time there is no need to plaster the wall. You need to apply a layer of primer on it. The installation procedure is similar to the first option. Apply mounting tile or plasterboard adhesive to a sheet of foam plastic in five places and apply the sheet to the primed wall. We fix this sheet at five points (along the edges and in the center) with fastening mushrooms. We cover the joints with putty. What is the difference with the first method? The fact is that now we do not need to maintain a strict plane.
We prime the insulation laid on the wall and install lighthouse perforated profiles on it. To install the lighthouse perforated profile, we apply a putty path to the wall along a vertical line. The path can be made either continuous or with frequent dots. We glue the lighthouse profile onto it. We set it by level.
The final touches of insulation
In order to level the profile, you need to press the beacon with the same level. Therefore, the level should be used as long as possible so that the beacon profile does not bend when pressed. If there is no level of the required length, use a rule with a short level attached to it. The distance between the beacons should be slightly less than the length of your rule so that you can pull the putty.
Further work on putty is carried out as usual.
Required tools and material
Before starting work, you need to prepare tools and materials so as not to be distracted during the process.
So, you will need:
- polystyrene foam (its thickness will depend on the degree of insulation you need);
- adhesive composition (if you work using the frameless method);
- spatula-comb;
- primer emulsion;
- level;
- rule;
- drill;
- a nozzle called a “mixer”;
- dowels for attaching foam plastic (if insulation is done by screwing);
- self-tapping dowels;
- vapor-proof film;
- plaster mesh;
- hanging plates;
- metal profiles to strengthen the frame or insulate the walls if mineral wool is used.
Which basalt wool is better to choose?
The effectiveness of wall insulation with basalt depends on the correctly selected insulation and compliance with insulation technology. Among the criteria by which it is necessary to choose insulation: the thickness and density of the mats, as well as the manufacturer.
Thickness. The thickness of stone wool for wall insulation depends on the climatic zone in which the house (the apartment is located) is built and on the type of walls: concrete, brick, wood or frame.
For central Russia, an indoor insulating layer of basalt 50 mm thick copes with its function perfectly. For a facade, a thickness of 100 mm is needed, for a frame house - 150-200 mm.
If you wish, you can use an online calculator to more accurately calculate the thickness of the insulation.
Density. The thermal conductivity of the material (the lowest for insulation with a density of 60-80 kg/m3) and the rigidity of the slabs depend on the density indicator. The rigidity indicator is very important when insulating a frame house, where a lot of pressure is applied to the bottom row and when finishing work is carried out directly on the insulation (decorative plaster).
The density of basalt wool for wall insulation should be within:
- 50-75 kg/m3 for frame houses;
- 80-130 kg/m3 for walls with a gap for ventilation;
- 130-160 kg/m3 with the “wet” method of insulation;
- 150-175 kg/m3 for a concrete facade.
It is better to buy basalt fiber wool from reputable manufacturers on the market. At the same time, it is not necessary to strive to purchase mats with the brand “PAROC” or “Rockwool”. They have high quality, but the price is also very high.
Other manufacturers' quality fully complies with European and Russian standards, and the cost is an order of magnitude lower. Therefore, why overpay for a trademark if there are products from TechnoNikol, Isover, URSA, and Beltep (Belarus).
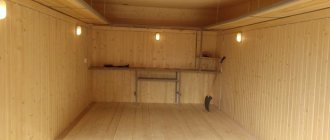
A simple option for insulating a frame house
Frame houses are almost ready-made structures, the elements of which can be immediately covered with siding. Essentially, these are structures made of vertical posts tied with beams from below and above. The photo below shows the frame of such a house.
Frame of a wooden house Source gran-nt.ru
To insulate such a house, you simply need to lay a 100 mm thick layer of thermal insulation material between the posts. After that, vapor barrier is laid in horizontal strips along the racks. Laying is carried out from the bottom up with an overlap of the upper strips on the lower ones in the amount of 10-15 cm. The joint is covered with self-adhesive tape.
After this, wooden slats with a cross section of 50x50 cm are placed vertically along the racks. They will create a ventilation gap between the insulation and the siding. And siding is installed along the slats and attached to them.
Installation of gypsum boards
To attach drywall, you need to purchase self-tapping screws. Their number is calculated based on the fact that about 30 pieces are required per sheet. Self-tapping screws need to be chosen a little longer, approximately 20 mm. Of course, you can buy 16 mm screws, but when fixing, it is possible that when screwing in, the tip will bend the surface of the profile without drilling into it. Longer screws eliminate this possibility.
This is how drywall should be attached to the profile
You will also need a screwdriver and quality bits.
Installation of drywall sheets is carried out according to this algorithm. The material is laid on the frame and the lower corner is secured. Next, screw the screws in order to the opposite end of the sheet (not all corners at once!).
When the lower and upper sections are fixed, fasten them to the main frame slats. In this case, the pitch between the screws should not exceed 250-300 mm.
When a screw is screwed in, its head should be slightly recessed by 1-1.5 mm. Just don't tear through the cardboard! To simplify the fixing task, it is better to purchase bits with a limiter.
Upon completion of the cladding, the surfaces are prepared for final finishing.
Methods for laying penoplex under drywall
There are two installation options: with and without a frame. You can correctly install insulation under gypsum boards with your own hands using both methods, the main thing is to know their advantages and disadvantages.
- The frameless method is suitable for insulating small and flat surfaces. Quick, easy installation of insulation and drywall. Disadvantages: inability to level the base surface, low structural strength.
- The frame method is used if the walls are curved or have a significant area. This type of structure is more difficult to build, but it is more reliable.
How to install mineral wool correctly
Before laying mineral wool, you need to have a respirator, construction gloves, and a hat.
When the frame is completely assembled, the mineral wool is cut into strips of certain sizes using a drywall knife. The cut strips are laid tightly along the frame posts. If the ends are joined, it is better to overlap from 10 to 15 cm.
Coconut cork and combination board
If it is important to achieve maximum sound insulation of a plasterboard partition, you can use balsa wood and coconut fiber boards. You can combine these soundproofing materials
Then you can achieve the maximum permissible sound insulation effect.
Expanded polystyrene boards are perhaps one of the best thermal insulation materials used in insulating plasterboard partitions. Expanded polystyrene boards come in different sizes and densities. Usually these are 120x60 and 100x50 cm with a thickness of 2 to 5 cm. They differ in density into soft, semi-rigid and hard. They are connected using grooves.
They also speak well of polystyrene foam as an insulating material. High heat transfer, a wide range of sizes and shapes, allows you to insulate any wall made of plasterboard construction.
If a decision is made to carry out insulation exclusively with the help of mineral wool, then Rockwool will be an indispensable insulation. After all, it is no worse than the same polystyrene foam. As an advantage, it is worth emphasizing the fact that Rockwool can have a heat reflector. It should be remembered that ROCKWOOL mineral wool comes in both slabs and rolls. If it is a roll, then it can have a thickness of 30,40, 50 cm; length 5, 8, 10 m, standard width 1 m. If it is a slab, then dimensions: 100x60 cm with a thickness from 5 to 20 cm. This insulation is able to withstand large temperature differences and has good water-repellent and fire-resistant characteristics.
Polymer heat reflectors are used to maintain temperature in a particular room. They are usually sold in rolls with dimensions: 2-5 mm thick. width - 1 m. length - 30 m. The thickness of the heat reflector foil itself can also be different.
We step by step analyze the thermal insulation process
Insulating walls from the inside with mineral wool is not a very complicated process. However, to achieve the desired result, you need to know certain basics. Next, the process will be discussed step by step.
Preparation
Preliminary preparation of walls is the most labor-intensive process. You will need to do the following:
- Remove the finishing coating (if any). If the walls are finished with panels (of any type), they can be carefully removed and used in the future.
- Level the rough surface. If the walls are concrete or brick, it is advisable to put them in order. The most effective and affordable method is a small cement screed.
- Lagging areas are removed. It is also necessary to achieve level alignment. The walls must be level so that the guide bars can be installed correctly.
- Then the surface is cleaned from dust and debris. Otherwise, the adhesives will not adhere.
- Now all surfaces are covered with protective impregnations and antiseptics. This is especially important for wooden buildings, where fungus and mold appear very quickly.
- When the impregnations have completely dried, a membrane film (or similar moisture-proofing material) is glued to the entire area. The sheets are laid overlapping with an allowance of at least 10 cm. This is necessary in order to prevent the formation of condensation at the joints. For fixation, you can use “liquid nails” or “Moment Universal”. After preliminary setting, it is advisable to shoot all the sheets with staples using a construction stapler. In this case, maximum bonding with the original surface will be ensured.
Creating a frame and laying insulation
Now a frame is created from bars into which mineral wool will be laid. The dimensions of the logs should be equal (approximately) to the expected thickness of the thermal insulation layer. When forming a frame, you must adhere to the following principles:
- The distance between the vertical posts should be 58 cm (the width of the mineral wool roll minus 2 cm). A small allowance is needed so that the mineral wool fits as tightly as possible, without gaps.
- Horizontal racks must be positioned so that they accommodate the joining of gypsum board sheets. Therefore, you will have to write out all the dimensions in advance and draw up a small plan.
Important! You can build the frame exactly the opposite - the horizontal bars are located at a distance of 58 cm, and the gypsum board is attached to the vertical posts.
- At the edges of the walls (adjacent to the ceiling and floor), bars must be located, regardless of the chosen scheme. This is the right thing to do, because it provides increased structural strength.
- Mineral wool is placed in the created niches. Since the distance between the bars corresponds to the width of the roll, trimming will be minimal. The mineral insulation is attached using a construction stapler. If we are talking about concrete or brick walls, then you will need to use a special glue.
- The entire structure is covered with another moisture-proofing layer. This measure will completely protect the insulation from the effects of condensation (since it will be hidden inside). However, it is not necessary, especially for rooms where there is no high humidity.
Selection of thermal insulation filler
Experts believe that insulating external walls is more effective. But in multi-storey residential buildings it will be almost impossible to carry out work independently. But the use of plasterboard as insulation allows you to significantly save on hired labor and achieve high thermal insulation properties. At this stage, the most important issue will be the choice of insulation. Currently used:
- Styrofoam;
- glass wool;
- isolon;
- basalt (stone) wool.
Foam plastic remains relevant in the insulation market. However, in residential premises it is better to avoid insulating walls with this material. Firstly, rodents love it, so over time the insulation layer will lose its properties, and warm air will begin to leave the room through the holes that appear. And to replace the foam, you will have to open the trim, i.e. go through the renovation again. Secondly, foam plastic has low sound insulation and does not “breathe”. A residential apartment will require additional ventilation. If you still choose it, then you will be pleased that it is a very simple and easy material to work with.
Glass wool also has low thermal conductivity, but this is a specific material that attracts only its low price. Its main disadvantage for internal wall insulation with plasterboard is the presence of glass fibers, which, if they come into contact with the skin, cause itching and burning. When working with glass wool, it is necessary to wear gloves, protective clothing and a respirator only. Such inconveniences, as a rule, repel buyers, so they are practically not used in residential premises.
Isolon is much more in demand. This material has a number of advantages. It not only retains heat, but also does not allow noise to pass through, which allows you to save on sound insulation. Do-it-yourself work on insulating walls from the inside takes up not only time, but also the usable area of the room. Izolon has a small thickness, which allows owners not to worry about meters “eaten” by the insulation.
Basalt wool is often used in the thermal insulation of walls. In terms of its properties, it is most similar to glass wool, but differs in composition. Rocks are used in its production, which makes it fire-resistant and hypoallergenic. But its disadvantage is the price; it is more expensive than glass wool and polystyrene foam.
Each apartment owner must answer the question of how to insulate walls with plasterboard. You need to build on your financial capabilities and your preferences. I would like to give only one piece of advice: if possible, purchase insulation in the form of slabs, not rolls. This will make the work easier and faster. The slab insulation has a standard width of 60 cm, which corresponds to the mounting step of the frame profile.
How to properly insulate the walls of a house from the inside with your own hands
If, nevertheless, despite all the shortcomings (or you have no other choice), you decide to insulate the walls from the inside, then perhaps you need to know the following:
Today, there are two types of do-it-yourself wall insulation from the inside:
- using insulation
- using electric heated floor mats
Using an electric heated floor will be much more correct, but much more expensive. Moreover, these are constant increased costs for electricity during the heating period, and here you can already think, maybe it’s cheaper to insulate the outside!?
Next, we will consider only the thermal insulation of the wall from the inside using conventional insulation.
First you need to decide what material you will use to decorate the walls. The easiest way is to improve them after thermal insulation with plasterboard; this method will, I think, be the cheapest and most practical.
Do-it-yourself thermal insulation of walls from inside the house with mineral wool
After that, decide what we will use to insulate it.
The cheapest option is insulation with mineral wool. First, you need to remove dust and various types of peeling, and then install a vapor barrier on the walls. Then a frame is created from a metal profile or bars for attaching sheets of drywall. After this, the insulation is spread into the voids between the drywall and the vapor barrier, and finally the drywall itself is installed.
There should be no free space between the insulation and the wall, otherwise condensation will accumulate there and periodically it will leak from there into the room, finding leaks.
The thickness of the thermal insulation should be calculated; it should not be thicker. The diagram shows that the more thermal insulation there is inside the room, the further the dew point will move inward, which will have a negative effect on the insulation itself and on the wall.
Do-it-yourself thermal insulation of walls from inside the house with polystyrene foam or EPS
If the inside of the wall is to be plastered, then it would be more advisable to use polystyrene insulation, such as polystyrene foam. But in this case, you should know that insulating the inside with polystyrene foam is not the best solution; there are several disadvantages of this type of thermal insulation:
- flammable
- sound insulation is less than that of cotton insulation
- airtight, there can be a large amount of condensation between the foam and the wall
- release of toxic substances when heated
There are also several positive qualities, such as a thinner layer compared to mineral wool, and the possibility of surface plastering of the wall.
But these advantages, in my opinion, will never cover all the disadvantages of such thermal insulation of walls from inside the house. The technology itself is as follows: first, the wall is completely cleaned and primed, since the installation of this heat insulator must be done with a special glue; you can read more in the article about insulating walls with foam plastic.
The glue must be applied to the entire slab (wall), and not just pointwise, because there should be no voids between the insulation and the wall; condensation will accumulate in these voids, which will subsequently find a loophole and come out.
Well, after installing the insulation, we already carry out preparatory and plastering work.
Whatever method of thermal insulation of walls from the inside of the house you choose with your own hands, you should know that this method of thermal insulation will never replace insulating the house from the outside!
Insulation of an unheated room
Many novice builders are interested in the issue of installing gypsum board in an unheated room. We warn you right away: most professionals are against such installation. The fact is that even moisture-resistant material cannot withstand strong changes in temperature and humidity. If you decide to install plasterboard structures in such a room, but do not want to install additional thermal insulation, it is enough to attach the sheets to a frame made of metal profiles. The air between the structure and the main wall will provide some thermal insulation.
Insulate an unheated room, such as a loggia or balcony. possible only under certain conditions. Firstly, it must be glazed. We are not talking about simple wooden frames, but at least double-glazed windows. They provide reliable protection from moisture and cold. In addition to the walls, you will need to insulate the floor and ceiling, which are covered with high-quality moisture-resistant plasterboard.
GCR can be used in loggias that are connected to a living room with a normal microclimate. Think carefully before you start installing drywall in such rooms, because the structure “eats up” at least 6-7 cm of space. Thermal insulation in the loggia is carried out in the same way as in ordinary rooms, but with some features. First, the wall is covered with waterproofing material.
If you approach wall insulation responsibly, you can create an atmosphere of comfort in any apartment. We hope that our simple instructions will help you implement this plan. Good luck.