Garage clapboard cladding
Cladding a garage with clapboard is not a complicated process, but quite painstaking. Here, first of all, you need to choose the right material; this mostly depends on the structure itself.
After this, the garage is covered with clapboard, and in this matter you just need to follow a certain sequence and do everything according to plan. You will be offered instructions on the rules of work.
Also, before you start, you should look at photos and videos, then you will be able to understand everything in more detail.
Why do you need garage lining inside?
Finishing the garage will keep the room dry and warm. The creation of such conditions is necessary to keep things in the garage, as well as the vehicle, safe and sound.
If finishing work is not carried out, the humidity in the room will always be high.
Dampness will contribute to the beginning of the process of rotting of the car and the appearance of rust on its spare parts. Tools and other things stored in the garage will also deteriorate.
Finishing work is intended not only to create an aesthetic appearance in the garage, but also to maintain hygienic conditions in it. And working in a warm, well-maintained garage is much more comfortable.
Is it worth installing a suspended ceiling in a garage?
Today, some car enthusiasts, in pursuit of comfort and coziness, decide to install a suspended ceiling in the garage. This is a very attractive option, which is durable and completely resistant to moisture. Even if the roof leaks after heavy rain, the water will not cause problems - it will simply accumulate on the surface of the ceiling and can be easily removed with a puncture, which will be carried out by experts. The ceiling can easily withstand several buckets of water. And a warranty period of 10-15 years says a lot - you won’t have to redo repairs in the garage very soon.
Options
Since a lot of work is carried out with various chemicals, finishing work must be done from exclusively high-quality, proven materials. Let's take a closer look at how you can decorate a garage.
Plaster
Plaster has become less and less used for finishing work, since it is very difficult to work with it, especially if there are no special skills. In damp and cool weather, this material dries completely only after a few days.
Suitable for both wall and ceiling decoration. You most likely won’t be able to create a neat and high-quality plaster finish yourself and will have to hire a specialist.
Plaster tends to burst due to temperature changes. Over time, the appearance of such cladding deteriorates greatly - the plaster becomes dull and quickly becomes dirty. Getting rid of dirt on plastered walls is not easy.
PURCHASE OF PRODUCTS FOR INTERIOR FINISHING
Wood that is less resistant to natural phenomena is used mainly for interior finishing work. It wins in external aesthetic appearance.
Wood used for interior decoration.
- Maple . Wide range of colors, easy to process when sanding. It has virtually no drawbacks.
- Ash has a peculiar ornament on the cut. The surface is covered with small vessels.
- Walnut With extraordinary hardness, it is easy to process. Less susceptible to deformation. Color and structure depend on the region in which it grows.
- Cherry . It has a very noble rich shade that darkens over time
Note! During interior finishing work, many more types of wood are used, which gives designers room for flight of imagination.
How to do the finishing yourself?
Whatever building material you choose when finishing a garage, you need to know how to work with each of them, where to start and what stage of finishing should be next.
Floor preparation is the initial step when carrying out interior finishing work in the garage. Porcelain stoneware is mainly used for floor finishing . But they only lay it on a concrete-filled, perfectly flat, completely dry floor.
The tiles are attached using a special glue that is resistant to temperature changes.
If the concrete used to fill the floor is old and chipped, you can use a leveling mixture to level it. But before that, the floor is thoroughly cleaned of debris and dust , and then covered with a special primer - it is applied with a roller.
While applying the leveling mixture to the floor, all windows and gates must be closed . The mixture is applied using a leveler only after the primer has completely dried.
Watch this video to see how to finish a garage floor with porcelain stoneware:
After preparing the base, you can begin laying the tiles. Apply glue to a small area of the floor (no more than 1 sq.m.) in an even, not and level it with a spatula.
Then the tiles are laid one by one, inserting a special cross between each one , designed to maintain equal spacing between the tiles.
If necessary, the tiles are cut with a special machine, but it is recommended to leave these parts near the baseboard so that the appearance of the laid tiles looks aesthetically pleasing. In order not to “move” to the side when laying, you can stretch transverse ropes over the floor.
Ceiling
Before decorating the ceiling, you need to make sure that moisture will not penetrate into the room through the ceiling and heat will not escape.
Plastic panels are often chosen for its cladding. The reason for this is the lightness of the material, since you have to work with them at height. They are also economical and practical.
Do you know how to glue foam ceiling plinths? More information here.
They are attached to the ceiling on a prepared frame. To ensure it is assembled correctly, you must perform the following steps:
- Make precise markings along the entire perimeter of the ceiling.
- If the garage has a slope and all its corners are at different heights, first, using a water level, you need to determine the lowest of them - it will be the reference one.
- Also, using a water level, this height is marked on the opposite wall, in the same corner.
- The resulting two points must be connected to each other using a rope and measurements taken at the same height in the remaining two corners.
- As a result, 4 ropes should be stretched along the perimeter of the ceiling at the same height, along which the frame is attached.
- to attach guide metal profiles to each wall , which are secured with dowels.
- The intermediate frame elements are attached to the guide profiles at intervals that will be equal to the dimensions of the panels. But this distance should not be more than 50 cm.
In the following video, watch how to sheathe a ceiling in a garage:
The panels are inserted into the prepared frame with a shim into the groove of the previous element. The most difficult ones to secure are those that should be located against the wall. If necessary, they can be cut to the desired size by stepping back from the side that will meet the wall.
How to insulate gates from the inside
To properly sheathe garage doors, you will need skills in finishing with the selected class of thermal insulation products. The technology of the finishing process is based on several basic rules.
- Installation of thermal insulation is carried out on a clean and dry surface, otherwise the material will not adhere well.
- The cleaned surface is treated with anti-corrosion agents. Mortise and built-in locks are repeatedly tested for functionality (defective ones are lubricated or replaced).
- Upon completion of the preparatory work, the thermal insulation is fixed.
- After sheathing with insulation, the sashes are finished with high-strength material that protects from mechanical damage.
- Insulation materials such as polystyrene foam, polystyrene foam and penoizol are used as the middle layer.
- In order to increase the fire resistance of the insulation, garage doors are covered with non-flammable material or a foil insulating layer.
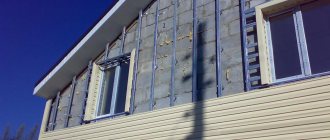
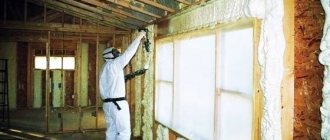
Internal thermal insulation using polyurethane foam
Foam sheathing process
Sheathing with foam plastic is carried out in several stages:
- Preparation stage. Rust and old finishing coating are carefully removed from the internal planes of the sashes. Bitumen mastic is applied as waterproofing or the surface is painted over.
- The stage of creating the sheathing. A sheathing is created from wooden blocks cut to the width of the sash and matched to the thickness of the foam insulation. The slats are fixed to the sashes with nuts and bolts. The bolt heads should be located on the outside of the doors.
- Finishing stage. After cutting the foam panels to the required sizes, the insulation is fixed to the sheathing using polyurethane foam sealant (spray foam). Also, foam plastic can be attached to the sheathing with other adhesive thermal insulation products.
Installation process and seam taping
After completing the cladding process, to give garage doors visual appeal, it is recommended to trim them with plywood, OSB sheets or plastic panels.
Photo of garage doors insulated with foam plastic.
Sheathing with foam plastic boards
Finishing requirements: features
What are the requirements for a garage box:
- The difference between the outside temperature and the temperature in the box should not be large; for this reason, the box does not need to be additionally heated or cooled. If you plan to carry out renovation work indoors, then the internal temperature should be more or less acceptable; this is achieved through good thermal insulation.
- Often, a lot of spare parts and tools, and sometimes flammable substances, are stored in the garage. It is better to sheathe the walls and ceiling with either poorly burning materials or (ideally) non-flammable ones. Fire safety should be a priority.
- During the cold season, there is a possibility of moisture accumulating in the form of condensation, which is detrimental to materials, so preference should be given to those that are resistant to rot and are not susceptible to moisture.
- It's not easy to keep a garage clean, so the sheathing should be easy to clean.
When calculating the amount of lining, you need to remember that its length does not always coincide with the width of the ceiling or the height of the room.
Covering a garage with clapboard is an excellent solution, you just need to choose it correctly. The lining can be made of plastic or wood, both types have their advantages. The installation principle is the same for both types; you can easily do it yourself. When choosing lining, you need to proceed from the specific needs and characteristics of the room.
Tools you will need:
How to decorate the walls inside
Whitewashing garage walls with lime is an option from a series of cheerful, inexpensive and do-it-yourself options. Lime has an antiseptic property, so the surface on which it is applied will also have additional disinfection.
Lime is available in two versions:
- Powder;
- Lime dough.
It is better to apply lime using a brush, spray gun or spray. If the garage is built from aerated concrete blocks, then the walls can be plastered or covered with other cladding options.
In addition to lime, you can also decorate the walls inside the garage with ceramic tiles.
Ceramic tiles have high strength and a protective layer from chemical and mechanical damage, as well as from fire and moisture, and are easy to clean from dirt. The tiles give a well-groomed and neat look to the garage. But tiling the inside with ceramic tiles is an expensive and time-consuming process.
You can use tiles to decorate walls and floors:
- Clinker;
- Porcelain stoneware.
To save money, you can finish the lower part of the wall, because... it is more susceptible to damage and contamination, with more expensive and durable tiles, and the top one should be covered with ordinary ceramic tiles, painted or plastered. When planning to install tiles on garage walls, you need to take into account their heavy weight.
A common option for finishing walls is to plaster them before painting. Plaster is an inexpensive material; you can apply it yourself and still get a high-quality wall covering.
Plaster has positive aesthetic, technical and operational characteristics:
- Water-repellent (does not lose its decorative effect after getting wet);
- Aeropermeable (releases household fumes, promotes humidity balance);
- Complies with sanitary and environmental standards;
- Does not burn;
- Low cost of repairing damage.
Before applying whitewash, plaster or tiles, you must first level the walls. This can also be done by covering the walls with plasterboard or OSB sheets.
Wood lining: characteristics
The quality characteristics of wooden lining largely depend on the type and species of wood. Of course, mahogany is unlikely to be used for these purposes, but you should not deprive it of attention: its qualities are quite suitable, and mostly red species can be used. What qualities does wood lining have:
Wooden lining is distinguished by its maximum performance in terms of heat and sound insulation.
- The highest possible indicators for sound and heat insulation. Ideal for harsh, long winters.
- Wood has the unique property of creating and regulating the microclimate in any room. If the walls and ceiling of the box are covered with wooden clapboard, then you don’t have to worry about vapor permeability. Wood can provide the necessary degree of comfort.
- Moisture resistance indicators are average, so before starting work it is necessary to treat the slats with a product that protects against moisture and open them with varnish. The coating will have to be renewed periodically, the frequency will depend on the type of tree, for example, ash has a negative attitude towards changes in humidity, while larch, on the contrary, does not react to the influence of water, so it can even be used to decorate the outside of a building.
- An important point is the degree of resistance to fungus and rot; to improve performance, treatment with special substances is necessary. In this regard, coniferous species outperform deciduous species due to the resin content in them.
How to cover a garage with clapboard: from choosing the material to finishing
Cladding a garage with clapboard is not a complicated process, but quite painstaking. Here, first of all, you need to choose the right material; this mostly depends on the structure itself.
After this, the garage is covered with clapboard, and in this matter you just need to follow a certain sequence and do everything according to plan. You will be offered instructions on the rules of work.
Also, before you start, you should look at photos and videos, then you will be able to understand everything in more detail.
Lining made of plastic
Plastic lining is not susceptible to the influence of various microorganisms.
Plastic lining is a relatively new type of finishing. The production material is polyvinyl chloride, which is quite popular today. It is chemically inert, does not attract rodents, and is also not a favorable environment for the habitat of various microorganisms.
In addition, it has the following qualities:
- insensitive to moisture, which means moisture resistant;
- not susceptible to rotting and fungus;
- plastic is a fireproof material, does not burn well and does not emit substances that poison the body;
- in terms of heat and sound insulation qualities it is significantly inferior to wood;
- It is easy to maintain - if necessary, you can simply wipe it with a cloth.
Which is better to choose: plastic or wood?
In fact, both materials have advantages and disadvantages, they are actively used for both internal and external work, but there is a difference - the thickness of the lamellas, so take this into account.
- The installation principle is the same, in addition, it can be easily done with your own hands, so there should be no problems.
- Wooden lining is popular today. Of course, it is not at all necessary to use mahogany slats for lining a garage, but this does not mean that you should not pay close attention to the type of wood. But the price of this material will be significantly higher than plastic.
- If severe winters are common in your region, then know that you need to use only wooden lining.
- Wood is also vapor permeable, which means it is able to absorb and release moisture from the air, as a result of which a favorable microclimate reigns in the room, which is important.
- Moisture resistance should be low; it is for this reason that before installation, the lamellas must be treated with special protective agents, and then varnished; this is the most important condition.
Cladding finishing: technology
Scheme of wall cladding with PVC clapboard.
Covering a room with clapboard is not that difficult; it is quite possible to do the installation yourself. The installation process is similar, the difference is in the joining and the nature of the fasteners: lamellas made of plastic need to be connected with a tongue and groove, and those made of wood need to be overlapped. How to line a garage with clapboard:
- The starting stage is the creation of the sheathing. The material can be a galvanized profile or a wooden beam (more often used in decorating garages).
- The slats need to be placed depending on the installation method: if the slats are placed horizontally, then the lathing needs to be done vertically, and vice versa. Using the same principle, the sheathing is mounted on the ceiling. Fastened with galvanized nails or self-tapping screws.
- If you plan to insulate the garage, then it needs to be done at this stage: place waterproofing between the slats, then insulation and then a layer of vapor barrier. Fiberglass (which rodents are very afraid of) or mineral wool will do an excellent job as insulation.
- The sheathing process must begin either from the left corner of the wall or from the bottom up. If plastic lining is chosen as the material, then the process begins with fixing the starting panel and then attaching the main lamella to it.
- The slats need to be joined tightly; if the lining is made of wood, it is recommended that the seams be additionally treated with sealant.
- The finished wooden lining must be coated with varnish, ideally fire-resistant.
Useful video: mastering the principle of working with lining
You will definitely find this helpful video useful. Watch the following video to understand all the key rules for working with this material. You must be able to handle the lining correctly and install it correctly.
If you are careful and act wisely, this lining finish will last for many decades, maintaining its excellent technical characteristics.
Source
How to calculate the required amount of lining
To sheathe a garage, it is advisable to immediately stock up on everything you need. If you calculate using the formula “the number of linings is equal to the area of the room,” then this is completely wrong. The length of the lining rarely completely coincides with the width of the ceiling or the height of the room, which means that part of it will go to scraps.
It is important to perform the calculation correctly, taking into account the length of the board.
Before you start covering, you need to decide on the location of the lining - vertically or horizontally, then find out the length of the slats. When purchasing, you need to add at least 5% to the total number; it’s better to have a little left over than to have to go to the store for one or two boards.
What materials are suitable for cladding?
When choosing interior lining for a garage , you should consider not only its appearance and cost. Materials used in the garage should be:
- non-flammable;
- do not absorb odors and dirt;
- resistant to chemical influences - in case of contact with solvents, oils or fuel, the casing should not react with them;
- resistant to physical impact - the casing should not be scratched or cracked by accidental impacts;
- easy to clean - stains and dust should be easily washed off the covering.
There are many materials on the market today that meet these requirements. The most common is plaster. Advantages of plaster:
- low cost;
- possibility of application without the involvement of specialists;
- ease of repair;
- compatible with any walls and ceiling.
Disadvantages of plaster:
- the need for serious cleaning after application:
- labor intensity;
- takes a lot of time;
- subsequent painting is desirable.
Plastic panels are the second most popular way to decorate garage walls. The material has a low cost and is simply attached to the walls and ceiling, leaving no dirt or dust in the room after installation.
The disadvantages of using plastic panels include:
- the need for lathing;
- reduction of garage space by 6-8 cm on each wall;
- poor thermal insulation;
- low resistance to physical impact;
- You can attach cabinets to the walls or hang shelves only in those places where the sheathing runs.
You can cover the walls in the garage with plasterboard . It has the following advantages :
- ease of installation;
- affordable price;
- the ability to mask communications and layers of insulation;
- absence of dirt during the covering process;
- lightness of the material.
Disadvantages of using drywall to decorate the inside of garage walls:
- Suitable for dry rooms only;
- needs painting or other finishing;
- requires installation of sheathing.
Wooden panels or lining are also quite often used by car owners to decorate their garages with their own hands. This material is inexpensive, looks great, is easy to install and does not leave dirt after working with it. In addition, wood retains heat and is completely safe for health. But wood-based finishing materials also have disadvantages
- flammability;
- absorption of odors;
- susceptible to rotting.
You can sheathe the inside of the garage with OSB (oriented strand board).
OSB consists of chips and a special resin, which retains all the advantages of wood and makes it impervious to chemicals and odors, non-flammable and resistant to moisture.
The main disadvantage of OSB is the presence of phenol in the resin that holds the chips together.
The content of harmful substances is strictly regulated, but compliance with the regulations is difficult to verify.
PVC lining is often used for lining the inside of the garage . Its difference from plastic panels is in appearance - it looks like wood, and in the presence of special grooves that facilitate installation. In addition, PVC lining is painted completely, and plastic panels are painted only on one side.
Ceramic tiles are not a very common material, but they are quite suitable for finishing a garage. The only arguments against its use can be the complexity of installation, the high price and the requirements for structural strength - only a permanent garage with strong walls can be finished with tiles.
Ceramic tiles have many advantages
- durability;
- aesthetics;
- complete immunity to chemicals;
- ease of care;
- non-flammability.
Practical advice from the master
Eurolining must be varnished in one layer before installation.
If you decide to cover a garage box with clapboard, then you need not only to know the installation technology, but also some tricks of the job.
- If the slats are laid along the ceiling, the room will visually become longer; if the slats are placed crosswise, the garage will appear wider.
- The planks for creating the frame must be smooth, there should be no knots or splits.
- Walls and ceilings that have unevenness must be leveled at the stage of attaching the frame.
- If the finishing used was not eurolining, but simple, then inspect it for roughness. If there are any, they need to be sanded. It is better to varnish a simple lining in two layers; for euro-lining, one is enough.
- If electrical (and sometimes plumbing) work is necessary, it must be completed before the sheathing begins.
- The sheathing can be treated with an antiseptic and then the sheathing process can be carried out.
- The last rail may turn out to be wider than necessary, so in this case it needs to be loosened to the desired width and secured with self-tapping screws.
- To hide the seams and connections, you can use decorative cladding in the form of corners and strips.
If you don’t know which garage finish to choose, then take a closer look at the lining. Sheathing the ceiling and walls with clapboard is not so difficult, but the sheathing will last you for many years. Cover the garage box with plastic or wood if desired and get a reliable finish and an aesthetic appearance.
In this post I will talk about the process of insulating and sheathing a garage.
First of all, you need to determine what materials will be used as a frame for the sheathing, what the actual insulation will be, and what to cover the whole thing with. There are many options here, depending on taste, color and wallet.
As a material for sheathing
I chose a beam of natural humidity 5*5 cm. An alternative option was to use metal guides, which are used when installing gypsum board. I chose wood because, as it seemed to me then, it was easier and more pleasant to work with. In fact, after that, I realized that the metal frame is still easier to assemble and it gives much more possibilities in shaping surfaces.
Choice of insulation
essentially came down to a choice between mineral wool and polystyrene foam. With a similar thickness, they have a similar thermal conductivity coefficient. I chose foam plastic because... he is not afraid of moisture. If mineral wool is used as insulation, then it is necessary to isolate it from moisture with an additional membrane. Plus, foam plastic is easy to cut and lay, and even holds itself if you fit the slabs end-to-end. The disadvantages of polystyrene foam are that mice can eat it, and it is also highly flammable. To avoid such problems, I bought 4cm thick Knauf foam with fire retardant additives (fireproof) and a rodent repellent. 4 cm is not that much, but my goal is not to live in a garage, but only to maintain a comfortable minimum of 13-15 degrees at any time of the year. On top of the foam, as a membrane, I took craft paper with foil, as well as a stenophone. The essence of the material is as follows: it works as a membrane, preventing moisture from passing through, plus it has a foil layer that works as IR reflective insulation. These materials were chosen because as a source of heating for the garage, I chose an IR heater, which works precisely on the principle of IR heat radiation.
The last element is the cladding material
. There are generally a lot of options: you don’t have to cladding at all, you can use PVC sheets, gypsum board, OSB, chipboard, lining... Since I planned to load the walls (hang shelves and hooks, put up racks), I needed a fairly rigid material that could withstand load. The choice was between two materials of similar cost: lining and OSB boards. I chose forcing only because it looks more aesthetically pleasing. It’s unrealistically cozy in the garage, like in a bathhouse) On the other hand, OSB boards are much easier and faster to install, many times over, so by choosing them you can save a day or two of work.
Once you have purchased your materials, you can get started!
First of all, you need to saturate the timber with fire protection in several layers and let it dry. If this is not done, the wood will begin to become damp, rot, turn black and become flammable.
Having stained the timber, you can begin installing the sheathing, having first marked out for yourself at least an approximate diagram. It is necessary to provide for the spacing of the sheathing, mortgages, clearance from the ceiling and floor, etc. You can install it locally, but in this case there may be surprises.
At this stage, it is important to remember that if you plan to load a wall somewhere, then you need to provide embeds. Those. It would be nice to already have a plan for the future arrangement of the garage.
For example, in this place I will hang the tabletop of a folding workbench. To strengthen the structure along the entire length, I attach bars so that later everything hangs not only on the lining, but is attached more securely.
After the sheathing is installed, you can take on the insulation. Foam plastic is easy to cut and adjust, and it’s a pleasure to work with. The only thing is that everything around will be covered in white balls from him)
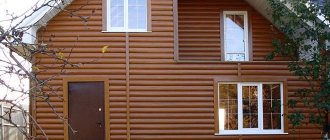
How to cover the outside of a garage door
It is advisable to finish the sashes from the inside and outside. In the first case, we lay insulation. Exterior finishing involves improving the appearance of garage doors and additional insulation.
Building diagram
The external surface is finished using the following materials:
- wood-laminated boards (plywood);
- profiled metal sheets (corrugated sheets);
- thin cladding boards (lining);
- facing panels (siding).
Installation of lining
When choosing thermal insulation products, they take into account condensate indicators and dew point temperature (the temperature of the air at which the steam it contains condenses into dew).
Garage box: requirements
The car does not tolerate a large difference in temperature between its box and the temperature outside, so, for example, the garage room should not be cooled or heated. But since it also serves as a repair shop for the car owner, it is still necessary to maintain at least a tolerable temperature. This is ensured by good thermal insulation.
- As a rule, not only the car itself is stored in the box, but also its components, repair tools and the most dangerous thing - fuel. Therefore, walls and ceilings should be sheathed only with non-flammable or hard-burning materials. Fire safety is a priority in this case.
Due to the difference between the temperature of the outer part of the wall in the house and the inner one - during the winter heating period, there is a danger of condensation falling and accumulating. Which, in turn, significantly reduces thermal insulation and destroys finishing materials. Therefore, the latter must be resistant to decay and little susceptible to water.
- A garage is not a room that is easy to maintain order. The covering material should be easy to maintain.
See also:
Author: Igor Published in Garage Arrangement 2018-04-21 What are the requirements for the interior decoration of a garage? It must be resistant to physical impact, as well as temperature changes, and react neutrally to oils and technical fluids. When dirty, its surface should be easy to clean. A garage is a closed space, so the environmental friendliness of the finishing material is important. Covering a garage space with clapboards fully meets these requirements.
A significant advantage of lining as a finishing material is its accessibility and simple installation method. Sheathing does not require professional knowledge, but it will be difficult to do without the use of a special tool - a hammer drill. It is needed to install guides on the walls, which will become the basis for attaching the lining itself.
Standard cladding of garage walls, where lining is used as finishing, takes place in two stages. The first is horizontal marking of the walls followed by attaching wooden planks to them, which will become the supporting frame for the cladding. The second is fastening the lining itself to the frame using nails or special clips.
If the garage is made of brick or concrete, then a hammer drill will help to secure the finish to the walls. But how to make gate trim? Since the gates are under constant mechanical stress, the lining can be replaced with plywood.
To do this, load-bearing wooden bars are installed in the metal corner at the same level as it. The size of the plywood sheet should be selected in accordance with the part of the gate where it is to be attached. In this case, the plywood, when sagging, will not allow them to change their linear dimensions.
Preparation for installation of lining
Due to the fact that the individual elements will be fixed to the frame, leveling the wall surface is not a necessary step if the garage is covered with clapboard.
Stages of fastening the lining. To prepare the frame and install the sheathing, you will need the following tools and materials:
- wooden block 20x40 mm or metal profile (for PVC panels);
- lining made of wood, PVC or MDF;
- nails, dowels depending on the material of the garage wall;
- hacksaw or electric saw;
- drill or hammer drill;
- hammer;
- building level, plumb.
When installing the frame, you need to take into account the direction in which the finished sheathing elements will be located. It is important to follow the rule: the frame bars should always be directed perpendicular to the direction of the lining elements.
Having determined the desired direction of the block, mark the walls and ceiling:
- beat off horizontal and vertical;
- mark the places where the bars are attached in increments of 50-60 cm;
- drill holes for dowels (when fastening to nails, self-tapping screws) or dowels.
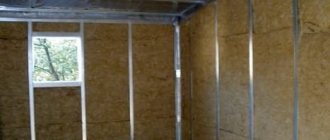
Before installing the frame, cover the walls and ceiling of the garage with a vapor barrier material to prevent moisture from condensing on the cold surface under the sheathing.
Types of lining profiles. This can cause the wood panels to rot.
When installing bars, you should constantly check the verticality of the structure using a plumb line. To level the block, wooden wedges are used, which are fixed to the wall when it deviates from the vertical. For the same purpose, it is convenient to use metal hangers for guide profiles for drywall. The bars are attached to the profile using wood screws in the holes in the hangers intended for this purpose, and the hangers themselves are mounted on the wall or ceiling of the garage with dowels or self-tapping screws in dowels.
If there is a need to insulate the walls of the garage, then after the installation of the frame is completed, heat-insulating material of the required thickness is laid between its bars.
How to finish it yourself?
How to line a garage from the inside? When decorating a garage yourself with clapboard or PVC panels you will need:
- Decoration Materials;
- wooden beam or metal profile for sheathing;
- ladder;
- painting knife;
- screwdriver;
- level;
- roulette;
- hammer;
- hacksaw.
Installation of lining
Lining made of wood or plastic is durable and beautiful. However, wood can deteriorate from moisture, absorb odors and attract rodents. protective coating allows you to avoid these problems and increase the service life of wooden lining .
After drying, the lining can, if desired, be treated with stain or varnished - this will create an additional protective layer and make the color of the wood brighter. Plastic lining does not require additional processing.
When choosing a tree, take into account its features : coniferous wood can release resin when the room temperature rises, ash will have to be varnished more often - it is afraid of moisture, and larch is ideal for damp, unheated rooms.
Installation of any type of lining occurs after completion of all electrical work and installation of thermal insulation.
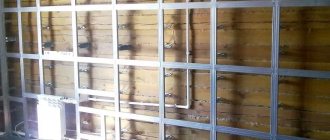
The first stage of cladding is creating the sheathing .
, a wooden beam is most often used as a material for this purpose , although a metal profile is also suitable.
The timber is fastened at a distance of 0.5 m . screws or self-tapping screws.
Before starting work, it is necessary to determine how the lamellas (lining plates) will be laid and position the sheathing bars perpendicularly.
The direction of the slats can visually change the size of the room, but if this is not critical when decorating a garage, then the ability to combine horizontal and vertical placement on one wall can be useful - for short “vertical sections” you can use the remaining trim from the ceiling lining.
Ways to fix the lining:
The choice depends solely on the preferences of the garage owner.
When covering walls horizontally, it is better to start work from the top - in this case, debris will not get into the grooves intended for connecting the lamellas. When choosing a vertical option, work begins from the corner, and when covering the ceiling, from the door or window opening.
The cladding is carried out according to the following algorithm : tongue-and-groove connection, securing the element in the chosen way. You can adjust the boards with a hammer if you hit not the lamella, but a specially placed piece of wood.
Every 10-15 elements it is necessary to check the evenness with a level or plumb line . The width of the last board must be reduced with a hacksaw to the desired size.
PVC panels
PVC panels can be mounted on wooden or plastic sheathing. In this case, the plastic is attached to the wall at a distance of 25-35 cm, and the wooden beam - 50-60 cm.
Fastening the panels starts from the corner. Having secured the first panel with self-tapping screws, insert the next one into the groove and secure it.
The last panel of the wall or ceiling must be inserted into the U-shaped profile and only then attached to the frame.
PVC panels be placed horizontally or vertically on the wall, and on the ceiling along the longest wall.
The last stage of the cladding is the installation of skirting boards and securing the corners.
Plaster
You can plaster the walls of the garage with ready-made mixtures , which are sold in construction stores. The packaging of the mixture indicates for what conditions it is suitable, so the choice will not be difficult. The only disadvantage of ready-made mixtures is the rather high price. Preparing the solution yourself, even if you buy all the ingredients, is much cheaper.
Making a solution for plastering garage walls is not difficult, the main thing is to decide in advance which composition of the solution is most suitable.
Lime -based plaster is cheaper than cement plaster; it adheres well to the work surface and hardens quickly. Lime-based solutions are suitable for dry garages - such plaster quickly deteriorates from moisture.
To obtain a good solution, the components included in it must be thoroughly mixed . In the absence of a concrete mixer, a drill with a mixer attachment can cope with this task. It is extremely difficult to knead plaster by hand.
To prepare a lime mortar, slaked fluffed lime is mixed with water to obtain a creamy mass and filtered through a sieve to remove impurities. Sand is added to the resulting milk of lime in a ratio of 1:5 . The mass is thoroughly mixed and diluted with water to the consistency of a thick dough.
If you want to get a stronger plaster, add cement to the finished solution: 1 part per 10 parts of the prepared mixture.
Then the solution is diluted again with water and mixed. This plaster is not afraid of dampness and temperature changes.
Low-quality components can ruin the work, so it is better to purchase river or construction sand without foreign impurities with a fraction of up to 2 mm.
get a quick-drying mixture by adding gypsum to lime plaster: 1 kg. gypsum per 5 kg of mixture. This solution sets in 40-50 minutes - you need to prepare it in small portions.
You can plaster a garage almost free of charge with a clay- if there is a clay quarry nearby. To prepare the solution, the clay is soaked for several (optimally a day) hours, mixed thoroughly and all impurities are removed. small sawdust to the resulting creamy mass - 1 part of the mixture per 3 kg. sawdust The strength of the composition can be increased by adding 1 kg of cement to the mass. by 10 kg. solution.
cement- based . To prepare it, thoroughly mix the dry ingredients - cement and sand in a ratio of 1:5-6. Mortars for interior work may contain more filler (sand), but the garage may be damp, so you should not save much on cement.
The mixture of dry ingredients is diluted with water, adding it little by little. For preliminary spraying of walls you need a liquid solution, for subsequent application - a thick one.
You can add plasticity to cement plaster by adding a lime or clay mixture . You can also use a ready-made plasticizer or use the simplest option: pour dishwashing detergent or liquid soap into the solution. At 10 kg. pour 1 capful of the product into the finished mixture and mix.
Plaster consumption is 15-18 kg. per 1 sq. m. with a layer thickness of 1 cm.
The first stage of plastering walls is primer . The surface is covered with a solution diluted to a liquid state and allowed to dry completely. Then beacons - aluminum or galvanized profiles 2.5-3 m long and 4-10 mm high, which are attached to the wall with the same solution at a distance of 10 cm less than the length of the building code used.
The finished solution is applied with a spatula between the attached beacons slightly above their level. The filled opening is leveled by applying the rule from bottom to top and removing excess mortar. If shells remain on the surface, they are filled and the surface is leveled again using the rule. The operation is repeated until the surface is smooth. Then they begin work on the next opening.
Before plastering the ceiling, a metal mesh , and the plastering itself is carried out in two layers - this avoids cracking and shedding of the plaster.
You shouldn’t put off finishing the interior of your garage – it’s not at all difficult to do.