- home
- Services
- Residential insulation
- How to insulate a bathroom. Tips for choosing materials, as well as the nuances of carrying out thermal insulation work
—
—
—
You can create a comfortable microclimate in the bathroom with the help of high-quality thermal insulation. Do not forget that the bathroom is a room with high humidity, so the choice of insulation, finishing materials and the thermal insulation work itself must be taken with due responsibility.
It is advisable to insulate a bathroom located in a private house, as well as all walls of a private household, from the outside. On the scale of an apartment, it is impossible to carry out external insulation of a bathroom, so all thermal insulation work is carried out from inside the room.
Materials for thermal insulation of rooms with high humidity
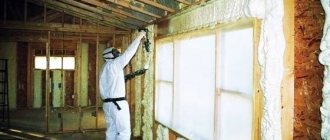
Laying mineral wool on a metal frame
First of all, let's focus on the choice of materials.
Since the bathroom is a room with high humidity, the materials for cladding must have certain technical characteristics:
- Low water permeability;
- Strength and durability;
- The finish should be easy to clean with any, even aggressive detergents;
- The vapor permeability of the finish should ensure free circulation of air under the skin;
- The lining in the bathrooms, as required by the instructions, is made from materials that are not susceptible to fungus and mold.
Thermal insulation of the bathroom from the outside
External wall cladding helps to achieve excellent results in insulating the room. For this purpose, various thermal insulation materials with great energy-saving potential are used:
- mineral wool . The outer structure with mineral wool is fireproof, heavy and has fairly low thermal conductivity, while allowing the building to breathe;
- expanded polystyrene. A relatively lightweight material with low vapor permeability, which, in addition to thermal insulation, protects the building from the appearance of fungus.
The process of insulating a façade involves attaching heat-insulating material to the external walls and then finishing it with a decorative waterproof layer.
Reasons for low temperature in the bathroom
Taking a shower becomes a chore if the bathroom is cold.
The bathroom in the apartments is not a heated room, so there are no radiators in it. But there are water or electric heated towel rails, the main purpose of which is to maintain a comfortable air temperature. In a private house, you do the wiring of the heating system yourself, so you can install radiators even in the bathroom, even in the toilet, even in the pantry - it’s up to you. Before insulating a bathroom in a private house or apartment, you should think about the feasibility of this event.
Additional insulation is needed if it is cold there. Causes of low temperature:
- cracks in the windows (if it is a private house);
- too powerful hood with natural draft;
- cracks in the walls or floor - this also happens;
- Insufficient power of the heated towel rail.
First, you should eliminate the cause; if the result does not suit you, then all that remains is to insulate the bathroom from the inside. It should be remembered that there is always a lot of moisture in it, and some insulation materials are afraid of it. Everything will have to be completely insulated: the floor, the walls, special attention should be paid to the ceiling, since most of the heat comes out through it.
If the hood in the bathroom is too strong or the heated towel rail is not powerful enough, then you are guaranteed to get goosebumps after a shower. Correcting these shortcomings usually eliminates the need for insulation when it comes to an apartment.
Why is a bathroom insulated from the inside? The layout in apartment buildings is designed in such a way that the bathroom does not border on the street. That is, its walls face the entrance. The walls in the bathroom are thin because they are not load-bearing structures, but simply a self-contained concrete box. In brick houses, the partitions are also not made thick. External wall insulation may only be required for a bathroom in a private house, but the floor is still finished from the inside.
To make steam heating with your own hands in a private house, you will need to spend more than one hour on the drawings, because the matter is not so simple.
Internal bathroom insulation work
If for some reason it is impossible to insulate the facade of a private house or the bathroom does not have contact with the street, thermal insulation work is carried out indoors. To insulate the internal walls of the bathroom, the following insulation materials are used:
- Mineral wool thermal plates. The material has increased rigidity, so it is suitable for insulating both bathroom walls and ceilings. To secure it, a supporting frame made of a metal profile is equipped, which is resistant to corrosion and mechanical deformation. Mineral wool is characterized by high hygroscopicity, which allows the surface to breathe.
To preserve the properties of mineral wool when performing thermal insulation work, the material is carefully sealed with a waterproofing layer, and in places of contact with heating elements - with aluminum foil.
- Styrofoam . The material has high heat and moisture insulation properties, but rather low vapor permeability. In this regard, there is a possibility of condensation accumulation under the thermal insulation layer and mold formation. Before installing the foam plastic, the surface must be primed several times with antiseptic primer.
To ensure the integrity of the coating and avoid moisture accumulation, the joints are carefully sealed, and then 2 layers of finishing putty are applied to the surface. The putty surface is finished with moisture-resistant decorative materials.
Photo gallery: thermal insulation materials for bathroom insulation
- Cork insulation. To insulate a bathroom, the material must be treated with wax impregnation. The cork thermal insulator is attached to the surface with a special glue for cork.
- Polyurethane foam. This liquid insulation is ideal as a thermal insulation material for bathrooms. It has moisture resistance, fire resistance, vapor permeability, and high heat and sound insulation properties. The material is sprayed onto any surface of the walls and ceiling in a thin layer.
Monolithic biologically resistant polyurethane foam coating completely eliminates the accumulation of condensation and mold formation.
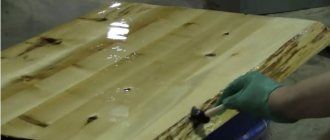
- "Warm" plaster. The cement base of the material ensures high vapor permeability, and special additives provide low thermal conductivity. Applying plaster does not require preliminary leveling of the walls and ceiling; it is enough to prime the surface.
“Warm” plaster in the bathroom
Another option for insulating bathroom walls is to apply “warm” plaster. This material appeared on the market relatively recently, so not everyone knows how to use it. In fact, it is a material based on ordinary cement. Only the filler is not sand, but special additives that reduce the thermal conductivity of the coating.
Types of warm plaster
- Vermiculite compositions. In such plasters, expanded vermiculite is used as a filler - a mineral that is light in weight and has poor thermal conductivity. Such compositions have antiseptic properties, so they can also be used in wet areas.
- Sawdust compounds. Cellulose and sawdust are used as fillers in such plasters. These compositions are recommended for use in dry rooms; when used in the bathroom, mold may appear on the walls.
- Expanded polystyrene compositions. This type of plaster is prepared using polystyrene foam granules as a filler. These compositions are also perfect for use in bathrooms.
Advantages and disadvantages of “warm” plasters
The advantages include:
- Fast application.
- There is no need to level the walls before application.
- Excellent adhesion to all materials.
- This type of insulation does not form “cold bridges”.
The disadvantages of coverage are:
- To achieve a good effect, you have to apply a fairly thick layer of plaster (if compared with foam plastic, the layer of plaster should be 1.5 times thicker).
- The applied plaster is not a finishing coat. On top of it it is necessary to finish with other materials.
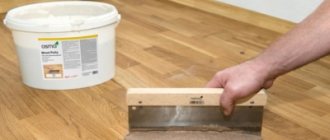
How to apply “warm” plaster?
- The walls are cleaned of old coatings and dust, and primer is applied to them.
- A composition is prepared from a dry mixture with the addition of water.
Advice! You need to prepare the plaster in such a quantity that it can be used within two hours.
- The prepared composition is applied to the walls using a wide spatula in the direction from bottom to top.
- It is impossible to apply too thick a layer of plaster at once; the thickness of each layer should not exceed 20 mm. In this case, after applying the next layer, the surface must be allowed to dry for at least four hours.
- The most common defects in finished plaster coatings are cracking and peeling. They can occur due to the fact that the plaster solution was applied to an undried surface, or the plaster was laid in a layer that was too thick. Therefore, it is important to follow the application technology.
So, warm walls in the bathroom are a guarantee of a comfortable stay in the room. In addition, wall insulation is a measure to prevent the occurrence of condensation, that is, a way to reduce dampness in the room. This, in turn, reduces the risk of mold growth on walls and other surfaces, that is, insulating the walls in the bathroom is a concern for the health and well-being of all household members.
Insulation of walls with “warm” plaster compositions: stages of thermal insulation work
The advantage of “warm” plaster mixtures is the ability to obtain a uniform coating without cold bridges.
To thermally insulate bathroom walls, you can apply “warm” plaster to them. A feature of “warm” plasters is their high vapor permeability and low thermal conductivity. Vapor permeability of plasters is achieved due to their cement base, and low thermal conductivity is ensured by the introduction of various additives into the composition. Depending on the filler, vermiculite, sawdust and polystyrene foam compositions are distinguished.
The advantages of “warm” plaster mixtures are the ability to obtain a uniform coating without cold bridges; before applying the mixtures, there is no need to pre-level the surface, and their high adhesion allows the plasters to be applied to any surface. The disadvantage of these thermal insulation materials is the thick plaster layer, which significantly reduces the usable area of the room, as well as the need for additional finishing.
Before applying plaster compositions, it is necessary to prime the insulated surface.
What you need to do to keep your bathroom warm
It is necessary to minimize all cold bridges; in the photo there is insulation with gypsum board sheets
There are several rules, following which you can be sure that the bathroom will be warm and comfortable:
- Insulating a bathroom from the inside requires high-quality exhaust ventilation of the room;
- When installing insulation, voids and loose fitting of the material should be avoided, as this will lead to it getting wet and sagging during operation;
Waterproofing insulation
- The thermal insulation layer must be protected from direct exposure to water using a water barrier;
- Seams in decorative finishing must be treated with a water-repellent sealant;
- All “cold bridges” are additionally insulated using special moisture-resistant mastics and putties.
Naturally, only the main points in the thermal insulation of a bathroom are considered. More detailed information on installation can be found on our website.
Video tutorial: thermal insulation of walls in a wooden house
There are many materials for insulating walls in a bathroom from the inside. Each home owner can find a heat insulator that is best suited for a particular room. The main thing is to take into account all the operating features. This will help avoid troubles in the future. Remember, consulting a specialist is never superfluous. If you are not confident in your abilities, do not hesitate to ask for help.
Describe your question in as much detail as possible and our expert will answer it
Source
Insulation of a wooden floor
When building a house, as a rule, all work on its insulation, including the floor, is carried out at the initial stage. However, what to do if you have purchased a ready-made construction option that requires work to insulate it?
Experts in this field confidently say that this is not such a difficult job. Even a beginner can do it. You just have to thoroughly figure out which material to use to preserve heat and which method.
The main rule when choosing a material is reliability and a high level of thermal insulation properties . Most often, for this process they choose: sheets of polystyrene foam, mineral or stone wool, ecowool, cork insulation or polyethylene foam.
Let's consider some of the nuances that arise when choosing such insulation:
- compare your financial capabilities regarding the cost of the selected insulation (for greater awareness, it is important to know that each of the above examples has good thermal insulation, so advertising arguments will be unnecessary);
- It is strongly recommended to use mineral or ecowool when there are small rodents in your house (mice are the most common residents in the spaces between the foundation and wooden flooring);
- if you are looking for a cost-effective option, then stop at expanded clay. Talk about its harmfulness and toxicity turned out to be unfounded.
So, the required material has been selected. The stage of preparatory work begins. This may include dismantling the old baseboard and, directly, raising the wooden floorboards themselves. It is very important that when removing floorboards, be sure to leave their own serial number on each, this will allow you to simplify the reverse process of restoring the coating.
The next step for you will be to inspect each joist for the presence of rot, mildew or mold. If any of them are severely worn or damaged, replace them with a new one, or, failing that, treat them with a protective solution. Next, you need to clean the base under the joist - sweep or use a vacuum cleaner. The planned work is almost half completed, now it is necessary to lay the insulation.
In the first place, heat-insulating material is laid down, that is, sheets of stone or mineral wool, which are placed in the space between the logs. The principle of using expanded clay instead of cotton wool is the same, pour it at least 10 cm thick.
your thermal insulation layer with a layer of vapor barrier (for example, a polyethylene film). This material is laid overlapping, each strip overlaps the previous one by at least 15 cm. In fact, the process of floor insulation is completed. All that remains is to return each floorboard to its place, according to the numbering, and install the baseboard.
Bathroom floor insulation
Every year, residents of prefabricated Soviet-era dwellings wait with bated breath for the arrival of winter. It’s not even that they like this time of year so much; rather, it’s the opposite. And residents of similar houses have a reason to dislike winter.
If in the summer, during intense heat, cracks and holes in the walls serve as a refuge from the hot air inside the living space, then with the advent of frost, the same saving gaps turn out to be almost detrimental to the well-being of the owners. Since not many people want to continuously live in a cool apartment (since the heating is completely different from what it was before), the only option left is to insulate it.
Insulation materials
Penoplex is in wide demand in the building materials market. Among its advantages are good thermal insulation characteristics, long service life and ease of installation. We’ll look further at how to insulate bathroom walls with penoplex.
Table of contents:
- Wall insulation with penoplex: advantages and features of the material
- Insulation of walls with penoplex - technology and types of material
- Insulation of walls from the inside with penoplex in the bathroom
- Insulation of walls with penoplex under siding: insulation installation technology
Wall insulation with penoplex: advantages and features of the material
Penoplex is classified as a material that performs the function of protecting a room from heat loss. Its installation can significantly reduce the thermal conductivity of the area of the building on which it is installed.
Penoplex is produced as slabs, which are extruded polystyrene foam. In appearance and structure, this material is often confused with polystyrene foam. However, penoplex has a higher level of rigidity and strength.
In addition, this material has the following advantages:
- low level of thermal conductivity, thanks to which the material is able to retain heat in the room;
- high level of strength both before bending and compression;
- resistance to moisture is ensured by the low moisture absorption of the material, this advantage reduces the level of development of mold and mildew on the insulation and increases its service life;
- low level of vapor permeability;
- duration of operation, which is more than 50 years;
- resistance to fire and high level of fire safety;
- environmental safety, absence of substances harmful to human health;
- Possibility of operation at temperatures from -40 to +70.
In addition, installing penoplex does not require special skills or special equipment. One day is enough to complete the work. The cost of the material, compared to other types of insulation, is average, therefore, by comparing the quality and price of penoplex, it is possible to obtain high-quality insulation for a moderate amount of money.
However, the use of penoplex for external insulation of a building, and in particular for facade systems, leads to its gradual delamination. This is due to the fact that the material has a high density, which does not allow it to absorb glue, therefore, some time after installing the penoplex, under the influence of moisture and other external factors, it peels off from the surface and the appearance of the facade deteriorates.
Therefore, to prevent this unpleasant factor, you should use special fasteners - fungi. It is also possible to replace penoplex with polystyrene foam, which is more practical for external insulation.
Insulation of walls with penoplex - technology and types of material
There are several types of penoplex, which differ in relation to density and scope of application. The slabs have a standard size, but if necessary they can be easily cut and installed on the surface. Depending on the thickness of the penoplex for wall insulation, penoplex from 2 to 10 cm is distinguished.
In addition, there are the following types of penoplex:
1. Used for wall insulation - allows you to insulate the walls of a building both inside and outside. In addition, it helps insulate the basement and interior partitions. The material is suitable for constructing walls using the well masonry method.
If the walls are insulated from the outside with penoplex, then siding is laid on top of the heat-insulating material, the tiles or the wall are plastered.
2. Penoplex for foundation insulation. Used in the process of building basements. This material has zero moisture absorption and increased density.
3. Roof insulation is also possible using penoplex. It is used to insulate roofs of both flat and pitched types. The material has excellent thermal insulation characteristics and, due to its lightness, does not load the structure.
4. Insulation of roads and runways - even in such cases, the use of penoplex is mandatory.
5. Another version of penoplex is intended for internal insulation of a house or apartment. With its help, it is possible to insulate the walls, floor and ceiling of any room.
To insulate walls using penoplex, follow these steps:
1. Preparing the base.
This stage involves preparing the surface for attaching insulation to it. The surface, regardless of its type, must be clean, dry, free of finishes and paint. Use plaster to level the walls. Next comes the process of treating the surface with a primer with an antiseptic effect.
Warm floor system
How to insulate a bathroom floor? A floor covered with ceramic tiles is itself cold. Therefore, electric mats are often installed under this facing material. They heat the surface of the flooring and maintain a constant surface temperature.
The entire overall system, together with electric heating mats, is called a “warm house”. On the construction market, this material is sold in different sizes.
In addition to mats, hot water is used for thermal insulation of the floor. But since the total area of the bathroom is small, and the water has low purification quality in plumbing systems, insulating the bathroom floor using this method is a difficult task. Therefore, floor insulation is best done using heating elements.
The work intended to create a “warm floor” system is divided into several actions:
- The floor surface must be strong and dry, and there must also be an intermediate layer of cement (screed).
- Then you need to correctly install the heating elements.
- Before you begin installation work, you need to remember that each electric heating mat has exactly two wires, each four meters long. The voltage of all systems is 220 Volts.
- Proper installation will ensure reliable thermal insulation of your bathroom floor.
Electric mats are already programmed to a regular temperature. Hot water heating has significant differences from electric heating:
- Low price of installation work.
- The "warm floor" system is completely independent of central heating.
- Huge service life.
- High level of reliability.
- The thickness increases slightly. Heating with hot water raises the surface of the flooring by several centimeters.
Although the installation work is quite simple, floor insulation must be carried out carefully and certain safety rules must be followed.
Proper insulation of the bathroom from the inside will allow you to create unique comfort and coziness in this room. You will be able to freely take water treatments, because cool air in the bathroom can be detrimental to your health.
Water floor
It involves installing a system of underground pipes through which hot water circulates, thus providing the required level of heating. This option is more suitable for private houses where there is independent heating. In addition, such a pipe system can be installed not only in the bathroom, but also in all other rooms.
This method of heating your home is a very rational solution, since you can save on heating bills.
And all because for a water floor, 40 degrees is enough and the coolant no longer has to be heated to 70, which is necessary for supply to room radiators. In general, the efficiency of such a heating system can be called very high.
Electric floor
There is an electrical cable running under the floor that connects to the network and heats the surface. Experts recommend installing electric floors in apartments of multi-storey buildings. This can be explained by the ban on connecting underfloor heating pipes to the central heating system. And therefore, it is possible to install a water floor in an apartment only by installing an autonomous electric boiler that will heat the coolant, as well as a pump that will ensure circulation. All these are complex and expensive procedures that are justified only in a private home.
Laying an electric heating mat for a heated floor
Layout basics and site selection
As already mentioned, owners of private houses have the opportunity to independently plan how and where the room for taking water procedures will be located.
But it is worth considering that if the building has already been erected, then the bathroom must be placed in strictly designated areas.
Of course, first of all, you need to start from the number of floors of the house, but if you plan to make 2 rooms, then it is better to place them on top of each other. This will save money and will not require re-piping.
By the way, you can look at a photo of a bathroom in a private 2-story house for a better perception.
READ DIY guillotine for paving slabs
You also need to pay attention to the age of the building:
- If the building is from 15 to 30 years old, it is recommended to add a bathroom in the built-in garage.
- If the building exceeds the age mark of 30 years, we place it next to the kitchen, on the veranda or on the platform under the stairs (if it is a 2-story house).
Well, the best solution would be to make a bathroom in a private house, simply by adding a room to it.
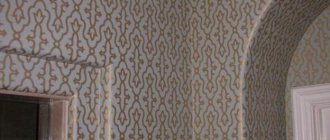
Wallpaper in the bathroom
To decorate the bathroom, you can also use special moisture-resistant wallpaper. However, in places where there is direct exposure to water, it is better to combine it with another, more moisture-resistant material, such as ceramic tiles.
Installation of insulation on walls
Before making thermal insulation, it is necessary to treat the wood with antiseptic compounds.
- A frame of wooden slats is mounted on the timber walls, which are also treated with an antiseptic. If a log house is being insulated, there is no need to do lathing, since the bends of the logs create a natural air gap.
- In the spaces between the slats, slab insulation is laid or a thin layer of sprayed insulation is applied.
- Next is waterproofing. Film sheets made of polyethylene or a breathable membrane are spread on top of the insulation, overlapping each other and secured together with tape, and are also fixed to the slats with mushroom fasteners.
- A conro-lattice is made on top, which is attached to the frame. This design is needed for the installation of finishing, as well as for additional ventilation inside the insulation pie.
If you plan to lay tiles, then sheets of moisture-resistant plasterboard are installed on the sheathing; you can also line the walls with wooden clapboard.
How to insulate - from the inside or outside
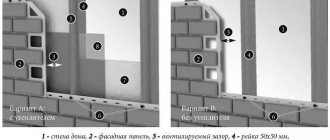
If in apartments the layout is such that the bathroom does not border on external walls, then in private houses it is difficult to arrange it this way. Often the bathroom turns out to be a corner room, and it is almost always cold in it. It is advisable to make high-quality insulation of the walls in the bathroom from the inside and outside.
External thermal insulation of walls is usually carried out before finishing the facades, and materials are selected to insulate the entire house as a whole. But the inside of the bathroom should be insulated separately. It is necessary to minimize heat loss through the floor, ceiling and walls. For each design, insulators are selected taking into account the materials from which they are made.
Waterproofing and insulation of floors under tiles
One of the ways to waterproof a floor when laying tiles
This option is suitable for thermal insulation of a bathroom on the first floor in the presence of durable wooden floors. This method involves insulating the lower part of the floor structure at the location of the beams.
- All wooden elements are treated with an antiseptic. Next, waterproofing of the base is carried out. To do this, a waterproofing film is spread on the joists, and then insulation boards are laid in the spaces between the beams. A layer of vapor barrier is laid on top and a counter-lattice is installed on which the boards are laid.
- Dust and dirt are removed from the subfloor. This is necessary to ensure good adhesion of the material to the wood.
- Next, internal waterproofing is carried out using a self-adhesive bitumen-polymer film. First, a concrete primer, which is a water-soluble emulsion, is applied with a roller to the entire surface of the floor. It is also necessary to grab the lower part of the wall to a height of approximately 20 cm.
- The composition dries very quickly, at room temperature it takes no more than half an hour. Waterproofing should be done immediately after the primer has dried.
- A piece of the required length is cut from the roll, rolled, and placed on the floor. Carefully removing the protective film, unwind the material in the opposite direction, gluing it to the base and immediately removing any air bubbles that have formed with a brush.
- The next canvas is laid with an overlap, the joints are coated with bitumen emulsion.
- After laying the waterproofing on the floor, the material is applied to the pre-treated wall. It is necessary to cut strips 30 cm wide, of which 20 cm go to the wall, and 10 cm are glued to the floor, previously lubricated with mastic.
- A reinforced concrete screed is poured over the film, and then, after the solution has completely dried, ceramic floor tiles are laid on waterproof glue.
How to insulate a bathroom: basic methods
This article will talk about how to insulate a bathroom, and will separately consider the features of insulating a bathroom and installing a heated floor in a bathroom.
When renovating a bathroom, you should think not only about its design, but also about insulation. At the same time, it is necessary to clearly define the organization of space, and when choosing material for floors and walls, in addition to the color palette and aesthetics of the decor, one should take into account their quality and technical characteristics. All surfaces must be breathable and resistant to moisture.
Lack of heat and high humidity in the bathroom are quite common occurrences. To eliminate these unpleasant moments, you should carefully consider the insulation of the bathroom.
The modern construction market offers a wide range of various thermal insulation materials, including:
- Fiberglass materials;
- Mineral wool;
- Extruded polystyrene foam (foam), etc.
Important: according to experts, the latter material, due to its high thermal insulation properties and almost zero water absorption, turns out to be several times more effective in the fight against dampness.
Surely everyone has heard about the “warm floor” system. This method allows you to evenly distribute heat, creating an atmosphere of coziness and comfort. Another option for insulating a bathroom is to install an electric, water or combined heated towel rail.
How to properly carry out insulation: practical aspects
The principles of electric and water heated floors are largely similar. The only difference is that communications are connected to different energy sources.
This type of work refers to capital transformations. You need to be prepared from the very beginning that the long-awaited comfort will be preceded by a rather long period of installation and launch of the system. The installation of a heated floor is carried out as follows:
- carry out a complex of preparatory work - remove tiles, old screed, clean and level the surface;
- prepare channels for laying communications in the walls;
- putty, prime the base of the floor, treat with a fungicidal composition;
- lay a thermal insulation layer;
- lay reinforcing mesh;
- the cable or underfloor heating pipes are laid on the mesh according to a pre-planned scheme - there is no need to provide communications under the bathroom, in places where other plumbing fixtures, a washing machine or furniture are located;
- connect and check the functionality of the system.
- a damper tape is installed around the perimeter of the bathroom - it will “control” the change in the size of the screed, which expands when heated and will rest against the walls if a buffer is not provided;
- perform floor screed;
- carry out coating waterproofing work if roll work was not carried out at the stage after preparing the working surface;
- After the screeds have completely dried, the final coating is laid - a warm floor exhibits its properties best when combined with ceramic tiles.
Sectional view of the structure of the bathroom floor - such a room will always be truly comfortable
Combined bathroom
The area of a private house usually allows for a separate bathroom and toilet room. But sometimes a combined bathroom becomes a more rational and convenient option. By allocating an area of 5 square meters for it, you get ideal conditions for performing any hygiene procedures. This space is enough to equip a bathroom:
- washbasin;
- bathroom (jacuzzi);
- shower cabin;
- toilet;
- bidet:
- urinal;
- hanging shelves;
- horizontal cabinets;
- mirrors.
Architectural and visual zoning is widely used in the design of combined bathrooms. For example, a bathtub is separated from the toilet area by a brick partition. Or the bathtub is installed on a podium, the lining of which contrasts with the floor. The walls in the toilet and storage area are covered with decorative plaster, and next to the bathtub and washbasin - with ceramic tiles.
Mosaic tiles
Mosaic tiles will help you decorate your bathroom brightly and creatively. It can be ceramic, glass, metal and even pebbles. You don’t have to compose individual fragments yourself - they sell ready-made solutions with a specific pattern. The mosaic floor looks elegant. To implement this idea, they use special mosaic floor tiles, which are thicker and stronger than regular ones. A mosaic ceiling is associated with luxury.
For cladding corner and radial architectural elements (protrusions), tiles on a flexible basis are used. It is also suitable for decorating columns and arches.
Not only simple geometric patterns are laid out with mosaic tiles, but also landscapes, urban paintings and any other images. It is organically combined with ordinary ceramic tiles, enriching the interior and emphasizing its individuality.
Pipe laying
According to SP 30.13330.2016, internal sewage systems should be made of pipes and connecting parts with an estimated service life of at least 25 years. Sewer pipes should be laid with a constant (over the entire horizontal section) slope in the direction of the riser, which is at least 1/D, where D is the diameter of the pipe in millimeters (that is, for a 50 mm pipe, the slope must be at least 2%).
In practice, both polyethylene pipes with welded joints and products made of polypropylene and polyvinyl chloride with detachable socket joints are used. Since the required thickness of the masking screed also increases with the length of the pipe, it is advisable to locate the equipment as close to the riser as possible.
Water pipes (except metal ones with threaded connections) in insulating sleeves made of elastic foam can also be cast into a screed, ensuring a rise towards the water fittings of at least 0.3%. But for water supply it is easier to make horizontal grooves in the partitions.
Ideally, the floor in the bathroom should be 2–4 cm lower than in the adjacent room, but this is very difficult to achieve, therefore, as a rule, a waterproof threshold is made of monolithic concrete, followed by tiling.
How to install under tiles
The “warm wall” system is effective as heating in a room where there is high humidity. Installation is carried out both on internal and external walls.
The water type of system is more difficult to install than the electric one. But, for plaster it is preferred.
"Dry method"
To install the system using the dry method, ready-made panels are first selected based on the calculation of the total wall area. After this, installation can be carried out in the following sequence:
- Using foamed polyethylene on a foil backing, insulate the inside of the wall.
- Attach the mounting tape or metal mesh using dowels.
- Fix the heating element mechanically.
- Cover the “warm wall” with a layer of plaster (rough) and leave until completely hardened.
- Perform finishing plaster, finishing putty and decorative finishing.
- After a month, you can turn on the heating and check its effectiveness.
If ceramic tiles are laid on a warm wall, you only need to use special glue so that the finish does not crumble over time. If desired, you can install plasterboard sheets over the cable. To avoid mistakes, you need to provide a place for self-tapping screws in advance.
"Wet method"
If it is not possible to insulate the outside, be sure to apply it inside.
For this, polystyrene foam or polyurethane foam is used. It is convenient to use panels with aluminum inserts, which are covered with sheets of plasterboard after laying out the contour. Pipe routing can be done in a “snake” pattern vertically or horizontally. The snail method is not recommended due to the difficulty of removing the air plug. It is best to use a variable step so that the temperature is distributed evenly in the room:
- up to 120 cm in height, pipes are installed in increments of 8–15 cm;
- above 180 cm – 30–40 cm;
- in the range from 120 to 180 cm in increments of 20-25 cm;
- the contour is laid under plaster or drywall;
- An electric pump is installed separately.
Make sure that the coolant movement in the circuit is 0.25 m/sec minimum. To squeeze out the air accumulated in the system, the water pressure must be strong. It is recommended to plaster the wall after checking the pipe for leaks.
How to arrange a drain in the floor?
In a bathroom with a shower area, the floor is equipped with a drainage ladder or drainage channel (tray), which is installed simultaneously with the pipelines and walled up in the screed. In this case, the floor, over the entire area or locally, is given a slope of 2–3% to the drainage area. The most common height of a floor drain is 90–96 mm, that is, the floor surface must be raised above the ceiling by at least 100 mm. On sale you can find products with a height of about 70 mm, which allow you to reduce the thickness of the screed to 80 m, but are significantly inferior to the standard ones in terms of throughput (to ensure normal drainage, you have to install two devices).
When choosing a model, you should pay attention to such options as protection against breakdown and drying out; they are especially useful if you like to travel and leave your apartment for a long time. An easily removable mesh strainer filter will not hurt either. And if you want the drain hole to be as unnoticeable as possible, pay attention to wall-mounted slot trays, for example Uniflex (Geberit).
What determines the service life
The service life of the “warm wall” system depends on how the recommendations are followed.
It is important subsequently not to block the wall with decorative panels or furniture. When carrying out a project, you should pay attention to heat transfer so that the surface does not heat up too much, because when materials expand under high temperatures, cracks may appear on the surface.
Thanks to the evenly distributed heat from the wall, the system provides a comfortable temperature and prevents the appearance of fungus and mold in the bathroom. The air does not dry out and, compared to infrared heating, does not ionize it.
How to insulate a metal font with your own hands?
Below are detailed step-by-step instructions for insulating an iron bathtub using foil polyurethane foam (penofol).
For detailed instructions on thermal and sound insulation of a bathtub using polyurethane foam, see our special article.
Step 1. Place the bathtub against the wall or lay it upside down on the floor, after covering it with cardboard or cloth. This is necessary to avoid damage to the enamel.
Step 2. The next step is to degrease the surface. A universal degreaser is perfect for this. But if you don’t have it, it doesn’t matter, you can use alcohol or regular dishwashing detergent. Wipe the entire surface thoroughly and let it dry for 10-15 minutes.
Step 3. If you have insulation in rolls, cut a piece of the required length so that the bowl is covered crosswise from side to side, as shown in the photo. Don't forget to peel off the film from the adhesive layer.
After you have glued the sheet to the bathtub, you need to trim off the excess and once again iron the insulation tightly with your hand so that there are no bubbles.
Step 4. Measure the width of the most even areas and cut strips of 15-25 cm. Then glue them to the bowl in the same way, cutting off the excess.
Step 5. Next, glue the remaining empty spaces with the same small strips.
Don't forget to cut a hole for the drain.
Step 6. Tape the insulation joints with reinforced tape.
Step 7. Remove the insulation from the mounting points of the legs.
Do-it-yourself insulation of a private house
To make living in your own home truly comfortable and enjoyable, you should pay attention to the insulation of the house. This is especially important to do in our weather conditions. Constant exposure to unfavorable external factors (precipitation, wind, ultraviolet radiation, temperature changes) causes walls in wooden houses to dry out and cracks to form, brick walls may freeze, etc. This in turn leads to a decrease in the average temperature in the interior. In order not to spend money on heating and maintaining adequate temperature conditions, it is strongly recommended to invest in insulation work. This practical use of funds will give positive results already during the first winter. In modern economic conditions, we often cannot afford to hire a team of specialists who will do all the necessary work for us. In this case, you have to rely only on yourself. Naturally, if you are not involved in construction professionally, you cannot know all the subtleties and nuances that occur during insulation work. We are ready to help you find out which insulation for a private home is better, share your experience and determine an algorithm of action. If you are not afraid to do repairs with your own hands and are ready to get started, then this article is intended specifically for you.
The composition of insulating tiles often includes perlite, vermiculite or expanded clay, less often - siopor granules. It is glued to the walls, thus creating a warm, inner layer. After the walls are lined, they are subjected to final finishing - painted, wallpapered, and decorative plaster is applied. Although it is possible to purchase insulating tiles for walls with a decorative front surface, then additional finishing will not be required.
The process of insulating a room
Many people have felt discomfort while in the bathroom, as cold air flows into the room through the ventilation.
In order to get rid of this feeling, it is necessary to use only high-quality materials for thermal insulation:
- First you need to insulate the floor (this will be written below). If you want to cover the floor with tiles, you must remember that you should not slip on wet tiles. Or lay down some kind of rug.
- Then the procedure of thermal insulation of the walls is carried out. The insulating material in this case should be polystyrene foam (foam), because it is not exposed to water. Mineral wool will not be very suitable for this particular room, because this material absorbs moisture well. As a result, its thermal insulation characteristics will deteriorate. It is also worth remembering that insulating the walls in the bathroom will reduce the total space in it.
Algorithm for insulating a bathroom:
- At the very beginning, the walls must be completely cleaned.
- Then they need to be coated with a specially designed preparation that will protect the surface from fungus.
- Extruded polystyrene foam is glued to the wall.
- Immediately after installing this material, moisture-resistant plasterboard sheets are applied on top.
- Ceramic tiles must be laid on top of the plasterboard sheets.
This was the first method of insulation, there is another:
- Thermal insulation material must be laid in two layers.
- On top of the insulation it is necessary to install a system of materials that solve problems associated with waterproofing and vapor barrier (isospan).
- Again, moisture-resistant plasterboard sheets are glued to the top.
- We complete all the work by finishing the surfaces.
- Thermal insulation is also necessary for the ceiling. The best option is installation work with a suspended plasterboard ceiling. The distance that remains between the plasterboard sheets and the ceiling must be insulated using foam boards.
- It is important to take care of the correct ventilation system. Ventilation must effectively remove all vapors that form in the room. How to achieve this? A specially designed grille must be installed on the ventilation. The grille includes a fan. The fan will draw out any vapors that form. But outside air will not be allowed through.
- The sewer shaft will also need to be insulated. For what? The sewer shaft is the main source of drafts, and it also draws out all the heat, so the bathroom cannot heat up.
Wall insulation
Modern building materials make it possible to do this efficiently. Difficulties may arise if the area is small. It is advisable to insulate walls when they face the entrance or corner of the house. This causes humidity and cold in this room.
To begin repair work, you need to dismantle the old surfaces and carry out their processing. If there is no ventilation system on the ceiling, then it must be provided. She will remove the vapors formed in the room. Ventilation efficiency can be ensured by installing a grille. It is better to choose one that is equipped with a fan that extracts vapors.
Plumbers warn that such work reduces the space by ten centimeters. Those for whom this option is not suitable need to think about external insulation of walls from the street or from the entrance. When there is no other option, you should select building materials wisely.
Builders do not recommend giving preference to mineral wool. You should choose extruded foam. This material resists moisture. It will reliably insulate the walls. The quality characteristics can be improved by using reflectors and polyethylene film.
The work includes, at the initial stage, the construction of a frame based on a metal profile. After this, you can begin laying the waterproofing layer. Craftsmen warn that you need to treat the surface with anti-fungal agents in advance.