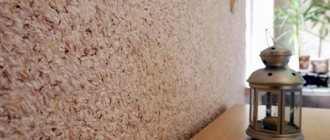
One of the most popular types of flooring is linoleum. This material is not difficult to install and maintain, is comfortable to use, and does not require replacement for a long time. At the same time, the attractive appearance and long service life of linoleum require proper installation from the very beginning. During the installation process, you should ensure, among other things, that the individual panels are correctly joined together. Here we will tell you in detail how this is done.
How and with what to hide linoleum joints
Is linoleum intended for a concrete or wood base?
Linoleum can be laid on concrete. However, this is only if there are no depressions, bumps or noticeable differences in height on the base. All this then begins to protrude, to avoid which you need to level the floor before laying the covering on it. Self-leveling products are most suitable here, thanks to which unevenness is smoothed out well. If necessary, you can repeat the concrete screed.
Linoleum can also be laid on a flat plank floor. Even such a base, if it is very dry and there are no pathogenic microorganisms in it, will not rot. But only if the linoleum is laid correctly and the floor underneath is then ventilated.
When fastening with hardware, you must ensure that their heads do not protrude above the surface, otherwise the finish will gradually be worn away by them. The caps must be coated with silicone sealant. You also need to ensure that the covering sheets are carefully connected and glued together.
Linoleum can be laid on both a concrete and wooden base, if it is smooth and does not have severe defects
For greater safety, you can additionally treat the coating with bactericidal preparations. If linoleum is laid correctly, water will never seep through it, which can cause great harm later. To avoid damage by water, you can use wide baseboards, which must be carefully pressed, and also treat the joints with sealing tape.
When laying linoleum, a backing made of insulating material is often used. It is optional, but it can even out minor unevenness and also absorb noise. If you have a cold basement, it is definitely better to lay a base: it will help retain heat.
Here are the most popular materials for linoleum backing:
- jute;
- cork (crushed material goes onto the substrate);
- foamed polyethylene.
Substrates are often laid under linoleum to even out minor unevenness.
Composite materials are often used as substrates.
As for extruded polystyrene foam, this is a bad material for a substrate: sheets about a couple of centimeters thick will greatly soften the coating, which will make walking on it unpleasant and uncomfortable. Synthetics with a persistent pungent odor are generally unsuitable for such a purpose, since this directly indicates a defective product that cannot be used if your health is important.
About linoleum substrates
Possibility of installation on old flooring
Some people want to lay new linoleum on the old one. However, it is still recommended to remove the old coating. It's very hard sometimes and there's simply nowhere to go but leave it on the floor. But this cannot be done if the old linoleum is irreparably uneven.
The depressions should be filled with putty, the protrusions should be cut off, and the gaps between the facing tiles should be rubbed with a special agent. When preparing, you need to be careful and meticulously follow all the subtleties of surface treatment if you want the leveling to be successful.
In principle, it is possible to lay new linoleum even on an old coating - parquet, tiles or linoleum. Blisters, if present, should be pierced and then repaired with glue. Cracks are sealed, which is usually not a problem. The unpleasant side is the softness of the final surface, into which the legs of heavy furniture can go deeper.
You can put new linoleum on the old coating if it does not have pronounced defects and is fairly smooth
Before laying the finishing coating on boards or parquet, it is recommended to create a substrate by placing sheet material on it. Otherwise, the boards may bend, and this is clearly not beneficial for this coating. Here you can use plywood. But slabs made of wood chips swell from water, deforming the surface, making the finish much less attractive.
When is it necessary to glue linoleum?
Linoleum is a finishing material made from natural or polymer fibers. Laying such a floor covering will not be difficult if you only know how to glue linoleum end-to-end at home.
The fact is that this finishing material comes on sale in the form of rolls 2 or 5 meters wide. There are no other options. If the room in which renovation is planned has a small area and you can cover the entire floor with a single piece, there will be no difficulties.
But much more often the rooms do not have the correct shape or the width of the room is more than 5 meters. In such cases, you have to cut out and lay several pieces of linoleum, which then need to be securely and discreetly fastened together. If this work is carried out poorly, water will penetrate into the joints, dirt will become clogged, and after a while the edges of the canvases will bend and twist.
It is necessary to glue linoleum in doorways and when replacing a damaged piece with new material. If the floor covering has a pronounced pattern or the designers decided to decorate the floors with colorful appliqué, it is also impossible to do without gluing the joints.
Should I use glue?
When laying out the coating, you can either fix it with glue or not use this product. Those who prefer not to use glue believe that linoleum is successfully pressed against the legs of heavy furniture and large household appliances such as a washing machine, and it is not necessary to glue it.
In principle, this is an acceptable option. However, in the summer, in the heat, the material expands from the heat, and then the objects fixing the linoleum move, without returning on their own when it gets colder, and then swellings appear on the linoleum. So people in the know believe that the material needs to be glued. If you partially glue the coating, it will then become deformed. So you only need to glue it over the entire surface.
When installing linoleum, glue is often used
Now you can choose any compositions. Here the question naturally arises about the choice of glue. In any case, you need to use exactly the kind of glue so that it is well suited to the substrate. Before laying out, the roll needs to be kept unfolded for some time so that it has time to align. If the covering is glued, the seams will then be of high quality.
Laying methods
Linoleum is easy to join. Here you just need to follow a special algorithm as accurately as possible. However, the connection of its canvases depends on the material and the method of its installation.
There are a couple of main types of this coating - household and commercial. They differ mainly in thickness: the commercial one is much thicker and stronger than the household one. Therefore, commercial linoleum is more difficult to connect, which is compensated by durability and strength. Before laying such material, you need to decide on its type. But you can also find semi-commercial linoleum on the market.
Attention: the thickness of linoleum must be at least three tenths of a millimeter, otherwise it is unsuitable even for living space - very soon you will have to replace the worn-out coating.
Linoleum should not be too thin, otherwise it will wear out quickly
This coating, although it seems monolithic, is made up of layers. The top one is the front one, it is made from PVC. It determines how strong and wear-resistant the linoleum will be. The type of linoleum depends on how thick it is:
- household, with a PVC layer 0.1-0.3 mm thick;
- semi-commercial, PVC layer 0.4-0.5 mm;
- commercial, PVC no less than 0.6 mm.
The front layer is not the only one, there are also the following:
- middle layer, a layer of reinforcing mesh made of glass cotton;
- bottom layer for heat and sound insulation, made from PVC foam.
The manufacturer sometimes coats the top layer with a moisture-resistant varnish, which adds aesthetics and protects from external factors.
You should decide on the shade and pattern of the material. Today there are a great variety of different shades of linoleum on the market. Here they are both plain and covered with ornaments, imitations of stone and plank floors. Even carpeting or tiles. From all this variety, you just need to choose something that matches the overall style of the room.
If the linoleum has a complex pattern, it is important that it matches at the joints
Important! If there is a complex geometric pattern, its coincidence at the joints is required. The material should be purchased with such a reserve in order to properly join the canvases. This means more money will be spent on the purchase.
Linoleum with a joint can be laid overlapping or joint to joint. Disadvantages of overlap laying:
- moisture gets under the canvas, causing dampness to form there. As a result, mold and mildew appear on the base;
- the layers of canvas will create a small step, due to which the floor will no longer be level;
- loose sheets on top of each other will allow debris to accumulate underneath them. And if they are held together with glue, they may one day come unglued.
It turns out that this installation method is not the best solution, and it is recommended to do the installation joint to joint. Having laid the canvases, you need to connect them, thereby avoiding the ingress of water and debris. Today there are several good docking methods. Now we will analyze them.
It is better to lay parts of linoleum end-to-end, since when laying overlapping, debris and moisture can accumulate under the linoleum
Sheet joining methods
Here's why you need to join the canvases:
- attractiveness and protection of the coating from mechanical damage;
- evenness and neatness of the floor;
- protection of the base from moisture and debris;
- protecting the basement from water if linoleum is laid in a private house or on the first floor.
There are four main methods of joining linoleum using glue or additional elements. Here they are:
- on double-sided tape;
- thresholds and partitions;
- cold welding (gluing);
- hot welding with a special cord.
You can hide linoleum joints using cold and hot welding, tape, thresholds
Let's look at them in more detail.
Features of flooring
The most popular, most widespread, is the group of so-called household linoleum. The base includes a wear-resistant material (fiberglass), and the bottom layer (substrate) is derivatives based on natural raw materials (felt) or its full substitute (polyvinyl chloride (PVC)). The advantage of this type of linoleum is its increased resistance to wear (exposure to external physical damage or chemicals), which classifies this flooring material as durable in use.
The other two groups (commercial and semi-commercial linoleums) have only one layer. Its homogeneous structure consists of PVC. These groups of linoleums have a higher cost. Materials with a textile base will last longer.
The main advantage of linoleum over other types of flooring is the ease of working independently (especially with household ones) with such material. Before laying linoleum, it is necessary to prepare the floor surface area required for work: completely remove all debris (dust, dirt, remnants of the previous floor covering), carefully repair all unevenness on the floor surface (protrusions and depressions). To simplify this process, experts recommend completely plastering the entire floor area. This will also help prevent further damage to the floor surface.
Another advantage of this floor covering is that there is no need to install or assemble an additional lining (floor covering that prevents the destructive effects of external forces). You first need to prepare the flooring material to size by cutting it. There is one subtlety here: due to its qualities, any type of linoleum can dry out and decrease in size, so linoleum is cut a few centimeters larger along its entire perimeter. With further use it will “settle down”.
If, when working with flooring, it is not possible to lay the floor with a whole part of the flooring material, then you can use pieces with neatly trimmed edges. There are two methods of connecting linoleum to each other. This is cold and hot welding. When it’s cold, special glue is applied to the edges that have been previously cleared of dust and dirt; when it’s hot, a special tool is used to carefully connect the edges of the linoleum. To make the seams on your floor less noticeable, it is recommended to carefully select the cut pieces of linoleum so that they match each other according to the pattern of the upper wear-resistant layer of this floor covering.
Cold welding
Adhesive processing of the joint between different cuts. Glue may only be used specifically for linoleum. This type is capable of dissolving the material, getting deep into it, and when it hardens, it connects two different canvases well. It should be borne in mind that glue is a toxic substance, and therefore the person working with it requires great care, careful compliance with all safety requirements and ventilation of the room. If you violate even one point, you can be poisoned by the vapors of the substances that make up the glue.
This is easy to do at home; this method is equally suitable for any linoleum. But only with a small gap between the pieces of material. Specialist. no equipment needed. The seams between the cuts are invisible.
However, for linoleum with a felt layer on the back, you should not use glue, as well as for thick linoleum that has many layers.
When using glue for cold welding, you need to be careful: you can be poisoned by vapors of harmful substances
Cold welding adhesive
There are three types of cold welding adhesives. Which one to choose depends on the category of seams.
Type A
This glue is suitable for joining completely new linoleum panels of any type. It is extremely fluid, suitable for processing only very small gaps, and it is desirable to use it for material that has a high density. The process requires the use of gloves and masking tape. This glue dries from half an hour to forty minutes, after which you can already move normally on the linoleum.
Cold welding adhesive type A
Type C
This glue is suitable for processing linoleum no more than 0.4 mm. It is usually used for used coatings. They can be used to join fabrics, even if the gaps are large. The composition of thick, masking tape is not necessary.
Cold welding adhesive type C
Type T
Adhesive for joining linoleum made from PVC, but on a polyester base. For this glue, it does not matter whether new or used linoleum is glued with it. This composition is often used to attach linoleum to the base, but it is far from the cheapest option, and therefore it is most often purchased to glue commercial linoleum.
Type T Cold Welding Adhesive
Attention! Whatever type of glue is used during installation, you must carefully monitor it during the process so that not a drop of this product ends up on the front side of the linoleum, otherwise it will be damaged. If glue gets on the front side of the coating, it should not be washed off. Here it is recommended to wait until the composition dries, and then cut off the hardened drop using a sharp knife.
What is the best adhesive for cold welding?
Cold welding procedure
Step-by-step instruction.
| Sequencing | Description |
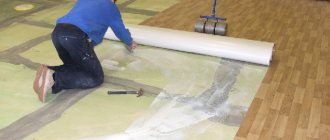
| Overlap the two covering sheets by five to six centimeters, thereby ensuring the possibility of correct cutting and careful joining. Use a ruler to mark and draw a straight line to cut the panels in the center of the overlap. To make the cut, use a metal ruler, pressing it against the coating along the markings. Use a sharp knife to cut both layers of linoleum. |
| Remove covering scraps. As a result, there should be a neat and now invisible joint. Cover it with masking tape and cut the tape along the joint with a knife. |
| Screw a cap with a needle onto the glue tube. Insert a needle into the gap between the sheets, carefully squeeze out the glue where it should be, moving the tube along the tape. |
| Wait a quarter of an hour, thereby allowing the glue to set. Carefully remove the tape. You can walk on the linoleum after another forty minutes, when the glue has completely dried. |
Putty of linoleum joints. Invisible seam on linoleum for centuries
Linoleum is one of the most common floor coverings. No wonder. It is available at any finishing materials store; there are usually no problems with installation and cleaning.
However, it is not always possible to fill a room with a single piece of covering. In some cases it has to be cut. Accordingly, joints are formed that need to be “stitched” correctly in order to avoid wrinkles, unraveling and other problems during future use. Below you will learn how to make an invisible seam that will last for years, even without gluing the linoleum to the floor.
What you need
- knife for installation work;
- blade 0.5 mm thick;
- steel ruler;
- masking tape;
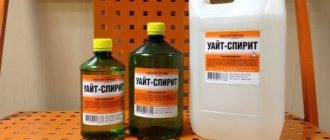
- PVC cold welding agent;
- napkin.
How to do
Before you start gluing the seam, prepare all the necessary tools. Load the knife with a 0.5 mm thick blade. You shouldn't choose thinner ones. In this case, it is better to give preference to a long arch. It is important that the extended blade does not move from side to side. Use a knife with a locking knob or lightly tighten the lock.
When cutting linoleum, it is important to guide the knife strictly perpendicularly, not allowing it to fall to the side. Otherwise, there will be cracks in the coating.
If your linoleum imitates a laminate pattern, do not make a joint at the border of the “wood”. It is better to indent from it.
Youtube | Shayter Andrey
Place one piece of linoleum on top of the other. The dies of the simulated pieces of wood should be approximately 5 mm apart from each other.
Youtube | Shayter Andrey
Place a ruler extending 2 mm beyond the line of the dies and cut the linoleum in a straight line.
Youtube | Shayter Andrey
Remove the cut pieces.
Youtube | Shayter Andrey
Join the linoleum together and seal it with masking tape. Cut it with a knife along the joint.
Glue several tape clips along the entire length to tighten the linoleum sheets to each other.
Youtube | Shayter Andrey
According to the instructions, hold the welding agent with both hands, gently pressing on the tube. Use a napkin to remove excess glue. The product must not come into contact with the finished surface of linoleum. Masking tape is used for protection.
Insert the spout into the joint and gently squeeze out the product. It will protrude out a little. Remove excess with a napkin.
After aligning the joints, tighten the linoleum with tape and continue gluing.
It will take 10 minutes for the product to dry. After half an hour you can walk along the seam. After this time, you can remove the tape.
Hot welding
This method is more complicated than others, but more reliable. Due to the need to use special equipment for hot welding, the method is rarely used for home coating. This method is in demand mainly in commercial premises. It is unsuitable for household linoleum: this coating is very thin, and it will melt due to too much heat.
Interesting! During the process, equipment and materials are heated to 450 degrees Celsius.
Linoleum is first glued to the floor. Hot welding should not begin before the glue has dried. In this case, the canvases should be laid very tightly end-to-end, and not overlapping.
Here you will need the following equipment:
- a cutter that allows you to make grooves between the blades;
- manual machine for linoleum welding;
- a sickle-shaped knife that allows you to remove protruding glue.
You can hide linoleum joints using hot welding
The connecting material here is a special four-millimeter PVC cord. This type is sold in construction markets in coils of one hundred meters, and such coils are painted in any shade. The heat melts the cord, and it fills the joint between different pieces of coating. The cooled cord has all the same characteristics as linoleum.
Step-by-step instruction
| Sequencing | Description |
| Make a groove with a cutter by cutting out a narrow piece of material, but not cutting all the way to the floor. If debris appears, remove it. |
| Insert the hot welding cord into the welding machine. |
| Place the nose of the device at the beginning of the groove, along which it is then guided. In the process, the groove is filled with molten cord. |
| Along the way, material residues are formed; remove them with a knife or a special device. It is important to do this before the material hardens. |
Attention! The length of the taken piece of cord should be suitable for processing the joint along half its length.
How else can you join linoleum together?
Thresholds
The next method that is used to connect linoleum sheets to each other is the use of special overhead thresholds. These parts are available to consumers and come in a variety of colors, so finding the right one will not be difficult. You can also select thresholds based on the material from which they are made: metal or plastic.
To connect the coatings to each other in this way, you need to do the following:
- Take the threshold and measure the length that is needed.
- Attach the strip to the joint and mark the locations for the screws. It is important to hold the nut tightly at this moment.
- Take a drill and a 6mm drill bit. Make holes in the marked places and insert dowels into them.
- Attach the threshold and attach it with self-tapping screws.
This method is considered the simplest, but it is important to say that in this way it will not be possible to make the joints invisible. The sills stand out above the cover so they are easy to see. But this option is perfect for interior openings, where the coating also needs to be firmly fixed.
Using a soldering iron
This option is not suitable for cases where it is necessary to connect large seams. You can use a soldering iron to repair defects in order to glue small joints later. By applying this method to large seams, you can end up with an unaesthetic and rough seam that will be noticeable.
To seal seams using this method, you need:
- Connect the soldering iron to the mains and heat it up.
- Using the machine, heat the edges of the linoleum until they become soft.
- Connect the sheets to each other and press tightly. Everything needs to be done quickly.
- Wait until the material has completely cooled and get rid of the tubercles that have formed.
- If the seam is very rough, you can use a hard roller and finish it.
Using masking tape or tape
Another simple method of gluing linoleum to each other, which does not require special skills and knowledge. But, it is important to say that this method only leads to a temporary high-quality result, because after a short amount of time the seams deteriorate, and the procedure has to be repeated.
It is also impossible to obtain full adhesion to a porous surface using adhesive tape or masking tape. Considering this fact, before using these devices, the surface of the base made of wood, cement or concrete must be covered with strengthening soil. In addition, this method is not suitable for felt linoleum.
When everything is prepared, you can start removing the protective tape from the tape and gluing it to the base. It won't hurt if you roll the seam with a hard roller.
Other connection methods
There are also methods for joining this flooring. These could be thresholds, double-sided tape, a profile.
Double-sided tape is the simplest material for this purpose. This is a cheap and fast method, but far from being of high quality. When working, first glue the tape to the floor, and then glue the covering sheet onto it.
You can use tape to join linoleum, but it will not hide the joints beautifully.
It is also easy to join linoleum with thresholds, but here you will have to work more. And sometimes it is not possible to choose the thresholds of the same shade as the linoleum, which leads to a less attractive appearance of the floor.
When selling a threshold, fasteners are usually included with it - dowels, screws. All that remains is to screw the threshold to the floor where the pieces of linoleum meet. Before this, the floor itself is drilled where the dowels will be.
Attention! For shaped joints of linoleum, you can use glue or a flexible profile.
Putty for linoleum. Self-repair technology for linoleum
Many people are familiar with the situation when, when laying linoleum or using it, damage and holes occur. Don’t get upset and look for an opportunity to re-lay the floor in your apartment; you can restore its beautiful appearance with simple improvised means.
Linoleum should be restored as soon as possible after damage occurs, because over time, one small cut can turn into a huge hole, under which dirt and moisture can get in. Linoleum finally loses its inherent attractive appearance, continues to deteriorate and is unlikely to be restored.
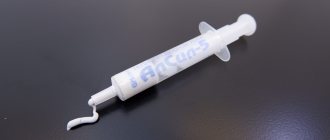
What will it take to restore the presentation of your floor? First, you need a piece of the remaining linoleum (usually after installation there is always a piece of unclaimed linen left, it’s finally time to use it!). Secondly, you also need a corner made of wood or metal to create an even, rectangular cut. Thirdly, you need the usual tools for repairs, which can probably be found in any apartment: a spatula, masking tape and a roller. Fourthly, you will need a flooring cutter, but if you need to cut a small piece of linoleum, you can get by with just a mounting knife. Of course, you will need materials for attaching the coating and its further processing: rosin, glue, primer and putty. Fifthly, restoration will require an electric hair dryer to heat the damaged area and a hard material that can be applied to the damaged coating before it dries. And, of course, don’t forget about the syringe for applying construction adhesive.
Thresholds
If you install a threshold in the doorway to connect the coverings between rooms, this will not require a large investment of effort and money. As a result, the edges of the coating will be secured, and seams and other installation defects that may arise during the process will be hidden.
Advantages:
- It is quite easily secured with the screws supplied with the threshold or with “Liquid Nails” glue;
- reusability;
- easy to replace;
- protects the floor well from water, dirt and dust;
- durability, which especially applies to metal products, and with the right choice of shade, almost complete invisibility;
- additional decorative effect, as the interior will look like it’s finished;
- the difference between coatings of different thicknesses on the floor of the same level can be smoothed out.
To hide the joints of linoleum, you can use special thresholds
Flaws:
- slight protrusion above the floor;
- installation only under an arch or in a doorway, since such seams cannot be hidden in the middle of the room;
- It is important that the installed thresholds do not interfere with closing the door completely, and therefore you then need to either file the edge of the panel or install the door only after the floors are completely finished.
Types of thresholds
We have not listed all the overlays that are suitable for covering the joints of linoleum with each other or with some other coating.
Here are the types of thresholds, differing in design and installation method:
- straight - suitable for joining linoleum of the same thickness;
- multi-level - to compensate for height differences and join coatings of different thicknesses;
- finishing - they can be used to seal the edges of linoleum without connecting it to any other coating;
- corner - they are used to decorate the seams and edges of linoleum on stairs.
There are several types of thresholds for linoleum
Materials for planks:
- Aluminum and brass are the most commonly used materials due to their strength, durability and attractive appearance. Usually painted to resemble metals such as gold, silver, bronze;
- plastic is short-lived, but cheap. Among the products made from it there are those suitable for rounded joints. The requirements are regulated by GOST 19111-77, according to which door thresholds are semi-rigid products. A plastic strip zones the space and hides the difference in thickness of different coatings;
- rubber overlay on an aluminum base - feet do not slip on it;
- MDF is an unpopular material, very expensive, and it swells from moisture;
- cork is common because it is environmentally friendly, soft, and durable. It also cushions and performs a compensatory function.
Which threshold for joining linoleum is better to choose?
The process of attaching the linings
The planks can be secured with self-tapping screws or by gluing them. Each of these methods has its own differences from the other.
The use of self-tapping screws is much more reliable, and the use of a decorative plug hides the fasteners.
The connection with glue will not be so strong, but for a base that is loose and unsuitable for holding self-tapping screws, you will have to use this particular method.
Algorithm for installing thresholds on self-tapping screws.
| Sequencing | Description |
| Lay the linoleum, adjusting the joints as close to one another as possible. Measure the full length of the seam. The base and part of the linoleum at the joint should be completely cleaned of all types of contaminants. |
| Cut the threshold to the required dimensions and fit it to the joint. |
| Mark areas on the floor where you will then need to drill holes for dowels. Make holes according to the marks, insert plastic elements for fastening there. |
| Place a strip over the seam and secure it with self-tapping screws. Snap on the decorative cap. |
Attention! When screwing in the self-tapping screw, you must not overdo it. This must be taken into account so that the bar does not burst if it is made of wood or plastic.
It is easy to join linoleum strips with thresholds to each other and to other coverings. They are not suitable for hiding seams in the middle of a room, but they are quite suitable for decorating a doorway or a joint on a staircase.
Thresholds for hiding linoleum joints can be easily secured using self-tapping screws
Preparatory work
Before connecting linoleum at the joint, it is necessary to carry out a number of manipulations to ensure the durability of the resulting seam.
- First of all, you should let the material rest so that it straightens out and takes its final shape. Otherwise, after some time has passed after sealing the seams, “waves” will appear on the surface.
- Sometimes it may be necessary to eliminate defects in the base of the floor - cracks and unevenness.
- To obtain a reliable and durable seam, you must carefully remove all dirt and dust from the floor. This is especially true for the space between the connected pieces of linoleum.
USEFUL INFORMATION: Moisture-resistant gypsum fiber sheets for flooring: board dimensions, application
Joining linoleum and other floor coverings
It is relatively easy to connect a couple of pieces of linoleum. But linoleum is more difficult to join with other types of coating. Here you need to solve several problems at once:
- height differences between materials;
- selection of a suitable shade;
- problems with joint tightness.
If you want to combine linoleum and another type of flooring, and both types are on the same level, the ideal option is a threshold. If you are going to leave steps, this is where a corner profile can come in handy.
You can join, for example, linoleum and laminate using a threshold
If the linoleum is joined correctly, neither debris nor moisture will ever get under it, and the coating will remain attractive in appearance. Let us remind you that the average person can lay out and connect linoleum correctly on his own, as long as his hands, figuratively speaking, grow from the right place.
Which way is better?
When covering the floor of an office or commercial establishment with linoleum, it is recommended to use hot welding. This is a reliable technique that gives long-lasting results. The resulting seams are difficult to notice unless you look closely, and they are practically invulnerable to moisture.
In a residential area it is better to use cold welding. This method is more universal, and is also accessible even to the average person. The main thing is to choose exactly the glue that suits the specific conditions.
It is recommended to connect linoleum and laminate with a threshold. This method will also hide the transition. It is useful to use it when joining rooms, or when allocating a work area in a room.
The easiest way is to use cold welding - if used correctly, this method will allow you to hide the linoleum joints well
Linoleum is clearly visible against the background of other coatings. It is durable and quite cheap. There are also several methods for docking it. And everyone can choose a method for themselves.
What experts say
Experts recommend taking into account some nuances when gluing different strips of linoleum:
- It is best to join linoleum strips along a special edge provided during production, then the accuracy will be greatest;
- when cold welding, use only very high-quality glue;
- tape to make it easier to remove later, use the one on paper;
- sharpen the knife before work;
- use personal protective equipment during installation;
- When working, thoroughly ventilate the room;
- when purchasing materials, consult with the seller;
- Select the glue, taking into account how wide the seam is.
We hope that our article will help you carefully and correctly join the covering sheets if at least one of them is linoleum.