Some builders and apartment owners level the walls with tile adhesive.
Various situations may arise, so you must follow the rules and regulations for carrying out repair work.
You need to know about the technological characteristics of tile adhesive, its positive and negative aspects, in order to correctly carry out the repair process.
Why level the walls?
Leveling the walls is the main stage of repair. Without this, you cannot begin laying tiles, painting or installing panels. If we are talking about a wall on which I will apply wallpaper, they can be corrected using sheets of drywall. But if this is a bathroom where you plan to lay tiles, a different approach is needed.
The walls should be leveled because:
- better adhesion between the finishing material and the wall is ensured;
- less building materials are consumed;
- the prospects for breakage of the finishing material after installation are minimized.
Creating a smooth surface on wood
Many people wonder whether it is possible to level the floor with tile adhesive if the base is wood. This can be done without unnecessary difficulties.
To begin with, you should install guides on the surface. They will act as guidelines when determining the height of the future layer of tile adhesive. They are nailed to the level. They are placed approximately 50 cm from the existing vertical surface. In this case, the base itself should be free of dirt and dust layers. For cleaning, it would be a good idea to use a construction vacuum cleaner. In addition, the surface is often degreased for better installation.
After this, you should prepare the mixture for work. To do this, take tile adhesive to which sawdust is added. The mass should be thick. This mixture is applied in layers. This is based on the fact that the shrinkage of the material is very high, since sawdust is used. The second layer of the mixture is placed only after the first one has completely dried, which should have a thickness of about 1 cm. There should be no rush. It is better to wait and do everything efficiently than to redo everything later.
If everything is done according to the technology of leveling the floor with glue, the surface will not only become smooth, but also very strong and reliable.
When the floor screed is installed on top of a wooden base, but has uneven surfaces, there is no need to add any impurities to the tile adhesive. It is enough to use the usual consistency and a small layer.
For large differences, we suggest considering dry screed technology.
Is it possible to level walls with tile adhesive?
Builders allow the possibility of correcting the surface not only with special mixtures, but also with tile adhesive. This composition comes in two varieties: dry, which is diluted with water, and ready-made.
The first option is more suitable for correcting irregularities. In terms of its characteristics, it is similar to a more plastic plaster. Its main advantage is not only the cost, but also the ability to create a composition of any consistency.
Leveling with a tile compound is an option, but it is better to give preference to preliminary preparation using starting plaster and primer. The option with a tile composition is suitable if defects in the previous stage were discovered during the work process.
If we consider the cost of this method, it turns out to be much more expensive. If the surface is curved, the master will have to spend not a single bag of mixture on it. But the advantages of this method include quick drying, excellent ductility, and resistance to temperature changes.
When correcting walls, it is better to use beacons and a level. It will be better if it is laser. In this case, the likelihood of getting a perfectly flat wall is higher.
What can glue do?
Many people wonder whether it is possible to level the floor with tile adhesive, and also in what area it is most often used. Over time, almost any screed will begin to malfunction and show all its qualities from the negative side. In such a situation, you will have to carry out work to restore the surface yourself. You should choose tile adhesive or other mixtures for the job by looking at the floor covering used. In addition, the existing height differences will play a significant role.
Leveling the floor with tile adhesive is used for minor differences, when it is possible to carry out repairs at a lower cost. In this case, the screed cannot always cope at a high level.
It is worth highlighting the problems that can be encountered on the surface of the finishing coating of a self-leveling floor:
- The screed begins to peel off in parts over the entire area of the room.
- The appearance of small holes, potholes, cracks, holes and other defects.
- A large amount of dust may appear during operation. This indicates that the solution was not mixed according to the rules, or that a low-quality construction mixture was used in the work.
All these negative manifestations of non-compliance with self-leveling floor technology should be eliminated immediately, so as not to encounter even greater problems in the future. You can level the floor with tile adhesive under the laminate in a short period of time and it won’t put a big dent in your pocket. It is not uncommon for local restoration of the surface to eliminate the occurrence of major repairs.
The scope of application answers the question of whether it is possible to level the floor with tiles. This is very easy to do, and subsequently you can even lay any type of floor covering. True, the subtleties will depend on the coating.
Leveling walls with tile adhesive when laying tiles
Before laying the tiles, the walls are plastered with adhesive. This stage is preparing the surface for installation. The process depends on what state it is in.
Preparation
Surface preparation depends on its composition. If it is a concrete wall, it must be treated with a soap solution before applying the mixture.
When concrete slabs are made, they are coated with an oily liquid that must be removed as it impairs the adhesion of the layers.
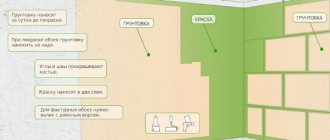
A whitewashed room should be washed off and the remnants of old plaster removed. Then prime the surface in 2 layers. Alkyd paint also needs to be removed.
Next you need to install beacons. The smoother they are, the less solution will be used. The number of layers depends on the curvature of the surface. Each applied layer dries for at least a day.
You should not apply a layer of more than 1 cm, as there is a risk that the tile may fall off. If the difference is more than 1 cm, layers of glue should be applied in stages.
How quickly can you level a wall with tile adhesive?
A quick way to eliminate unevenness with glue is suitable for those whose differences do not exceed 1 cm. This option allows you to combine surface leveling and laying tiles. The master can independently regulate the amount of glue.
The advantage of this method is the speed of leveling. The builder does not need to wait 24 hours for the previous layer to dry.
Craftsmen can correct uneven surfaces and lay tiles at the same time using a tile mixture. To carry out such work, experience is required.
Which glue is better not to use for leveling?
The variety of tile mixtures is wide, but you can make it yourself. But no matter what type is chosen, proportions must be observed. When correcting deficiencies in a room, it is better not to use a liquid solution; it takes longer to dry and is harder to apply.
To fix the wall surface under the tiles, you do not need to choose expensive types of glue. Epoxy or dispersion glue will not work if you have no experience working with it. It is better to give preference to inexpensive cement-based compounds. It is also better not to use ready-made solutions, since its consistency will be impossible to correct.
Preparatory work
The technology for using tile adhesive for leveling is very simple and can be done even by a beginner in the construction industry. Leveling the floor with tile adhesive is not problematic, practical and less time-consuming. It is enough just to fill the surface defects with glue, and then level it with a metal spatula.
It is very important to prepare the surface. To do this, all unnecessary debris and dust are removed, all elements are cleaned and then primed. There may be several primer layers. Everything will depend on the quality of the base, humidity level and other factors. All layers of primer should be allowed to dry before applying adhesive to the floor. Sandpaper is used to rub the surface for better adhesion. It is worth noting that the technology for using tile adhesive for leveling is completely identical to the construction of the finishing layer of a self-leveling floor. Everything must be carried out at high quality.
There are nuances regarding the installation of flooring. If, for example, you take tiles, then leveling is carried out using a high-quality adhesive composition for the coating. When we have a laminate, tile adhesive is used only to completely eliminate all defects on the surface.
Tips and tricks
To ensure that the correction process occurs without surprises, you should adhere to the following rules:
- use thick glue so that it is easy to apply;
- the layer thickness should not be more than 1 cm;
- before leveling, the surface must be prepared;
- if you have no experience in leveling with a mixture, it is better to entrust this to builders.
You can correct the imperfections of the tiled wall yourself. Tile adhesive is a great alternative to plaster as it has stronger adhesion and durability. This mixture can smooth out almost any unevenness.
Features of operations
It is recommended to process a fresh screed the next day after pouring.
Before preparing the solution, you need to carry out some preparatory work. The list of preparatory operations includes:
- Use a spatula to manually remove protruding irregularities and possible delaminations. It is easy to handle a fresh screed with your own hands 1 day after pouring. After gaining strength, you will have to use a grinding tool on the subfloor.
- The adhesive must adhere firmly to the base. Given the small thickness of the layer, dust removal of the surface is carried out especially carefully with a construction vacuum cleaner. At the same time, the entire room is cleaned - after leveling, installation of the floor covering will begin.
- Increasing the adhesive properties of concrete is achieved by generously applying a primer. The base under the floors is kept for 1 day. For information on eliminating screed defects using tile adhesive, watch this video:
You can get guidelines for ensuring a horizontal surface by cleaning the previously laid beacons (if they are not the cause of the curvature) or making new ones from a thin side of the prepared adhesive solution.
Working with wood coverings
How to level a ceiling: pros and cons of leveling the surface using putty and drywall
Wooden floors can also be smoothed with glue. For this you will need:
The first thing you need to do is set up guides that will allow you to navigate with the height of the layer. Next, we fill the planks in a row, checking their location with a level.
The second stage is preparing the adhesive solution: mix sawdust with glue until it looks like a thick mass. Cover the surface, previously cleared of dust and dirt, in layers of 1 cm, wait for it to dry and repeat the procedure. The fact is that sawdust tends to dry out, which means that you need to apply the material a little with a reserve. The main thing is to take your time, this work is not done in a hurry.
Now you can handle any repair! Remember, if you do all the work with soul, the result will be much better!
Subscribe to our VKontakte group. to keep up to date with the latest news
General information
Tile adhesive is used to install the following floor coverings:
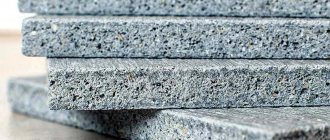
- thermal insulation tiles;
- mosaic canvas;
- porcelain stoneware;
- natural stone;
- ceramic tile;
- heavy stones.
When choosing a material, you should take into account the characteristics described below.
Typically, tile adhesive is used to fix tiles and stones.
Adhesion
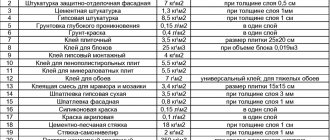
This is one of the main qualities on which the adhesion of materials depends. The heavier the floor covering, the more adhesion the adhesive used should have.
For example, for standard tiles, adhesion should be 5 kg per 1 square meter. cm. This way the product will stick without problems and will not suffer from vibrations and stress for a long time. This is what distinguishes tile adhesive from the usual mixture of sand and cement.
Recommendation! For porcelain stoneware, you need to use a hardening base, the adhesion of which is 10 kg/sq. cm. Porcelain tiles are heavy, so if the fixing force is insufficient, the surface can quickly collapse.
It is important that the tiles adhere well to the adhesive
However, excessively strong glue, which is used to attach heavy and large stones, can also cause destruction of the ceramic surface after hardening.
ceramic floor tiles
The basis
The base for the coating can be:
- plaster;
- concrete;
- brick.
It is also worth considering the type of surface. Glue with increased elasticity and good adhesion must be used for the following surfaces:
- glass-magnesium coating;
- used tiles;
- warm floor;
- self-leveling floor;
- drywall;
- glass.
New tile covering can be laid over old tiles
Warm floors are often used in the bathroom. This system involves temperature changes, so simple glue cannot be used, as it will simply dry out and disintegrate. In this case, you need to choose elastic compounds with high heat resistance.
Recommendation! To make the right choice and purchase glue with the desired characteristics, you need to carefully read the text on the packaging. Manufacturers are required to specify for which surfaces and materials it can be used. Especially when it comes to a warm field or complex surfaces.
Pay attention to the glue packaging: all recommendations and characteristics are indicated there.
How to level a concrete floor
Interfloor ceilings are often made of monolithic concrete slabs, the surface of which is not ideal. In addition, there are significant differences at their junctions. How to level the floor under linoleum or ceramic tiles in this case? How to hide laid communications (cables, water supply and heating pipes)? Let's look at the two most popular methods.
Wet floor screed
The technology of this process consists of the following stages.
- Using a level, the boundary of pouring the leveling cement-sand mixture is determined. A corresponding line is drawn on the walls of the room along the entire perimeter.
- The concrete floor is cleaned of dust and treated with a primer. The waterproofing material (polyethylene film with a thickness of at least 50 microns) is laid in a continuous layer.
- Beacons made of T-shaped profiles are installed on cement mortar, laid in cakes at a distance of about 0.5 m from each other. The distance between the beacons is selected according to the width of the rule.
- A solution is prepared from cement, water, sand and small crushed stone. The mixture is stirred to a uniform, creamy consistency.
- The solution is laid out between the beacons, evenly distributed and leveled by the rule. In this case, the tool is pulled closely along the beacons.
- After the screed has hardened, the beacons are removed, and the resulting depressions and other irregularities are filled with solution. The surface of the screed is finally leveled using grout, while applying a thin layer of the mixture.
- To prevent the screed from cracking, it must be periodically lightly moistened or covered with plastic wrap while drying.
- After drying, the screed is treated with a primer: this will bind its top layer. After a few days, you can lay the floor covering, but the use of laminate and parquet is possible only after 28 days - after complete drying.
Dry floor screed
This method of floor leveling has a number of advantages over wet screed. It is different:
- better thermal insulation;
- better sound insulation;
- absence of a “wet” stage, which speeds up work;
- The floor can be used immediately after screeding.
The technology is based on the use of expanded clay - a porous natural material obtained after firing clay-containing rocks. The step-by-step leveling of the floor with a dry screed can be described as follows.
- Using a laser device or another method, the level of the future floor is determined.
- An edge strip is attached along the walls for sound insulation. A waterproofing film is laid on the base with an overlap on the walls.
- At a certain level, rows of beacons (made of metal profiles) are placed parallel to each other.
- Expanded clay is poured. The optimal layer thickness is 10 cm. The insulation should be leveled according to the rule.
- Moisture-resistant gypsum fiber sheets, plywood or OSB boards 16 mm thick in two layers are laid on top of the expanded clay. The joint lines of adjacent sheets should not coincide with the joints of the slabs of the adjacent row. The edges are glued with construction adhesive.
- The sheets are fastened with self-tapping screws.
- The cracks are sealed with putty. To obtain an ideal surface, the plywood is sanded.
This method can be used to level both concrete and wooden floors. Its disadvantage is a significant reduction in ceiling height. How to level a floor: a video demonstrating the installation of a dry screed will help you understand the details of the process.
In addition to the above methods, self-leveling mixtures (for concrete) are also used to prepare reinforced concrete foundations for laying finishing material. The technology for performing such work is similar to that used for wooden floors.
By following the stated rules and recommendations of material manufacturers, you can create a high-quality, smooth floor surface for laying laminate, linoleum, parquet or ceramic tiles.
What type of adhesive is better to choose?
A thin screed is made with tile adhesive, which are divided into 3 types. They, in turn, are divided into classes. To select the composition, you need to know the manufacturer's labeling. Its types:
- Cement.
- Dispersive.
- Reactive.
Tile adhesive classes:
- main class 1 (basic);
- basic class 2 (improved, with additional characteristics);
- additional classes (fast-setting adhesive, resistant to vertical slip, with an increased appearance of the open layer, elastic and with increased elasticity).
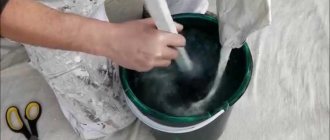
Dispersion glue is sold in closed containers. This is a completely ready-to-use composition. Reactive glue comes with a ready-made composition, but requires the addition of water and good mixing.
Important
You can prepare it yourself using a mixer with a special attachment. A single volume of the mixture must be produced within the time specified in the adhesive composition passport.
Subtleties and nuances
If you need to level the floor with glue, you cannot choose gypsum fiber board sheets as a substrate. This material collects moisture very well, which will negatively affect the drying process of the surface. When choosing a material to level the floor with glue, you should focus not only on the quality, but also on the manufacturer itself. Sometimes his reputation leaves much to be desired. After all, the quality of the surface after leveling, as well as its strength and the ability to be used under various floor coverings, will depend on the tile adhesive.
Using tile adhesive, leveling the floor is a pleasure. It is worth paying attention to the fact that the ceiling height will be reduced. The floor will rise somewhat and you will have to think about raising the location of the doors between the rooms.
The technology for performing the work is that it is very important to prepare the foundation. The final quality after using glue as a leveling material will depend on the subfloor. If the flooring is installed in a bathroom or other rooms with high levels of humidity, then it is best to purchase moisture-resistant compounds for installation.
How does alignment work?
Deep depressions are poured from a container, a trowel is used for leveling, and then usually about 3 meters long. If there is little space, then you can take a shorter rule. As a rule, specific movements are performed that seem to stretch the mass from its greatest thickness to zero level.
Movements must be performed across the beacons. If the mixture is not enough, you can refill it. If deposits appear on the floor, they must be removed. The better the mixture is stretched over the surface, the smoother it becomes. Don't rush and pour out a large amount of solution; it will form in swells and it will be difficult to pull it out well.
Finishing surfaces
The concrete surface is leveled not only for laminate, but also for linoleum and tiles. Uneven surfaces are removed and the floor is treated with a construction vacuum cleaner. After this it is primed. The leveling layer is laid out along the wall as a rule. A high-quality layer is an excellent base for linoleum. This floor will last a long time.
How to get high-quality results?
Tile adhesive is an excellent replacement for plaster, as it allows you to level walls quickly, efficiently and inexpensively. The glue has excellent strength and increased adhesion, so it lasts for many years. The mixture can be used to eliminate unevenness on any type of wall.
If you do not have sufficient knowledge in the field of construction and repair, trust the leveling of walls to professionals. They will quickly cope with the assigned tasks and guarantee excellent results.
Source
Step-by-step instructions for carrying out work
Preparatory stage
Preparatory work takes place in the following order:
- Use a spatula to level the surface. Clean off roughness, peeling, and protruding elements. After a day, it is very convenient to process the screed yourself, as strength is gaining strength. But you will need to use a grinding tool.
- The base must adhere firmly to the adhesive layer. Therefore, the floor must be thoroughly vacuumed, and if necessary, washed with a damp cloth.
- After the clean surface has dried, apply a layer of primer. This procedure increases the adhesive properties of concrete. If necessary, priming is performed more than once.
Alignment
Alignment is carried out in a horizontal position using the rule. The length of the tool is up to 3 m in order to pass well through the beacons without touching the corners. In narrow openings and door gaps, you need to use a shorter version of the rule. If there is a need to perform a stepwise transition, then use a template rule with a given difference.
The work is performed in the following sequence:
- Deep places are filled with the mixture directly from the container, using a trowel for leveling.
- The rule is to make stretching movements across the beacons from the place with the greatest layer thickness to the zero level.
- If there are deficiencies in the set mixture, they are eliminated by re-filling.
- Sagging is removed with sanding agent after the composition has hardened.
Leveling for tiles
Rules for planning the laying of ceramic tiles on a rough surface:
- Determine the highest and lowest points of the floor. This is easy to do with a laser level or rule. A control beacon is placed in the center of the resulting base.
- Pre-lay out the tiles. In this case, the element that will be laid at the lowest point of the base is determined.
- A cord is pulled along the edge of the first tile parallel to the base wall to maintain the laying direction. This is how we move towards the lowest point.
Advice
Cladding work is easy only at first glance. If the work was not carried out according to the first-priority technology, then the cladding will not be done well. It is important to follow all the preparatory steps and calculate the amount of material that will be required to lay the base base.
How to prepare a concrete floor for laying laminate
People often ask how to level a concrete floor for laminate flooring. For this procedure you will need to make a screed. Concrete screed must be poured in rooms with reinforced concrete floors.
If the surface is already covered with peeling glue or concrete, then they need to be removed. Otherwise, the floor will bubble and its performance characteristics will deteriorate.
First you need to remove the floor covering to the very base. Then they check how wet the concrete that was under the floor is. We inspect the surface for cracks and irregularities.
Only after this check is the surface covered with soil. Then, on the roughing platform, all existing voids are sealed with a dry compound.
The finished solution is applied to the platform, leveling it using a building level or rule. In a room of normal size (walls 3 or 4 meters long), two signs are enough.
The thickness of the concrete layer at its thinnest point should be more than 7 millimeters.
Once the applied layer has hardened, additional priming is carried out. Next, fill in the self-leveling solution.
Then the room in the apartment is not used until the concrete has completely hardened. This result is achieved within a day. Following this, they create insulation from water and noise.
Screeding is the most popular method of floor adjustment. But you can take note of other ways to properly level the base:
When leveling the floor, only leveling solution can be used. But the thickness of the layer made should be such in different places of the floor that there are no bumps or holes.
To properly prepare the self-leveling mixture, you should pour it into water. It is diluted from 75 percent sand and 25 percent cement. Mixing is carried out with a drill with a special attachment.
The composition is used immediately after preparation, since it will not be possible to dilute the thick mixture with water later.
It is advised to pay attention to the shelf life of the dry product, it can be limited. The mixture is spread in a thin layer, which spreads, forming a mirror-smooth surface.
When mixing and pouring the cement leveling mixture, bubbles often form on its surface. They must be removed, eliminating the risk of poor adhesion to the platform. This is done with a needle roller.
An easy way to level it is to use tile adhesive. This method will help eliminate cracks and errors. In addition, leveling with glue will be cheap.
To level the screed with tile adhesive, you need to use a 3 m long wedge. It is directed diagonally. This glue ideally hides the pits formed in the screed.
It is not recommended to cover the floor with tile adhesive in small quantities. Otherwise, voids will appear.
It is recommended to level the floor with tile adhesive when there are small cracks and bumps. It will not be difficult even for a beginner to perform this work with tile adhesive.
Instead of beacons, you can take commercially available plasterboard guides. They are placed at a distance of 60 to 80 cm. Small pieces of plywood or plastic can serve as a backing for the signs.
In this situation, it is better not to use fiberboard instead of a substrate, as it absorbs moisture, thereby destroying the concrete.
Monolithic concrete floors have a high absorption rate, so it is recommended to treat such surfaces more than once.
To maintain a straight and smooth surface, use a horizontal level. Concrete is poured only after the guides are installed.
Study in detail the technology of leveling a concrete floor with your own hands in the video.
Video: