GKL boards are universal materials that are used to create various interior compositions by using technologies of varying complexity. To make decorative bricks from plasterboard with your own hands, you do not need any special skills. Existing methods allow you to obtain a spectacular finish in a short time and save a lot of money.
What is drywall?
The modern material plasterboard is in great demand both in the field of repair and in the field of finishing. These are gypsum sheets reinforced with durable types of cardboard. With its help, your plasterboard ceiling design in the hall will be perfect.
However, not only in it, but also in any other room. There is only one “but”. In rooms where there is a high level of humidity, moisture-resistant types of plasterboard (gypsum board) should be used.
Drywall is suitable not only for creating a ceiling, it can be used to cover floors and walls, and make high-quality partitions. This is especially true for studio apartments.
When making design decisions, it is important to decide whether a single-level or multi-level ceiling will be the ideal option for your particular application. Single-level ones are easier to make. Multi-level ones will give you more opportunities to realize your creative ideas.
Variety of drywall
According to its design features, it can be:
- ordinary;
- moisture resistant;
- fire resistant;
- with increased sound insulation;
- in the form of a gypsum fiber sheet with increased strength.
This significantly expands the range of its application.
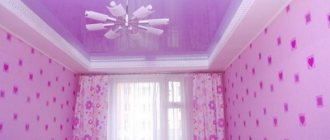
Ideas for beautiful plasterboard ceiling design
Before you begin implementing your plasterboard ceiling project, it doesn’t matter at all what the intended purpose of the room is, put together all the components of the future interior. It is he who often acts as the core component in this system.
Your imagination will not face annoying limitations. Drywall is good precisely because it can be used to create ceilings of any shape, color and style.
It is important here, even at the stage of thinking through the idea and design, not to make mistakes in choosing a specific design.
To do this, you need to calculate in advance where the lamps will be located, where you will hide the wires and other purely engineering nuances. Then your finished ceiling will not disappoint you. It will delight you for many years without causing major or minor problems.
Often many people decide to design a plasterboard ceiling in the kitchen. Here you need to put comfort and unobtrusiveness at the forefront. Only in this case nothing will disturb the regularity and peace during cooking and eating.
Types of plasterboard partitions in the interior
When planning to change the interior using plasterboard partitions, you should take into account that their installation will require some time. It depends on the shape and design of the structure. Designers offer a huge variety of ideas that will completely transform the interior.
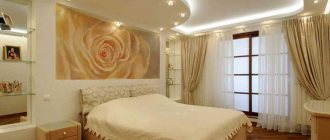
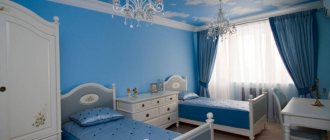
Plasterboard partition in the bedroom
Solid
These partitions are also called fixed partitions. They are used to divide a room into two or more spaces. This is the simplest type of design. In them, the frame is connected at an angle of 90°, and then sheathed with sheets of plasterboard. Their main advantages include:
- durability;
- strength.
Plasterboard partitions
Partitions not only perform the function of zoning a room, but also do a good job of soundproofing the separated space. With their help, you can divide, for example, a work space and a relaxation area with a sofa.
Plasterboard partitions
Half
Such a partition is not installed over the entire height or width of the room, but only over part of it. It emphasizes the functional direction of the separated space. This technique is often used in small rooms.
Plasterboard partitions
After zoning is completed, the lighting remains common for the entire area; if necessary, additional lighting can be provided to each zone.
Plasterboard partition for TV
Rack
Partitions in the form of racks are very popular due to their functionality. They are complemented by open and closed shelves, installed either from the very base or at a certain distance from the floor. In addition, many owners choose a design with a blank side on one side and shelves on the other.
Open narrow shelves made of plaster
With a niche
Since a plasterboard partition is assembled from metal profiles and mounted to the ceiling and floor, designers often offer an original solution - to make a niche in them for subsequent installation:
- TV;
- aquarium;
- shelves;
- other interesting accessories.
Plasterboard partitions
Openings for niches can be open, closed, or decorated with decorative glass inserts, such as stained glass.
Plasterboard partitions
With decor
Partitions are often chosen to decorate the interior. Wiring must be installed inside and several spotlights must be installed. The main advantage of such structures is that there are no restrictions on finishing:
- you can paint the surface with simple or textured paint;
- make an original bright drawing on it;
- wallpaper;
- apply decorative plaster;
- glue a small ceramic tile.
Plasterboard partitions
The main thing is to respect the general style of the room. Thanks to this, the room, with a plasterboard partition installed in it, will acquire individuality.
Decorative plasterboard partition
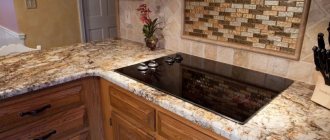
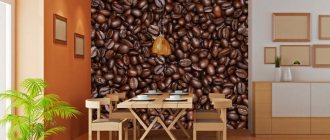
Plasterboard partition in the kitchen
Curly
Designers suggest using openwork or patterned design of the wall for the room and unusual zoning, for which a curved frame is pre-installed. Often such designs are decorated with spotlights to illuminate shelves and niches. Curly partitions can also be installed in the doorway.
Semi-oval design
Plasterboard partition in an apartment
Advantages of plasterboard ceilings
Why does a DIY plasterboard ceiling break all records in popularity? It's all about merit. Other types of construction and finishing materials cannot boast of them.
Note!
- Design of a small bathroom 2, 3, 4, 5 sq. m. (140 photos): new items, beautiful finishes, ideas for mixing and matching
Children's room for a boy: TOP-150 photos of new designs, layout, zoning ideas, selection and placement of furniture
- Dressing room: the best design projects, placement and arrangement options, 140 photos of a small and large dressing room
Pros of plasterboard ceilings:
- if you are very tired of classic white and smooth ceilings, then this option is just for you;
- allows you to create structures of almost any shape;
- the material is easy to cut and when wetted is elastic, it can be bent in the desired direction;
- suitable for creating complex volumetric varieties of ceilings;
- it is easy to embed lamps into it, and leave all communications behind its surface;
- cope well with the tasks of zoning rooms of any size and configuration;
- easily help to change the very architecture of the room and various shortcomings;
- with their help you can hide not only ugly wires, but also fittings and pipes running along the original ceiling of the room;
- Almost any of the finishing options can be applied to it. Not just painting and wallpapering or film;
- environmentally friendly for you and your pets;
- not flammable;
- it can even be used for children's rooms;
- breathes;
- perfectly dampens extraneous noise and loud sounds;
- will help create chic interior accents.
Drywall capabilities
Interest in plasterboard is caused not only by its use as dry plaster, leveling walls or as a material for installing interior walls. It mainly attracts with its capabilities, thanks to which, when working with it, you can make any configuration of wall structures.
Most often, gypsum boards are used to create beautiful arches, original figured partitions and other structures delimiting space.
The ease with which the material can be processed allows you to arrange any wall design and change the layout according to a pre-developed project of any type, from simple to the most complex.
To decide to change something in a house or apartment, you need an appropriate reason or a visual example of what you would like to see in the end. As a rule, visual images of various structures made of gypsum board and presented in advertising catalogs become motivators for such actions.
Having seen photos of plasterboard walls, many are eager to install something similar in their home. All the more attractive is the fact that such a thing (wall, partition) can be built independently.
You just need to correctly calculate the amount of material and make sure you have all the necessary tools. Then making walls with your own hands will be easy. Especially if there is interest in the matter.
Disadvantages of plasterboard ceilings
There are also flaws. They are due to the characteristics of plasterboard ceilings:
- When wet, various deformations often occur. Even moisture-resistant varieties should not be installed in bathrooms and bathrooms;
- multi-level plasterboard ceiling. will inevitably “eat up” the height of the room. This nuance can be easily corrected with properly arranged lighting.
Subtleties of installing a plasterboard ceiling
To make the ceiling beautiful and reliable, it is important not to violate certain stages of the technology.
First you need to install the metal profiles and carefully align them. Then connect the wiring to the places where the lighting elements will be installed. Multi-level ceilings suggest that these profiles will not be installed at the same height.
Then the sheets of drywall are attached. They are given the desired shape in advance. The sheets are hemmed to metal profiles. They are cut and carefully adjusted so that the joints of adjacent structural elements perfectly match each other.
Note!
Apartment design in a panel house: 100 photos of an ideal layout and a successful combination of interior elements
- 10 free programs for interior design and planning an apartment or private house: a review of the best online resources for design
- Design of small rooms (200 photos): examples of ideal design, choice of color and style, layout and zoning
After this, you can begin finishing. It is necessary to carefully putty not only the seams, but also the recesses that appear from fastenings using self-tapping screws.
The putty must dry completely. Coat with the same composition a second time. Then, after drying, take a grater and smooth out all the unevenness. Then you should glue the joints of the sheets with bandage tape.
Now the entire surface of the ceiling can be puttied. After drying, carefully sand and prime.
How to decorate a plasterboard ceiling is up to you and only you. The finishing stage can make you nervous. We recommend that you pay attention to the new designs. It is possible that some of the ideas proposed by the pros will be completely in tune with you.
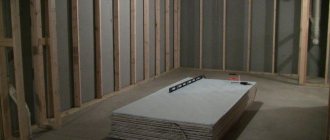
General scheme of wall covering with plasterboard
Finishing walls with plasterboard with your own hands is quite possible. However, the basic rule should be observed: strictly follow the sequence of actions. Only in this case the result will be exactly as expected, and it will last for a long time. Therefore, let’s consider what the algorithm of actions is when working with this popular material when doing wall cladding with your own hands.
Conventionally, the entire process of covering walls with plasterboard can be depicted in five sequential operations:
- Selection and preparation of materials that will be required for wall cladding.
- Marking the wall surface that will be decorated with plasterboard.
- Installation of the frame onto which the material will then be attached.
- Frame covering.
- Rough version of finishing using plasterboard.
Attention! The following five points are required to obtain an ideal result when decorating a wall using such a universal material as drywall.
Now let's study in more detail what each step is and how to perform it correctly.
Wise choice of materials
There are several types of drywall. This material can be used in various construction and finishing works. And depending on the type of room in which drywall will be used, the requirements for it will vary. After all, it can have various characteristics that determine the possibilities for its use.
The most important parameters by which you should approach the choice of drywall when deciding to cover walls with it include:
- thickness. There are several varieties of this material for interior work, which vary in thickness. And for wall cladding, a material with a thickness of 12.5 mm will be considered optimal;
- moisture resistance. When upholstering the walls of rooms where there is high humidity, the only possible option is to use plasterboard marked “KGLV”. This material is suitable for rooms such as toilets and bathrooms, storage rooms, if the humidity level here may increase. For other, “dry” rooms, it will be normal to use ordinary drywall.
You will also need other materials to decorate the walls. At the preparation stage, you should also stock up on them in the required quantity. These will be:
- primer;
- elements for arranging the frame. This includes guides, PN and PS profiles, as well as self-tapping screws and direct hangers;
- serpyanka mesh;
- There are two types of putty – starting and finishing. Finishing putty will be necessary only if you plan to paint the wall after finishing the work.
Types of profiles for drywall
In addition to the listed materials, certain tools will also be required. They will allow you to carry out all the work on covering the wall with plasterboard to the highest quality. For this job it is recommended to have:
- masking tape;
- rule;
- a set of spatulas of various sizes;
- an electric drill or screwdriver of sufficient power;
- metal scissors or grinder;
- cuvette;
- roller;
- building level;
- meshes (preferably a set) for grinding.
This minimum of tools will allow you to complete the work of decorating the wall with plasterboard with maximum convenience and quality.
After preparing the necessary materials and tools, you can proceed directly to work.
Marking on the wall surface
Marking is carried out in order to obtain a perfectly flat surface. It must be performed before starting work on laying gypsum board.
The execution diagram looks like this:
- A line is drawn on the ceiling along which the supporting profile will be attached. Drywall will be attached to it. The location of the line is at least 40 mm from the wall surface. If the wall, which will be decorated using this material, will be insulated, then the thickness of the insulation should be added to 40 mm.
- The resulting line on the ceiling should be transferred to the floor surface. To do this, you can use plumb lines. And also the construction level. With its help, vertical lines are drawn on two opposite walls to the floor level. And the resulting points are connected by one line.
- Now markings are applied to the surface of the walls. To do this, mark the attachment lines of the PS profiles, onto which the drywall will then be fixed. To do this, draw vertical lines at a distance of 10 cm from the corners. The pitch of these lines (that is, the distance between them) should be 60 cm.
- Now, along the resulting lines, you should mark the places where the suspensions are attached. To do this, additional horizontal markings are made every 50 cm.
The given sequence of steps must be carried out on all walls that are planned to be finished with plasterboard. This will allow you to better position the frame and then fix the drywall.
Execution of the frame
Leveling walls with plasterboard with a frame with your own hands makes it possible to get perfectly smooth, beautiful walls. Any finishing touch will look great on them: painting, wallpapering. The frame installation process is quite simple. And the following detailed step-by-step instructions will help you do it yourself:
- All guides are pre-cut to the length of the wall on which they will be attached;
- Then, using dowel-nails, guides are attached to the walls and ceiling. It is these nails that will ensure the most reliable fastening and long-term preservation of the material on the surface of walls and ceilings that are sheathed with plasterboard. If the walls that are sheathed are made of foam blocks, then in addition to dowel-nails, the use of special fasteners for foam blocks will be required. This way the grip will be the strongest and most durable;
- Now the PP profiles are cut to the required sizes and fixed into the guides. They are fixed in hangers. It should be remembered that profiles tend to sag slightly. Therefore, it is necessary to align them regularly using the rule;
- Now, by attaching the jumpers, the necessary strength of the resulting frame is created. To do this, the transverse jumpers are cut together and arranged in a checkerboard pattern.
This method of fastening them allows you to obtain the most durable and even surface.
Attention! Professionals give good advice: in order for the resulting surface of the frame to be smooth, you should initially install corner guides and connect them all in pairs using a cord. This will result in straight lines along which, like beacons, you can attach the remaining profiles.
The given sequence of actions is applicable when covering walls using plasterboard. In the same way, it is necessary to cover all surfaces that will then be covered with this material.
Owners of houses made of wood should especially pay attention. Since this environmentally friendly natural material is prone to rotting and mold, especially in rooms with a high degree of humidity, it is recommended that before installing the frame, thoroughly treat the walls and ceiling with special antiseptic agents. They will perfectly protect the wood and prevent its premature deterioration. And only after the wood has completely dried can you install the frame and cover the wall with plasterboard.
We cover the frame
Now we proceed directly to covering the resulting frame with plasterboard. Depending on the type and size of the wall being sheathed, preliminary cutting of sheets of material is carried out. The process of cutting drywall is quite simple. For this, there is also a simple algorithm of actions that allows you to obtain individual parts of the required size and shape.
This algorithm looks like this:
- several points are applied to the surface of the sheet in accordance with the dimensions required for a separate section of the wall;
- points are connected by straight lines using a rule;
- when using a mounting knife, a part of the sheet of the required size is cut;
- Now the sheet is folded and the cardboard is cut along the fold line.
The resulting sheets are fixed to the required place on the wall using self-tapping screws. This process is simple and does not require special skills. However, you should remember some points that will allow you to get the most even surface of the sheathed wall:
- The edges of the drywall should be exactly on the center line of the profiles. This will make the sheathing as neat as possible, since it is the overhanging edges that begin to crack and crumble over time;
- location of screws - step of at least 25 cm;
- The caps of the screws should be carefully “sunk”. This will allow further processing of the resulting surface with the highest quality. After all, protruding caps will interfere with further finishing of walls that were covered with plasterboard.
Plasterboard lathing is performed on all types of floors. However, when finishing frame buildings with this material, you can do without lathing. In this case, sheets of material are attached directly to the walls of the building. The resulting wall finishing with plasterboard without a frame or profile on frame buildings holds up well without disturbing the geometry of the premises and giving them a more attractive appearance.
We carry out rough finishing
After installing the plasterboard sheets to the frame, it is rough finished.
First, a chamfer is cut from sheets of material. Its width should be about 5 mm. If the corners of the sheets are rounded, then there is no need to chamfer. Serpyanka is glued to the joints. Using a primer and a paint roller, the joints are processed to level the surface.
Attention! Puttying of plasterboard walls is carried out in order to eliminate the slightest irregularities, since during finishing they become noticeable and reduce the value of the final result.
After the treated surface has completely dried, a starting layer of primer should be applied. A paint roller can be used, and in particularly difficult to reach places, a paint brush can be used. Particular care should be taken in places where there are depressions from the screw heads.
Plastering plasterboard walls is carried out as a finishing coating. It is a decorative coating that can have different textures and different shades. The more even the layer of soil was laid, the more neat and beautiful the decorative plaster will look on such a wall.
Shape of plasterboard ceilings
You can create real miracles with this material. Modern plasterboard ceiling design will help create interesting visual effects. They are capable of correcting even the most complex flaws in a room, even if they are related to the geometry of the living or working space.
Note!
Stretch ceiling with lighting (around the perimeter, from the inside): photo of modern design, color choice, materials, sizes, price
- Children's room for a girl: TOP-200 photos of modern design, layout, zoning, selection and placement of furniture for the nursery
- Unpretentious indoor plants - review of the best options for apartments and private houses (photos and names)
It is important to understand that the more complex the design, the easier it is to encounter unexpected visual effects. Especially when it comes to complex shapes and three-dimensional designs. Here it is better not to hope for chance, but to seek advice from professional designers.
To avoid troubles, we recommend that you listen to these useful tips:
- if your ceiling consists of squares placed at different distances from the floor, then they will visually open up the space. Ideal for narrow and small spaces. Luxurious voluminous waves will create the same effect;
- the round shape is acceptable to create an interior accent. It is used to mark the center of a living room or hall;
- It is better not to create ceilings of complex multi-level structures in small rooms. They look out of place, cluttering up an already modest space;
- smooth lines, oval shapes, pastel colors will make the interior relaxing and soft;
- Square and rectangular plasterboard ceilings are very formal and strict. It is better to leave them for offices and work rooms. They will not add comfort to the room.
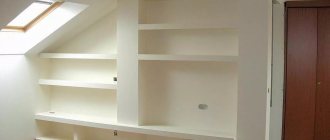
DIY plasterboard niches in the living room
Any plasterboard structure is based on a frame made of metal profiles and the sheets themselves, which are used for cladding. To make a niche of even the smallest size, you need a special approach. You should definitely consider the following:
- The shape of the niche should be in harmony with the size of the living room. For example, a niche can be placed on the wall along which the sofa will stand. In this case, you will be able to arrange a small home library or arrange various accessories. These could be family photographs, figurines or small vases with decorative plates.
- If there is a niche made of plasterboard in the living room, then the living room no longer needs other bulky furniture, for example, walls or slides. This is an ideal option for a small room.
- The cost of plasterboard structures is much lower than the price tag for cabinets or walls. It doesn’t take much time to make a niche with your own hands.
- The external decoration of a niche made of plaster structures can always be changed if desired.
Modern redevelopment of the living room using plasterboard is an ideal option for decorating a fashionable, stylish and comfortable interior. More and more apartments need zoning, which can also be done using drywall.
Semicircular arch made of plasterboard
Zoning with a plasterboard ceiling
Often our apartments have fewer rooms than we would like. It is not difficult to solve this small difficulty through a design technique such as zoning. Plasterboard ceilings cope perfectly with this difficult task.
If the living room is used both for entertaining your guests and for family dinners, then you can highlight them with color or in another suitable way, for example, light, shapes, different textures.
An area for receiving guests and relaxing together, where a spacious sofa is located, will help to highlight an arc on the ceiling or brighter lighting. The colors, shades and textures on the gypsum board ceiling will also help.
What is drywall
Drywall is a building material consisting of two even, parallel to each other, layers of building cardboard and a special filler of hardened gypsum located between them.
Due to its low cost and ease of installation, it is widely used in various designs of modern construction.
There are many varieties of it, which differ in: the softness of the cardboard itself, fire-resistant qualities, good water resistance, and the increased hardness of its components.
The standard sheet dimensions are 1200 mm x 2500 mm, with an area of 3 square meters. meters. Thickness and weight vary depending on its type.
On the Internet you can find a wide variety of photos of drywall installed by yourself. This makes it possible to see from the outside what this or that design will look like and choose the option that suits you.
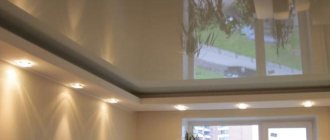
Beautiful plasterboard ceiling design
The design of plasterboard ceilings, even one-level, can be turned into a real work of art. This can be done using different methods. Raster lamps are in great demand for these purposes.
They allow you not only to create space lighting of the desired type and intensity. They can completely transform even the simplest plasterboard ceiling design.
In addition, light can be of different shades and colors. They allow, leaving everything else the same, to give the surface a new look. Light spreads across its surface, making its own adjustments to the surrounding space.
Which drywall to choose for curved walls and ceilings
Flat and three-dimensional figures are best made from arched or flexible plasterboard, the thickness of which is 6.5 cm. Its main distinguishing property is its high flexibility, which makes it possible to easily create convex and concave surfaces.
When working with arched drywall, there is no need to wet and treat the surface with a needle roller to increase elasticity. The cost of flexible gypsum plasterboard is higher than that of conventional material, but it pays off due to the strength and long service life of the created structures.
It is possible to use ordinary ceiling or wall plasterboard with a thickness of 8 to 12.5 mm, but in this case you need to be prepared for the fact that it is much more difficult to give it the desired shape.
Method of volumetric painting of plasterboard ceilings
The design of plasterboard ceilings can be based on a variety of methods and technologies. For example, volumetric painting is undeservedly ignored.
It is this that allows you to create a real exclusive. It looks very expensive and unusual. You will have nothing to compare such a ceiling with. All other finishing options will simply lose without even entering the competition.
- Everything is quite simple. Apply the selected pattern to the surface of the plasterboard ceiling. This can be done using a simple pencil. The so-called liquid paper is suitable for creation. Then the surface must be thoroughly dried, after which the sheet can be mounted in its original place.
- The technology is quite simple. True, it will take some time to apply and dry the design itself. The resulting elements can be left white, or they can be painted in the chosen shade. You will give an unusual look to even a standard one-level plasterboard ceiling.
How to bend drywall?
Methods for bending plasterboard sheets (regular, non-flexible):
- Using water and a needle roller (awl). The side of the sheet that will have a concave shape is moistened with water and rolled with a needle roller. After the plasterboard is slightly saturated with water, it is carefully bent, placed on the template and fixed in the desired position until it dries completely.
- By creating cuts. A very strong bend can be obtained using the “dry” method; to do this, you need to make cuts on the surface of the sheet at a distance of 1–5 mm from each other and up to 6 mm deep, which should be located across the bend. The distance depends on the radius of curvature: the smaller it is, the more frequent the cuts should be. After giving the plasterboard the necessary shape and fixation, the incisions are filled with putty.
USEFUL INFORMATION: Frame from a profile for plasterboard: we sheath the walls, assemble partitions and structures
Multi-level plasterboard ceilings
The design of multi-level plasterboard ceilings offers a lot of options. We recommend that you first inquire about this issue in specialized literature or on design websites. You will learn a lot of useful and new things.
Interesting effects are created because the lamps on such a ceiling are located on different tiers. The colors of the backlight, as well as its type and intensity of glow, can also be different. The designs also offer great variety. Deciding on a specific option can be quite difficult.
It is better to entrust this task to a professional designer. In this case, you are more likely to get exactly the result you want.
In addition, you will be able to order preliminary visualization and make adjustments to the appearance of the future plasterboard ceiling before the workers begin to create it. Beautiful and high-quality photographs of finished ceiling designs made from this promising material will also help you.
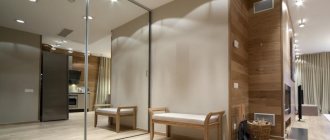
Plasterboard structures for zoning different rooms
Each room has a specific purpose, which must be taken into account when installing a partition.
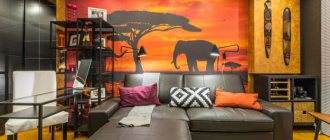
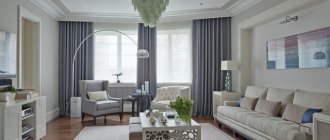
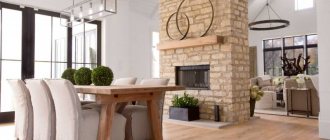
Living room
Most often, the separation of this object is carried out in a one-room apartment or private house if combined with a kitchen. To obtain the optimal result, it is advisable to think in advance whether the emphasis will be on functionality or visual appeal. Although, if you have enough space, utility and decorativeness can be successfully combined.
The kitchen-living room will look great with partial separation. In this case, the food preparation areas are closed, and the remaining space is designed as a bar counter. It can be used not only as a table, but also serve to place decorative elements, open inserts from other materials or niches for flowers.
When separating the hall from the corridor, you can also implement interesting design ideas. Open-type compositions look good, complemented by correctly positioned lighting.
Attention! Designs in the living room can be used for hanging a TV, interior items, or for arranging hidden storage spaces.
Bedroom
The main purpose of this room is relaxation, but clothes are also most often stored here, so the partition can be used as a compartment for a built-in wardrobe. If you have space, you can get a functional dressing room.
In the bedroom, the design is also used to separate the work area, covering most of the allocated area. The configuration can also be open, when the emphasis is on stepped columns with niches for papers or books.
Children's
Plasterboard partitions must be built beautifully and harmoniously to eliminate discomfort due to compressed space. Therefore, zoning is carried out conditionally: with the allocation of recreation and study areas. To achieve this, wavy partitions of various shapes are erected with open elements for storing books or toys.
It is more difficult to separate areas when children, especially children of different sexes, live together. In this case, the needs of each child should be taken into account without creating excessive closeness.
Hallway
Functionality is most important in this room, so a plasterboard partition that allows for built-in clothing storage systems is an excellent solution. When combined with a corridor, the emphasis is on the visual component. To do this, an open configuration is selected, which is complemented by lighting and beautiful decorative inserts.
Bathroom
A partition in the bathroom is most often necessary if the bathroom is combined. Its structure can be different, but due to the small space it is predominantly a simple closed element with a smooth or stepped edge.
Zoning is only advisable in a large room. In this situation, a partition separates the sink from the shower or bathtub.