Mirror tiles in the interior
Advantages and disadvantages of mirror tiles in the interior
This finishing material has many functional and aesthetic advantages:
- Resistance of the tile surface to chemical attack (mirror tiles do not deteriorate or wear off when in contact even with aggressive household chemicals).
- Safety compared to fragile mirrors. Ceramic material, if broken, will not injure a person with sharp fragments.
- A large assortment of different configurations (sizes and shapes of tiles).
- Ability to implement unique design solutions. A mirror tile with a facet, which has recently become widespread, can help you with this. The edges of this product are specially processed and acquire an edge, which is subsequently cut at an angle. The cut edge begins to shimmer. Beveled tiles in the interior make the decor more sophisticated, neat and refined.
- A room tiled with reflective tiles always seems visually more spacious.
A full-wall mirror can highlight the design, but it can also look awkward against the general background.
Regarding the disadvantages:
- Fragility of the material due to careless transportation.
- Incorrectly laid tiles with mirrors, like all ceramic finishes, can move away from the wall, at best. In the worst case, the tiles can easily collapse and harm your health.
- Some tiles are poorly resistant to moisture, but this problem is easily solved by good ventilation of the room or daily airing.
Designers use mirror tiles to visually expand the space in a small room, as well as make it cozier and brighter.
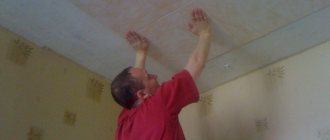
Features of working with ceiling tiles
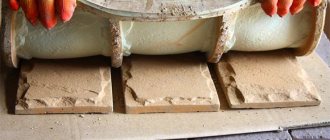
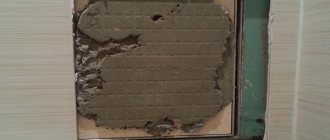
First, the surface is leveled, achieving a maximum difference in thickness between the tiles of a maximum of 3 mm. First, a set of tiles is laid out on the floor in the intended order of fastening. The tiles are also polished in advance.
The adhesive solution is not applied in a very thick layer. The most economical method of fastening remains liquid nails or gray sealant. It does not contrast with the mirror surface and has antiseptic properties.
And before gluing the tiles, the wooden surface of the ceiling is treated with an antiseptic. To increase adhesion, the surface is primed with varnish, paint or a special compound.
Before applying sealant to each coating, the material is covered around the perimeter with masking tape. Apply sealant to the back side of the material, pressing the tile more tightly to the ceiling. Random smears of glue from the mirror surface are immediately removed with a scraper.
It is permissible to use cleaning products for washing. After 4 days, the seams between the tiles are grouted. If the material is used to decorate the ceiling in a room with high levels of humidity and temperature changes, then end-to-end gluing is unacceptable.
Unfavorable conditions lead to pressure on the tiles against each other, small pieces break off, and cracks form. The material glued in this way will soon become unusable.
Using mirror tiles to decorate a room will allow you to create a unique luxurious interior without the help of professionals. The material advantageously emphasizes the advantages of the room and reliably hides all the shortcomings.
To obtain a bevel, the mirror is processed in a special way: a chamfer is removed
. This processing gives the product sophistication and sophistication, allowing you to reveal new facets of mirror surfaces.
On what surfaces is it better to use mirror tiles?
Walls
Wall decoration with glossy tiles will look great in the living room, hallway and bathroom.
Mirror tiles will look unusual in any room.
A continuous covering on the walls can multiply the space. A design with narrow tiled mirrors and large distances between them will reduce space and is suitable for spacious, elongated rooms.
The interior mirror on the wall must also be of a certain shape, type, size
When installing shiny ceramic panels on walls, consider the following nuances: tiles with reflection should not be on opposite sides. This simple mistake will lead to rapid visual fatigue and an unpleasant feeling of the infinity of this labyrinth.
Consult a designer when laying mirror tiles.
The same rule applies to adjacent walls. In this case, it is better to cover one wall with plain or tinted tiles.
Ceiling
Ceiling decoration with glossy tiles can be used in the following rooms: in the living room and hallway, in the kitchen, in the office and in the bathroom. By decorating the ceiling with mirrors, you automatically make the room brighter. You should not tile the bedroom ceiling. This is a good solution for work areas.
Mirrored ceilings are relevant in high-tech style.
Mirrored islands on the ceiling will help highlight the functional area in the room. In the living room, such parts can be placed above the dining table.
A solid canvas is more suitable for rooms with low ceilings; in this way you can easily adjust the ceiling height.
Important! Do not use a large number of small interior items. They will all reflect off the ceiling, and then the room will seem overloaded.
Floor
Flooring made from reflective tiles is extremely rare (in expensive clothing stores and pretentious nightclubs). This means that there are very few varieties of such tiles on the Russian market due to low demand.
Mirror tiles are durable in use.
Firstly, this material is much thicker (has a special layer that protects against scratches), which means it will cost you many times more.
Secondly, for many people, reflection from the floor causes headaches and dizziness, disorientation and has a bad effect on their mental state.
Thirdly, such a floor will not look good in a room filled with furniture; many designers regard this as excessive pretentiousness. Please note that in order for the living room to look stylish and not cheap, you can lay tiles only on part of the floor. For example, along the walls or, conversely, as an insert in the middle of the room.
Fourthly, a mirror finish floor is impractical. The tile will become dull and scratched very quickly.
Surface preparation and requirements
Mirror tiles can be applied to any material that has sufficient strength.
- In order to ensure good adhesion of the tiles to the base, before application the surface must be dust-free and free from wallpaper, loose paint, chalk, and lime.
- If necessary, apply compounds to combat efflorescence, fungi, mold, etc. on the wall.
- Cover the base with primer. To do this, you can use paint or varnish with the addition of an appropriate solvent, or special priming compounds.
The base should be:
- Smooth and free of bumps, sharp kinks and protrusions (roughness and potholes are allowed in small areas).
- Smooth - only minor curvature of the base is allowed over a large area.
- Dry, clean.
- Well primed.
Attention!
Do not use cement-based adhesives (Vetonit, Plitonit and others) to attach mirror tiles.
Also, do not use acidic/acetic/"all-purpose" sealants. The use of these materials may lead to the destruction of the mirror amalgam.
In rooms with sudden temperature changes and high humidity (bathrooms and actively used kitchens), it is not recommended to lay mirror tiles end-to-end. Frequent heating and cooling of the tiles can cause the mirror panel to begin to “bulge”, and individual tiles will crack or fall off.
Sizes and shapes of mirror tiles
Tiles come in different sizes and shapes. There are no specific standards for its manufacture. Most often in repair and finishing work, tiles of the sizes indicated in the table below are found.
Let the designer choose the size of the mirror tiles.
| Tile shape | Size (length and width) |
| Square | 50x50, 100x100, 150x150, 200x200, 250x250, 300x300, 400x400, 500x500, 600x600 |
| Triangular (equilateral) | 150x150, 200x200, 300x300, 400x400 |
| Rectangular | 50x100, 50x150, 50x200, 100x150, 100x200, 100x600, 100x1000, 100x1200, 150x200, 150x600, 150x1200, 200x300, 250x400, 300x40 0, 300x600 |
| Arched | 150x150, 200x200, 300x300, 400x400 |
Note! The thickness of the material varies from 2 to 4 mm. It is very important to pay attention to the width of the bevel; it can be 10, 20, 30, 50 mm.
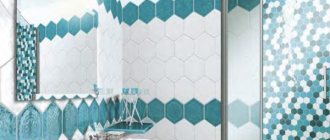
Hexagons look unusual in the interior.
A tile in the shape of a honeycomb (hexagon) is gaining popularity. Honeycombs in combination with aged structures are used to create a special vintage, eclectic and baroque interior. For a more modern design (for example, loft style, minimalism, hi-tech), the tiles can be placed at different distances from the wall, thereby creating a panel with a 3D effect.
When properly installed and used, mirror tiles are very durable.
Production and technical specifications
Mirror tiles are made differently from classic ceramic tiles. This is due to the structural features of the product. The manufacturing process of such material is automated. The warp is made by cutting large sheets into uniform segments of the desired shape and size. The mirror side is made using the damping method. Crystalline substances are added to glass melted at high temperatures, due to which a characteristic shine appears. The cut fragments are processed on a grinding machine and polished.
If the tiles are made from polystyrene, they are much easier to cut and paint. However, this option is no longer so environmentally friendly and safe. All designs and ornaments on surfaces are applied by sandblasting.
Which rooms are appropriate to be tiled with “mirror tiles”
Bathroom
When choosing tiles for your bathroom, pay attention to their moisture resistance and installation method.
Cladding with mirror tiles in the form of a panel is perfect as a bathroom decoration.
Otherwise, when the humidity level is higher than the maximum permissible, the material will very quickly lose its characteristics and become unusable. Such finishing in the bathroom will require daily care (drops of water and splashes of toothpaste will be very noticeable on the mirror surface).
Mirror tiles are often used in the bathroom due to its practicality.
The following will look great in the bathroom:
- Large or medium sized tiles, square in shape, laid diagonally in diamond shapes along the entire plane of the wall;
- Elongated, rectangular or mosaic elements in an ensemble with matte plain ceramic tiles;
- Chaotically laid mirror inserts on a light background.
Hallway and corridor
In the hallway it would be appropriate to install glossy tiles on either side of the entrance, but not opposite it. In a narrow hallway, try positioning the tiles so that they reflect the natural light coming from the windows of other rooms.
Mirror tiles in the hallway are necessary because everyone looks at their appearance before leaving.
You should not place mirror surfaces on the farthest wall - the room will become even narrower. It will be remarkable if you decorate one of the walls with a combination of several textures, using mirror tiles. You can combine wood and stone finishes with several inserts of shiny honeycomb tiles.
Living room
In your living room design, use the ability of mirrors to double the surrounding objects. If you place a small number of indoor plants so that they are reflected, they will appear larger.
Mirror tiles in the living room as a special type of decoration.
In a spacious, but not too large living room, tiles will help highlight several parts: the dining area, the fireplace and the comfort (or relaxation) area.
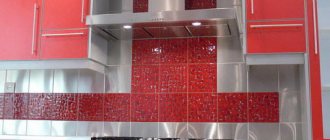
Kitchen and dining room
When decorating the work area, use mirror tiles for the kitchen apron. Choose mosaic elements, small diamonds and squares. Before deciding to install mirror tiles in the kitchen, think about the performance of your hood; the tiles will quickly lose their shine and become covered with a layer of grease if the hood does not cope with the job.
To make your interior special, you can take mirror tiles of non-standard sizes.
The dining and bar area can be arranged as follows: install a panel opposite the table or bar and complement it with proper lighting. The dishes you have prepared will be reflected.
Compositions for application
It is best to use any neutral sealant as glue. You can use Liquid Nails LN-930 Mirrors, but this composition is inconvenient to work with large volumes because it takes a long time to set.
For grouting joints, it is recommended to use neutral sealants of any color. The most commonly used sealant is dark gray - it does not create a contrast with the mirror tile itself and has bactericidal and antifungal properties, which is important for rooms with high humidity.
When laying with a neutral sealant, the seams can be grouted within 1-2 days. Tiles laid on “Liquid Nails” LN-930 Mirrors, it is advisable to grout the joints after 4-5 days. Using a neutral sealant has another advantage - mirror tiles are glued and grouted with the same compound. Thus, less waste is generated after the work is completed.
To quickly clean the tiles from sealant residues after grouting, we recommend two technologies to choose from:
- Before laying the tiles, cover the perimeter of each tile with masking tape;
- After laying the tiles, apply masking tape directly to the seam, and then use a knife with replaceable blades to cut the seam, which will be filled with sealant. These technologies ensure maximum accuracy and speed of work.
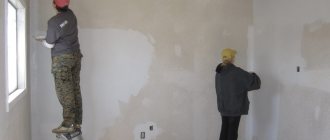
Useful tips for laying tiles yourself
- First of all, when laying tiles with your own hands, remove the remnants of old wallpaper, glue and sand the surface. The durability of your tile panels, mirror ceiling and floor depends on the base on which the tiles will be laid. Any surface, horizontal or vertical, must be perfectly flat. The slightest increase or decrease in the level will not allow achieving uniform reflection of light from the mirror surface and will lead to image distortion;
- The second step is a high-quality, correctly selected primer;
- First you need to lay out the desired pattern on the floor, and only then proceed to marking the surface;
- We start finishing from the bottom along horizontal rows, without deviating from the markings;
- To achieve equal distances between seams, use plastic crosses;
- Apply adhesive to the tiles. A good tile adhesive or sealant will keep the tiles from slipping;
- After installation, you should wait from 2 to 4 days (depending on the humidity of the room) so that the surface hardens well;
- The next item is grout. It is necessary to ensure that the structure is completely sealed and safe. The best grout is neutral transparent silicone, the excess of which can then be wiped off.
Proper care of mirror tiles will increase their service life.
By following these rules, you can lay mirror tiles without resorting to the help of expensive craftsmen. But, if you have never dealt with such finishing, it is better to entrust it to professionals.
Self-installation technology
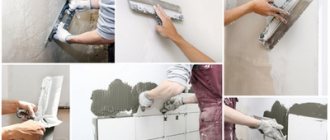
The quality of the finish depends on the accuracy and precision of the installation of mirror tiles. The tile laying process consists of several stages:
- preparing the base;
- tile adjustment;
- laying the material;
- final processing of the laid layer.
Mirror tiles can only be laid on a flat surface. Therefore, work should begin with preliminary cleaning of the surface from debris, dust and remnants of the previous facing material. Defects identified during the work are eliminated. If plastering does not solve the problem, it is recommended to cover the walls with plasterboard. After cleaning, the wall or ceiling should be leveled and primed. This is important to ensure better adhesion of the tiles to the surface.
When the base is ready, proceed to preparing the tiles. To begin with, it is laid in the order in which it will be mounted on the wall. When adjusting, do not remove the edge, as it is processed in industrial conditions. Its violation leads to the appearance of cracks and chips, which are difficult to eliminate without special skills.
To glue mirrors you will need the following tools:
- glass cutter for adjusting tiles to size and shape;
- level, ruler and plumb line;
- square;
- spatula (standard and notched);
- masking tape to protect surrounding interior elements.
When the tools and material are prepared, it’s time to start laying the tiles. The first row is laid only horizontally. Seams between elements should not exceed 4 mm. If the distance is greater, the drawing may “float”.
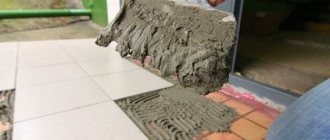
Silicone adhesive is applied to the back of the tile using a spatula. Often the composition is replaced with liquid nails. Then each component is applied to its location and pressed against the surface and held for 5 seconds. This is necessary for the composition to “set”. It is advisable to lay the tiles using a piece of fabric. This installation method will protect the material from contamination.
Important! The protective film can be removed from the tiles only after completion of construction work.
After laying the last layer, the masonry is left for 2-3 days. After the solution has dried, you can begin grouting the joints. For this procedure, a gray sealant is used. This shade is not noticeable between mirrors.
Options for mirror tiles in the interior
Selection of adhesive mixture
Before gluing mirror tiles, you should carefully select.
Cement-based glue is absolutely not suitable for such material. You also need to be careful when choosing a sealant, because cement and vinegar destroy the mirror amalgam and spoil the appearance of the surface of the product.
The best option is a special tile adhesive that is used for mirrors. It is also good to lay tiles using neutral sealant or liquid nails.
Varieties
In the traditional sense, a mirror is always glass. However, this is not entirely true. Modern technologies make it possible to create reflective tiles from durable plastic - for example, polystyrene. Of course, glass options also exist. The variety of materials opens up wide possibilities for designers. The tile can be:
- tinted, having various shades;
- ornamented - the design is applied by sandblasting;
- decorative - decorated with drawings or three-dimensional images;
- with a flat surface without any changes - in this case, no seams will be visible during joining;
- with a smooth bevel - a classic (without patterns or decoration) option that is convenient to install;
- imitating metals - for example, chrome, silver, gold or polished bronze.
Both identical and different types can be used in decoration. It all depends on your financial capabilities (tiles with a pattern are more expensive than smooth ones) and the idea that you want to put into the design.