Oriented strand board (OSB, English oriented strand board, OSB) is a sheet material consisting of glued thin wood chips. It is widely used in the construction of houses, for example, using frame technology, from SIP panels, as well as in the construction of roofs and partitions indoors.
Correctly plastering walls made of OSB boards for subsequent decorative finishing or painting is not difficult; this technology will be discussed below.
Is it possible to plaster OSB?
Oriented strand boards are used for interior decoration and facade cladding. The decorative design of surfaces involves painting, applying plaster, gluing wallpaper, and tiling.
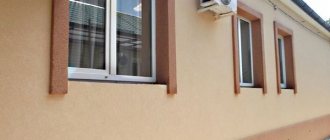
Plastering OSB is permitted in accordance with building codes. Finishing is necessary to increase the durability of the coating, give it moisture-resistant characteristics, increase the strength of the base, and noise and heat insulation of premises. However, it is important to select materials in accordance with operating conditions (high or medium air humidity).
The protective coating for OSB must meet the following requirements:
- waterproof;
- resistance to mechanical damage;
- resistance to temperature changes;
- vapor permeability;
- environmentally friendly composition;
- high level of fire safety;
- long-term operation;
- maintainability;
- resistance to mold and mildew;
- non-exposure to ultraviolet rays;
- light weight of the slab (does not weigh down the supporting structure);
- affordable price;
- simple application of the plaster mixture;
- the ability to do the finishing yourself.
Surface reinforcement
When it becomes necessary to reinforce a wall, after priming it, glue a reinforcing mesh (preferably fiberglass) onto the surface using an adhesive solution or fasten it with dowels. When applying the mesh, the joints must overlap.
CAREFULLY!
The mesh must not be allowed to sag: to do this, it must be well tensioned.
If sagging occurs, it will cause gaps to form between the putty and the wall, which can lead to the mixture peeling off.
When the mesh is tightly fixed, the beacons should be set and the first layer of leveling plaster should be applied . Application should be made with sharp movements (throwing parts of the composition onto the mesh) for greater adhesion. After the first layer has dried, apply the second and wait until it dries completely.
When the wall is leveled, you should begin applying elastic plaster.
Reinforcement
Why do OSB panels need to be plastered for external and internal use?
OSB plaster is necessary for interior and exterior decoration to solve the following problems:
- creation of additional noise and heat insulation of the building;
- formation of a monolithic base for decoration;
- correction of joints, seams, cracks and surface defects;
- embodiment of the author's design of facades and interior walls;
- increase in service life after repair;
- protection of the coating from moisture, sunlight, insect pests;
- prevention of mold and mildew;
- reducing the cost of heating the room due to the use of insulation during the plastering process.
Traditional way
This option involves extensive preparation. Without this, OSB boards will constantly be exposed to moisture, which the plastered layer absorbs and transfers to the base.
The preparatory stage includes:
- Fastening on a base of moisture-proof material. As mentioned above, this can be asphalt cardboard, roofing felt, kraft paper or polymer coating.
- Installation of reinforcing mesh. It can be fiberglass or galvanized steel mesh. It is filled with special glue so that the composition completely covers the reinforcing layer.
- After the glue has completely dried, the surface must be treated with deep penetration primer to increase adhesion.
After waiting for the applied primer to dry completely, you can plaster the OSB boards using silicate or mineral mixtures. They have good long service life, decorative and protective properties.
The solution is applied in a thin layer of 1.5 to 5 mm. Therefore, this process is reminiscent of applying putty. This type of plastering of OSB boards requires time and money. But, once everything is done efficiently, the owner can forget about repair work for a long time.
Positive and negative sides
Plastering OSB boards has the following advantages:
- leveling the base;
- increasing the durability of the design;
- increasing the strength of walls and facades;
- the ability to change the shade of decorative trim;
- the coating is not damaged by wet cleaning;
- simple technologies for applying the mixture;
- the ability to repair sections of facades, interior walls, etc.
When deciding whether it is possible to plaster OSB boards, the disadvantages of the finishing material are taken into account:
- Products are produced in different classes; when purchasing, it is important to study the composition of the slabs. The blocks should not contain synthetic resins.
- Some types of sheets should be covered with plasterboard or other finishing materials.
- To maintain a comfortable atmosphere, it is necessary to install ventilation systems.
- After plastering, additional decorative finishing may be required.
Is it possible to apply Rotband gypsum plaster on the surface of a chipboard wall?
Theoretically, this can be done after preparatory work, which includes priming and drying.
Next, you can attach a plaster mesh to the chipboard and you can plaster.
In practice, no one plasters chipboard with Rotband.
There are many reasons:
Chipboard slabs, which are called “by default”, are a smooth material; leveling the surface with plaster is not required, the maximum is puttying the surface, the same Rotband is applied with a minimum permissible layer of 5 mm,
If the surface is filled in a plane, then it is leveled not with plaster on the chipboard, but with lathing under the chipboard.
Chipboard is a material that simply swells when exposed to moisture; Rotband needs time to dry completely.
and not plaster (Rotband).
If there is a need to plaster chipboard, then I advise you to use dry plaster, also known as drywall.
What plaster is used for OSB boards
Mixtures based on the type of base are divided into the following compositions:
- mineral;
- elastic;
- polymer;
- decorative, etc.
According to the purpose of the plaster, it can be:
- roughing (leveling);
- finishing (for decorative finishing);
- thermal insulation;
- noise-absorbing;
- X-ray protective;
- waterproofing, etc.
According to the scope of application, materials are divided into the following types:
- for interior work (in heated rooms);
- external (for facade and interior decoration);
- universal.
The compositions differ in the binding components, type of filler (from natural or artificial materials) and functional additives.
Mineral
The slabs can be plastered with a mineral composition, which can be based on gypsum powder, clay, cement or lime. The advantage of the mixture is increased strength, environmental friendliness of the components, good vapor permeability, and resistance to temperature changes. The plaster is non-flammable, affordable, and resistant to ultraviolet radiation. The material is repairable, durable, frost- and water-resistant.
The disadvantage of the finishing agent is low elasticity. This product is not recommended for treating walls that are subject to mechanical stress due to the risk of cracking. Mineral compositions are sold by manufacturers in finished form or as a dry powder. When preparing the solution, the proportions of the ingredients are taken into account. For facade finishing, gypsum-based mineral mixtures are not used.
Elastic
This plaster mass is sold ready-made. The binding ingredients in the product are acrylic resins. The advantage of the material is increased ductility, which ensures stretching of the composition under load on the base.
The plaster is waterproof, has a wide range of shades, is durable, has good adhesion, and is easy to apply. The material is recommended for finishing new houses and buildings in earthquake-prone regions. The coating is repairable. However, it is necessary to take into account the low vapor permeability of the plaster mixture, low resistance to ultraviolet radiation, and high cost.
This group of materials also includes super-elastic silicone compounds with high strength and durability.
This product is expensive and difficult to clean after hardening. Elastic mixtures can be used to plaster OSB boards indoors.
Polymer
This plaster belongs to the decorative variety and is used for applying the finishing coating. In the class of polymer mixtures there are silicone, siloxane, acrylic and polymer acetate. The advantages of this type of product are breathability, increased heat and sound insulation of the room, durability, environmental friendliness of the composition, resistance to fungus and mold.
The plaster is waterproof; polymers are used as binding ingredients. The material is offered ready-made or in the form of a dry powder. The instructions indicate the proportions for preparing the mixture and the type of reagent. The cost of such plaster is higher than that of mineral materials.
Polymer plaster is made with 2 types of bases:
- water soluble;
- soluble in organic diluents.
Decorative
For decorative finishing on OSB wall panels, factory-made plasters are used.
For work you can choose the following compositions:
- structural;
- stone (mosaic, marble);
- textured;
- colored;
- Venetian;
- flock.
Decorative plaster is applied in several layers, the texture is reproduced through the presence of different fillers and the use of special tools (texture rollers, hard brushes). On a cement plaster base, you can imitate stone or brickwork. Bases with a single-color coating are created after putting slabs in 2-3 layers and painting the surface.
Textured plaster mixtures are distinguished by the presence of fillers (granite, marble chips, etc.) that change the texture of the material. The advantage of plaster is its plasticity, lack of shrinkage after drying, strength, resistance to temperature changes, and easy application to the base.
The textured composition can be used to correct surface unevenness. You can change the saturation of the shade using coloring pigments, mica, pearlescent particles, etc. The material helps to enhance the heat and sound insulation of the room.
The compositions do not contain harmful substances, so the mixture is universal for finishing residential and public premises and outdoor work.
Textured materials are presented mainly in natural tones and other natural shades. It is optimal to create an imitation of a wood base using golden, brown, ocher colors. Neutral white, gray and steel materials are used in public spaces. Light colors are optimal for decorating bedrooms and small rooms.
According to the type of texture, textured plasters are divided into the following subtypes:
- "bark beetle";
- under brick;
- with imitation silk;
- travertine, etc.
Manufacturers produce bark beetles in various shades and with different granule sizes. The material belongs to the finishing variety and is applied at the end of the finishing work. The coating is intended for cement, stone, plasterboard, and wooden substrates. In finishing you can combine several mixtures of granule type and shades. The material is suitable for internal and external processing.
Brick plaster allows you to reproduce an imitation of such masonry. The composition can be used in rooms decorated in grunge, boho, loft, and minimalist styles.
Plaster with imitation silk fabric helps to visually expand the size of the room. In addition to the special mixture, you will need a roller and a spray bottle. The applied plaster is smoothed with tools. As a result, a seamless coating is formed, which is optimal in baroque, classic, rococo, renaissance, art nouveau, and Provence style interiors.
Plaster with a travertine texture is used to imitate stone surfaces. The color range is natural: brown, golden and sandy tones. The coating is created from mixtures of 2 shades, applied in several layers. A texture is created on the formed plaster base. At the end of the work, the composition is coated with wax to improve aesthetics and reduce hygroscopicity characteristics.
Elastic plaster
Like standard polymer plasters, elastic compositions are made on the basis of synthetic acrylic resins, but have an increased proportion of them in the composition. An undoubted advantage is the high elasticity of the material, its ability to stretch during deformation, vibration, and displacement of the base.
Such plasters are ideal for new buildings and houses located in seismic zones.
Positive qualities are:
- moisture protection;
- strength;
- environmental friendliness;
- long service life;
- high adhesion to OSB;
- maintainability;
- ease of application, plasticity;
- ease of care.
Many elastic plasters attract dust and dirt, which is their undoubted disadvantage. In addition, the cost of materials is higher than that of mineral and standard polymer compositions.
Methods for plastering OSB boards outside the house
You can choose the option of how to plaster an OSB board from several finishing technologies:
- traditional method without insulation;
- with insulation;
- using plasterboard sheets.
Traditional way
When plastering without insulation, it is recommended to use a membrane material with high vapor permeability, a broaching mesh to reinforce the base, glue and a plaster composition in the finishing.
The work is carried out in stages:
- The membrane material is fixed to the surface using a stapler.
- Membranes can be replaced, if necessary, with craft paper, bitumen cardboard or roofing felt.
- The canvases are joined using an overlapping method of 10 cm using glue or double-sided tape.
- A reinforcing mesh is fixed on top.
- Then the adhesive base is applied in 2 layers to securely fix the reinforced mesh.
- After drying, the base is sanded, then a primer mixture is applied.
- For plastering, it is recommended to use elastic mixtures, because... These materials are less susceptible to cracking.
- It is important to treat the ends of the slabs for the durability of the finish.
Insulation and plastering outdoors
Insulating facades before plastering allows you to save more space indoors and apply the plaster mixture more reliably and more durablely. The recommended insulation option is sheet foam, which is glued to the panel.
After the adhesive base has dried, the material is fixed to the surface using dowels. Joints are formed between the foam blocks, which are filled with polyurethane foam. The remains of the frozen mass are cleaned off after drying. The next layer is to apply the adhesive solution to the mesh. Plastering is carried out after the glue has dried.
Using drywall
Plaster on the OSB board on the facade can be applied after fixing the drywall. GKL are used as additional insulation, leveling the base of the material. Together with the OSB panel, plasterboard will improve the sound insulation characteristics in the premises and prevent the risk of fire in the building. The materials are secured using self-tapping screws. Then putty and plaster are gradually applied to the base. Drywall is universal and suitable for finishing with different types of plasters.
Features of OSB boards
When plastering OSB walls, you need to remember that:
- sheets of compressed shavings are not vapor-permeable, moisture from the room will not be able to escape through them;
- but the ends of the slabs are open cuts of wood chips, where moisture can penetrate;
- Like any wood materials, OSB can be subject to deformation and shifts if it is weakly attached to the frame. Accordingly, cracks in the plaster are possible if the technology is not followed. There is practically no expansion due to temperature;
- these panels are divided into four levels of moisture resistance (OSB-1 and 2 are not moisture resistant);
- hold fasteners well;
- Can be coated with any wood paints or primers.
Features of plaster on OSB indoors and on the facade of the building
Plastering on OSB boards is carried out on facades and inside buildings. When performing work outside a building, it is important to choose days with calm, dry and warm weather. The site is covered with a canopy from the sun's rays and possible precipitation. The optimal air temperature range is +5…+35°C.
Working indoors is more comfortable; air humidity should not be higher than 65%; drafts are prohibited during wall finishing. It is not recommended to use fans and heating devices to speed up the drying of panels.
If these requirements are violated, cracks may appear after plastering. Electrical wiring in the room must be de-energized before starting work.
Insulation and plastering
If you don’t want to bother with a lot of layers, you still need to decorate the facade and you can use another finishing method. To do this, you will need to purchase polyurethane foam in sheets. Fix it securely to the base. It will perform the functions of thermal insulation.
To attach the insulation, you can use a special glue for external work. When choosing an adhesive composition, pay attention to whether it can be used for polyurethane foam.
A thin layer of plaster solution is applied to the insulation, and reinforcing fiberglass is laid on top of the wet layer and pressed in, leveling the applied solution. After this layer has dried, apply a little more solution in order to hide the places where the mesh may be visible.
After drying, you need to rub and paint the surface. For painting it is better to choose acrylic paint.
Step-by-step plastering technology
Plastering is carried out in stages:
- After installing the panels, the surface of the walls is checked.
- Stains are cleaned, rough spots are sanded.
- The areas can be finished off with a vacuum cleaner.
- The joints are coated with sealant.
- The seams are puttied and leveled.
- The wall is dried and coated with primer using a roller or brush.
- After drying, vapor barrier materials (roofing felt, membrane fabric, etc.) are applied to the soil and fixed using a stapler.
- A layer of adhesive base up to 3 mm thick is applied on top.
- Then a reinforcing fabric is applied, straightened, and pressed into the adhesive base.
- After 24 hours, a layer of adhesive mixture is re-applied on top of the mesh for leveling and dried.
- Then priming is performed using a product suitable in composition.
- After the primer has dried, finishing plastering work is carried out.
- The plaster is applied using the chosen method to form the optimal texture on the surface.
- The finish is dried, painted or covered with clear varnish.
Tools for work and applying plaster
In order to efficiently complete all assigned tasks, you need to prepare a list of materials and consumables in advance:
- container for mixing plaster (if it is a dry mixture for dilution with water);
- spatulas of different sizes;
- trowel, grater, grater;
- short-haired brush and roller;
- primer;
- glue;
- masking tape;
- sealant;
- stapler with staples;
- grinding machine;
- solvent;
- drill with mixer attachment;
- rags;
- construction level.
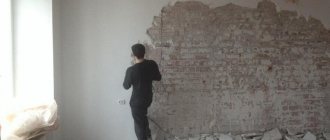
Preparing OSB for plaster
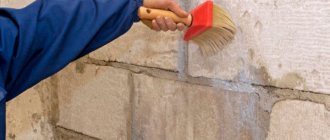
If a lot of time has passed after fixing the OSB, the surface of the boards may become covered with dust, dirt, and stains. The material must be thoroughly cleaned, otherwise adhesion to the plaster will be reduced. It is best to wipe the surface with white spirit or another solvent so as not to wet it with water. Indoors, you can clean the walls with a vacuum cleaner, and selectively wipe off stains with acetone.
Next, the joints between the plates are sealed with a sealant, choosing a composition with increased elasticity (acrylic or silicone). It is highly elastic compounds that will allow you to maintain expansion gaps on the sides. If there are unevenness, scars, or other defects on the slabs, they are removed using a grinding machine or sandpaper. Afterwards, acrylic primer is applied with a brush or roller in 2 layers with complete intermediate drying. Instead of such a primer, you can use a primer with fine quartz chips, which improves adhesion.
Attaching the insulation
To install insulation outside the premises, instead of polystyrene foam, you can use mineral wool. After attaching the roll insulation and gluing the reinforcing mesh, the base is primed and then plastered.
For interior work, polystyrene foam is used mainly, which is glued directly to a suitable adhesive composition in this way:
- The OSB surface is degreased and dirt is removed.
- The adhesive composition is applied with a spatula.
- The insulation is securely pressed to the glue.
- Wait for the glue to dry.
- The joints are reinforced with tape with a self-adhesive base.
Fastening the upholstery
This stage involves coating the joints between the sheets of insulation with sealant, as well as laying cardboard and kraft paper impregnated with bitumen and securing them with staples. For the purpose of additional insulation, these materials can be used as a supplement to traditional insulation or instead of it as a more economical option.
The final plaster layer is applied with spatulas of the required size. If decorative plaster is used, the surface is formed according to the selected effect. The dried layer is painted or varnished. Working with OSB boards is not difficult, but it requires care, adherence to technology and accuracy at every stage.
Safety precautions when performing plastering work
When plastering, it is important to comply with safety requirements:
- Work is carried out only in special clothing, a respirator, gloves, safety glasses, and a hat.
- Finishing is not done from the stairs, so you can use a table or cabinet. The scaffold must be placed firmly on the floor covering.
- If your health worsens during the procedure, it is recommended to stop plastering.
- Work is performed by persons over 18 years of age.
When deciding whether it is possible to plaster OSB in a room with open windows, experts recommend taking into account the characteristics of the finishing material. The composition applied to the walls must dry without drafts or temperature changes. Otherwise, it will quickly crack and lose its aesthetics.
Applying putty
Finishing OSB walls with putty is allowed only at positive temperatures and at air humidity of no more than 60%. If this rule is not followed, the plaster layer will subsequently quickly crack and fall off.
OSB walls are usually puttied in two layers. The material is applied to the slabs and carefully leveled horizontally. First use a spatula and then a rubber roller. Next, a little more putty is applied to the wall and leveled, this time in a vertical direction.
After all surfaces are finished, a second technological break is arranged. The drying time of the putty layer before painting or applying wallpaper depends on the type of composition used. But most often the final finishing of the walls begins no earlier than a day later.
Before painting or wallpapering, putty walls are cleaned with fine sandpaper. For this purpose, you can, of course, use the paper itself. But it’s better to purchase a special paint grater. This tool is inexpensive and can save a home craftsman a lot of effort.
Classification by purpose
Fine-dispersed facade finishing materials, depending on their purpose, can be represented by compositions of different size fractions and consistencies:
- starting putty, better known as a base or leveling mixture;
- the finishing version of a fine-grained putty with a relatively liquid consistency;
- a decorative version of putty that allows you to create textured decorative elements;
- wood putty used to level and protect wooden surfaces.
Depending on the intensity of exposure to external factors, not only the compositions, but also the technical characteristics of facade putty mixtures can vary. A high-quality putty must be vapor-permeable, moisture-resistant, frost-resistant and sufficiently elastic, which will allow the work to be completed by applying paint, decorative tiles, enamels, mosaics or other finishing materials.
Putties differ in composition and characteristics
The base and finishing mixture can be waterproof, frost-resistant and heat-resistant:
- mixtures with water-repellent qualities minimize the risk of condensation appearing on the surface, which can occur under the influence of rain and evaporation. This putty is distinguished by its simple and quick application, uniform distribution, and compatibility with other types of finishing materials;
- frost-resistant mixtures are used when sealing cracks or chips, and increase the resistance of the surface to low-temperature conditions;
- heat-resistant compounds combine excellent adhesive properties and have proven themselves when treating surfaces exposed to high temperatures.
Putties not only hide unevenness, but also perform protective functions for the facade
Using putty - photo
Upholstery
First of all, the joints between the sheets are coated with an elastic sealant, after which the surface is covered with kraft paper or bitumen cardboard, which is fixed with a stapler. Reinforcement in the form of a fiberglass or plastic mesh is glued onto the surface prepared in this way, after which the walls are ready for applying plaster mortar.
The undoubted advantage of this method is the cost-effectiveness of the process, however, the lack of insulation will negatively affect the thermal insulation characteristics of the building. This disadvantage can be partially compensated for by internal insulation.
Strengthening the structure
Sheathing the frame with OSB sheets photo
It is advisable to think about the choice of coating at the stage of forming the skin, in order to be able to prepare the surface as much as possible for future work
In this case, it is necessary to pay attention to the assembly of the supporting frame and/or sheathing, which will serve as the basis for installing OSB sheets
The frequency of arrangement of load-bearing elements must comply with construction regulations - reducing their number and increasing the distance between them is extremely undesirable.
The installation of the sheets themselves must also be carried out as reliably as possible in order to prevent strong mobility of the elements. The main enemy of a plastered surface is vibration and the moving structure of the base - when forming the cladding, it is necessary to smooth out these negative factors as much as possible.