Is it a good idea to cover the battery with plasterboard? Many people don’t even understand why to do this. Let's discuss this in detail. Old cast iron radiators and steel gas pipes, which are found in so many houses, can hardly be called works of art. Their presence can spoil any interior in the room. If you create a special box from plasterboard, you can hide the presence of heating pipes and unpleasant parts.
The main advantage of this process is that anyone can do it. You don't need to have special knowledge or be a repair professional. A small layer of drywall will completely hide the radiators. It's also very cheap. In this guide, we will look at not only the process of installing drywall, but also many interesting nuances on this topic.
Design options
Before actual work, we select the type of structure. Finishing can be:
- Hinged screen and cover. Better for a large, cast iron radiator. Suitable for structures with large dimensions.
- Hinged screen without cover. For cast iron batteries, as well as other types of structures.
- Flat screen. It is better for installation on a modern radiator, which will be located inside a niche.
- Attachment box. It hides the entire battery well, as well as all the mounting points.
Each design must be selected individually. Consider the variety of your batteries, only then make a decision.
How to choose drywall to cover batteries
Drywall comes in different sizes for sale. To select a material based on this parameter, measure the dimensions of the box. In terms of thickness, it is better to take wall gypsum plasterboard. It is thicker and stronger.
Drywall for different purposes differs in color
According to its intended purpose, plasterboard can be standard, moisture-resistant, fire-resistant and combined with fire and moisture protection. The more impregnations, the more expensive the material. Fire resistance is not important here. You can even save on moisture resistance by purchasing a standard gypsum board for covering a heating radiator. If the battery breaks, protective moisture-resistant impregnation will not save the drywall. On the other hand, when the radiator cools and heats up, there is a temperature difference in the niche, which can cause condensation to form. For this reason, moisture-resistant drywall is the best choice for sheathing.
Necessary tool
To mask a heating battery correctly, you need to acquire a lot of tools. All of them will help you speed up and facilitate installation. An option is to borrow tools from friends and neighbors rather than buy new ones if you do not have your own equipment of this type.
Required tools:
- Building level.
- Knife for metal.
- Drill, screwdriver.
- Pliers.
- Hammer.
- Dowels and screws.
- Pencil, rulers.
- Roulette.
Necessary tool
This is a standard set of tools; you need to acquire each one from the list, without exception.
Additional materials are also needed in the form of plasterboard sheets, a small amount of putty and U-shaped metal profiles. It is better to think through the layout of the entire structure in advance. It can be standing, as the option is popularly called, and visually looks like a special cabinet under the heating equipment. The second option - a hanging box that does not touch the floor, is possible with individual gas heating.
Drywall sheets
Putty and metal profiles
Be sure to inspect the batteries before installation. If the paint has peeled off, you need to erase the old layer and apply a new one. This is the preparation of material for a future plasterboard structure.
Battery
How to hide heating pipes in an apartment
Recently, it has become very fashionable to embody any interior style or its details in houses and apartments. Certain elements of classic or modern, for example, will also bring freshness and attractiveness to the apartment.
However, even just cosmetic repairs can be spoiled by the presence of pipes and radiators. Most people use old Soviet batteries, regularly tinting them, and no longer notice their presence. But a person from the outside clearly notices the risers and radiators framing the windows.
Not everyone undertakes to hide batteries and pipes. However, once you see the result, it will simply be impossible to continue living next to them.
How to hide a radiator and pipes
There are several options in this case:
- build a plasterboard box;
- apply a decorative screen;
- “drown” in the floor and wall;
- decorate the pipes.
DIY installation
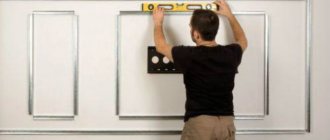
Do you want to sew up the battery and have already acquired everything you need for this process? Then what are you waiting for, let's get started. And it all starts with markings for the box. You need to measure the entire battery very accurately; the error can be a maximum of a millimeter. To speed up the process, you need to use a tape measure, a building level, a square ruler and a pencil.
The depth varies depending on the dimensions of the radiator. Speaking about the edges of the structure, you should retreat no more than 10 centimeters. If the window sill is too narrow, it must be dismantled. How do you know if there is not enough clearance? The minimum level between the battery and the window sill is three centimeters.
Types of plasterboard boxes
Before sewing up the gypsum board battery, you need to analyze its location on the wall and the specifics of the supply of heating pipes. The choice of box type depends on this. There are two types of cladding structure:
- When the battery is hung on a blank wall without a window, then the only correct option is to build a box. The design requires few materials, but is complex. Additionally, you will have to build small boxes along the entire wall to hide the heating pipes. It is more convenient to create a box if the heating radiator is hung on a blank wall without a window
- The space under the window sill, where the battery is hung, does not play a special role in the spaciousness of the room. It is easier to cover this area with a false wall. It can be decorated so that it will be completely invisible in the interior. When placing a heating radiator under a window, it is more profitable to build a false wall
Since most heating radiators are located under window sills, a false wall is most often chosen.
Let's look at drawing markings:
- You need to start by carefully drawing horizontal lines. We set a level along the structure and make marks on it. If the box is a standing model, then you need to draw three lines at once.
- Lines must also be drawn in a vertical position. To do this, take a carbon ruler, apply it to the lowest edges, then create a perpendicular. Using a level, the markings are the correct size.
- Now all the lines need to be connected. All this will happen above the structure itself, the horizontal part will unite all the lines.
Before you start sewing up the battery with drywall, you need to inspect the structure and make sure that the markings are in the shape of a square or rectangle. Each line corresponds to a plumb line. Keep in mind that the error cannot be corrected in the future, so everything needs to be inspected at this stage and corrected.
Installation diagram
Let's start creating the box
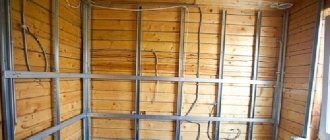
You already have an idea of what a box is; essentially it is a structure made of a metal frame covered with plasterboard. But even this matter has its own nuances.
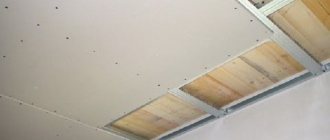
The first step is marking for the future pipe frame. Using a level, markings are made on the floor, wall or ceiling. Next, proceed to fastening the guide profile. Having drilled holes for the dowels and secured the guide profiles, install the jumpers. The recommended distance between jumpers is from 50 to 70 centimeters. The front edge, which is not adjacent to the walls, is mounted after the installation of the other two is completed.
Finished box after tiling
When creating a frame for pipes, remember the places where you need to ensure their exit. And in places where valves or meters are installed, provide space for a door or a removable part of the box. If the frame is made over noisy sewer pipes, special materials are used for sound insulation that reduce the noise level. Since such a box is not dismountable after installation, think in advance about access points for pipe repair.
Later the doors can also be made
less noticeable by covering them with the same material as the rest of the walls. From an aesthetic point of view it is very beautiful. The main thing is to make sure that the door can open and close easily.
In the future, a door will be installed in this place to facilitate monitoring of water meter readings
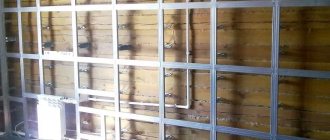
The next stage is the installation of drywall on the frame. The sheets are cut so that the frame consists not of pieces of plasterboard, but of solid sheets. Remember that the side edges of the box are sheathed first, since the front strip should also cover the side sheets. The sheets are secured with self-tapping screws every 25-30 cm. Screw in the screws so as to recess the caps into the sheet by a millimeter. This will hide them while puttying the surface.
Installing a box on the ceiling, the main thing is to attach the jumpers, which will ensure the strength of the structure. Using the same technology, you can decorate the space under the bathroom. You can carefully hide communications only with the box. Example of using plasterboard boxes in the living room
Example video:
Having secured all the sheets of drywall, we begin to putty and process the corners. The corners are formed using special perforated corners, which are attached to the starting putty. At the last stage, final puttying or preparation for laying tiles is carried out. At this point, we can assume that the process of creating your box has been successfully completed.
Sooner or later the moment comes when it is necessary to make repairs in your apartment or office. I want a beautiful and stylish design of the room, regardless of its purpose and price factors.
Therefore, in such a situation, the most pressing question arises, requiring a prompt solution: how to make a box from plasterboard with your own hands.
GCR box for pipes in the bathroom
Installing the frame
To disguise the heating battery, you need to create a special metal frame. To do this we need several metal profiles, dowels and screws. The structure is held together and is reliable. Then we will use scissors, a hammer drill, a screwdriver and pliers. First, we cut and secure the main parts of the structure, then they need to be installed in the wall:
- Using the U-shaped profile, press it tightly against the wall.
- Use a screwdriver to create a small mark.
- You need to create several holes for future fasteners.
- Then a dowel is inserted there.
- We press the profile in the right places.
- We screw in the screws, securely and firmly.
Each hole in the profile must be at least 15 centimeters apart from each other, the maximum distance is 25 centimeters. The markings are created in advance so as not to cause trouble during installation. All guides are mounted on the wall. Where there are corner joints you need to use metal scissors. Now it remains to form the final depth of the box.
Technology for assembling gypsum plasterboard structures - step-by-step instructions
The general technology for assembling frames consists of three main stages of work:
- Creating a frame.
- Sheathing the frame on the outside with plasterboard.
- Finishing the surface of the box.
Let's look at these stages in more detail.
Frame making
The pipe box consists of two mutually perpendicular planes, attached to the wall and the floor (for horizontal distribution) or to two adjacent walls (for a vertical riser). Therefore, the frame is also made of two gratings perpendicular to each other, fixed to the corresponding surfaces of the walls or floor. The order of assembling the frame is determined by the configuration of the room and the location of the pipelines.
First, you need to attach the main guides to the load-bearing surfaces of the walls or floor, to which the rack elements will be attached, connected by an edge from another main profile. They are connected using special self-tapping screws; at the joint areas, the side shelves are cut with metal scissors and bent to connect the elements more tightly. If wooden blocks are used, first assemble two gratings, which are then attached to the wall on one side and to the floor on the other (or an adjacent wall if you need to cover the riser).
Wooden frame for the box
Step by step procedure:
Step 1. Surfaces are freed from foreign objects (hooks, hangers, mirrors, etc.).
Step 2. The frame is carefully marked. The position of all lines is controlled by a building level or plumb line. The distance to the edge of the frame is determined by the area where the pipes protrude further from the walls, plus 5 cm for the width of the guides or wooden blocks.
We make markings
Step 3. Using an electric drill or hammer drill, prepare sockets for installing dowels. The installation step of fasteners is determined by the size and location of the box, but not less than 0.7 m.
Making holes for dowels
Step 4. Cuts are made on the side walls of the metal main guides where the crossbars are attached.
Step 5. The main guides are installed on the walls and fixed with self-tapping screws.
Fixing the guides
Step 6. Install pre-cut cross members.
Step 7. Both sides of the lattice are connected with an external rib from the main profile, in which cuts have been made in advance for attaching the crossbars.
Metal frame for vertical pipes
Installation must be done as firmly and accurately as possible. It must be taken into account that any mistake made when assembling the frame will subsequently affect the appearance of the box. Distortions will become noticeable when laying tiles or wall panels that have clear geometric shapes.
Self-tapping screws for metal with a drill tip
Drywall installation
After completing the assembly of the frame, they begin to cover it with plasterboard. First of all, you need to cut pieces of material corresponding to the sides of the box. It should be noted that the first will exactly repeat the shape of the frame, and the width of the other will increase by the thickness of the sheet. It is best to cut off and immediately attach one of the pieces (either horizontal or the one without inspection hatches) so that the size of the second piece can be measured without errors.
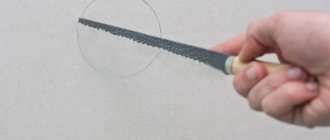
To cut drywall, use a hand saw with fine teeth and a slight spread, a jigsaw, and sometimes a regular stationery knife. They cut the sheet along a ruler, break it along the smooth edge of the table and finally cut it off along the fault line.
Cutting drywall with a utility knife
The resulting edge is rarely perfectly smooth, so it is additionally processed with a plane or a special grater. During cutting and processing, a large amount of gypsum dust is raised, so you should work with safety glasses and a respirator. In addition, you cannot work in rooms where computers are installed - fine gypsum dust has a fatal effect on fans, completely depriving them of their functionality and jamming the bearings.
The material is fastened to the frame using phosphated plasterboard screws. They are black with a fine thread pitch. You can also use ordinary wood screws, but you need to be more careful at the final stage - they have a larger thread pitch, so the head may go too deep into the surface of the gypsum board. It is recommended to make the distance between adjacent fasteners in the range of 10-15 cm.
Self-tapping screws for drywall
A socket for installing an inspection hatch or a window for taking meter readings is cut in place. First, mark the surface and drill holes in the corners. Then a hole is cut out of them according to the markings, the dimensions of which correspond to the size of the hatch frame.
Creating the depth of the box
Our actions:
- We cut several profile pieces of the required size.
- Where the edges of the bends need to make small cuts of five centimeters.
- The middle bends downwards of the structure.
- Cut off each side.
- The fragments must be attached to the edge of the vertical guide at a right angle.
- Each element is connected to a long profile.
To sew up heating radiators correctly, you need to regulate the quality of all processes carried out. The structure should not wobble. Each screw must be tightened carefully, using caution. The profile is easily damaged, keep this in mind. In this case, the fasteners must fit tightly and securely. Inside the frame you need to leave a “window” for the screen, which guarantees the flow of heat in the future.
Battery screen
This option is the simplest and most popular. Screens can have different appearances. Often there are structures made of metal. There are two types:
- Hangable. They are simply placed on the battery without any additional fastening. Therefore, with any contact they can fall.
- Built-in. They are inserted into specially prepared boxes made of wood or plasterboard. A very convenient option. In addition to those made of metal, there are plastic, wooden and HDF (high-density fiberboard).
Which option to choose depends on your specific situation.
The last stage is installation of drywall
The main processes are completed, the easiest part remains. You need to start directly installing drywall on the old battery.
- We cut out several plasterboard sheets and attach them to the previously created profile.
- Then we mark on each marking sheet.
- Using a utility knife, cut out the necessary elements of the box.
- We lean the parts against the main structure and secure them with screws.
Remember that the material itself is quite fragile. To ensure its integrity, use a sharp knife. For one meter of drywall you need 4 self-tapping screws. Do not forget about the heat that the room will receive through a special hole. The maximum diameter of each is no more than five centimeters. It is possible to simply install a ventilation grill, this is a more beautiful option.
Step-by-step installation instructions
Preparing the base
To build a structure, the foundation must be properly prepared. The old coating is cleaned from the surface, dirt and dust are removed, and primed.
If the wall on which the battery is located has significant unevenness, then it should be made smooth using gypsum plaster. Then it is advisable to putty the surface, since it will be impossible to do this after the construction of the structure.
Markings and drawings
If you plan to make a floating box to disguise the battery, then:
We measure the required distance from the bottom of the radiator and draw a straight line along the level - the bottom of the box. Draw the side lines using a construction corner
It is important not to forget about the 15 centimeters that should be between the edge of the batteries and the beginning of the structure. We connect the upper edges of the perpendicular lines by level. We inspect all straight lines according to the level. If a box standing on the floor is mounted, then the markings begin from the top edge of the battery, and perpendicular lines are drawn from top to bottom
You can see how to do this in the photo
If a box standing on the floor is installed, the markings begin from the top edge of the battery, and perpendicular lines are drawn from top to bottom. You can see how to do this in the photo.
In addition, the box is marked on the floor so that the end of the box on the front side protrudes 15 cm relative to the radiator.
Example of a screen frame drawing
In some apartments, heating radiators are installed in niches that developers provide under the windows. In this situation, only the second method of constructing a box is suitable.
Friends, good day. I decided to cover the radiator in the kitchen with plasterboard. The kitchen area is quite large, allowing you to implement the idea without much damage to the space. And the presence of individual gas heating in the apartment and not too severe winters make it possible to lose some of the heat from the battery without compromising the overall temperature in the apartment. To begin with, I dismantled the old window sill and began to build a frame around the battery from ceiling metal profiles.
For rigidity, I additionally strengthened the long horizontal crossbars.
After assembling the frame, I installed the window sill, covered the frame with plasterboard and began to putty the structure.
After filling and cleaning, I painted the box along with the walls with water-based paint in two layers. That's what came out of it.
After that, I installed the decorative grille.
For normal heat exchange of the battery, I made holes in the window sill and installed ventilation grilles.
- Advantages
- Preparatory work
- Marking for the box
- Frame making
- Sheathing with plasterboard sheets
- Finishing features
The battery box is an excellent solution for disguising the heating device. This is especially true if the appearance of the radiator leaves much to be desired and disrupts the harmony of the interior. A home-made battery box can be adapted to match the color of the furniture, simply painted, covered with wallpaper, decorated with decorative stone or tiles. Today we will tell you how to make it using plasterboard sheets and metal profiles.
Making the box more beautiful
Finishing the box - the process is not included in the installation, but is integral.
- It all starts with a little processing of each joint between sheets of material. Everything needs to be sealed well so that the surface is smooth and prepared. We start by placing a serpyanka mesh over each joint, then the surface needs to be puttied.
- It is necessary to treat all places, even those in which fasteners are installed.
- If you need to make the corners stronger and each line clear, then you should apply drywall to the perforated corners.
- The entire box needs to be puttyed, and then allowed to dry and leveled.
- At the very end, the sanding process is performed with fine-grained sandpaper.
Grouting joints
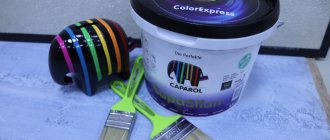
When the finishing is finished, you can decorate the box. This may include color changes and other decorative processes.
Making a box for batteries in the kitchen starts with a frame
Let's mark the frame of the box on the walls and floor. Using the markings, we will fix the PNP profile 27×28. We lay a special soundproofing tape of the Dichtungsband type between the profile and the wall or floor.
To fasten the profile we use a hammer drill. We drill holes simultaneously in the profile and the wall, holding the profile with the second hand. The dowel profile is fastened with nails (type K dowel) or 6×40 dowels with screws. The fastening step is arbitrary, the main thing is that the profiles are firmly held on the wall and floor.
The frame of the box itself is made from PS profile 60×27. It fits perfectly into the 27x28 PNP profile. All rack profiles are set to the building level. We connect the profiles with metal-to-metal screws (LN type) with a length of 9 mm.
We make the angle of the frame as in the photo. For the corner, you can use PNP or PS profiles.
For air movement we plan two holes in the battery area. We mount PS rack profiles along the edges of future holes. We connect these rack profiles with jumpers from the same PS profile. To connect the profiles we use the connection as in the photo.
The finished frame of the box should be strong, should not wobble, and you should calmly lean on it without the danger of destroying it.
Advantages and disadvantages
The main advantages are:
- Completely environmentally friendly material. There are no harmful or dangerous emissions into the air, the material itself does not burn.
- Assortment on the market.
- This is a cheap and economical method.
- Easy installation that does not require rare tools or specific knowledge.
- Everyone can use their imagination and mount the structure the way they see it in their head.
Main disadvantages:
- The material is fragile and can crumble easily, which makes it necessary to work with it very carefully and carefully.
- The drywall needs to be finished additionally; prepare a spatula and other tools.
- The material should not be installed in the bathroom or other rooms with high humidity. Drywall absorbs water and begins to warp.
- We do not recommend storing such material; it can become deformed if left in a vertical position for a long time.
Types of boxes for radiators
MDF grille under the window sill
First of all, boxes are divided according to the type of construction. The following options are available:
- Flat box - an example of such a product is shown in the photo above. This is not so much a box as a decorative panel that can be made of different materials. It is installed on a window left in an installation assembled from plasterboard, MDF, wooden paneling and other materials of a similar type.
Advice! The size of the grille is selected so that it is slightly wider than the radiator itself, along the edges of which input and output connections are made and taps are installed. That is, in this way we create access to these technical nodes.
- Oddly enough, the installation of such a box is the most difficult, since it also includes assembling the installation. We will talk about this in detail in the second part of the article - we will provide step-by-step instructions, analyze the intricacies of installation and give useful tips. The only exceptions are situations when the battery is initially installed in a wall niche, for example, under a windowsill.
Closed wooden box
- The other option is called closed . Depending on how the radiator is connected, it may include side parts, have holes in them for pipes, or be completely devoid of them.
- Such boxes are sold as one-piece products. There are a huge number of them on the market - the options differ in shape and design, so choosing the best box for a specific interior is not difficult.
Closed hanging box
- The dimensions and shape of the products will also differ from model to model. The same applies to the principle of fastening such a box. The photo above shows a compact hanging type option. Its front panel can be carefully removed, which will allow you to get to both the battery itself and the mounting system that holds the entire product on the wall - very convenient and practical.
- Floor boxes are also attached to walls using mechanical fasteners, but they have additional support, which makes the installation process somewhat easier. They look more massive and solid, and if hanging options are better suited for typical rooms, which are found in our apartments, then these will fit perfectly into the interior of a house with high ceilings and spacious rooms. This is also facilitated by the fact that water pipes often approach the radiator from the floor, or come directly out of the walls where they are installed. That is, the box will completely hide all communications.
- In apartment buildings where risers enter the rooms, this will not work, so you have to choose the most accurate option.
Different access systems for heating radiators
Each type of box has its own way of accessing the batteries. This point should also be taken into account before installation. The options may be as follows:
- As mentioned earlier, radiator grilles are placed in holes in installations, or cover niches in the walls. Depending on the shape of the product, its fastening will also differ. Plastic options have a mounting base and a decorative trim around the perimeter of the grille. This allows them to be inserted into a hole of a certain size and shape without using any fasteners. When needed, they simply pull out, revealing the radiator.
- The photo above (left photo) shows the hinged opening model. Such a grille will cost a little more due to its complicated design, but it is much more convenient to use than other overlays. Stoppers that can be removed prevent the door from opening completely. If technical work is necessary, the door can be removed completely.
The panel is glued to the installation
- Models made of wood and MDF are for the most part constructed as a regular overlay, which does not have any mounting devices. They are placed on glue. This installation option is very simple to perform, but later it results in certain difficulties. Imagine that you need to turn off a tap. You rip the grille off (it's quite possible to damage the wall finish in the process), do what needs to be done, and want to reattach it. But not everything is so simple, since there is old dried glue on the back of the product and on the installation itself, which will not allow the parts to fit tightly together.
- As a result, these residues will need to be cleaned off, which takes a long time and sometimes is completely impossible. Therefore, we consider the built-in option to be more preferable.
Double-sided folding grille
- If we talk about closed boxes, then there are a lot of options for accessing batteries. Moreover, such products can be completely removed in the shortest possible time and then returned back, which will give complete freedom to the craftsmen who repair the heating system.
- The photo above shows the folding model. Not the most successful solution, in our opinion, since the gratings that make up the front side will dangle and sway without additional fastenings.
All the beauty is spoiled by the pipes going to the heating riser
Prices for radiator grilles
Radiator grille
Manufacturing materials
Radiator boxes are made from different materials. Let's look at the advantages and disadvantages of the most popular solutions:
Quite a rough metal box
- Metal – looking at the photo, many have probably already winced, because the solution is not very attractive in appearance. And why cover a metal battery with the same metal box? It doesn't add beauty! The fact is that the function of the box is not only to decorate the room. It is also installed for protection - some radiators are so hot that you can actually get burned on them. But such a box will save you from troubles. In addition, it has high thermal conductivity, which reduces heat loss and promotes a more uniform distribution of heat in the room. It is very durable and, unlike the same wicker options, will not be damaged in any way by an accidental blow. The boxes are not afraid of changes in temperature and humidity, they last a long time and are inexpensive when compared with closed wooden models.
Natural wood is always in price
- Wood , unlike the previous option, looks noble and can be matched to any interior style. The buyer always has a choice according to the type of wood, which will change the natural pattern of the material and its performance characteristics, according to the type of processing - it is varnished, brushed, painted, coated with oils, and so on. Moreover, if the material has gone through all stages of processing, it tolerates temperature changes well. It is environmentally friendly and safe for humans, does not cause allergic reactions and is pleasant to tactile contact.
- Disadvantages include the high price and intolerance to high humidity, although this does not apply to all breeds. For example, larch doesn’t care about moisture; you can even put it in water for a long time - it will only become stronger from this. Another disadvantage is reduced thermal conductivity, which is why it is so important that the product design includes properly positioned convection holes. Their size also matters, so we give preference to larger ones.
Milled MDF grille
- The next group of popular materials are MDF, fiberboard and plasterboard . We combined them together for the reason that they are perfect for milling. An example of such a lattice is shown in the photo above. Its essence is that various figures are cut into a solid panel, which can be of absolutely different complexity, ranging from simple holes to complex filigree patterns of any format.
- Milled panels look very beautiful and, due to their pattern, can be suitable for one or another type of interior. If we talk about thermal conductivity, it is also quite low, but due to the large number of holes, the flow of warm air from the radiator passes almost unhindered.
- These materials and some of their properties are also combined. For all three, exposure to moisture is not advisable. Together with temperature changes, such conditions can lead to rapid deterioration of the boxes.
Video - Drywall battery boxes
Prices for drywall and sheet materials
Drywall and sheet materials
Plastic radiator grille
- Here is the most budget-friendly option for a radiator grille. It is a set of inclined slats mounted on a frame . We wrote more about the design above.
- Plastic also transfers heat poorly, so when installing, you need to be prepared for a decrease in battery efficiency. However, they can be safely used in rooms where other models could be damaged by water and steam. These are bathrooms and stuff.
Glass panel for radiator
- And the last, so to speak, exotic option is glass . Such boxes look very impressive and fit stylistically into many modern interiors. They have good thermal conductivity (better than wood), but from a practicality point of view they clearly do not meet safety standards. Glass is a fragile and unreliable material and can be broken by accident. There are no convection holes in it, as this will further reduce the strength of such protection, so air can only circulate through the openings at the top and bottom of the panel.
It's up to you to decide which box to buy. We have given you the information, and you can decide for yourself what happens next. Therefore, without delaying any more, let’s move on to assembling and installing the box under the radiator.
Find similar information about making a plasterboard box in our special article! All about the types of drywall, the advantages and disadvantages of the protective box, components for drywall. Step-by-step instructions for making a frame!
How to keep warm?
There are several simple methods that can solve this problem. The first concerns a special heat reflector screen. It is mounted behind the battery itself and has a foil color, glitters and shimmers.
Heat reflective screen
As it heats up, it reflects heat into the room, a negligible percentage. Sintepon, which is covered with aluminum inserts on both sides, is a version of a homemade reflector. You will receive enough warmth even in the harshest winters. Another option is aluminum foam, it does not bend at all.
Aluminum foam
Also remember that screens should not have very small holes, the holes should be medium sized. This guarantees a normal amount of heat in the room. But don’t overdo it; you shouldn’t make them more than five centimeters in diameter. Holes must be made on the front side and on top of the entire structure. This ensures heat distribution throughout the room.
Features of the material and advantages of use
Radiators provide heat transfer from hot water to the air inside the room using two technologies: infrared radiation reaching objects located in the room and convection heat transfer from the hot wall of the heater. Hot air rises to the ceiling and expels cold air masses, thanks to the natural circulation of the layers in the room, until the temperature becomes equal throughout the volume.
First, before covering radiators and pipes with plasterboard, you need to realize that all decorative and protective structures reduce the thermal power of the heater. The larger the area of such a surface, the worse the room will heat up. Based on the greatest heat transfer from the radiator, the ideal option for these purposes is a mesh design with large holes.
In addition, the protection must be designed in such a way that full access to the battery and pipes is possible. This is necessary if the system begins to leak or needs to be serviced. Therefore, it is preferable to use a removable screen.
Features of decorative designs for different types of batteries:
- The convector type works quite efficiently only if there is free access to air flows to the devices and there are no obstacles to the further movement of air to the ceiling. Blocking air jets will not allow the heater to operate efficiently; specific fuel consumption will increase along with the cost of such heat supply. In connection with this, it is necessary to make enough holes in the plasterboard protective structure along the direction of air movement.
- Cast iron batteries have the ability to emit heat in the infrared spectrum. The presence of a solid fence that does not conduct heat into the room is unacceptable. Actually, because of this circumstance, it is necessary to form only the main body part of the structure from plasterboard. An orthogonal cutout is made in front of the radiator. Mesh iron or plastic screens are installed in it.
Failure in the heating system. Snowmelt or rainwater accidentally falling on the windowsill or ordinary water spilled during cleaning will be destructive for drywall. Therefore, for the production of such cladding it is necessary to use water-resistant materials.
Some simple solutions to close the battery
- plasterboard 12 mm thick;
- profiles of two dimensions: 60x27 and 27x28;
- serpyanka;
- perforated corners;
- fasteners: screws for metal and drywall, dowels 6x40;
- putty.
- Drill a large number of smaller holes. A diameter of less than a centimeter is unprofitable: heat will pass through with difficulty, and the holes themselves will quickly become clogged with dust and will need to be cleaned.
- Make some kind of windows in the box and insert plastic ventilation grilles into them, such as are used in the bathroom and kitchen.
- GCR is cut to exact dimensions. To do this, use a stationery knife.
- The elements are screwed onto the profiles with self-tapping screws with a frequency of 3-4 pieces per linear meter. The caps need to be recessed by 1 millimeter so that they become flush with the sheet, but do not tear the cardboard covering.
difference between the lining of a box and, say, a niche: in order to cover the battery with plasterboard, but not lose the overwhelming amount of heat it generates, ventilation holes must be drilled in the sheets. They can be done with a drill with a crown attachment. The recommended hole diameter is 5 cm, but such holes may not look very attractive. As an alternative, you can choose one of two directions: Anyone who is planning to make a battery box with their own hands should first of all pay attention to the window sill above it.
It can cover the entire structure from above, or even protrude slightly beyond its edges. This is required not only by the aesthetic side of the matter, but also by the practical one: the box sticking out from under the window sill will constantly be touched by household items, and therefore the service life of the structure will be reduced. To implement the idea we will need: In fact, there is a way out!
It is necessary to make a box from plasterboard , which will close the entire problem area from the floor to the window sill from view. This solution to the problem has a huge advantage. In the end, it will be very beautiful, including thanks to the presence of an overhead grille, which I recommend matching to the color of the furniture.
- hammer drill with 6 mm drill
- screwdriver
- metal scissors
- straight level
- tape measure and pencil
- stationery knife with replaceable blades
- stapler
The radiator, which some are not shy about comparing to a log in the eye, performs a vital function
, and we must not forget about it, because it is impossible to survive a harsh winter without proper heating. That is why all attempts to decorate a radiator should not go beyond the bounds of common sense. It should be noted that the last point is the most popular at the moment. At the same time, it cannot be considered the most ideal. The fact is that creating a solid box is a rather controversial decision.
After all, in case of any breakdown or leakage, you will have to disassemble it completely, which is very inconvenient.
Fastening drywall
The cladding of the gypsum board frame begins with the rear wall of the niche, if required, because often its role is played by a flat base surface. First, the recess is lined, and then the drywall is installed on the front surface. There are a few things to consider:
- If you plan to place sockets or spotlights in a niche, then holes for them in the drywall are cut in advance.
- Bevels are made at an angle of 45˚ in all places where individual plasterboard fragments will be joined.
- Sheathing elements forming right angles are installed so that the plane of one covers the end of the other.
- Fragments from gypsum plasterboard are mounted in increments of 20–25 cm. The fastening points on adjacent pieces are shifted relative to each other.
- To bend drywall, for example for a niche in the shape of an arch, proceed as follows: the surface of the element is moistened with water and rolled with a roller with needles. Another option: a series of parallel cuts are made on the fragment, forming the desired bend. The smaller the radius, the more frequent the cuts. Only cut through the cardboard layer on one side of the element.
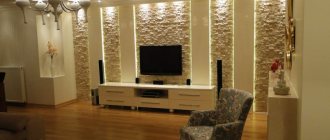
USEFUL INFORMATION: How to fix a TV on a plasterboard wall
Conclusion
In the new interior, old heating radiators do not look aesthetically pleasing, so to disguise them, special decorative screens and grilles were developed, which are made from different materials. In addition, you can close the batteries using plasterboard sheets installed on a metal frame.
In any of these cases, care must be taken to ensure free access to circulating air heating devices, as well as their quick dismantling in the event of an accident. The video in the article will help you find additional information on this topic.