If there is an old but working refrigerator in the kitchen, its owner is faced with a difficult situation. It happens that old household appliances do not match the new interior. You should not throw away a time-tested “unit”. You can paint your refrigerator at home with special paint. If necessary, household appliances are updated both outside and inside.
Is it possible to paint a refrigerator at home?
Often an old, but still fully functional refrigeration unit spoils the entire interior. Taking into account the level of income in our country, it is safe to say that not everyone can afford to purchase new household appliances. In this case, you can get out of the situation by painting the equipment in the desired color. You just need to understand how to repaint a refrigerator and what paint to use.
The simplest way to update a refrigerator to the Loft style
Painting is a simple job; to perform it, a home craftsman does not require any special skills or abilities. The main condition is to choose the right color and paint composition and be careful in your work. Let's try to figure out what kind of paint can be used to paint the outside of the refrigerator.
An excellent upgrade to old-style refrigeration equipment. This refrigerator will add charm to any interior.
Why paint a refrigerator?
In order for the interior to look attractive and tidy, all furniture and appliances must be kept in order. The reasons for restoration may be:
- Updating equipment when changing interior design. Sometimes old units work, but outwardly they do not look so presentable and do not fit into the new interior;
- Violations of enamel layers. Damage in the form of scratches, cracks, chips, rust stains and abrasions is difficult to ignore. New devices are quite expensive, and it makes sense to get rid of working equipment if it can be updated;
- Restoring an old unit is a great field for realizing the fantasies of creative people. An ordinary refrigerator looks inconspicuous, but a painted device will bring new fashion trends into the room.
Many people are concerned about the question of whether it is possible to paint a refrigerator. Experts say this procedure is possible. The main thing is to choose the right coloring composition and become familiar with the features of this procedure.
How to paint the outside of a refrigerator: choosing paint composition and tools
The first thing that needs to be decided is how the coloring composition will be applied to the surface. There are two options here - brush and roller or spray. Both have their positive and negative sides. We will dwell on this issue in more detail.
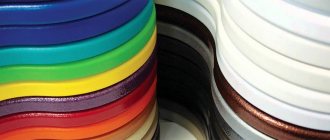
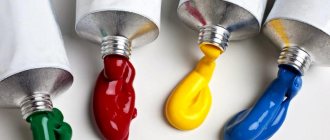
Once the choice of application method has been made, you can proceed to the choice of paint. There can be three options here - enamel, epoxy or acrylic paint. It is on this issue that we will now dwell in more detail.
Refrigerator exterior paints applied by brush and roller
All three types of paints used can be applied with a brush and roller, but there is a certain difference between them:
- enamel paint. It is with these compositions that the surface is painted in production, which means this will be the best option. The enamel has good adhesion, and the surface after painting acquires an even gloss that is pleasing to the eye. The only drawback is the presence of highly toxic solvents in the composition. Therefore, it is worth taking care of good ventilation or (if possible) performing work in an open space;
- epoxy composition . After application it looks identical to enamel. It has the same characteristics, however, it is significantly inferior to the previous version both in price (such pigments are much more expensive) and in ease of application (epoxy compounds are very difficult to work with);
- acrylic _ Despite the fact that this composition is inferior in characteristics to enamel, it is quite suitable for surfaces used indoors. In addition, the cost of painting will be significantly lower.
How can you paint a refrigerator without using a brush?
Today on store shelves you can find many aerosol paints that do not require the use of a roller or brush. Automotive pigments in cans are perfect for painting a refrigerator; their characteristics are not inferior to conventional enamels. Their use will significantly speed up and facilitate the process. However, the cost of such compositions is slightly higher.
Painting surfaces with a brush or roller is more difficult, but the work can be done more accurately without staining the floors or walls. It is better to use aerosol paints if you can take the refrigerator out into the open. The advantage of aerosol formulations is that the coating is thin and even.
There are aerosol enamels designed specifically for household appliances, but their cost is higher
How to decorate an updated refrigerator
When using coloring compositions with magnetic shavings, you can write on the surface with crayons. If plain coloring seems boring to you, decorate the surface with simple geometric lines or shapes. Use masking tape in areas of color transitions.
A simple way to decorate a refrigerator is with regular “self-adhesive” film. It is sold in the form of ready-made graphics, plots, figurines of birds, animals and flowers. Vinyl stickers, which are available in all hardware stores, will also work. The main thing is to choose a sticker of the appropriate size and color. As for working with film, it needs to be glued carefully so that there are no creases, irregularities or “bubbles” in the picture.
If you are familiar with the airbrush technique, apply any pattern to the surface using dot spraying. This technique is often used to paint cars. It is possible that the painting process may seem monotonous and tedious - for example, when the surface of a refrigerator requires the application of two or even three layers. For variety and originality, use the decoupage technique. This is an applique in the form of an expressive acrylic drawing. In such drawings, small elements are carefully drawn, and the strokes look lively and bright. Thick paper coated with varnish is used as a material for decoupage. It is sold in art supply stores and is often called a “decoupage card.”
The following are also suitable applications:
- napkins folded in several layers;
- pictures cut out from a magazine;
- illustrations drawn by yourself;
- printouts from the Internet made on a color printer.
How to choose a coloring composition: editorial recommendations
The choice of pigment will depend on the result that the home craftsman wants to achieve. If the kitchen design is made in bright colors and something exclusive and unusual is required, then the only right solution is to use acrylic compositions. Moreover, they are completely harmless.
If there are traces of rust on the surface, zinc compounds should be used. They are much more expensive, but they perfectly stop the corrosion process and prevent it from spreading. An interesting option is to use luminescent paint. Such a refrigerator cannot exactly be called an ordinary one - the surface will accumulate light, and in the dark it will glow slightly, giving away what it accumulated during the day.
What paint should I use?
Before you go to the store, decide on your main task:
- Make the surface of the refrigerator smooth and uniform by simply updating it.
- Change the appearance of the outside so that the appliances blend in with the finish.
- Turn an old refrigerator into a designer piece of furniture.
Look at a selection of ideas on how to easily and simply update your interior without investment.
The photo shows a combination of a repainted pink refrigerator and a blue kitchen
The choice of coloring composition depends on the chosen task. There are 4 main options that have good adhesion to smooth surfaces.
How to paint an old refrigerator with your own hands: stages of work
Before you paint your refrigerator at home, you need to prepare the surface. Otherwise, the paint will begin to peel off after a short period of time. We also decide how the painting will be done. Let's consider the algorithm for producing work step by step from the first to the last step.
Refrigerator painted in a color to match the interior. You can't buy this in a store
Tools and materials needed for painting
It is better to approach the choice of tools, and paints in particular, wisely. After all, not every enamel, especially an old refrigerator, can withstand painting well.
To work you will need:
- solvent for degreasing the surface;
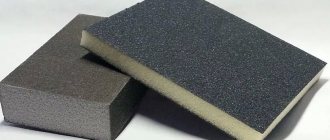
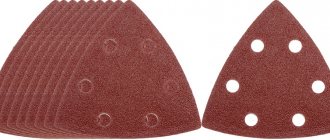
- sandpaper;
- masking tape, which is used to cover non-paintable surfaces;
- roller, brush (if this option is selected);
- dye;
- clean dry rags;
- film or paper to protect the floor covering if work is carried out indoors.
Having prepared everything you need, you can begin work.
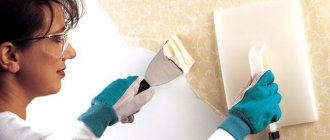
How to prepare the surface of a refrigerator for painting at home
To begin, lay newspaper or film around to protect the floor covering. Next, use sandpaper to remove the paint in places where it is peeling off. If there are corrosion spots, they also need to be cleaned. Then we pass sandpaper over the entire surface, removing the gloss. The entire area of the refrigeration unit should be matte - this will ensure good adhesion. We wipe the refrigerator with a dry cloth, and then with a cloth moistened with solvent, degreasing the surface. We seal all non-paintable surfaces with masking tape. After the preparation has been completed, you can proceed directly to coloring.
How to update the outside of a refrigerator: painting methods
When choosing a method of painting a surface with a roller or brush, you should understand that the work will be more complex. If there is excess paint on the brush, smudges may form, which is unacceptable for the refrigerator - this will ruin the appearance even more than it was before painting. The paint is taken with a brush in small quantities; there is no need to rush. The resulting smudge can be removed with a sponge, after which you can paint the area again using a smaller amount of coloring composition.
Such an update will clearly not be beneficial - the unit probably looked better before painting
If you choose the option of painting with an aerosol can, but there is no way to take the refrigerator out into the open space, you should take care to protect not only the floor covering, but also the walls. Ventilation is very important - the room should be well ventilated.
Despite the fact that the paint from the can is applied in an even and thin layer, if it lingers in one place, smudges can also form. Spray the paint from the can evenly, without lingering in certain areas. It is better to paint the surface a little later with a second layer. Automotive nitro paint dries very quickly. Photos of self-painted refrigerators can be seen below. Perhaps some of the ideas you use to decorate and paint your equipment.
Choosing paint for painting a refrigerator
You need to figure out what paint and varnish materials are needed to paint a refrigeration unit at home. Here it is appropriate to evaluate the requirements of manufacturers of household appliances:
- the paint layer should be evenly maintained on long vertical walls;
- The user should be able to add the desired shades of colors to the composition and change the saturation;
- the coefficient of thermal expansion of the paint must correspond to similar characteristics of the metal on which it is located. It should be remembered that the difference between temperature values in different parts of the parts can reach tens of degrees;
- the composition of coloring materials requires additives that retain elasticity after polymerization;
- the painted surface will be washed quite often using detergents. Resistance to mechanical stress, as well as to alkalis and acids, should be quite high.
Based on the stated requirements, the following has been established: waterproof paint is needed to paint the metal surfaces of the refrigerator outside.
Attention! In modern household appliances, there is a tendency to replace metal with plastic. Therefore, you will have to paint the plastic elements. Here, the conditions of adhesive bonding may differ markedly.
Since the mid-seventies of the last century, when creating household appliances, metal was present on the outside, and the inside surfaces were made of polypropylene or polyethylene. The interior trim parts were not painted; pigments were present in the plastics, giving the desired colors and shades. Restoring color or applying a new one to the inside of the refrigerator is possible using paints that form reliable adhesion to plastic materials.
Types of paints for the refrigerator
To obtain a durable layer, compositions containing zinc are used. When applied to a steel surface, zinc paint not only sticks, forming adhesive connections between dissimilar materials. Two metals form an ionic bond. It's much stronger. It will be much more difficult to remove such a composition.
Alkyd enamels are created on the basis of organic solvents. The resulting paint layer is large (0.05...0.15 mm). The film has excellent glossy properties. The adhesion to metal is quite intense. A uniform thin layer is easily formed.
Organosilicon paints have a complex composition. They are able to withstand sudden temperature changes. The paint coating retains high elasticity down to –18…25 °C.
Nitrocellulose dyes have a high drying rate. A layer with a relatively small thickness (0.02...0.04 mm) is formed. Acetone or a mixture marked No. 646 is used as a solvent.
Attention! Resistance to mechanical damage is low.
Dyes based on epoxy resin provide fairly strong adhesion. The two-component mixture polymerizes within a few hours, forming a thick elastic layer. Epoxy paints can easily be used to paint metal and plastics.
Acrylic paints and varnishes are gaining high popularity among professionals. Even novice craftsmen achieve noticeable success using such paints. It is easy to achieve the desired color, just add dry or liquid pigment.
Good results can be achieved using natural drying oil paints. It is produced from linseed oil. This supporting base evaporates quite quickly. A durable layer is formed on the surface. However, manufacturers note that such dyes are best used on wood or on a porous base. With metals the efficiency is slightly lower.
Paints that use polyurethane as a binder have the highest stickiness. This substance of organic origin begins to harden within 5-8 minutes. When slightly heated to 50-60 °C, the formation of a durable layer occurs within 6-9 minutes. A fairly strong elastic layer is formed.
Users often choose aerosol cans. To activate them, simply shake the container vigorously to ensure even mixing of the paint. In the future, you can paint the surface of the refrigerator. Similar paints are produced with nitro paint or acrylic dyes.
Motorists prefer to use spray cans. They explain it simply. These devices allow you to restore the coating within a few minutes. There is only one limitation: the air temperature must be above +10...15 °C.
Other ways to update the appearance of your refrigerator
If a DIYer knows how to paint, you can update your refrigerator using acrylic pigments without resorting to full painting. The door and walls of the refrigeration unit can be painted with various patterns - acrylic is perfect for this. However, it should be understood that the pattern must be protected by covering the surface with varnish. We offer you to see what old refrigerators updated with your own hands look like using photographic examples.
If the home craftsman does not have artistic skills, you can use a stencil that you make yourself or order from art workshops. In this case, to apply paint you can use either a roller with a brush (or a sponge as an option) or the same aerosol can. A good option would be stickers with different designs.
Preparing for painting
Preparing for the restoration of a kitchen appliance involves choosing:
- Coloring technologies.
- Tools.
- Paints.
The following tools may be needed for work:
- brushes, roller;
- spray;
- polyethylene and construction tape.
It is worth noting that using brushes and a roller will not give such an ideal result as a spray gun. The surface will still be uneven, with defects. Creating decor, on the contrary, requires careful use of these tools.
It is good to use a spray bottle in a spacious room or outdoors, in a free area that is easily cleaned of contamination. When using a spray gun, the layer is smooth, thin, neat, and uniform.
For your information! Using a spray gun is convenient for painting large surfaces. It is better to pass through restricted areas with an aerosol can.
Before starting work, the surface must be washed with soapy water, degreased and dried well. Remove the flaking coating with sandpaper, remove greasy stains with a solution, and cover with tape all areas that will not be painted. Protect floors and adjacent surfaces with film or old newspapers.
The cost of professional painting: a brief overview of prices
On average, the cost of professional painting varies slightly across Russian regions. As of May 2021, prices were fixed at the following levels:
- painting a small refrigerator – 5,000 rubles;
- medium – 7,000 rubles;
- large – 9,000 rub.
Painting (airbrushing) the door of a refrigeration unit will cost approximately 8,000 rubles. High-quality stickers can be purchased at prices ranging from 800 to 1,500 rubles. Now, knowing the approximate prices, the home craftsman should think about how much cheaper it will be to do this work with his own hands.
Professional airbrush on the door costs about 8,000 rubles.
First stage: surface cleaning
First, you need to wash the refrigerator thoroughly. I only washed it on the outside. Therefore, the process did not take much time:
- I took off the magnets.
- I diluted a few drops of dishwashing detergent in warm water. I wet the cloth and walked over the entire surface.
- Upon closer inspection, it turned out that in some places there were dried spots and a yellow coating.
- Dried stains were removed with a spatula and an old toothbrush.
- Rubbed greasy stains with baking soda.
- I wiped the surface several times with a clean, damp cloth and left the refrigerator to dry.
Summarizing
There is no doubt that updating a refrigerator is much cheaper than purchasing a new one, and doing this work yourself is more convenient than hiring professionals. Moreover, it is not a fact that the hired workers will do everything better. It was not for nothing that old people said: “If you want to do it well, do it yourself.” In addition, such work does not require special skills. The main thing is that a specific idea for renovation is formed in your head, and bringing it to life will not be difficult.
We hope that the information presented in today's article was useful to our dear reader. In the discussions below you can ask questions if you have any while reading. Our editorial team will be happy to answer them as quickly as possible. There you can also share your experience in painting or decorating a refrigerator, if you have one. This will be very useful for beginning home craftsmen. Write, communicate, share, ask. And we suggest consolidating the information received by watching a short but very informative video on how to paint a refrigerator at home.
Recommendations for preparation
Whatever paintwork material you choose, it should be carefully prepared before painting the refrigerator. The stage includes:
- The washing up. Use dishwashing detergent - it removes plaque, grease, and old stains. If that's not enough, try a chlorine cleaner or abrasive powder.
- Rinse. Detergents form a film on the surface that should be washed off with clean water. To consolidate the result, immediately wipe dry.
- Sanding. Fine sandpaper will increase the adhesion of the metal to the paint. A mandatory step if there is no primer layer and there is rust or chips on the refrigerator.
- Degreasing. Removes excess dust and prepares for painting, performed immediately before the start of the process.
Important! Only the front and sides are cleaned and painted.
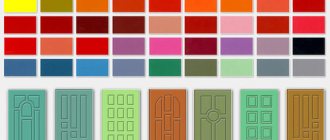
Refrigerator shade and interior style
Not only the color of the appliance, but also its shape determine the ability to combine a colored refrigerator with a particular interior style .
Eg:
- Modern trends in design, such as hi-tech, loft, minimalism, are characterized by strict, clear silhouettes and the absence of curved and rounded edges. Monochrome interiors in gray, white, black tones will fit perfectly and create the right contrast with refrigerators in red, yellow, rich blue and black tones and rectangular shapes;
- Interiors in Scandinavian or marine style involve the use of blue, blue, and turquoise tones. The form of technology can be any; If you have chosen an unusual shabby chic style or a popular Provence style to decorate your kitchen, then pale pink, blue, green, lilac, and cream shades will suit this interior. And the refrigerator itself should have rounded edges and slightly convex outlines;
- Suitable colors for the Renaissance or Baroque style would be emerald, burgundy, burgundy, plum, rich blue; New eco, country, rustic or classic styles go well with natural wood tones.
So, for example, the TOPSTO online store presents a successful model of the Indesit TT 85 T refrigerator, whose body imitates the colors of natural wooden panels.
The store offers affordable prices, a convenient payment system and a wide range of products.
Painting Tips
And so, the product is already fully prepared. Now you can begin the process of coloring it.
Here the tips will be slightly different, as they depend on the type of paintwork and the tools that will be used to paint.
It is imperative to use personal protective equipment - this is a prerequisite.
Painting with paint from cans
If the paint was purchased in cans, then you need to hold them from the refrigerator and spray them at a distance of 30 centimeters, move your hand from left to right, and do not keep the can in one place for a long time, otherwise smudges may result.
If trouble does occur, then use a solvent, for example, acetone.
Paint in several layers, between which they take a 30-minute break so that each previous layer dries a little on the surface.
Pearl or marble
Pearl shade is a more interesting solution due to the presence of an unobtrusive pearlescent shimmer.
Such a piece of equipment will be advantageously
combined with facades made of light wood , decorated with decorative carvings and glass inserts. A marble-effect refrigerator will be a good addition to a marble countertop or window sill, marble floor tiles or kitchen backsplash. The presence of a pearl or marble shade in the interior makes it noble and expensive. In this case, it is important not to overdo it, otherwise the kitchen will become “cold”.
Stage four: primer
The surface of the refrigerator is considered complex. Therefore, you can’t do without a primer. I used the same brand of primer as the paint. Products from the same manufacturer are perfectly compatible. They are manufactured using the same technology and undergo different tests. At least this applies to companies that value their reputation.
How I primed the refrigerator:
- I poured some primer into the paint tray.
- Rolled it out with a universal roller.
- Apply a thin layer to the surface of the refrigerator.
- I primed hard-to-reach areas using a small soft brush.
- Left it until completely dry.
- The primer dried in about 2 hours.
- After that, I lightly rubbed the primed surface with sandpaper.
- I wiped away the resulting dust with a damp cloth.
Advice. Wash the brush, roller and tray immediately after priming. It will still be needed for painting. If the primer on an instrument dries, it will be more difficult to clean. I wiped off the remaining primer with a rag and then rinsed everything in hot water.
First coat of paint applied to refrigerator