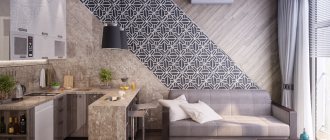
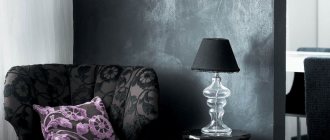
Ceiling rosette as a wall element
This decor looks so cool and works so well in a modern setting that it's hard to ignore the idea. True, creating these decorations is not a simple process; the ability to draw is required and there is a need to purchase or manufacture the appropriate form.
But dark walls combined with white accessories on them can create a rich and luxurious look in the bedroom. (From remodelaholic).
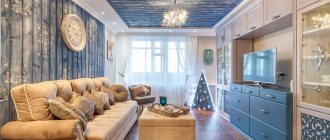
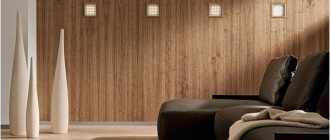
Decorative plaster in different techniques
Wall decoration with decorative plaster is becoming increasingly popular in home renovations.
After all, it is used for both houses and apartments. But despite its prevalence, most people still ask such questions. What material is this? Can a novice specialist do this kind of work? How to use it appropriately and accurately? And many other questions. So, what is it and how to make decorative plaster with your own hands. To begin with, let’s determine that this is a specially designed, plastic mixture. Most often, mica, pebbles, etc. are introduced into it.
Its purpose is to decorate and decorate walls or ceilings. First of all, it is worth preparing the walls by thoroughly cleaning the base.
Remove old wallpaper or paint, then clean the surface of dust, grease or other contaminants. Knock down the protrusions and fill the cracks. The surface must be flat, otherwise you won’t be able to create a relief cladding.
If necessary, level the entire area of the wall or ceiling. Now we will step by step analyze how to perform it using different techniques.
Fish scales in gold
Gold is one of the colors of the season in recent seasons. Keep this in mind if you want to repeat the project shown in the next photo.
This textured wall has become one of the hottest design trends for fall 2013. Bring them together with a DIY project and you'll need to scale a wall art installation.
Although this "fish scale" looks grand and impressive, the entire project will not be too expensive. (From lets go sunning).
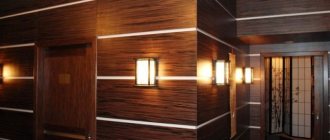
Flemish plaster - two-color tinted in the mass
It is made from ordinary putty, as in the universal technique, but differs in the method of application. The difference is that the dye is diluted directly into the plaster mass, and is not introduced in a separate layer.
- Costs are approximately 85 g per 1 m2
- The area to be worked should be carefully leveled with a trowel or spatula.
- It is necessary to mix plaster of 2 shades and achieve an unusual two-color combination.
- This technique is performed in three layers, using different tools, changing their size from one layer to another from larger to smaller.
- Take a twenty-centimeter spatula, in two stages, except for the first.
- Produce layers so that gradation and roughness are formed within smooth surfaces.
- After applying the plaster, paint with a deep penetration primer.
- When the plaster is dry, glaze it with a trowel. The mass must be made based on the cost of 120g. Per 1 m2
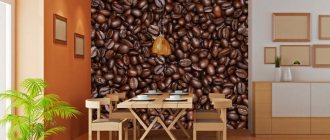
Chocolate heart on the wall
Without a doubt, this is the sweetest project on the list, a sweet idea for Valentine's Day. Upon reflection, you will agree with us that the implementation of this plan will not take much time.
A bag of candy, some gold wrappers and some glue is enough to get the job done. And don’t waste your time – a beautiful bouquet of scarlet roses will express your feelings. (From The Sweetest Occasion).
And again a short parting. See you in the last part of the collection!
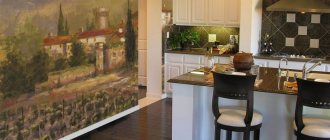
Versailles plaster from ordinary mixtures
Do you want your home to resemble the apartments of Versailles? This is quite possible and even simpler than it might seem at first glance.
- Prime the wall.
- Artistic plaster is performed with a mixture of water in proportion to one to one finishing and starting gypsum plaster.
- Mix the mass thoroughly 2 times, the first time immediately after mixing, and the second after how many minutes.
- Take a spatula and trowel.
- Apply the material 2 mm thick, making random strokes to get the desired pattern.
- Don't forget about corners and places near doors and baguettes.
- Initially, apply an even layer of the mass, and after that a voluminous layer is added with a trowel, which adds texture.
- Wait for the surface to dry.
- Sand and smooth out any uneven surfaces with a paint float and sandpaper.
- The result should be a coating with a pronounced and not very deep texture.
- Then coat the uneven areas with a deep penetration primer.
- Next step: paint over the primer
- Once the paint has dried, go over the first layer with a roller. You should not fill in all the roughness and leave marks from the roller.
- The final stage is done with varnish and glitter. Dilute the varnish with water and add glitter (1 teaspoon per 1 liter).
- Brush the polish periodically to keep the glitter from settling.
Pasting with crumpled paper
This type of wall decoration with paper does not require any special skills, abilities or artistic talents. All you need is a sufficient amount of paper, preferably similar to tissue paper, and wallpaper glue. The gluing technique will be no different from ordinary wallpaper, but the preliminary work with the canvas has slight differences. Before gluing, all paper sheets must be thoroughly crumpled. It is at this moment that you create the future texture of the coating. After that, simply glue the paper to the wall, without trying too hard to straighten out the folds.
After the wall is completely decorated with crumpled paper, it can be painted or simply covered with tinted varnish. You can also apply colorless varnish if you are satisfied with the existing shade. If the panels are translucent and the texture of the base appears through them, tinting will still be needed. It can be done in one color or several - it depends on your desire. If tinting is carried out in several colors, first apply the main one, and after it has dried, paint the surface with a second or third color and shade the applied strokes directly over the wet layer with a soft cloth or sponge.
Plastering with stencils - take cardboard and plywood
Stencil plastering is one of the simplest ways to create a textured artistic layer without the use of special facing materials. This method requires the use of a number of tools and consumables. For repair you will need:
- stencils for decorative plaster;
- finishing acrylic putty;
- color;
- starting putty;
- primer;
- acrylic paint.
The hardest part is making the stencil correctly. The easiest way to make it is using a thin plywood sheet or cardboard. First, apply a suitable design to a sheet of plywood or cardboard, for example, a flower, leaf, bunch of grapes or graphic design. You don’t have to draw it all yourself; you can simply print the picture from your computer and transfer it to plywood. Next, cut out this design in the future stencil. You can cut it out of cardboard with a simple stationery knife, but to work with a plywood sheet it is better to use an electric jigsaw.
Plastering with stencils
When the stencils for creating textured plaster are ready, you can proceed to facing work. To do this, add a color to the finishing putty that will give the finish the required color, and mix the composition thoroughly so that the color dissolves evenly in the putty. Apply putty to the entire surface of the wall in an even layer and wait until it dries completely, then level the wall with a spatula and cover with primer.
You need to apply two layers of primer with a paint roller or a regular brush. The layers are applied alternately, after the previous one has dried.
When the primer has dried, apply a stencil to the wall and fill in the design with unpainted putty, which will form a pattern on the surface. You can remove the stencil only after the design has dried, otherwise it will become deformed and the wall will lose its attractiveness. After the pattern has completely dried, the sharp edges of the patterns can be sanded with fine sandpaper to make the wall look attractive and natural. At the end of the work, all that remains is to paint the drawing with the prepared paint.
Required materials and composition of plaster
The main raw material for paper plaster is, of course, paper. These can be sheets of stationery or notebook paper. Suitable paper is newspapers, egg trays, advertising brochures and other types of waste paper. It is not recommended to use cardboard, as its presence negatively affects the pliability of the finished plaster.
You will also need an adhesive base - CMC wallpaper and PVA glue. They are needed to give the paper pulp the ability to stick to the wall and connect its fibers to each other.
You can additionally add a coloring agent to the composition - color for acrylic paint. When painting decorative plaster from new paper, of course, the result is purer tones than a composition made from waste paper. It is also worth considering that when drying, the color of the plaster noticeably fades.
To make the paper covering more decorative, colored threads cut into short pieces, shredded tinsel, shiny ribbons for tying flowers and souvenirs, and shredded foil are added to the mixture.
To make the plaster resistant to fungus and mold, special bactericidal components are added. Sometimes sandless clay is added to the composition. It gives the mixture elasticity.
Threads and tinsel and pigment are added to the resulting mass. Mix at low speed with a mixer. After adding glue, mix by hand, otherwise dense, unbreakable lumps will form in the mixture. Before use, the gypsum mixture is injected. After mixing, they immediately begin to work (because the composition sets quickly).
Textural work with newspapers - learning as you go
Plastering with newspapers is much less difficult than creating Venetian plaster. This method of cladding will require newspapers, acrylic paint and putty, and experts recommend using starting finishing compounds, as they allow you to obtain a deeper texture than finishing ones. First, make a tool out of newspaper that can be used to give the putty surface a textured structure. To do this, you need to crumple the newspaper so that it turns into a handle with a ball at the end. Place a plastic bag over the ball, which will prevent moisture from getting on the paper and softening the newspaper.
Plastering with newspapers
Now apply putty to the wall with a layer of up to 10 mm. Without waiting for the material to dry, apply newspaper to the surface, creating a textured decorative coating. We recommend starting work from the most poorly visible places on the wall, moving on to open surfaces as you understand what kind of structure can be given with newspaper, and how best to proceed for this. Decorative finishing of walls is a multi-stage process, in which you will have to not only create a textured surface with your own hands, but also prime the walls, and after the primer has dried, paint the putty with acrylic paint. If you find too rough edges on the wall, you can sand them down with fine-grit sandpaper after the paint has dried.
Creating shaped surfaces can be done not only with the help of newspaper, but also with other tools. A textured spatula, malt or sponge is suitable for this work.