Plywood for the floor is the best solution
Plywood has many analogues, but it stands out for some of its qualities, for example, price or weight.
It is worth noting that plywood is not inferior to other materials for flooring under parquet in any of the following parameters:
- Light weight even for wide and thick sheets.
- Plywood is a fairly durable material that can withstand heavy loads; in addition, plywood sheets can bend slightly without breaking.
- No toxic materials are used in the production of plywood, which is used for installation in residential premises.
- Some brands of plywood have good moisture resistance.
- Thanks to its multi-layer structure, plywood creates a rigid base for the laminate floor.
- Plywood sheets are easy to cut and lay.
- Plywood does not require additional care.
If you are still thinking about whether plywood is needed for laminate flooring, then we can assure you that this is a necessity, because laminate flooring laid on an uneven floor will creak, and the locks holding it together will quickly become unusable (about
Why level the surface under the laminate?
The covering fabric consists of separate panels interlocked with each other by a locking system. The connection is strong enough, capable of ensuring the density and strength of contact of all elements with each other.
But on an uneven base, there is an excessively high load on individual panels, whose locking system will be subject to too difficult conditions. Gaps will appear along the joint line, which can develop into fairly wide cracks .
The appearance of the canvas in these areas will be spoiled, in addition, during wet cleaning, water will get into the gap, which will very quickly weaken the lock. The connection between the panels will be completely destroyed.
This situation is unacceptable, therefore the surface of the subfloor must be carefully prepared for laying the material, ensuring a flat plane without differences in height or curvature . If the subfloor does not meet the requirements of the material, it is leveled in various, most suitable ways.
Selection of material
So that later the question does not arise as to why the laminate creaks, it is necessary to choose the right plywood for the base. Having decided on the general qualities of plywood, it is worth talking about its individual brands and determining which plywood to lay under the laminate.
There are a huge variety of plywood varieties, among which there are cheap and very expensive options, for example, the BS brand has a very high price and is used only in the construction of watercraft and air transport.
Plywood also differs in its strength, moisture resistance and toxicity, which does not allow the use of certain brands in enclosed spaces (read: “Which plywood is best for the floor - choosing the brand and type of material”).
Types of plywood used for laying indoor flooring:
- FSF brand plywood has a high moisture resistance, but is not recommended for use in residential premises due to the toxicity of the glue.
- FOF is a brand of plywood that is completely harmless, because toxin-free adhesives are used for its production, but here its disadvantage manifests itself - poor moisture resistance.
- The FC brand can withstand exposure to a small amount of water, but it is also not worth watering. Plywood is harmless and can be used to install the base under the laminate.
Speaking about what kind of plywood is needed for a laminate floor, it is also worth paying attention to the material from which the plywood is glued together:
- The coniferous base
is resistant to various influences, for example, fungus, but when interacting with glue, the resin can release toxins, so it is practically not used in residential premises. - Birch plywood
is the best solution for laying a base under a laminate, because it does not emit toxins and is quite durable, but it should be treated with special antiseptics against fungus and pests.
Having considered all the variations of plywood, it is worth noting that FK brand plywood made from birch is an ideal option for flooring under laminate, and for outdoor work it is better to use the FSF brand made from pine needles.
Having chosen a brand of plywood, you should choose the appropriate grade and coding. Varieties are divided according to the quality of the material:
- First-grade plywood does not have any flaws and can be used to level the floor, but it has a very high price.
- Second-grade plywood has minor imperfections, such as veneer inserts and knots. It is used for laying the base, but this is also not the cheapest option.
- Third-grade plywood is an ideal option for laying under laminated flooring. There are many knots and cracks on the surface of the plywood, but they will not interfere with the work. Plywood has an excellent combination of price and quality. It is better to make a choice so that the thickness of the plywood under the laminate is slightly greater than indicated below.
- The fourth grade of plywood is not suitable for installation work related to the floor, because it has strong unevenness, and its price is not much lower than the previous option.
The plywood price tag will also have a coding written on it, for example, FK-3E1SH1, which we need. It contains various information about the plywood sheet, which is not necessary to understand.
Having decided on the required material, you need to talk about what the thickness of plywood should be for laminate flooring on a wooden floor. In this case, the rule applies: the more, the better, but you should not waste extra space in the apartment. Choose plywood with a thickness of at least 12 mm.
Thickness and purpose of plywood
The thickness of the plywood sheet depends on the number of layers of veneer. Each of them can be from 1 mm (hulled) to 3.5-4.0 (planed). Rotary cut veneer material is more flexible. In terms of strength characteristics, planed is better.
Production of planed and peeled veneer
The layers are connected with glue under pressure, so that the direction of the wood fibers in them does not coincide - this significantly improves the ability of the material to withstand mechanical damage. The composition of the adhesive determines the level of moisture resistance and safety of plywood:
- FSF (glued with phenol-formaldehyde resins) - used only for non-residential premises and outdoor work, high moisture resistance (thickness 4-40);
- FKM (use melamine resins) – average water resistance and safety;
- FC (formaldehyde and urea-formaldehyde resins) – used exclusively for interior work, does not withstand moisture (thickness 3-24);
- FBA (glued with albumin casein glue) is an environmentally friendly material, non-moisture resistant (sheets with a thickness of 3-8 are produced);
- FB (or bakelite plywood) - withstands any environmental influences, including high humidity, open fire, mechanical damage (available in thicknesses 7-40), used in shipbuilding, automobile production, construction of podiums, stadiums.
Bakelized (bakelite) plywood
Thickness 3mm
Plywood with a thickness of 3 mm or less is called aircraft grade. Previously, it was used in the aircraft industry, but now it is used mainly in modeling. The material bends easily, so unusual interior items are made from it. Available in two sizes 1525x1525 and 1525x1830. Packaged in packs of 130 pcs. Total weight 590 and 707 kg respectively.
Thickness 4 mm
The scope of use of such a sheet is already wider. It is suitable for the production of furniture, wall decoration and even flooring. As a rule, it consists of 3 layers of veneer. The most popular size is 1525x1525.
Thickness 6.0, 6.5 mm
Five-layer sheets for construction and furniture assembly. The thickness allows you to produce fragments up to 3 meters long. The most common sizes: 1525x1525, 1220x2440, 1500x3000.
Plywood 8, 9,10 mm
Sheet of 7 layers of veneer. It is used for both finishing and furniture production. The material will withstand the load as a floor when laid in one layer. Available sizes: square 1525x1525, rectangle 3000x1500, 1220x2440.
Plates 12, 15 mm
Sheets of plywood whose thickness exceeds 12 are called slabs. They consist of 9 or more layers of wood. They are used for the construction of structures that require heavy loads: shelving, partitions, floors.
Plates 18 - 30 mm
To produce these boards, 15 or more layers of peeled veneer are glued together. When using planed, their quantity is approximately 2 times less. This plywood is very durable and is used for interfloor slabs, decking, formwork for foundations, and the construction of summer kitchens.
Plywood 35-40 mm
The thickest slabs produced by factories are used in the production of pallets, brick making machines, countertops, and stairs. The sizes are varied: 1220x2440, 1250x2500, 1500x3000, 1525x3050.
The standard provides for a maximum deviation of the sheet thickness from the declared one.
The maximum deviations allowed by GOST are invisible to the eye
This is interesting: Standard brick - dimensions, characteristics, areas of use
Related Posts
- Laying plywood on joists
- How to make your own plywood floor on joists
- The main differences between sanded and unsanded plywood
- Level the floor with your own hands: instructions on how to level a wooden floor in an apartment
- Plywood in the interior of the house: how to decorate any room in an original way
- DIY adjustable floors: raised plywood floor + base on adjustable joists
- How to cut gvl: how to cut sheets at home
- Corrugated sheet dimensions: length, width, height, thickness
- How OSB is laid on a concrete floor: technology, how to lay OSB without logs under linoleum
- Electric heated floor in a private country house: installation features in a wooden and frame house
- Floor screed thickness
- Step-by-step instructions for thermal insulation of floors with penoplex
- Insulation of a concrete floor in an apartment
- How to make a dollhouse with your own hands
- What is the weight of slate
- Installation of beacons for floor screed
- "penoplex" under a warm water floor, the advantages of the material, methods and technology for its installation
- Optimal temperature for heated floors
- Corrugated sheet
- How long should a floor screed dry?
- Installation of a warm water floor
- How to insulate a concrete floor in a private house, do-it-yourself insulation of the concrete floor of the first floor
- Laying a tongue and groove floor with your own hands: lessons from experts
- Required profile for a plasterboard partition: 3 types
- Step-by-step technology for pouring self-leveling floors
Read with this
- Laying plywood on joists
- How to make your own plywood floor on joists
- The main differences between sanded and unsanded plywood
- Level the floor with your own hands: instructions on how to level a wooden floor in an apartment
- Plywood in the interior of the house: how to decorate any room in an original way
- DIY adjustable floors: raised plywood floor + base on adjustable joists
- How to cut gvl: how to cut sheets at home
- Corrugated sheet dimensions: length, width, height, thickness
- How OSB is laid on a concrete floor: technology, how to lay OSB without logs under linoleum
- Electric heated floor in a private country house: installation features in a wooden and frame house
Fitting plywood sheets
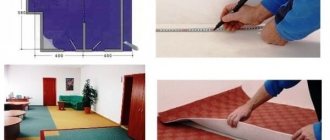
Having purchased the necessary material, bring it into the room and let it acclimatize. After this, carefully cut out the sheets. After cutting, the sheet should be cut with an electric jigsaw, but in the absence of one, you can use a regular hacksaw.
Lay the sheets one by one, adjusting them to fit each other. Keep a gap of 8-10 mm between each sheet; for this you can use pieces of thick cardboard. It is also worth leaving a gap of 15 mm between the wall and the plywood sheet, which will prevent the plinth from being knocked out when the plywood expands.
You should not place sheets one after another in even rows, because this way you will create long horizontal and vertical seams, as well as “crossings” of them, which will negatively affect the quality of the work done. It is best to lay plywood sheets, following the rules of bricklaying, as in the photo.
You can easily trim the sheets to fit all the curves and protrusions of the walls without losing the strength of the subfloor. Once you have all the sheets in place, number them so you don't get mixed up when you put them back on the clean sheet.
If you find it difficult to decide how to properly cut a plywood sheet, then follow the following instructions. The standard sheet size is 125 cm by 125 cm, which is quite difficult to work with alone. It is more convenient to lay and adjust such a sheet by sawing it into 4 even parts with dimensions of 60 by 60 cm.
When cutting sheets, be careful not to leave any unevenness or delamination.
Plywood floor on joists - operating procedure
Preparing the base
The main goal is to eliminate defects in the ceiling and ensure its high-quality waterproofing. If the floor is installed using joists in a new house, then the task is greatly simplified. It is enough just to lay a polyethylene film (thickened) on the base so that its edges are wrapped on the walls, and secure the sections with construction tape. The excess above the floor is the height of the logs + the thickness of the plywood sheets + another 2 - 3 cm. The protruding film will subsequently be covered with a plinth.
If leveling the subfloor is done in an already inhabited room, then there are two possible options.
- Complete dismantling of the entire structure and work from scratch.
- Removing the flooring (leaving the joists) and waterproofing the floor with penetrating compounds.
The feasibility of a particular solution is determined by the state of the logs and the base on which the installation is carried out.
Installation of the supporting frame
Many questions arise regarding the interval between lags
Part of what needs to be taken into account (plywood thickness, room area, installation diagram) has already been said. But the main criterion is the dimensions of the sheets
They are laid on the logs so that the cuts coincide with the longitudinal axis of the guide.
Therefore, you should focus on the distance between the logs within half a meter. If required in certain areas, additional logs are installed. Actually, the drawing is drawn up in order to determine their optimal placement in the room. As a result, the supporting structure should look something like this.
What to consider:
- A wooden “shoe” (made from pieces of MDF, OSB, fiberboard, trimming a thin board) is placed under each rail. It is not difficult to fix it on the ceiling. What is the advantage of such a solution? Firstly, there will be good air circulation under the plywood floor, which will partially prevent the formation of mold. Secondly, with this installation method it is easier to align the upper sections of the joists.
- Work begins at opposite walls. Along each one, with an indentation of 3±0.5 cm, one log is laid. They are aligned in a horizontal plane, and subsequently serve as a guide for installing the rest.
- To achieve maximum leveling of the logs with your own hands, it is advisable to make a special device. The device is simple - a long strip, in the middle part of which a level (construction level) is fixed. Even better is to buy (or rent) a level. Then there will definitely be no mistakes.
Floor insulation
From the point of view of “easier, faster, cheaper” - pour expanded clay between the joists or lay mineral wool mats. The work is so simple that it is not worth considering this issue in more detail.
At the same stage, utilities are laid (if necessary) - TV lines, Internet, and so on.
Fastening plywood sheets
Features:
- First, a “try-on” layout of the sheets is done. After they are aligned and adjusted, the points for installing fasteners are marked.
- Each sheet is additionally processed (the edges are cut at an angle) and holes are drilled for self-tapping screws.
- Countersink. It is mandatory, since the fastener heads must be recessed into the plywood after screwing it in.
- Laying sheets in place. They are mounted one at a time, starting from any corner of the room. After leveling along the joists, it is advisable to make “channels” in the timber using a thinner drill. Then the leg of the screw will fit into the wood quite easily. If installation is carried out using a screwdriver, then this can be neglected. The main thing is that the fasteners “go” strictly vertically, without distortions.
The figure shows an approximate layout of their installation.
What to consider:
The placement of screws depends on the dimensions of the plywood. Mandatory fastening is around the perimeter of the sample. But additional fixation is determined by its size. For large-format sheets - in a criss-cross pattern; for small fragments, only in the center is enough.
- To reduce the so-called “shat” of sheets, it is worth putting strips of roofing felt under them (on the logs).
- The plywood is laid so that when it is joined, the bevels form a groove. It is easily filled with sealant, completely closing the resulting gap. This increases the hydro-, heat- and sound insulation of the floor.
- Special compounds are also used to mask fastener heads. They are available for sale in various shades. If the plywood is to be varnished, then it is not difficult to match it.
If plywood is laid in two layers, then it is fastened like this.
The final stage is cleaning all joints. Typically, just going over the seams with sandpaper is enough to remove excess dried caulk. And then - according to plan: coating with varnish or paint, finishing with other materials. The main thing is that the plywood floor is completely ready.
Laying plywood
Plywood for laminate flooring: thickness, size, quality and brand - these are the points that will greatly facilitate your work and also make it of higher quality. You will be convinced of this at this stage, because, for example, by choosing the correct dimensions and thickness, you will maintain the strength of the sheet, but reduce its weight, which will greatly facilitate its installation.
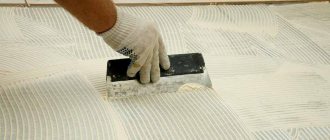
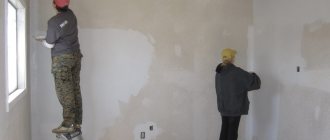
Before laying plywood, you should prepare the surface:
- The concrete floor should be leveled and primed, after which, take the soil, or prepare it yourself by taking glue or mastic, which must be diluted with solvent or gasoline to a liquid state and applied to the floor.
- A wooden floor should be leveled with an electric plane and a sanding machine so that the difference in floor height does not exceed 2 mm. After this, remove all dirt using a vacuum cleaner.
Start laying the plywood. It is attached to concrete with glue and dowels, and to wooden floors with self-tapping screws. Attach the sheets according to the numbering you made when fitting the sheets.
The screws are screwed in at a distance of 20 cm from each other, retreating 2 cm from the edge of the sheet. The sheet should be secured over the entire area using self-tapping screws, which should be 3 times thicker than plywood.
How to properly prepare the base
Many people are interested in how to level a floor with plywood, and absolutely all construction manuals, as well as qualified workers, will answer that such work can be done when you are sure that the base has a perfectly flat surface.
When preparing the base, dust is removed and minor defects are eliminated, after which a primer is produced, which you can make yourself (glue for wooden products is mixed with any solvent, or a mixture of bitumen and gasoline is made). This solution will be ideally absorbed into the base of the concrete, this has a good effect on increasing the adhesion of the plywood sheets and the base of the room. The primer mixture can be applied using a roller. After the surface has dried, the installation of plywood sheets begins.
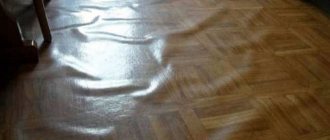
Laying laminate
Laying laminate flooring is a fairly easy, but important step, because the strength and beauty of the floor covering will depend on your laying.
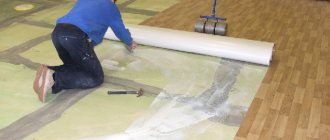
First of all, you should put a backing, such as polyethylene foam. Carefully get rid of uneven folds, and then glue the joints of the substrate with construction tape.
It is worth laying the laminate from the corner that is opposite the window. Lay the slats in rows, connecting narrow ends, taking into account the dimensions of the laminate flooring. When approaching the opposite corner, you can safely cut the lamella to size.
The plank for the next row should be cut so that the laminate can be laid according to the rule of brickwork, observing the “screed”. This will strengthen the connection of the locks, which will prevent their premature wear.
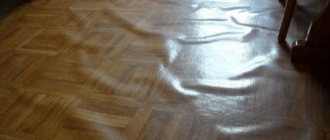
You can see the result of the work in the photo, noting that plywood is the easiest and most reliable way to level a wooden floor for laying laminated flooring.
Preparing the floor surface
Check the air humidity level in the room in which you plan to level the floor with plywood on joists - it should not be higher than 60%
It is equally important to check the moisture level on the old screed. To do this, you should lay plastic film on the floor for two to three days and press its corners
As a result, the inside of the film should not be wet, and the formation of condensation is unacceptable.
When there is no condensation, this will mean that the concrete surface is completely dry and suitable for further installation. Now clean the concrete surface from possible contamination.
Prepared logs should be well dried. They should also be cleaned of dust, and then treated with an antiseptic impregnation using a brush. It will help you in the future to avoid the occurrence of fungus and mold, due to which the wood collapses and rots.
The length of the logs should be up to 2 meters, their cross-sectional size is 50x100 cm. There are also square logs measuring 100x100 cm. You will also need a substrate, insulating material, moisture-resistant plywood with an approximate thickness of 18 mm and foamed polyethylene. Some craftsmen who want to save money use asbestos boards instead of plywood, but this should not be done.
Birch plywood of natural origin is a little more expensive than other materials, but it is an environmentally friendly product that does not emit toxic substances of various origins into the air, unlike oriented strand boards and asbestos boards, which contain formaldehyde resins.
So, the base is completely ready for laying the floor joists, all that remains is to apply the finishing coat of primer to the dry concrete. This primer helps improve the strength of the surface and also remove dust. Wait until the primer has completely dried, since floor joists must be laid on a completely dry surface.
What does sheet thickness affect?
The sheets have different sizes. The choice of one material or another depends on the construction task assigned to the workers.
Size affects the following parameters:
- The thinner the plywood sheet, the worse the job of leveling the surface will be.
- If you choose thick sheets, you will not need additional thermal insulation materials.
- The thicker the veneer, the less deflection, and the rigidity of the structure, on the contrary, is greater. Thanks to this, it is possible to increase the interval between the lags of the subfloor, and the quality of the latter will not deteriorate as a result.
According to the standard, veneer sheets have a thickness of 4, 6, 10, 12, 15, 30, and 40 mm. This indicator affects the ease of installation in joists and its wear resistance.
The thickness of the sheets does not affect the height of the room in any way. Therefore, you should not be afraid of making a mistake with the size. Maximum plywood can raise the floor by 40 mm.