Arch made of plywood
An original arch made of plywood, which you can make with your own hands inexpensively and with high quality, will help to stylishly decorate the interior space of any room: hallway, living room, dining room or kitchen. The cascade of arches, which are located in one room one after another, looks very impressive and unusual. A large arch can divide a room into separate functional areas. In recent years, this design has become very popular among modern consumers due to its affordable price, ease of installation and finishing work. Plywood and components can be easily purchased at any hardware store or market; you only need to calculate the required number of sheets and other materials with maximum accuracy. Qualified craftsmen also note the important property of plywood - it holds its structural shape perfectly, is well cut even into small parts and is quickly attached.
The main thing that is necessary to obtain a good result in the form of a beautiful decorative detail is the selection of high-quality consumables and basic materials, the purchase or rental of the necessary technological equipment, which, with proper preliminary preparation of the object, can be required literally for a day or two. It is necessary to properly plan the work into several stages.
Settlement stage
Preparatory and calculation work
At the initial stage, measurements are taken of openings and other structural elements of the room, their standing is assessed, the need for preliminary finishing or dismantling of old doors, decors and other products. Experts advise, based on the data obtained, to develop drawings of the future structure from several angles, indicating the exact parameters down to the centimeter. This scheme will greatly help in carrying out the work. Using the drawings, it will be possible to calculate in advance the required amount of materials and consumables. Then you won’t have to run around several times for missing parts, waste your time and money on transport.
Electric jigsaw
From materials, tools and equipment you should prepare:
- electric jigsaw;
- construction knife;
- a regular hacksaw;
- construction ruler;
- drill or screwdriver;
- sheets of plywood with a thickness of at least 4-5 mm;
- screws and dowels;
- polyurethane foam;
- materials for finishing: putty, paint or wallpaper;
In addition, at the preparatory stage it is necessary to clean the openings from the old finish or repair existing cracks, chips and other imperfections in the surface of the doorways. Since plywood is a material susceptible to high humidity and significant temperature changes, standard conditions should be ensured in the room and maintained during the entire period of work. Thus, after careful preparation, it will be possible to quickly and efficiently complete a beautiful design that will delight all residents of the apartment and guests of the house with its appearance.
About technology and general recommendations
The main thing is to bend, but this is not a problem.
How to make an arch with your own hands from plywood is the main question of the material.
There are three basic techniques:
- The first option is to set up an arched arc and fit it into the overall ensemble of the wall;
- The second option is to design and manufacture the entire arch structure;
- The third option is complex and combined designs, which involve the creation of ready-made models and their subsequent installation on site.
Each of the presented options will be discussed in some detail in separate chapters.
And now about general recommendations during the preparatory period:
- The beginning of the beginning is a sketch of the proposed design on paper, to scale, and with real dimensions. This simple technique will help greatly facilitate not only the idea of the project being prepared, but also the calculation of materials;
- The construction itself must be carried out on a prepared site. This, in turn, involves dismantling door jambs and, if necessary, repairing walls;
Wet material can be rolled up like a carpet.
- Preparing the tool does not take much time, and you don’t need much of the tool itself:
- Jigsaw and plywood files;
- Impact drill and concrete drills (if the arch is being built in an apartment with brick or reinforced concrete walls), just a screwdriver in a wooden house is possible;
- Also a finishing tool. There may be variations here, from spatulas and everything that involves grouting, leveling and other elements associated with working with plasterboard sheets, to ordinary brushes and a roller for wallpapering an arch, or painting.
arched arc
The simplest thing is an arc and foam.
This is the simplest method, the price of which can be equal to the price of one sheet of plywood.
The essence of the method is as follows:
- First, a fragment is cut out of plywood - a strip that will form an arc (see also the article Cutting from plywood with a jigsaw - drawings for success). The edges are ground with an electric planer in such a way that they ensure a smooth transition from the arc to the wall;
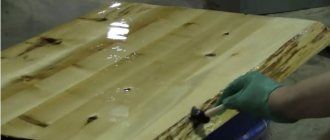
- The plywood fragment is pre-moistened with water. The idea of this action is very simple, wet plywood is easily rolled up even into a roll;
- After the material becomes pliable, it is installed in a stationary place and fixed with self-tapping screws either to the dowels or to the wall directly;
- The fragment is left in a stationary place until the plywood is completely dry. In order to give the material the correct shape, it is necessary to set spacers;
- The space between the arc and the box can be closed in two ways:
- The first is plasterboard inserts. This is a fairly simple solution, taking into account the fact that if you decorated the walls with plasterboard, then the trimmings are quite suitable for the arch;
- The second is polyurethane foam. Some authors argue that it is even preferable, since it occupies the entire volume and, supporting the plywood, transfers the load evenly, leveling the arch. After hardening, the foam is cut and puttied in the usual way for painting or wallpapering.
- The finished arch can be decorated; it is possible to use special flexible plastic corners, decoretto and other elements.
Note! In this case, plywood is a competitor to plasterboard in the production of arches. However, making a vault with plywood is less labor-intensive and does not require special frames made of profiles.
Formation of the opening
Option number two.
The second method of making an arch can be called the opposite. It is no more labor-intensive, but is also guaranteed to solve the problem.
To implement it, the following actions are carried out:
- Two sheets of plywood are cut in such a way as to cover the entire doorway from floor to ceiling, and even with a 20 cm grip on the stationary wall for fastening;
- The sheets are used to mark the arched opening, which is called “full height”. To ensure uniformity when sawing, sheets of plywood are stacked on top of each other and openings are cut out with a jigsaw;
- Next, the finished fragments are installed in permanent places. The resulting voids must be filled.
For this purpose you can use:
- Thinner plywood;
- Decorative boards;
- Lining, fiberboard, OSB and other materials. with sufficient flexibility;
- Next, the entire ensemble undergoes finishing and decoration.
Advice! Many people believe that the inner arc of the arch should be smooth and light. Let's not argue about tastes, we'll just say that this possibility also exists.
You can use tape that is recommended for sealing seams in plasterboard sheets. After applying the plaster, the tape becomes part of the general composition and the surface becomes even, smooth and white.
The most difficult way
It is better to order such products.
Let’s immediately say that this method requires not only special tools, but also skills. It is mentioned in this material for the sake of completeness.
The following actions are performed:
- In wooden posts, grooves are milled for plywood with a width of 4 to 6 mm to suit the thickness of the plywood and a depth of up to 8 mm for sufficient fastening stability;
- A wooden arch is formed according to a preliminary template; the wooden fragments are fastened using the tenoning method. All fragments are processed with a milling cutter so that the plywood sheet fits completely into the grooves, forming a complete structure (
General construction stage
Arch made of plywood sheet
Filling with polyurethane foam
After preparing the opening according to a pre-developed scheme, an aluminum profile is attached to the surface. First, the profile blanks are fixed with special dowels or self-tapping screws (hardware is selected depending on the wall material) around the perimeter of the opening, and then the bent elements are attached. For radius structures, you can purchase a specialized profile, but it is expensive. Or you can spend a little time and apply small notches at a certain distance (about 5-10 cm) to a regular profile, which will make the guide element more flexible.
Sheets of plywood are folded in half and the necessary elements are cut out with a jigsaw according to the drawing, strictly according to pre-planned dimensions. The edges of the sawn elements must be thoroughly cleaned of sharp splinters. The resulting blanks are attached to the load-bearing parts of the opening on both sides.
Note!
Professional craftsmen recommend filling the junctions with polyurethane foam before final covering.
Second way
Take a piece of paper or cardboard and draw the arc of the arch. Fold two sheets of plywood together, draw the resulting contours of the arch and carefully cut out a semicircle with a jigsaw. Clean the edges of the cut to avoid splinters. The sheets on both sides of the opening must be secured with dowels.
Plywood semicircles installed in the doorway form a void. There are several options for filling them out. Can be installed across:
- planks;
- lining;
- narrow wooden slats;
- thin plywood;
- Fiberboard (fibreboard).
If the paneling or slats are varnished, it will turn out quite decorative.
Before wallpapering or painting, the gaps between the boards must be filled and plastered, then the inner surface of the arch will become smooth.
To ensure that the arch in the opening is absolutely smooth, you can use a mesh under the plaster. There is a dissolving plaster tape on sale, which, after applying the solution, dissolves and the surface becomes even and smooth.
Finishing stage
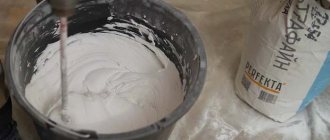
The joining seams are carefully sealed with putty, which in its composition is compatible with plywood. If an arch is planned in the future
Plywood arches
paint, then additionally fill the holes from the screws. After the composition has completely dried, the surface is very carefully sanded with fine sandpaper.
Note!
To apply smooth paint, it is best to cover the arch structure with a special painting mesh or paper to obtain a more even surface.
You can additionally place decorative slats in the arched opening that imitate wooden beams, then coat them with varnish or paint them to match the overall structure. Built-in lighting or beautiful lighting fixtures look very stylish and impressive in such arches.
Cutting out the arched casing
Place a sheet of thick plywood on a flat horizontal surface and attach a template to it. If the template does not fit on one sheet, apply a second or third sheet. We place the template so that the sides of the plywood are equally spaced. If the plywood size is small, it is necessary to join the sheets. Be sure to keep in mind that when joining sheets of plywood, it is necessary to reduce the size of the segments by the depth of the plywood grooves. Mark with a pencil the contours of the lower part of the casing. Stepping back 10 cm, we draw the second contour of the clypeus.
Using an electric jigsaw, we cut out the curvature of the casing according to the markings. We need two identical blanks for both sides of the arch. It’s good if one piece of plywood produces an arc or even two. Usually on such an arch it is necessary to join pieces with different curvatures. To do this, use a router to cut out a groove in one piece and a protrusion in the other, which, when connected, form a larger segment. So we connect all the pieces. They must be carefully glued into a single whole. We select the appropriate glue and press it to the surface with clamps. Press the joint into the joint using a wedge. We wait for the glue to harden, so we proceed to further gluing the arc. Using a milling cutter, carefully process the edge of the arched casing and grind it. We do the same with our other half.
Return to content
We decorate your home using a plywood arch with your own hands
Have you started a renovation and want to somehow change the atmosphere in your home? Do you think that you need the services of a designer and there will be considerable expenses? It's quite the opposite. An excellent option would be to make door arches. This decorative element, like no other, is simple in its essence and beautiful at the same time. In addition, the costs will not be high at all if you make arches from plywood with your own hands. And also recently, plywood doors have become very popular.
The content of the article:
- Selecting tools
- The first method is to bend the plywood
- Method two - cut with a jigsaw
- The third method is an arc + 2 columns
- Interesting videos on the topic
- Additional material on this topic
- Return to Yandex search
- or write a comment
How to make plywood arches
Stylish interior decoration does not have to be too expensive. Materials such as plywood tell us this. Plywood arches are an easy way to make a room more original and sophisticated, while using your own strength and not incurring too much expense. Any room will be transformed with an arch, and their cascade, for example, in a corridor will look very impressive.
Learning to make arches from plywood
When can you build an arch?
There are several situations when using a structure technique in an arch passage may be appropriate:
- To mask an irreparable defect in the doorway.
- In order to make it possible to organize an opening in the wall with non-standard dimensions.
- In a situation where you want to add additional elements to the interior in a style that matches the type of furniture or other objects, such as baseboards, door frames, cornices.
- And the most common case is when there is no need for a door at all, since it interferes with the movement of air flows.
When deciding to create an arched opening, you should take into account the fact that the doors in the apartment are provided for by the project for a reason. They are designed to protect residents from drafts and increase sound insulation. In addition, when selling a home, the new owner may be dissatisfied with such a renovation and will demand a reduction in the price or restoration of the door. For this reason, it is necessary to think through all possible risks in advance and make a fully informed decision.
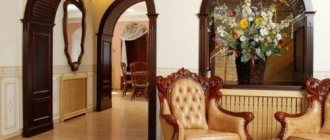
An example of a successful choice of style when decorating an interior with an arch
Ready-made arch kits
If you are not confident in your own abilities, and the educational video lessons from the Internet are not entirely clear to you, you can make your life much easier by purchasing a ready-made kit for forming an arch. Such sets can be made from different materials, have different designs, colors, designs and textures, which will allow each person to find the most suitable option. The most suitable option is a set made of fiberboard or MDF. Such materials are very similar to wood, but are less complex to process and install. The ready-made standard interior arch kit includes:
- 2 vault panels.
- Platbands.
- Inner plates.
- Elements for connection.
To choose the right set, you only need to measure the height, depth and width of the doorway. We hope that our article will be useful to you and give you confidence in your own abilities!
Source
Step-by-step instruction
If you decide to install an arch in the hallway, kitchen or balcony, follow the recommendations below:
- Remove the old door and trim.
- Widen the doorway to the desired size.
- Level the walls and repair any defects.
- If the structure will be backlit, carry out the wiring.
- Take all measurements in different places to minimize errors.
- For uneven walls, choose the depth of the arch at the thickest point.
- Don’t be too lazy to make a life-size sketch (this will allow you not only to install the arch as accurately as possible, but also to pre-assess what the arch will look like).
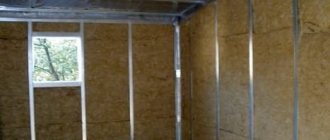
- You need to begin work on installing the supporting frame in the following sequence:
- Create a main contour from the profile around the perimeter of the doorway and fix it on the wall.
- Secure the frame system.
How to cut a profile correctly
- Install the vertical guides with an indentation from the plane of the interior surface to the thickness of the drywall and add 2 mm to the data (make a reserve for plaster).
- The surface must be rolled out with plaster until it is as even as possible.
- To create a semicircle from the profile, cuts are made on it in increments of 5-7 cm.
- When an ideal curve is formed from the profile, it is installed in the right place and fixed to the frame.
- For greater strength, the arc must be fixed with several hangers to the horizontal upper guide.
- Then the crossbars are installed in increments of 40-60cm.
- The result should be a structure made of metal profiles in the shape of an arch for further cladding.