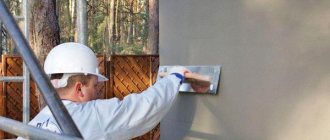
What can you use to plaster?
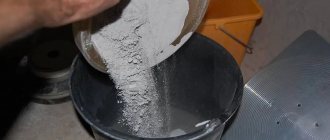
You can prepare the finishing composition yourself. For plastering the surface, gypsum, cement and lime bases are used. Sand is used as filler.
Cement-sand composition:
- 3-4 parts sand;
- 1 part cement;
- water (the amount is regulated independently, i.e. the liquid is added gradually until the required consistency is obtained).
Lime-gypsum mortar:
- 1 part lime;
- 1 part sand;
- 2 parts sand;
- water.
Lime-gypsum plaster is used for finishing rooms where there is a low percentage of humidity.
Lime-cement mixture:
- 1 part cement;
- 1 part lime;
- 2-5 parts of sand (adjustable independently);
- water.
To prevent the finishing material from swelling on the working surface, it is first necessary to extinguish the lime. This plaster is not afraid of high humidity. In order not to wait for the end of the chemical reaction, it is recommended to immediately purchase slaked lime.
How to stuff shit?
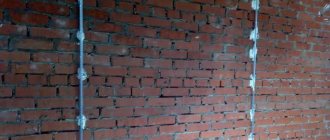
The plaster shingles can be nailed down immediately after the vapor barrier is made. The whole process can be divided into several stages.
Stage 1
To begin with, the shingles must be sorted into output and final shingles.
The shingle (bottom layer) does not put forward any special requirements: the strips must be thin, a slight curvature is allowed. The thickness of the shingles should not be less than 3 mm.
The output (top layer) of shingles should be smooth and even. The thickness of the shingles should be 3-5 cm, and the width 12-15 cm. This is necessary so that the shingles for plaster do not split while driving nails.
Stage 2
After the slats have been sorted, they need to be moistened before use. This will also help prevent them from cracking.
Stage 3
Start nailing the shingles at the bottom of the wall and smoothly and gradually move up.
Stage 4
The plaster shingles should be nailed at an angle of 450. The inner layer shingles should be secured using mounting nails. They are hammered not in the center, but along the edges, to facilitate further dismantling
What should be the distance between the slats?
- Shingles for plastering the bottom row on the walls - 5 cm between slats;
- Between the prostyle rows on the ceiling - 4 cm;
- If you have created a felt vapor barrier, then there is 2.5 cm between the rows on the walls;
- In a similar situation on the ceiling - 2 cm;
- The top layer of shingles on the walls requires a distance between rows of 4 cm;
- When exiting rows of shingles on the ceiling - 3 cm.
Stage 5
After the plaster shingles are nailed down, you can begin to work on the exit rows. The top row of shingles should be nailed perpendicular to the bottom row.
Stage 6
You need to nail the ends of the slats with two nails. Then nail intermediate nails at intervals of 1-2 strips of the bottom row.
Stage 7
We recommend that when nailing the top row, carefully remove the nails from the shingles of the bottom row.
Stage 8
If the shingles touch at the ends, then leave a gap of 2-3 mm between them. The ends of the shingles cannot be placed on top of each other.
Specifics of preparing wooden surfaces
Plaster shingles can be purchased at a hardware store or you can use existing slats at home. To perform finishing work, it is recommended to take planks that are as even and equal in size as possible. Plaster on shingles that have been severely deformed, for example due to moisture, will be thick. It will not be possible to make it thin, because... The curvature of the slats will not allow you to create a flat wall surface.
What material to use
Wall shingles can be made from any type of wood. Most often, the walls are covered with pine, spruce or aspen. The timber is placed in a special machine, which uses knives to split the wood into chips of the required thickness and width.
After purchasing, you should sort the planks. You can lay out the protile (first or bottom) layer from the curved shingles. The thickness of the material should be within 3-5 mm, and the width no more than 2-2.5 cm. Wider and even strips are applied on top.
Shingling can be made from thicker and wider slats, but it is not recommended to use them due to the fact that wood intensively absorbs moisture. During the finishing process, the lathing will absorb a lot of water, which will lead to prolonged drying of the surface. Another disadvantage of thick slats is that if excess moisture is absorbed, the slats will sag.
To create a wooden sheathing, you will additionally need the following tools and materials:
- hammer;
- nails (length up to 4 cm);
- level;
- knife.
In addition to making it yourself, you can buy a ready-made design. The advantage of such a grid is that it saves time.
Manufacturing algorithm
The planks are packed diagonally in 2 rows. The shingles should lie across the top layer. It is recommended to keep the distance between the slats the same. It should be equal to the width of 2-3 slats. In most cases, shingles for plaster are laid in 2 layers, but wooden lathing can be more (3-4 layers).
Installation technology
Finishing begins with priming the wooden surface. If the wall needs insulation or noise-reducing material, then the next layer is insulation. When there are no additional building elements, installation begins immediately after the primer has dried.
The first plank must be nailed at an angle of about 45° (relative to the floor). The nail is driven in completely, perpendicular to the wall. The last fastener, which is located at the bottom (end) of the strip, is driven in halfway. It should prevent the bar from falling, but there is no need to completely fix the bar. All intermediate nails begin to be driven in at an angle so that the tip points down and the head points up (in the direction of the slats).
This installation technology allows you to gradually “pull” the shingles, which will ensure a reliable fit of the sheathing. Fasteners driven in at an angle reduce the likelihood of the sheathing moving away from the main wall.
When the first layer is completed, begin stuffing the second. It is performed on the same principle as the forgiving one.
If a ready-made sheathing was purchased, then it is immediately applied to the wall and then secured with nails or self-tapping screws.
general information
At the beginning of the process , shingles are filled across the entire width of the wall; its very name suggests that it kind of covers the base, onto which the second layer of shingles is attached on top. Nail it at an angle of 45° relative to the floor. Curved, narrow dies are used for these purposes; their thickness should be at least 3 mm. A smaller thickness of the shingles will prevent the mortar from adhering to the shingles.
The second layer (exit shingles) is also installed at an angle of 45° relative to the floor, but in the other direction. In relation to each other, the shingles are located perpendicularly, at 90°.
The distance between the dies is 45 cm. The same distance is maintained in the second row. This creates a kind of mesh made of wooden shingles. The cells will be 45x45 in size, which gives rigidity to the entire structure and holds it together.
The second layer consists of even and thicker dies, but not more than 5 mm. The width should be 15-20 mm. The dimensions must be observed, since dies with a width of less than 10 mm usually split when driven, and a width of more than 20 mm causes them to bend from moisture without having time to dry out.
Plaster mixtures for wooden surfaces
You can buy a ready-made mixture for plastering wooden surfaces. If the finishing material is free-flowing, then it will need to be mixed with water (the proportions are indicated by the manufacturer) and you can start working. It is also possible to purchase plaster, which is used immediately after opening the container.
The following plasters are suitable for woodworking:
- Ferozite;
- Master of technogypsum;
- Rigips Isogyps;
- Baumit Manu;
- Kreisel Nanofix;
- Knauf Rotband.
Manufacturing algorithm
So, in order to ensure reliable adhesion of the plaster mixture to the wood surface, the latter must first be prepared by filling it with a kind of fixative - plaster shingles.
To prepare the shingles yourself, you will need the following tools:
- rubbish;
- knife with a sharp blade;
- construction level;
- nails from 2 to 4 cm long, 1 – 1.8 mm in diameter;
- hammer.
The shingles are applied in two layers. The first is prostrate, made of thin (up to 3 mm) and uneven slats placed to the wall surface at an acute angle relative to the floor in increments of fifty centimeters. The second layer is the output layer, and more even strips are chosen for it. Their installation is also carried out at a slope of forty-five degrees, but in the opposite direction. Stuffed crosswise, the slats form a mesh.
Please note that shingles 1 cm thick can be split by nails. In addition, it bends under the plaster layer because it does not have time to dry out.
Plastering wooden walls
Stuffing of shingles
Before stuffing or weaving of panels begins, the shingles are sorted into prostyle (for stuffing the lower, prostyle rows) and output (for stuffing the upper, output rows). The sorted shingles are laid in separate bundles.
The shingles are laid as the first layer on a wooden wall. To do this, use a curved and narrow shingle with a thickness of at least 3 mm, due to which voids are created between the shingle and the surface, under which the applied solution falls and firmly adheres to the packed output shingle. With thinner shingles, the adhesion of the plaster mortar to the surface is insufficient.
For the output row, straight, even, thick (no more than 5 mm) shingles with a width of 15 - 20 mm are selected. since shingles narrower than 10 mm chip when nails are driven into it, and wider than 20 mm warps and tears the plaster. If all the walls, partitions and ceilings are wooden, then the filling of shingles begins from the bottom of the walls. Having reached the top, they move on to stuffing shingles on the ceiling.
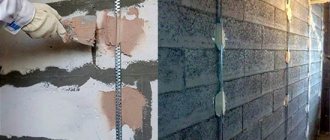
The rows of front and exit shingles are placed at an angle of 90 degrees to one another, and in relation to the floor - at angles of 45 degrees. The location of the shingles at an angle of 45 degrees in relation to the boards additionally holds them together and gives them rigidity. According to SNiP, a distance of 45 mm must be maintained between the shingles of the profiling and exit rows in order to form cells of 45X45 mm. When filling a sheet of shingles, it is only attached in the middle with one mounting nail or along the edges with two nails. They hammer them lightly so that they can just hold the shit. Having filled one or two rows of the final shingles in height on the walls and completely on the ceilings, they begin to stuff the output shingles. First, each output shingle is completely nailed with two nails only at the ends. One of the nails is driven straight, and the second with tension at an angle of 45 degrees, while pointing the tip of the nail towards the end of the shingle. This nail pulls the shingles tightly. Then intermediate nails are driven in: on the walls through two shingles into the third, and on the ceilings through one.
Plastering wooden walls
- The location of the shingles.
- Formation of a gap between the shingles.
- The solution gets caught on the shingles.
- Farewell shit
- Weekend crap
- The gap between the shingle and the surface.
- Plaster.
The ends of the built-up shingles are not connected end-to-end, but with a gap of 2 - 3 mm. An end-to-end connection without a gap when wet leads to warping of the ends of the shingles and swelling, which causes rupture of the plaster. The shingles are stuffed on the ceiling in the same way as on the walls. First, the entire ceiling is stuffed with final shingles, and then with exit shingles. The exit shingle is also positioned at an angle of 90 degrees to the outer shingle. Nails should be driven quickly, with two blows, inserting them only in the center of the shingles.