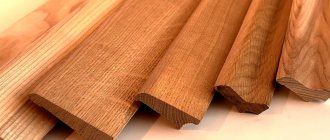
Dimensions
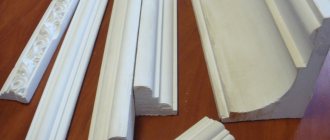
Skirting boards come in different sizes and differ in length, width and surface type.
Usually they are selected to match the overall style and interior of the room. Sometimes the choice of plinth depends on the size of the joint that has formed between the ceiling and the wall. Also, the choice of ceiling fillets depends on their purpose. If they should play an exclusively decorative role in the room, the walls are smooth, like the joint line, there is no need to hide any defects, then the plinth can be replaced with molding. Otherwise, use elements whose side attached to the wall is wide enough. This way you can hide small repair errors and joints.
In terms of length, it is better to choose options that, during installation, will create as few joints as possible and a minimum of scraps. Therefore, in order not to make a mistake with its length, before purchasing skirting boards you need to know the exact dimensions of all walls. If the installation of such elements is carried out independently and for the first time, then it is better to buy a plinth with a reserve, this will avoid the need to run to the store for additional material.
Some people have difficulty cutting corners during the installation process. Therefore, to simplify the work, manufacturers offer to use ready-made corners, which only need to be glued between the straight lines of the baseboards.
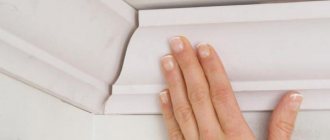
How to glue a product to walls without wallpaper
We prepare special glue. We eliminate all existing irregularities using sealant. This allows you to remove the gap between the product and the edge of the wallpaper.
Before gluing, the decorative element is carefully adjusted to carefully check the dimensions and all joints. Then the inside of the product and the walls are coated. Press tightly enough to the surface so that the sealant fills all existing cracks. The resulting residues are carefully removed with a clean, slightly damp cloth.
What do we end up with? Gluing the decor is not so difficult, the result is a perfect ceiling that will serve us for many years.
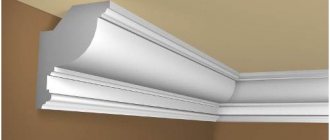
How to install a ceiling plinth on a suspended ceiling
It is worth noting that gluing skirting boards to the ceiling is not easy, but it is possible, both with your own hands and without the help of a specialist.
The sticker of the baseboard must be carried out strictly according to the technology in order to exclude:
- Formation of material distortions;
- Uneven edges and joints;
- Presence of flaws after installation.
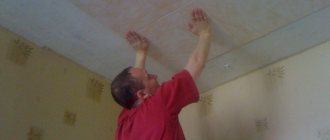
After replacing the ceiling covering, it is necessary to make markings along which the material will be applied. To do this, use a pencil or cord. If you first fix the wallpaper on the wall, and the baseboard is not light in weight, then when marking the position of the product, you need to make small cuts. To be more precise, the wallpaper will be removed above the cut.
There is a special insert in the internal and external corners. To independently make such a design, use a miter box, a special device with different levels of inclination. The plinth must be secured by spreading glue only along the end part, which will be applied to the wall surface. The opening between the ceiling and the product being installed should be as minimal as possible. If necessary, you can increase the opening to 2 cm, provided that lighting or other lighting devices will subsequently be installed there.
Installation must be carried out extremely carefully, since it is theoretically possible to insert and remove the baseboard, but this can cause glue drips to form on the wall, which will spoil the appearance of not only the canvases, but the entire room. The products are installed sequentially around the room.
If the walls have unevenness, then in addition to pressing, you need to apply pressure, but so as not to push through the baseboard, and also wait time for the two coatings to bond together. It is not uncommon to place masking tape on top of the baseboard in order to secure it to the wall as tightly as possible. It must be removed immediately after complete drying. Masking tape is unique in that it does not leave marks, even the smallest ones, which means the work will not be ruined.
How to install before finishing is complete
The algorithm for installing the plinth before finishing is completed differs significantly from the usual one, and among the key points are:
- preparing glue and putty;
- moisturizing the working surface;
- preparing a working solution based on putty;
- fillet sticker.
Preparing glue and putty
The choice of gluing before finishing involves two implementation methods:
- using glue;
- using putty.
The use of glue is implemented in the same way as the previous option, but you will need to tinker with the putty. It is necessary to achieve a solution that is slightly thicker than when treating walls.
Surface moistening
After the baseboard is adjusted and ready for gluing, the surface of the wall is wetted for better adhesion of the putty. In addition to the wall, do not forget to wet the inside surface of the baseboard itself.
Preparation of a working solution based on putty
Algorithm of actions necessary to prepare a working solution for working with ceiling plinths:
- Take a mixing container.
- Fill it with water.
- We gradually add the dry mixture to it until the solution reaches the consistency necessary for the work.
- Mix the mixture with a construction mixer for 2-3 minutes.
If the solution is made manually, first pour in the mixture, then pour in water.
How to glue fillets
When gluing the baseboard, you need to press it firmly against the wall so that part of the applied solution is squeezed out through the bottom, thereby filling the unevenness in the wall. Excess solution is subsequently removed using a regular spatula and a clean rag.
How to properly attach a product to wallpaper
To do this, you will need transparent glue that will not change color after a couple of years. They begin to attach the decorative element from the corner, having first prepared the corners of the plinths or cut blanks of the required shape. First, it must be applied to the surface, which will allow you to check the joints. Read how to make a corner on a ceiling plinth.
The markings are carefully applied with a simple pencil along the bottom line of the plinth. After that, a thin layer of glue is applied to the inside and pressed to the surface exactly according to the applied markings. In case of unevenness, the element is additionally secured with tape, which can be easily removed without affecting the final finish.
Gluing the ceiling plinth
The fillets are installed in all corners, then connected in even, neat pieces. Excess adhesive is removed with a clean rag. Once the product has dried, you can begin painting it.
Gluing corners
Features of fastening plinths to suspended ceilings
Installing a plinth on a suspended ceiling always begins with preliminary measurements and preparation of fillets (pieces of plinth). Remember that it is best to use fillets of medium length so that they are easy to attach and so that there is no need to glue small pieces.
If, when installing a plinth on a regular ceiling, it is painted at the finishing stage, then in the case of a stretch ceiling it is better to do this in advance. The condition is optional, but this way you definitely won’t stain the new ceiling.
The main feature of installing the plinth in our case is the method of fastening. The fillets are only glued to the wall. It is impossible to glue fillets to a suspended ceiling for a number of reasons:
- it is not tough enough;
- during operation, the ceiling may stretch;
- If you need to dismantle the plinth, you will damage the covering of the stretch ceiling.
We also note that it is not advisable to glue the baseboard to the wallpaper; they may simply not withstand it. That is, the baseboard is attached to the suspended ceiling before you glue the wallpaper.
Also, before starting installation, it is recommended to make markings using a tapping cord for a more even installation of the plinth.
Otherwise, the installation technology is standard. Install the plinth starting from the corner. Let us remind you that special corner elements can be used for the corners of rooms. If you couldn’t find the baseboards that match the design, then you can cut the fillets at an angle of 45 degrees and simply join them.
You can install the plinth using either glue or putty. To protect the stretch ceiling, you can cover it with polyethylene, which is then very easy to remove. Glue or putty is applied only to that part of the fillet that will be pressed against the wall. Parts of the plinth should be brought as close as possible to the ceiling so that the gap is small, but not pressed tightly. The joints between the fillets also need to be coated with glue or putty for better fastening of the entire structure.
If the installation of the plinth was carried out using putty, all joints and gaps are immediately rubbed with it. If glue was used, the gaps can be eliminated using sealant or finishing putty. After complete drying, the baseboard needs to be touched up in places that were puttied.
When the plinth is completely ready, it is necessary to remove the polyethylene from the stretch ceiling.
Features of finishing the junction of a stretch ceiling with a wall
Any master you turn to for advice will recommend that you think carefully before gluing a baguette to a stretch ceiling.
The very idea of gluing a fairly large part onto a thin stretched film is not the most rational, and here’s why:
Flexible decorative insert
- Stretch ceilings are most often a synthetic polymer fabric. Without knowing the composition of this fabric, you are unlikely to be able to choose an adhesive that will not react with the components of the material, which means that in any case we risk getting a melted hole at the place where the adhesive mixture is applied, which appears as a result of chemical interaction.
- The surface of the stretch ceiling has a high gloss coefficient. Therefore, for fastening we will need glue with high adhesive ability, and such products are characterized by chemical activity and a significant content of volatile substances. Why you shouldn’t apply such materials to a polymer fabric is clear from the first point.
Important! This applies to fabric tension structures to a lesser extent. However, if the fabric was treated with special impregnations, then they can also react with the glue. The hole, however, will not appear, but spots on the surface may appear.
Photo of wrinkles on canvas
- Any adhesive composition will deform the surface when it dries. Therefore, wrinkles will inevitably appear at the place where the fillet is installed.
- It must also be remembered that the load-bearing capacity of the canvas is very low. That is why even the lightest ceiling molding glued to the surface will cause it to deform under its own weight. If we manage to fix a heavier type, then the film may simply tear, and the cost of repairs will definitely not please us.
Obviously not everyone likes the narrow “native” plinth
Based on the above, we draw a simple conclusion: gluing a baguette onto a suspended ceiling cannot be implemented in principle. So what now, look at the ugly junction of the ceiling and the wall or be content with the simplest plinth that was used to stretch the canvas?
In fact, gluing baguettes to the ceiling is quite possible if you know a few tricks. We will dedicate the next section to them!
Preparation of tools and calculation of materials
To work you will need the following tools:
- A stepladder or a strong, stable table.
- Tape measure and pencil.
- Chop cord.
- A stationery knife and a miter box for trimming baseboards in corners.
- A dosing gun or a small metal spatula, depending on the glue used.
- A thin plastic or rubber spatula for puttying joints and removing excess mixture.
- Medium hard brush for painting.
Materials you will need:
- Adhesive for foam plastic.
- Finishing putty or sealant for filling cracks and eliminating joints before painting.
- Plastic film so as not to stain the stretch ceiling.
- A napkin for removing excess glue.
To correctly calculate the required number of baguettes, you need to measure the length and width of the room and calculate the perimeter using the formula: P=2*(a+b). Then for each corner add 15-20 cm, find the sum of the values and divide by the standard length of the plinth (2 m). The result should be rounded up and one or two details added in case of possible damage. If the layout of the room has a complex configuration, the area is divided into separate segments and then summed up.
An example of calculating the required number of baguettes for a rectangular room measuring 6x3 meters with four corners:
- Perimeter: 2*(6+3)=18 m.
- For corners: 4*0.2=0.8 m.
- Total length: 18+0.8=18.8 m.
- Number of stripes: 18.8:2=9.4 pcs. The resulting result is rounded to 10.
Thus, you should purchase 11-12 skirting boards, of which 1-2 are for unforeseen circumstances.
Plastic fillets
The most popular baseboards used in modern decoration. They not only imitate various finishing materials, but are also perfect for any interior. Another convenience is that they can be glued to wallpaper.
Fillers for stretch ceilings
When choosing fillets, it is necessary to take into account their flexibility, strength and weight.
In order to carry out installation you will need the following simple tools:
- roulette;
- knife;
- a simple pencil;
- miter box;
- regular spatula;
- a damp, clean rag and, of course, a stepladder.
In order not to stain the ceiling, it is carefully covered with film.
Tools and materials
Preparatory stage
- Make accurate measurements, buy the required number of fillets of standard length (it is better to buy not long products - no more than 1.3÷1.5 m.).
- Before installation work, you need to prepare the wall surface for attaching the plinth. For reliable, durable fastening, the surface must be clean, degreased, without traces of paint or putty.
- Make markings with a tapping cord or draw the bottom line with a pencil. This stage is needed to attach the decoration element evenly, without displacement.
- Prepare elements for installation, paint them in the desired color (preferably before installation, but possible after installation).
Tools that will be useful during installation
You need to prepare in advance:
- Simple pencil;
- Yardstick;
- Cord for marking the required length;
- Knife, hacksaw;
- Putty knife;
- Angle ruler or miter box;
- Suitable adhesive composition (putty);
- A small amount of sealant;
- Table with a flat surface;
- Ladder.
To avoid such troubles as, for example, dissolution of products, penetration of glue onto the outer surface of the skirting boards, leaving yellow marks on it, etc., the skirting boards must be glued with adhesive (putty) suitable for such work.
Tools required for work Procedure for using a miter box Trimming, preparing parts for installation
Gluing plastic skirting boards
To secure plastic products, it is convenient to use putty or liquid nails. The surface is pre-cleaned. To attach a plinth to a suspended ceiling, you need to perform the following steps:
- Mark around the perimeter of the room where the bottom edge of the baseboard will be located.
- Cover the canvas with polyethylene to prevent dust and dirt from getting in.
- Starting from the corner, glue the first part.
- Take the second plinth and lubricate it with adhesive. The side of the glued part is also coated.
- If the distance to the corner is less than 7 cm, the part is trimmed.
The final stage is lighting installation. This is a responsible job for which it is better to invite a master. Creating decorative lighting comes down to placing LED elements behind the baseboard. In combination with the glossy surface of the ceiling, such lighting looks amazing.
These are the main nuances of working with ceiling skirting boards
It is important to remember that when choosing, you should take into account the appearance, quality and weight of the fillets. The adhesive must match the selected material
During operation, it is necessary to protect the tension fabric from contamination. To avoid cutting corners, you can buy ready-made elements. Proper execution of the work is a guarantee that the products will be fixed beautifully and reliably, and in the future, if necessary, they can be easily removed to attach new ones.
How to choose a plinth
Ceiling plinths for suspended ceilings can be made from foam, plastic, or polyurethane. If required, you can find products that are made of natural wood or plaster. It is more difficult to work with such options, because they have more weight. It is much more convenient to use polyurethane elements; they are practical and can also be painted.
On a note! You should be very careful when choosing foam products. This option may be very impractical. The fact is that the ceiling plinth made of this material may dry out, this will lead to the formation of wide joints between adjacent elements.
The construction market offers a wide range of ceiling plinths from various materials.
What you should pay attention to when choosing a plinth:
- Products can have different sizes, therefore, to avoid numerous joints, it is necessary to choose longer fragments. You should also think about the interior design in advance. The fact is that the material can be smooth or embossed, which significantly affects the appearance.
- It is better to give preference to options that have a wider wall part. This will allow for better fixation, especially with less than ideal repairs.
- The product is purchased with the necessary reserve. This situation is explained by the fact that it is very difficult to adjust the connection of all corners. If you have very little experience, it will be better to do preliminary training.
- Before gluing skirting boards to a suspended ceiling, you need to choose the right glue. It is better to give preference to universal compounds that are suitable for fixing a specific material. It is also important to take into account the gluing time; some adhesive compositions require holding the parts after installation.
When installing ceiling plinths, it is best to give preference to universal adhesives.
On a note! Manufacturers of the material do not stand still. Therefore, additional elements are now on sale - special corners. They are glued to the corners, which makes it possible to avoid complex trimming.
How to install a ceiling plinth on a suspended ceiling with your own hands
In order for the ceiling decoration to be completely finished, it is necessary not only to choose a ceiling plinth that suits the design, but also to know the main points of its installation.
Tools for installing ceiling plinths on a suspended ceiling
To glue fillets you will need a certain set of tools and auxiliary materials:
- a miter box designed for adjusting corners;
- construction knife, hacksaw;
- roulette;
- ruler;
- a square with a right angle and an angle of 45 degrees, a protractor;
- for marking, a simple pencil;
- several types of spatulas (rubber, narrow metal);
- a construction gun for applying glue to fillets;
- container for preparing a working solution based on putty;
- finishing putty;
- white acrylic sealant;
- assembly adhesive composition;
- water-based paint.
When all this is ready, you can begin the process.
How to glue skirting boards to a suspended ceiling: instructions
Ceiling plinth can be installed on glued walls, plastered or painted surfaces. If the wall has unevenness, then it should be prepared as much as possible: cleaned, treated with a primer, leveled with plaster and primed again. Installation work should be carried out only after the soil on the wall has completely dried.
Instructions for installing plinths on a suspended ceiling:
- Using a construction gun, apply adhesive to the back side of the ceiling plinth.
- For better adhesion of the fillet to the wall, you need to let it lie for a few minutes, and only then apply it and press it to the intended surface. To avoid marks, it is recommended to press the element against the wall using a clean cloth.
- Excess adhesive should be removed immediately. Once they dry out, you won't be able to remove them.
- At the very end, all gaps must be treated with acrylic sealant or putty. For smoothness, the sealant can be smoothed with a finger dipped in water. For such work it is recommended to use rubber gloves.
- To fill gaps at joints, putty and a narrow spatula are used.
A video on how to insert a plinth into a suspended ceiling is presented here.
The adhesive composition should be purchased in strict accordance with the specific type of ceiling plinth. For decorating small spaces, the best solution in terms of choosing fillets would be narrow and simple models. But for finishing a stretch ceiling in spacious rooms, a wide plinth with a complex pattern will look more impressive.
If you want to highlight the suspended ceiling, then you can play with contrast, where the fillets will have a completely different color in contrast to the canvas. When installing, you should know that you need to leave a gap of 3-5 mm from the stretch ceiling. To avoid spoiling the appearance with excess glue, it should be wiped off immediately with a clean cloth. Anyone can install a ceiling plinth on a suspended ceiling, the main thing is not to neglect the rules for its installation.
Features of the plinth installation process
Additional elements intended for decoration are usually installed in place, and then, if required, they are painted. But, if you lay the plinth too close to the tension fabric, you can stain it with paint, so first you need to paint it and only then carry out installation work.
For work like attaching a plinth to a suspended ceiling, you will need the following tools:
- stationery or construction knife;
- ruler or tape measure;
- pencil;
- plastic or rubber spatula;
- brush;
- miter box.
Building materials are also needed:
- baseboards;
- adhesive composition for attaching planks;
- sealant, preferably acrylic;
- polyethylene film.
In addition, you will need a stepladder and a napkin to remove excess glue. Work begins with preparatory activities. First of all, you should protect the ceiling canvas from stains and damage. To do this, a thin polyethylene film is attached to it around the perimeter of the room.
To ensure a beautiful connection of planks in the corner of the room, it is advisable to purchase decorative corners. If these elements cannot be purchased, a miter box and a sharp knife are used to make them. You can make such a tool yourself.
To do this, a kind of tray is constructed from three boards, the width of the inner part of which should correspond to the width of the baseboard. Then, using a protractor, a hole is cut in its sides at an angle of 45 degrees.
Before gluing baguettes to a suspended ceiling, you need to prepare a high-quality adhesive composition, preferably one that is transparent and does not darken over time. The most commonly used “Moment” are “Mounting” and “Super-resistant”. "Titan" is also popular.
Installation methods
There are two main options for installing fillets. The first assumes that the walls are first covered, then the suspended ceiling is installed, and then the plinth is attached. This is a convenient and least time-consuming method.
The second approach is based on the fact that you should first stretch the ceiling, then glue the baseboard. Lastly, the walls are finished. The method is not without its drawbacks. Firstly, while working with the wall, you can damage the canvas. Secondly, when installing the ceiling, all the shortcomings of the wall will appear, since its finishing cladding has not yet been completed. It is up to the homeowners to decide which sticker method to choose. Sometimes it is not possible to finish the wall cladding before installing the ceilings, so you have to adhere to a non-standard sequence.
How to glue foam ceiling skirting boards
To glue foam baguettes to a suspended ceiling, you can use the following means:
- Liquid nails - from this line, universal glue Moment or specialized for polystyrene foam - INSTALLATION express decor - is suitable. This is a waterproof, white composition, intended for decorative friezes, safe for humans and will not damage the foam. To work you will need a dosing gun.
- Polymer glue - Eco-naset, Titan, Master, Elitance. A special product for gluing expanded polystyrene products. It is a transparent, water-based composition. It is cheaper, but the setting time is longer; you have to press the baguettes against the wall for 5-10 seconds. The work process is lengthened.
- PVA glue is safe and can be easily removed with a damp cloth. The disadvantages include high consumption and long setting time - about 3 minutes.
- Acrylic putty - Uniprof, MasterTeks HM. Waterproof, solvent-free adhesive based on acrylic dispersion. Suitable for any decorative items made of polystyrene and polyurethane. It has a high drying speed.
You can make the composition for gluing baguettes yourself. To do this, you need to mix finishing putty and PVA glue in a ratio of 4 to 1, gradually adding water until you get the consistency of sour cream. When the solution becomes homogeneous, let stand for 10 minutes, stir again and start working.
This is interesting: Drywall dowels - features of choice
Methods for installing plinths under a suspended ceiling
How to glue a ceiling plinth to a stretch ceiling? The method of fastening depends on the moment at which it was decided to install it. There are two main options:
- The product is glued directly after all work. The fact is that many people initially line the walls with wallpaper and stretch the ceiling fabric. Accordingly, the baseboards are fixed last. This state of affairs occurs most often.
- Fastening is carried out after the ceiling is installed. This precedes work on the walls. There is one small minus here. It must be taken into account that it becomes very difficult to carry out preparatory work on the walls. Firstly, the canvas can be easily damaged. Secondly, the suspended ceiling follows the configuration of the walls, which means that all irregularities will become even more visible.
Most often, the installation of ceiling plinths is carried out after finishing work on the walls and ceiling, although this is not always justified
Therefore, depending on the situation, the necessary technology is selected.
Finishing installation
Installation of plinths on glued or painted walls occurs according to the following principle:
A reliable adhesive composition is selected for the job. The best option is a transparent or white material
It is important to consider that the substance should not change its color after drying or over time. The setting time is also taken into account; the longer it is, the longer the part will have to be held. The necessary tools are being prepared
For this event you will need: a simple plastic miter box, a good utility knife, a saw, a meter, and rags. It should be taken into account that the work will be performed at height, so it is necessary to provide a reliable stand or stepladder. The plinth begins to be glued from the selected corner. It's the same as gluing baguettes.
To trim the baseboard you need to use a special tool - a miter box.
- Before gluing the product, it is first pressed to the surface to check the correct location. But it is better to make adjustments while working. This will help avoid mistakes.
- To prevent displacement of fragments, preliminary marking is performed. A mark is made on the wallpaper, just above the edge of the baseboard.
- The glue is applied exclusively to the part that will be pressed against the wall. The procedure is as follows: A small amount of the composition is distributed on the wrong side.
- The composition should not be applied to the very edge; you should back off a little to prevent excess from appearing.
- Before starting to glue, wait a while.
- Next, press the part to the selected location.
After applying the adhesive, the baseboard must be pressed tightly to the desired area
If the walls are not perfectly even, this will lead to gaps forming between the baseboard and the wall. To remove them, use masking tape. It is glued to the part and to the wall. That is, the existing defect is eliminated. After complete drying, the tape is removed.
The use of sealant or putty allows you to create a monolithic decorative coating
Thus, the entire area is covered. It should be understood that when removing wallpaper, in this case, damage to decorative elements is possible.
Installation to finishing
How to glue a plinth to a suspended ceiling if the walls are not yet covered with wallpaper? This option allows you to update the decorative finish without changing the installed products.
Mounting is done as follows:
- The parts are being prepared for work. Installation will be carried out using putty.
- The process begins with lightly wetting the surface. This will increase adhesion.
- The required amount of composition is mixed.
- The putty is applied with a spatula to the wrong side, the solution is distributed evenly.
- The part is placed in the specified place. It is pressed and leveled. This allows you to squeeze out excess mixture, which is immediately removed.
- All fragments are mounted. After complete drying, the surface is ready for further finishing.
The video will help you thoroughly understand the intricacies of the process:
Still, when deciding how to properly glue the ceiling plinth to a suspended ceiling, it is better to use a more universal option that allows you to avoid various defects. It consists in the fact that the walls are initially leveled and the ceiling fabric is stretched. Next, the baseboard is glued and the final finishing is performed.
Baguette installation technology
Lightweight foam models
To resolve the contradiction that has arisen (a ceiling plinth is needed, but the base cannot withstand the load), let’s try to reformat the question: let’s think not about how to properly glue baguettes to the ceiling, but about how to install a decorative panel at the junction of the ceiling and wall.
The easiest way is to use lightweight foam plastic models that are glued to the wallpaper without preliminary surface preparation:
- Before gluing the ceiling moldings, we apply markings to the wall. At the same time, we mark the line along which the lower edge of the fillet will be placed, making sure that the upper edge does not pierce the canvas.
The lightweight detail also adheres well to wallpaper
- After marking, we take the parts and cut them to size. To make adjustments in the corners, we use a miter box - a device for sawing panels at clearly defined angles. You can work with either a sharp knife or a special file for polystyrene.
Advice! If you haven’t cut ceiling plinths with your own hands before, then it’s worth making cardboard templates that will help you avoid mistakes and reduce material consumption.
- Having cut all the parts to size, apply a small amount of adhesive mixture to the bottom of the first panel. When choosing how to glue baguettes to the ceiling, we give preference to special compounds for polystyrene foam or polyurethane, since they will ensure the best adhesion.
For work it is better to use a special composition
- We apply the baguette to the wallpaper, carefully align it and immediately remove any drops of glue protruding from under the bottom edge.
- Press the part until it locks into place. After that, install the remaining panels in the same way.
Heavy polymer products
If, instead of light foam or polystyrene molding, you take a fairly heavy embossed baguette, then there is a risk that, under the weight of this part, the wallpaper will begin to peel off over time. In this case, we need to ensure contact of the finish with the wall.
The above algorithm will demonstrate how to properly glue a baguette to the ceiling in this situation:
Trimming parts using a miter box
- First, we cut all the parts to size, forming the corner joints using a miter box.
- Place the panel against the wall, marking where its bottom edge will be.
- Using a long metal ruler, level or rule, we draw a line along which we will need to cut the wallpaper. It is better to leave a margin of 0.5 - 1 mm, since it is much easier to cut off a thin strip of material when gluing it than to then mask the gap through which the plaster will be visible.
- Using a sharp knife, cut through the entire thickness of the wallpaper.
Advice! If the upper edge of the trellis is wrapped behind the stretch ceiling fabric, then the material must also be cut close to it for easier removal.
- Using a spatula, carefully remove the wallpaper from the wall. If necessary, they can be moistened.
Carefully glue the part without touching the canvas
- Before sticking the baguette on the ceiling, clean the wall under the wallpaper and then apply a penetrating primer to it. We carefully ensure that the soil does not fall on the tension fabric, and if this happens, quickly remove the drops with a damp cloth.
- Next, we carry out the work in the same sequence as in the previous case.
Wooden structures
As for wood products, here we will have to decide not what to glue the baguettes to on the ceiling, but how to fix them on the walls so that a fairly heavy part is securely fixed.
The instructions suggest the following installation sequence:
- First, we saw off fragments of wooden baguettes, adjusting them to the length of the wall. We cut the corners at 450, forming neat joints with minimal gaps.
Advice! The ends of the parts can even be sanded with sandpaper for a more accurate connection.
Installation of mounting blocks
- Then we cut out several dozen triangular fragments from a flat board about 20 mm thick. The bevel of the edge of such a part must correspond to the configuration of the baguette.
- We apply markings to the pre-leveled walls in increments of at least half a meter. Using the markings, we drill holes that we use to fasten the wooden corners with dowels.
- We apply the plinth to the corners, level it and fix it with self-tapping screws, recessing their caps into the wood by 1-2 mm.
Fixing the decorative panel
Note! We can try to do without mechanical fasteners, but then we will have to look for a long time for how to glue the baguettes to the ceiling, because the composition is needed with maximum adhesion.
- After installation is complete, take putty and fill the recesses above the screw heads with it. We carefully sand the baseboard, trying to ensure that as little wood dust gets on the tension fabric as possible.
- At the final stage, we varnish the baguette or paint it with interior paint.
How to stick after finishing finishing
Many people competent in the construction industry are still arguing about how best to glue the baseboard - before or after finishing. We will consider both options, and it’s up to you to decide which one to choose.
Note! Unless you are an experienced builder with the proper skills and equipment, try to stick the ceiling plinth on after the finishing is completed. This way you will reduce the risk of incorrectly calculating the location of the fillet fixation, and you will not have to redo the whole job again
Selection of adhesive composition
When choosing an adhesive, it is necessary to take into account the material of the baseboard and the characteristics of the room being repaired.
For those who don’t want to bother buying glue, we advise you to pay attention to the following products:
- Moment;
- liquid Nails;
- Adefix;
Moment
An adhesive that is in great demand among customers due to its versatility and practicality. Advantages:
- Suitable for most building materials used in renovation.
- Reliably fixes the part.
- Dries quickly.
Liquid Nails
The best choice for heavy fillet models that require increased reliability of the adhesive during fixation. The adhesive does not deteriorate when exposed to water, which allows it to be used in rooms with high humidity levels.
Adefix
Acrylic-based adhesive, suitable for working with skirting boards made of:
- polyurethane;
- polystyrene foam;
- extruded polystyrene.
After hardening, the glue does not lose its elasticity, which significantly expands the scope of its application.
Preparing tools
Correct, advance preparation of tools speeds up and simplifies any repair work. To glue the ceiling plinth after finishing, you will need:
- ladder;
- stationery knife;
- ruler or tape measure;
- hand saw;
- tray for cutting profile lumber;
- clean rag;
- pencil.
Performing markup
Marking is carried out using a pencil and tape measure, while noting:
- the lower edge of the ceiling plinth;
- joint places.
Applying glue
The glue is applied to the back side of the fillet, after which it is necessary to give it a few seconds for the substance to begin to set.
Trimming is done using a saw and a tray for cutting profile material. It has standard slots made at different angles, which greatly facilitates the process of marking and cutting.
Instructions for gluing skirting boards on a suspended ceiling
In order to competently carry out the work, learn how to glue the ceiling plinth to the suspended ceiling with your own hands, while preserving the PVC film, you need to know the features and nuances of this process. It becomes important to choose the correct adhesive base and carry out the sizing itself.
Not all types of skirting boards are suitable for suspended ceilings
We prepare materials and tools
To install the molding, prepare the following:
- step ladder (can be replaced with a stable, reliable table);
- pencil and tape measure;
- tapping (painting) cord for drawing straight marking lines;
- stationery sharp knife;
- miter box - this tool will help you accurately trim the baseboard for corners;
- spatula or gun depending on the type of glue used;
- a spatula (rubberized or made of soft plastic), which is used to remove the remaining mixture and putty the joints;
- brush if additional painting of the baseboards is planned;
- adhesive mass;
- putty or sealant for final decorative work (masking cracks/joints before painting);
- film for protecting PVC sheets.
In order to prevent excess purchased material, it is worth learning the rules for calculating the consumption of skirting boards. To do this, calculate the perimeter of the room using the formula P = 2x(a + b), where “a” is the length of the room, and “b” is its width. Add 15–20 cm to the resulting number (for each corner). We divide the resulting amount by the length of the plinth (in the classic form it is 2 m). We’ll add 2-3 more baguettes to the final result (for emergencies).
Choosing glue
To properly glue baguettes onto a suspended ceiling, craftsmen recommend using various adhesive modifications. The most common and proven ones include:
To work, you need to choose high-quality glue
You can also prepare adhesive mixture for skirting boards yourself. To do this, mix PVA glue and putty at the rate of 4 parts putty to 1 part glue. Water is carefully added to the mixture with constant stirring. As soon as the substance acquires the consistency of sour cream, leave it for 10–15 minutes, and then begin to work.
Surface preparation
To ensure reliable adhesion and long-term fixation of the working surface, it should be prepared. Preliminary work consists of cleaning the surface and priming. For priming, it is better to use a primer or an aqueous solution of latex at a rate of 1x5, where 5 parts are latex. All subsequent gluing work is carried out only after the primed surface has completely dried. When working, it is worth considering the following nuances:
- It is better to glue the wallpaper after installing the moldings to improve their adhesion to the walls and ease of subsequent dismantling of the wallpaper itself;
- if you already have wallpaper, then use lightweight foam baguettes to mask the gaps between the walls and PVC film;
- work especially delicately, try not to stain the suspended ceiling with the adhesive base;
- excess adhesive mass is removed immediately with a soft cloth or paper napkins;
- if painting the baguette is planned, then the initial layer of paint is applied before installing the structure.
Marking and working with glue
The prepared material is applied in such a way that the surface edge of the element is flush against the ceiling. Fix the bottom edge of the baguettes in the corners of the room with a basting. To mark, you can use a small piece of plinth 20–25 cm in size. After that, all the indicated marks are connected with taping tape and marks are marked along the perimeter of the entire room.
The sticker process itself begins from the corners of the rooms. The adhesive mass is applied to the baguette in an even layer and distributed evenly over the entire back side. Then the baseboard is pressed firmly against the wall along its length. The adhesive residues are removed. The rest of the elements are glued in the same way.
How to join moldings at corners
Corner joints are made at an angle of 45⁰. For precise and even cutting of baguettes, a miter box is used. And the baguettes themselves are quickly cut with a knife. It is better not to use a hacksaw - the foam will crumble and form crooked burrs. When corner joining a baguette, the adhesive mass is also applied to the area of the fastening joints.
Installation
The installation method is selected depending on at what stage of finishing you are going to attach the plinth, as well as on the condition of the walls.
Most often, a suspended ceiling is installed last, when the finishing of the walls is already completely completed. They are glued on top of wallpaper or other finishing.
Although it is preferable to install the plinth before finishing the walls, especially if they are not very smooth. But in this case, there is a risk of damaging or staining the already installed stretch ceiling when you glue wallpaper or paint the walls.
Installation on finished walls
- For gluing you will need a special transparent or white glue that does not darken over time. Experts recommend using Moment Installation, Moment Super-resistant, and Titan glue. They set quickly and you don't have to hold the baseboard with your hands for long.
Adhesive for ceiling cornices
- In addition to the glue, prepare a miter box (if you don’t use corners), a stationery knife (or a hacksaw if the baseboard is plastic), a tape measure, a stepladder and a clean, dry cloth.
Miter box with a hacksaw for metal with a fine tooth
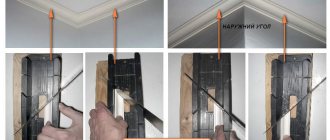
- You should start gluing from one of the corners . Before doing this, practice cutting corners correctly using a miter box. Not only the front side of the plinth, but also its thickness should be cut at 45 degrees. Moreover, the nature of the cut depends on what angle you are creating - internal or external. The picture below shows how to position the plinth in the miter box in one case or another.
Scheme for cutting adjacent cornices
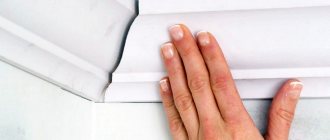
- Place the products in place, pressing them against the surface of the ceiling , make sure that the joint is correct. To avoid staining the wallpaper later, draw a marking on the wall along the bottom edge of the plinth.
Position marking
- Apply glue only to the inner surface (see When to glue baseboards) that will be adjacent to the wall. Wait a little for the glue to set slightly, and then place the plinth against the wall exactly according to the markings and press it. It is better to do this together to ensure uniform pressure along the entire length.
There is no need to apply glue to the side adjacent to the ceiling.
If the wall is uneven, then in those places where there is a gap, press the product more tightly and temporarily secure it with masking tape. After the glue has hardened, it can be removed without affecting the finish.
When working alone, masking tape will help hold the part in place.
For reference. The method described above helps to get rid of visible cracks, but the baseboard line is not straight. Instead, you can carefully seal the cracks with silicone sealant, and then paint the baseboard the desired color.
Fresh sealant can be easily removed with a finger and a damp cloth
- Having glued the product to one corner, you can do the same with all other corners , and then glue smooth areas between them. Or you can continue in a straight line to the next corner. In this case, measure the distance to it to determine how many whole parts will be needed and how long a piece will need to be added.
Cut off the corner element with a margin so that you can redo the imperfect angle
Attention! If there is less than 5-7 cm left from the last whole fillet to the corner, then it is better to cut it a little in length to lengthen the corner piece.
- Apply glue not only to the inner surface , but also to the end part to join it with the previous one.
- When gluing each fillet, immediately remove excess glue with a clean cloth if it has protruded onto the walls. Painting should be done after the glue has completely dried.
Pasting baguettes
Installation of products before finishing the walls
This type of installation is preferable, if only because when you subsequently change the wallpaper, you will not have to remove and reinstall the ceiling plinth. In addition, during installation you will be able to smooth out any existing unevenness in the walls. And paint the baseboard before wallpapering.
Installation of the plinth in this case can be done either with glue or sealant, or with putty. The installation technology is similar to the previous one, but you will need a spatula and a damp cloth. And the putty should be diluted a little thicker than for leveling the walls.
- You already know how to fit a ceiling plinth. This must be done “dry”, before applying putty.
- After adjustment, lightly moisten the wall at the installation site and the back of the baseboard with water.
- Apply putty to the inside of the baseboard using a small putty knife or a plastic bag with a corner cut off.
Advice. To avoid staining the stretch ceiling, protect it with cling film. It easily sticks to the surface, and is also pulled out after gluing the baseboard.
- Press the baseboard firmly against the wall so that some of the putty is squeezed out from under it, filling any gaps.
How to attach it yourself
- Carefully remove excess putty from the walls with a spatula, and at the joints with a damp cloth.
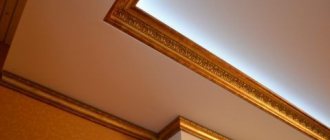
If you use a specially shaped cornice or leave a small gap between a regular plinth and the ceiling, gluing it 1.5-2 cm lower, then you can install LED lighting in the resulting gap.
Ceiling cornice for hidden installation of LED strip