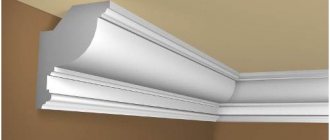
To make the finish more attractive, expressive and hide any imperfections, ceiling plinths are used. Fillets, moldings, baguettes or baseboards are made from a variety of materials. One of the popular ones is polystyrene foam. Foam plastic ceiling plinth has many advantages, including low weight, low cost and ease of installation. If you have chosen this particular version of the plinth, then you may be interested in the question of how to glue the foam ceiling plinth.
This is exactly what we will learn from this article. It will consider acceptable means for gluing foam skirting boards, preparing glue for DIY work, and the process of gluing products to walls. And thanks to training videos, this will be much easier.
What are the types of adhesives for ceiling moldings?
First of all, let’s figure out what foam ceiling plinths can be glued to. There are three most common types of materials on sale, each of which has its own pros and cons. To better understand which glue is best for gluing foam baseboards to the ceiling, you will need to compare them.
The following adhesive compositions exist:
- polymer adhesives;
- liquid Nails;
- acrylic putty.
How to make corner and intermediate joints
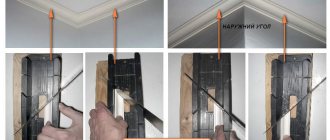
Fastening and preparing corner joints are considered the most difficult steps when gluing skirting boards. To avoid making mistakes, adhere to the following algorithm of actions:
- To work with internal corners, use special strips cut at 45°. They will allow you to evenly trim the two halves of the baseboard without leaving gaps at the junction.
- Before gluing the plinth in the corners, attach the two parts to each other at the place of fixation, thus checking that the cutting is correct.
The main thing is to take your time and do everything carefully, then problems should not arise.
Polymer-based adhesive mixture
This composition is considered the most common for installing foam baseboards. Most often, buyers purchase Moment and Titan glue. The uniqueness of these compositions is that they have a special adhesive base that provides quick setting and reliable fixation of the surfaces to be bonded.
It is worth noting that there are other adhesives with similar properties on sale, but they will not be presented here, as they have worse characteristics.
The characteristics of some adhesive compositions are not without nuances, so before purchasing you should either read the instructions or consult with the seller whether such adhesive is suitable for your needs. The composition must not contain any aggressive solvents that can easily damage the surface of polystyrene foam.
How to glue foam ceiling tiles. Features of choice
Attention: When choosing a tile, take into account not only aesthetic features, but also the quality and its operational features.
Pay attention to the edges of the material - they should not crumble or crumble, and the polystyrene particles should be the same size.
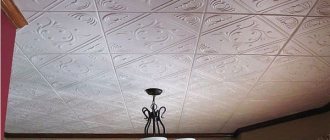
The shape of the material is of great importance - square products must have right angles, otherwise it will be difficult to join the tiles and it will not be possible to achieve the desired attractiveness. The surface should not have defects, since any chip or dent is clearly visible on the ceiling, regardless of the texture of the material and the color of the tile.
Figure 3 The right choice is the key to beauty and quality.
To make sure of its strength, take the product by the corner - a good tile will not crack under its own weight. If the opposite happens, the material is of poor quality and should not be purchased.
If you intend to purchase colored tiles, keep in mind that over time the paint will fade when exposed to sunlight. It is advisable to buy a white finishing material suitable for painting. If you are still more attracted to colored products, pay attention to the presence of a uniform shade over its entire area.
Expanded polystyrene ceiling tiles are available in a wide range in any specialty store. Its cost is affordable, and in terms of convenience, ease of installation, and maintenance, it is superior to suspended ceilings. When purchasing finishing material, do not forget to buy other accessories for its installation, in particular, glue.
When thinking about what is the best way to glue polystyrene foam ceiling tiles, keep in mind that one of the best compositions is “Titan”, which is characterized by quick adhesion to the surface, reasonable price, and reliability. Liquid nails and other transparent rubber-based compounds are effective for fixing finishing materials. After applying glue to the surface, reliable adhesion, depending on its type, occurs in about a few minutes.
What are liquid nails
This composition for installing foam plastic ceiling plinths differs from polymer glue in that it does not harm the material. You can always be sure that the ceiling skirting boards will remain intact and will be firmly fixed for at least 10 years.
Liquid nails come in the following two types:
- Neopropylene.
- Acrylics.
The difference between them is that the first type is made from an organic solvent. Such liquid nails have a pungent odor and are harmful to health in a liquid state if basic safety rules are not followed during work. The positive side of neopropylene adhesives is that they are indispensable for use in rooms with excessive levels of humidity.
Acrylic glue is the safest for humans and does not have any negative effect on ceiling skirting boards. The downside is that this composition is sensitive to high humidity, so it is better not to use them in bathrooms or kitchens.
Is it possible to glue skirting boards to a suspended ceiling?
Installation of a ceiling molding is the final stage of work on installing a stretch ceiling in a room. It will close the visible technological gap between the canvas and the wall. However, gluing the plinth to the tension fabric material is strictly prohibited.
When the glue hardens, it changes its volume and this can lead to the formation of wrinkles on the surface of the canvas, or even to its mechanical damage. When decorating suspended ceilings, the fillet should be attached only to the wall surface and located at a distance of 2-4 mm from the ceiling plane. How to do this - see here.
Acrylic putty
Many may believe that when installing foam ceiling skirting boards with your own hands, it is best to use acrylic putty. Undoubtedly, this is an excellent material that even professionals prefer to use. This is because gluing of the baguette occurs almost instantly, as a result of which there is no need to hold the baguette in one place for a long time until it adheres properly.
In addition, putty allows you to mask all the gaps between the ceiling, wall and foam molding. What’s especially nice is that this material is completely safe for the human body, so you don’t have to worry about your health. It is allowed to be used even indoors. Read also: “What glue to use to glue ceiling plinths - review, characteristics, choice of glue.”
Advantages and disadvantages
In many interior design options, foam dumbbells are used. Such solutions are associated with the following advantages of the material and its derivatives:
- Inertness to inorganic materials - lime, cement, alcohol, alkaline and others.
- Low cost of products and minimal costs for consumables.
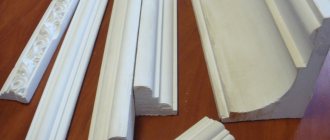
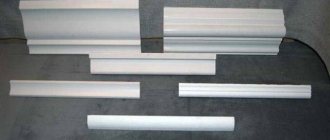
- Wide selection of products. Any retail outlet that sells building materials offers dozens of options for foam dumbbells. You can choose the pattern and width of the product for any interior.
- Presentable appearance. The texture lines are highlighted quite clearly. When dyed, they can complement a variety of designs.
- Possibility of coloring. Use water- or acrylic-based paints.
- Ecological and hygienic cleanliness. The use of elements made from this material does not create a favorable environment for the development of bacteria and fungal accumulations.
- Simple installation, accessible even for novice home craftsmen.
- Possibility of using plinths under a suspended ceiling.
- Low weight of elements.
- Absolute absence of hygroscopicity, eliminates the possibility of rotting.
- Possibility of gluing to putty mixtures without the possibility of breaking the fastening density during operation.
Ceiling plinth
Disadvantages include:
- the elements are fragile and require careful handling at all stages of work;
- they are subject to external mechanical damage;
- long-term use is associated with slight yellowing of unpainted surfaces;
- When exposed to heat from an open fire, they lose their consumer properties and release a significant amount of toxic substances.
Pay attention to the granularity of the foam composition, which causes difficulties when joining the ends of the parts. However, this feature is neutralized by simple putty. If there are minor defects in the joints or the formation of areas of loose fit to the planes, wait for the main adhesive composition with which the baguette was secured to dry out. Then the joints are puttied and cleaned with emery cloth.
We make the adhesive mixture ourselves
Before gluing the foam ceiling plinth, it is worth studying the technology of making your own adhesive composition. It will allow you to securely fasten the ceiling plinth.
For this we need:
- finishing putty;
- PVA glue;
- purified water;
- container and tools for mixing adhesive ingredients.
The following is a step-by-step list of work:
- Finishing putty is placed in the container.
- Next, add PVA glue in proportions of 1 to 4 (you will need 4 times more putty than glue).
- Mix everything thoroughly, adding a little water. This is done until a creamy consistency is achieved. Make sure that there are no lumps or clots left - you need to get rid of them completely.
- At the last stage, all that remains is to let the composition brew for 10 minutes and mix everything again.
Now you can begin the process of gluing the foam baseboard. Keep in mind that the finished adhesive composition must be used within 2 hours, as after this it will lose its adhesive properties.
Skirting mounting options
Molding cladding is done using adhesive compounds, putty mixture or hardware. Skirting boards can be mounted both on the wall and on the ceiling on top of the decoration or base without decoration. Each case has its own technological features.
Advice! Mechanical fasteners are used if the house has a suspended ceiling structure. In this case, the plinth is mounted on a mounting strip.
Mounting to finished finish
Is it possible to glue fillets to wallpaper? Yes, as with any wall decor. The work algorithm in this case is as follows:
How and with what to paint plastic ceiling plinth for PVC panels
- A polymer adhesive composition or putty is selected.
- The wallpaper is covered with masking tape so as not to stain the finished decor.
- The adhesive composition is applied to both surfaces: baguette and base. The strip of mixture should be thin so that after pressing the fillet, excess does not protrude.
- Press the plinth against the markings. If the adhesive composition is squeezed out, remove it immediately with a dry sponge.
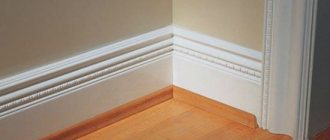
- To seal the joints, use white silicone sealant for the ceiling plinth. It is better to cover cracks and joints not with a spatula, but with your finger, quickly leveling the composition and removing excess.
Advice! In order not to paint fillets after installation with the risk of staining the wall decor, skirting boards are painted before the installation process.
Mounting on an unfinished wall
This option differs little from the first, but provides more opportunities for durable installation. The base is pre-cleaned, leveled, primed and dried.
Only then is the installation of ceiling plinths carried out:
- A putty mixture is used, which serves as an adhesive and leveling compound for the wall.
- It is better to apply the mixture pointwise, in increments of 15-20 cm. And it is better not to make a layer that is too thick so that the putty or glue does not spread.
- The lamella is applied along the markings and pressed a little. Strong pressure is not necessary - this will damage the design and leave fingerprints on the bar.
- Remove excess mixture, simultaneously sealing cracks and joints (if putty is used).
- The next day after installing the baseboard, seal the remaining cracks.
- After the putty or sealant used to seal the cracks has dried, the surface of the overlays can be primed and can be painted within a day.
Advice! It is better to start installing the ceiling plinth from the most uneven part of the plane or from a corner.
After installing the fillets, you can glue wallpaper or decorate the walls with other materials. When gluing wallpaper, the tapes are cut so that they extend slightly onto the fillet, and after gluing they are cut with a sharp knife strictly along the joint.
Ceiling or wall mounting
Where and how to glue? If this question arises, then you need to look at the place of fastening, namely, how the wallpaper or ceiling decor is pasted. If the edge of the wallpaper extends onto the ceiling, then the wide part of the baseboard extends onto the ceiling plane. If there is a gap between the ceiling and the wallpaper, you need to glue the wide part to the wall.
Advice! Craftsmen first assess the degree of flatness of the planes, and glue is applied to the plane that has a large number of defects. This way you can prevent the fillet from snapping away from the surface during operation.
Don’t worry, the foam fillet will fit well on uneven surfaces if you choose a high-quality adhesive or putty composition.
Important! If work is carried out with tension ceilings, the skirting boards are glued only to the wall. It is impossible to smear the surface that faces the tension panel.
Instructions for gluing foam baseboards
In reality, gluing skirting boards is not such a complicated process. Even a beginner can do this. The main thing is to ensure that the fixed elements are installed evenly and firmly. Foam baguettes are easy to bend, cut and are easy to paint. All this makes their installation as simple as possible.
Preparation before installing the ceiling plinth is carried out in the following sequence:
- First, the walls and ceiling are puttied and primed.
- Appropriate markings are made on the walls strictly horizontally.
- Now the plastic baseboard is being prepared. To do this, measure the length of the walls, and, based on these dimensions, cut the strips. Cuts are made from the required sides at an angle of 45°.
- At the final stage, the correctness of the angles is checked.
The success of all subsequent work will depend on how well the preparatory stage is completed.
It is recommended to buy one extra plinth, especially if this is your first time doing such work. You will need it if you damage any of the pieces of molding.
Once all the baseboards and glue are prepared, you can begin installing them. Glue is applied to the foam planks on the inside and pressed in accordance with the previously made markings throughout the room. There is nothing complicated about this, the main thing here is to cut the corners correctly in the right places. After all, in order to avoid an overlay and create a beautiful 90-degree joint, the skirting boards being joined must be cut exactly at an angle of 45 degrees. In this case, the joined planks will be cut in different directions.
To make a beautiful cut, you need to use a miter box. It is a special tool that makes it possible to cut the workpieces inserted into it at different angles. Therefore, we simply put our foam plinth inside the miter box and cut it according to the desired template.
Step-by-step instruction
Proper gluing involves performing several stages of work, which will be described below. If the surface is not well prepared, then the baguettes may be glued crookedly and unreliably. As a result, the effect will be negative.
If the surface is not well prepared, then the baguettes may be glued crookedly and unreliably.
Required Tools
Repair work begins with the preparation of tools and materials that will be needed during work. The following items should be purchased:
- Wide skirting boards are cut with a hacksaw, narrow ones (up to 2 cm) can be cut with a stationery knife;
- Miter box, for adjusting corners;
- Narrow spatula;
- Fine-grain sandpaper.
Repair work begins with the preparation of tools and materials that will be needed during work.
Surface preparation
The walls are leveled so that the fastening goes smoothly. The surface is sanded using sandpaper. Apply the primer mixture and wait until it dries completely. Markings are made, baguettes are applied to the surface, and the joints are marked with a pencil. Prepare the material according to the required dimensions.
The walls are leveled so that the fastening goes smoothly.
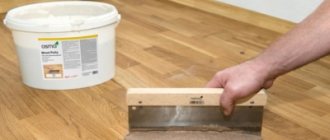
Gluing onto putty mixture
When working with putty, it is often necessary to dilute it; work according to the instructions, adding the amount of water specified by the manufacturer. Then proceed as follows:
- The mixture is applied in a thin layer to the baseboard.
- Excess from the front side can be removed using a rag or sponge.
- Place the molding against the wall according to the markings, check the evenness, and press it against the wall without force.
- The next baguette is additionally greased with the mixture from the end.
- Having glued all the parts, they are left for 24 hours, after which the surface is sanded.
When working with putty, it is often necessary to dilute it; work according to the instructions, adding the amount of water specified by the manufacturer.
Glue mounting
The principle of operation is similar to that described above; glue must be applied to the baseboard according to the instructions from the manufacturer. Press the material against the wall along the central and outer parts. Hold for the period of time indicated on the package. Excess adhesive solution is removed immediately. After drying, the joints are filled with sealant.
Press the material against the wall along the central and outer parts.
What mistakes are common for novice masters?
Sometimes it happens that during the work the plinth simply refuses to stick, or falls off a few days after installation. This is due to several installation errors.
To prevent them, use the following tips:
- The working surface that will be glued must be cleaned very well. There should not be a drop of moisture or dust left on it. To avoid staining the baseboard, wear gloves when working. And if the walls do not yet have a finishing touch, then it is better to prime them.
- The problem may be a poor-quality adhesive composition, especially if it was made by hand. In this case, once again study the properties of the glue and how to work with it, since different glues require different times for adhesion of surfaces. As a rule, you can release your hands after pressing the baseboard only after 2-3 minutes.
- It is possible that the adhesive you purchased is not intended for foam baseboards. The composition may contain a solvent, so when purchasing, ask whether such a composition is allowed to be used in your case.
- Drafts have not been eliminated in the room under renovation. When installing skirting boards, it is strictly not recommended to ventilate the house or apartment. This leads to rapid drying of the working material, which is why the gluing is not as good.
Putty for gluing
Putty is often used by professional builders. However, this material is also quite suitable for DIY work. Conveniently, there is no need to comply with temperature conditions. The glued plinth will remain in place for quite a long time.
Putty can perform several tasks at once:
- The material is convenient to use for leveling the working surface, that is, the one on which the plinth is glued.
- The putty will perfectly close the cracks.
How to install a foam fillet when using this material? An even, not very thick layer of putty is applied to the wall surface with a spatula. A plinth is placed on top and lightly pressed down. You can use the excess to seal the cracks.
DIY installation
As mentioned above, before starting work you need to draw up an action plan, as well as the exact amount of necessary materials with a reserve. Ceiling fillets need to be purchased 10-15% more than required in order to avoid shortages.
It is important to buy fillets in large quantities so that there is no shortage
To calculate the required number of skirting boards, there are online calculators that can be found on any construction site. But independent calculation does not require skills. It is enough to know the length and width of the room. Next, add up their value and multiply the resulting number by 2. Divide the result by the length of the ceiling plinth, that is, by 250 cm.
Gray wallpaper with white baseboards looks good
Combination of plinth with wallpaper in white shades
It is recommended to match the ceiling plinth to the interior of the room
It is important that its color matches perfectly with the wallpaper. To do this, you can take a small piece of wallpaper with you to a hardware store when choosing skirting boards and compare the colors
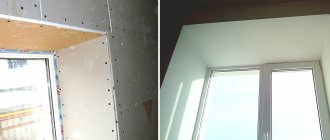
Surface preparation
Preparatory work before gluing ceiling plinths is carried out in advance. The surface of the ceiling is carefully inspected and if flaws and irregularities are found, sandpaper is used to eliminate them, attached for convenience to a wooden block.
Sandpaper on a wooden block, which removes unevenness well
Subsequently, the ceiling is treated with a special primer, prepared in advance. The primer must be prepared strictly according to the manufacturer’s recommendations, otherwise the desired effect will not occur. After all the steps have been completed, the surface needs to dry completely, after which you can begin work.
Priming the ceiling and walls before gluing the baseboard
Warning ATTENTION! To best achieve the result when installing the plinth, markings are made. The ceiling element is applied to the required location and a line is drawn along its edge
Measuring and cutting
Professional repair specialists recommend that beginners measure the length of the baseboards before starting work. For convenience, a diagram is drawn up on a sheet, all sections are measured, calculations are made and elements are trimmed. It is worth knowing that every wrong action can lead to deformation of the ceiling element.
Warning ATTENTION! To avoid deformation, it is recommended to practice on an unnecessary part.
Application
There is roughness on the inner surface of the ceiling element, which must be removed with sandpaper. At this stage, a spatula 8-10 cm wide is needed; with it, the solution is applied to the entire surface of the baseboard, which will subsequently interact with the walls and ceiling. This procedure is not difficult, even for a beginner. The main thing is to ensure that the solution does not get on the outside of the baguette.
Gluing
Gluing ceiling plinths begins from corner of the room to corner. To start work, you should choose the one that is within your field of view. Before connecting the element to the surface, it is necessary to check that there is no excess glue. In another case, if there is excess, then later when connecting elements it is difficult to get rid of glue residues. Next, the element is connected to the ceiling surface. The markings that were made earlier will help verify the correct installation. When choosing an instant-setting adhesive, there is no need to strongly press the baseboard to the ceiling surface. Thanks to this solution, the element is fixed instantly. Once the baseboard has set to the surface, immediately remove any remaining adhesive from under the edges before it completely cures.
Hand Right IMPORTANT! Excess glue is not always removed. If there are unevenness or other defects on the surface, the solution thoroughly smoothes them out, which gives an advantage when the edges of the skirting boards are formed
How to join corners correctly?
When connecting the second element to the surface, beginners often make common mistakes when joining skirting boards; glue is not applied to the inside of the element. It is always worth remembering that glue must be applied to each element of the plinth. After all, a small amount is required to avoid excess or keep it to a minimum. To dock all the elements, you need to press the element into place and dock it with another element. In this matter, care is required; the elements need to fit perfectly at the joints. Otherwise, all the flaws will be evident not only to the owner, but also to all the guests.
Advantages and disadvantages
Despite the fact that modern industry produces skirting boards from various materials, foam ceiling products are very popular and in demand among consumers. There are several reasons for such justified preferences:
- foam materials have the cheapest cost compared to other analogues made of polymers, gypsum or wood;
- the material has a long service life and retains its qualities for decades;
- installation of a foam molding is quite simple, and even a person with little experience in construction can cope with such a task;
- polystyrene foam is light in weight, so the installation of skirting boards can be done by one person;
- The width dimensions and appearance of the plinth design allows the use of foam material for interior decoration of any design style;
- in appearance, foam plastic imitates expensive gypsum stucco molding and at the same time looks dignified and attractive, harmoniously combining with any interior;
- the material does not have the property of expanding when temperature and humidity levels change;
- the plinth can be painted in any color, and it can also be installed on the surface of a stretch ceiling;
- polystyrene foam does not require special measures and methods of additional care;
- the material has good adhesive properties and is well mounted on painted, concrete or brick surfaces, drywall, wallpaper of any composition, plaster, and so on;
- the material is absolutely harmless to human health and does not release harmful chemical components into the environment;
- the surface of the foam is not susceptible to fungus or mold.
Of course, foam plastic also has a number of disadvantages, but they are so insignificant that few people pay attention to them:
When cut, coarse-grained polystyrene foam does not make it possible to make an even and beautiful joint, so the seam must be additionally sealed with putty or acrylic sealant; this material dissolves under the influence of organic solvents, so adhesive compositions containing this component are not suitable for installing foam plastic, as they burn right through it; thin foam baguettes are fragile, so you will need to be careful when performing installation work; over time, the foam decor may turn yellow, so it is updated by tinting; The glued foam plinth can only be dismantled by destruction; reuse of this material is no longer possible.
It is not difficult to purchase such decor - it is offered in a wide range in almost every specialized retail chain. Moldings look most attractive after painting; their color can be made in accordance with the overall decoration of the room or you can choose contrasting options. Inexpensive and versatile skirting boards look no worse than their gypsum counterparts, but significantly save your budget and do not cause problems when installing them yourself.
You can fix the foam plinth under the ceiling in the following cases:
- on the surface of any wallpaper - paper, liquid, vinyl, and also intended for painting;
- the wall can be painted with any type of paint or simply treated with a layer of putty;
- The plinth can be glued to the ceiling or simultaneously to the wall and ceiling.
Experienced builders glue the baseboard first, and then the wallpaper. But if you have little experience in performing such work, then it is more advisable to first stick wallpaper on the walls, and only then place the baseboards.