How to choose a needle roller?
The roller is widely used in modern construction for painting, plastering and finishing work and has different varieties. A needle roller is the same type of roller tool. This roller is indispensable for arranging self-leveling self-leveling and polymer concrete floors; it is needed for processing gypsum and cement solutions, and helps out when bending plasterboard sheets and removing wallpaper manually.
Surface preparation
To ensure that the created even surface layer does not crack around the perimeter of the room, it is necessary to stick a damper tape, preferably made of foamed polypropylene. Next, using a level (regular or laser), you need to find the lowest and highest points of the floor base. From the highest point, you need to mark the height to which you plan to raise the surface - at least 5 mm, and mark on the walls a control line to which the layer of filling the leveling mixture will reach.
Preparing the foundation does not require any special construction skills from you. First, check for holes and cracks. They should be sealed, and all fragile elements should be removed along with debris and dust. If you have an old vacuum cleaner, it is very advisable to vacuum the surface with it. Then the clean surface must be primed. The primer will take approximately 4 hours to dry. After this time, you can begin preparing the working solution.
Why is it needed?
During the floor repair process, a special mixture is prepared. In most cases, when mixing it, air bubbles are formed, which can become a serious obstacle to performing quality work. If they are not promptly removed from the solution, after drying the screed will have micro-voids. Such deformations will subsequently lead to surface unevenness. Such a floor will not last long.
A needle roller is indispensable for removing air from a liquid polymer or concrete solution. The cylindrical base of the roller consists of a handle and a substrate, which is covered with a needle-like material. The handle, in turn, can be metal, plastic or wood. Metal rollers are heavier, they are strong and durable, convenient for bending drywall and working with old wallpaper. Manufacturers often equip such products with an extendable handle.
What is it needed for?
A needle roller is necessary for removing air bubbles from the self-leveling floor, stripping off old wallpaper and bending sheets of drywall. In the first option, it serves as a layer leveler, and the needles pierce air bubbles in the solution.
A self-leveling self-leveling floor spreads and levels well, but without the use of a needle roller, bubbles will remain in it, which will evaporate through the pores over time, and voids will remain, due to which the floor will become brittle, begin to crack and swell.
How to use?
Using a needle roller, you can easily bend drywall and give it the desired shape. For these manipulations, it is better to choose a roller made of plastic material with steel needles. The technology is as follows: it is necessary to wet the sheet of drywall on the side on which you plan to bend it. Then you need to go over the surface with a needle tool and make punctures with a diameter of 2 mm, after which it remains to bend the softened material. The longer the needles, the more moisture will penetrate into the surface structure, the easier the drywall will bend.
To remove old wallpaper, you must first moisten the wall covering with water , and then carefully remove it from the wall using a needle roller. This process is quite quick and easy. A needle roller is suitable for removing various wallpapers (paper, vinyl, non-woven, textile and others). In the processing of self-leveling and concrete coatings, a needle roller is used to remove oxygen bubbles and level the fill.
To eliminate voids, it is necessary to intensively roll the roller over the surface of the screed, which is already distributed over the floor.
Before rolling with a needle roller, the floor is leveled with a spatula. Rolling is done without removing the roller from the mixture for 15-20 minutes. The time may depend on the composition of the mixture; before starting work, read the instructions in advance. It is necessary to work evenly and roll without pressure. It is better to move on special spikes for shoes so as not to deform the new floor.
It is advisable to treat the floor in this way at least three times. Such pumping reduces the porosity of the mixture and prevents its deformation, which is especially important for rooms in which industrial machines, massive objects and furniture are supposed to be placed on the floor. After work, it is recommended to thoroughly clean the roller from dirt and dry it.
The needle floor roller has a wide range of applications and is a multifunctional and useful tool. You can perform all of the above manipulations yourself, without calling a specialist, which will save time and budget. There is no substitute for a needle roller on the modern market; its use simplifies the process of arranging the floor and provides a guaranteed result. However, you shouldn’t rely on just one tool. A good result requires preliminary preparation of the base, the use of high-quality mixtures and materials, and following the instructions. Sufficient time is needed for the floor to dry.
Shoe attachments
These devices are otherwise called “cats”. A few spikes on the sole will be enough to move along the newly poured solution. They are fixed to the shoes in which a person works and allow movement along the surface of the screed without damaging it. Their cost on average is 1000 rubles.
It is possible to make such attachments yourself when performing a self-leveling floor once. There should be two blanks - for each leg. The material used is moisture-resistant plywood. Self-tapping screws or furniture screws are screwed into them, whatever is at hand. Fixation on shoes is carried out using adhesive tape, which can be peeled off very easily if necessary. Any material for the nozzles can be selected that can withstand the loads of the performer and the humidity from the solution.
Tips for choosing
Finding a needle roller today is not difficult; choosing a suitable and high-quality tool is a responsible matter. Needle rollers are available in construction stores, markets, and Internet sites. Needle rollers have found application in the field of beauty and health. An example of this is a magnetic or special needle roller for massage procedures. It is important not to confuse these products.
Construction magnetic brushes also exist, but they are designed for cleaning particles from the surface of the floor or sandy surfaces. They are quite voluminous and are produced in the form of trailers or varieties for manual rolling. When purchasing a regular needle roller, you must consider the following features:
Material of manufacture
The material of manufacture affects the service life. A metal tool is stronger and more durable, so you should give preference to it. Plastic deteriorates over time.
Roller width
Roller width, which varies from 150 to 600 mm. For a large area, it is more practical to buy a wide roller; a narrow model is convenient for processing narrow niches and hard-to-reach places. For processing drywall, a roller of any width is suitable; for removing wallpaper, you need a medium (400 mm) or maximum width (600 mm) option.
Needles
Needle clamping tools have needles ranging from 8 to 34 mm in length. This parameter is especially important if the tool is purchased for floor processing. The thicker the height of the tie, the longer the needles should be. They will penetrate deeper into the solution, which will ensure work efficiency and the desired result.
There are needles of several shapes: sharp cone-shaped, spherical and drop-shaped. Masters believe that spikes in the form of drops are less effective. Sharp needles are used for more viscous mixtures, for example, based on epoxy resin. These mixtures need to be pierced to remove any air pockets. For liquid self-leveling mortar, spikes with ball-shaped tips are suitable. It is better to choose the length of the needles slightly longer than the thickness of the floor being poured.
If the needles are too short, the roller body will contact the surface, creating tension and displacing the solution. As a result, irregularities will appear. Long spikes, if used incorrectly, will create more bubbles and splatter the mixture. It is important to match the length of the needles to the height of the floor layer. For mixtures of gypsum or cement, or bending drywall, you will need a roller with the maximum length of needles. For finishing coatings up to 5 millimeters thick, it is recommended to purchase rollers with the thinnest needles.
Pen
The roller handle can be simple or extendable. The second option can be adjusted in length, which is convenient to use (it relieves stress from your hands). The floor is processed in a standing position, so it is better to immediately purchase a roller with a special extension. When purchasing a product, pay attention to the length of the handle that is comfortable for you, so that you don’t have to work while bending over, otherwise your back will quickly get tired. Short rollers with a niche for installing a holder will have to be modified and a handle inserted. It's better not to choose this option.
General terms of delivery and pickup
Pickup is carried out at the address
Moscow, 41 km MKAD, shopping center "Melnitsa", row Zh 5/6.
— when paying on the spot, payment for products occurs before the machine is unloaded (deposit);
— in case of partial or complete refusal of high-quality and paid for products at the time of delivery, the funds are returned to the buyer in proportion to the reduction in the cost of the order;
— when ordering goods according to an individual size or with cutting to an individual size (linoleum, gypsum board, plywood, cable, rolled metal, etc.), 100% prepayment of the order is made, refusal of quality goods sold by the meter, as well as goods manufactured Custom size is not possible;
— delivery is carried out daily from 9-00 to 18-00;
— the cost of delivery does not include unloading, lifting, as well as cutting and sawing of materials;
— unloading time is limited depending on the weight of the cargo;
— delivery is carried out to the place where the car can travel without violating traffic rules and risking damage to the vehicle;
— pick-up is carried out only after prior agreement with the manager of the online store;
— large-sized material (insulation, barrels, etc.) is calculated based on the cubic capacity of the cargo;
— additional requirements for the car, for example, a small height for entering a parking lot or an open body for vertical unloading, are paid additionally: + 25% of the cost of the standard tariff.
| Cargo weight | up to 100 kg | up to 500 kg | up to 1 t. | up to 1.5 t. | up to 2 t. | up to 2.5 t. | up to 3 t. | up to 4 t. | up to 5 t. | up to 7.5 tons with crane-manipulator | up to 10 tons with crane-manipulator |
| Load length | up to 6 m | up to 6 m | up to 6 m | up to 6 m | up to 6 m | up to 6 m | up to 6 m | up to 6 m | up to 6 m | up to 10 m | up to 10 m |
| Moscow within the Moscow Ring Road | 800₽ | 1100₽ | 1500₽ | 1900₽ | 2300₽ | 2700₽ | 3100₽ | 3800₽ | 4800₽ | 6500₽ | 9000₽ |
| Cost of 1 km outside the Moscow Ring Road | 40₽ | 40₽ | 40₽ | 40₽ | 40₽ | 40₽ | 40₽ | 40₽ | 40₽ | 70₽ | 70₽ |
| Standard time for unloading | up to 15 min | up to 15 min | up to 30 min | up to 30 min | up to 45 min | up to 45 min | up to 45 min | up to 1 hour | up to 1 hour | up to 1 hour | up to 1 hour |
| Transport downtime during unloading in 1 hour | 200 | 300 | 300 | 400 | 400 | 400 | 500 | 500 | 500 | 1000 | 1000 |
| Delivery costs may vary due to non-standard conditions, wishes and unloading locations. |
Cost of loading and unloading and lifting to the floor
| Weight | Unloading (with elevator) | Access without elevator (1st floor) |
| up to 300 kg | 2 rub/kg | 2 rub/kg/floor |
| up to 1000 kg | 1.2 rub/kg | 1.2 rub/kg/floor |
| up to 3000 kg | 1.1 rub/kg | 1.1 rub/kg/floor |
| up to 5000 kg | 1 rub/kg | 1 rub/kg/floor |
| from 5000 kg | individually | |
| Bulk product | individually | |
| Drywall/Plywood/Sheet materials | 50 rub/sheet/floor | |
| Profile/Slats/Beams | 30 rub/piece/floor | |
| Insulation | 30 rub/pack/floor | |
| The cost of unloading may vary under non-standard conditions, wishes and unloading locations. |
Multiline phone
Delivery to Russian regions:
— delivery to Russian regions is carried out through the transport company SDEK 2 times a week;
— goods are shipped to the transport company only after 100% payment for the order;
— transport company services are fully paid by the buyer upon receipt;
— for cargo over 10 kg, delivery to TC SDEK 500 rub.
— return of goods of proper quality through TC is carried out at the expense of the Buyer.
Opening hours:
Monday-Saturday: from 8:00 to 19:00
Model overview
The photo shows a needle tool for drywall. Its needles are steel and have the shape of a cone. The handle is varnished, it is practical for long-term use and many manipulations. The roller width is 150 mm, which is convenient for applying notches to plasterboard sheets. It is also suitable for removing wallpaper.
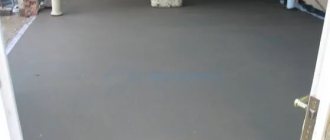
Roller for self-leveling floor with a metal frame and a protective cover. After rolling, pores appear on the floor surface, but they will smooth out and disappear when completely dry. This option is suitable for rooms with a large area. To level the screed in a small room, it is enough to purchase plastic products with an optimal width of 250 - 300 mm.
If necessary, you can build a protective cover yourself.
A roller with a needle surface is a universal and necessary tool of its kind, helping to perform flawless work. You should not ignore the need to use it when pouring the floor: as a result, you can get a perfectly flat and load-resistant floor.
To learn how to make a roller for a self-leveling floor with your own hands, see the following video.
Liquid wallpaper
On the building materials market there are 3 offers of liquid wallpaper and a huge number of varieties of rollers. Wallpaper can be: with the addition of cotton, silk and cellulose.
The main advantage of such a coating is environmental friendliness, and the main disadvantage is that too humid air will destroy the structure of the coating.
Following the instructions, gluing liquid wallpaper onto drywall is easy. Before applying wallpaper to the surface of drywall, you should putty the fasteners and bring the entire surface to perfection. Next, using a regular roller, the entire area is covered with primer. You need to wait until it dries completely.
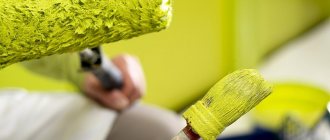
A selection of various rollers for applying liquid wallpaper
In the process of applying liquid wallpaper, a figured roller is used. They need to walk up and down in one place 2 times. At the same time, you should monitor the thickness of the wallpaper - no more than 2 mm. Liquid wallpaper dries within 48 hours if the room is well ventilated. There are no seams on this coating. The curved lines and color look elegant and amaze with their individuality.
Needle roller for self-leveling floor: tips for selection and use
Self-leveling floors have become very popular lately. They allow you to create durable and perfectly smooth surfaces using a minimum amount of force. However, to create such a coating you need to have a certain tool, one of which is a needle roller for self-leveling flooring.
It is worth noting that some masters consider the presence of this device optional. At the same time, claiming that there is no practical benefit from it, which is a serious violation of the installation process, especially when using quick-hardening mixtures.
Even small areas are subjected to this surface treatment
Is there an alternative?
Unfortunately, there is no alternative to a needle roller on the modern market. Thanks to the use of this device, the process of installing the coating is noticeably easier and it is possible to achieve a high-quality final result. When pouring, the mixture is first spread using a special spatula, and then rolled with a spiked roller. In short, you can’t do without the tool that this article is devoted to.
Squeegee for self-leveling floor
Operating principle and types
It is worth noting that the roller for self-leveling floors looks quite simple and cannot be called a complex technical device. However, its design can greatly affect the quality of the surface, and if selected incorrectly, even damage it. .
Purpose
- After stirring the pouring mixture, small air bubbles appear in it. Moreover, they remain there even after the floor of an apartment or house has been poured.
- There is a possibility that if you use a mixture that takes a long time to harden, the air will come out on its own. This is often an argument of inexperienced craftsmen who claim that rollers for self-leveling floors need not be used. However, if the consistency of the mixture is quite thick, then you should not hope for this.
It is better not to purchase a product with a short handle and without a seat for a long handle, since then they will have to be further modified
- The task of the roller is to walk over the surface with small needles to perform a kind of mixing of the layer, removing air bubbles from it.
- The fact that if such inclusions remain in the composition deserves special attention, then after solidification its structure will be greatly damaged. This will affect the surface strength and service life of the final product.
Advice! Do not neglect this device, as otherwise you can weaken the surface.
Correct installation involves first leveling with a special spatula, and then processing with a roller
Width
Currently, needle rollers for self-leveling floors are made in various widths.
At the same time, novice craftsmen face the question of what size of this product is needed.
- Wide rollers allow you to cover a larger area of the floor of an apartment or house in a short time. They are convenient to work with and the process takes little time.
- However, it must be remembered that there will always be hard-to-reach places in the room, and it is better to work on them with small rollers.
- Taking into account such features, the installation instructions recommend having both a wide and a narrow roller available in order to avoid problems in difficult areas and to facilitate work in large areas.
Advice! When purchasing a roller, you should immediately pay attention to the length of its handle. It should be large enough to allow you to work without bending over. Otherwise, when installing on large volumes, your back will quickly get tired.
Needle height
It should be noted that this product is equipped with needles of different lengths. On some rollers they are small, while on others their height is about 10 cm or more. At the same time, the price for them is almost the same, but the quality of installation depends on the right choice.
The fact is that if the needles are too small, then the roller will pass along the surface with its plane, which may not only not be beneficial, but also cause harm, creating surface tension and displacing the composition along the surface.
If the teeth are too large, then this is also bad, since the mixture will spread over them and splash, creating additional bubbles. That is why professionals recommend selecting this tool for a specific layer.
Separately, it is worth noting that there are devices on which a splash guard is installed on the back. You can also do it yourself, which allows you to use a roller with long teeth even on thin layers without the risk of damaging them.
Advice! After use, rinse the roller thoroughly to remove any remaining mixture. If this is not done, lumps will appear on its surface that will interfere with installation.
Using a product with small teeth on a surface with a large layer of fill is unacceptable, as this will only harm the quality of the floor.
Decorative putty
Putty rollers are very widely represented on the market. They vary in design, width, and material. Puttying drywall with a roller has many advantages:
- Saving. It takes much less time to cover the surface with putty with a roller than working with a spatula.
- Working with a curved roller is easy; no extra force is required.
- When working with a patterned roller, a beautiful patterned relief is created. Which, after drying, only requires painting.
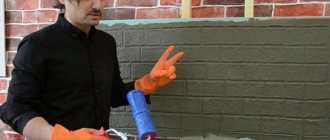
This is what rollers for decorative drywall putty look like
. But there are also disadvantages:
- For decorative relief, special putty solutions should be used.
- There is an overexpenditure of material. To apply putty with a roller, a flat surface of drywall is required. To do this, all fasteners and joints are sealed with ordinary putty.
- The roller does not fit into the corner, so the design should be finalized with a regular spatula.
With all the pros and cons, the use of rollers when working with drywall and its surface after installation is irreplaceable. This saves not only time, but also with the help of these tools you can create unique decorative elements that have several shades of the same color. The video shows the process of puttingtying drywall with a roller.
What kind of needle-shaped beast is this?
Whether you like it or not, in order to competently organize the work of laying self-leveling floors, you will need to use some tools, and one of them is a special roller for leveling the self-leveling floor. It is this rather small tool that allows you to get a strong, beautiful and durable coating. By scrolling, this tool allows you to “roll out” the liquid mixture of the floor covering, which in turn leads to the elimination of air bubbles. The correct use of this much-needed device largely determines whether your coating will be perfectly smooth.
If we talk about self-leveling floors, better known in narrow circles as industrial, they are a type of screed with self-leveling mixtures. Their minimum thickness can be about 3.5 mm. If you do everything correctly, then such a floor will level itself in the plane to an almost ideal horizontal line. Well, the roller helps with this.
In addition, using rolling technology, you free the mixture from bubbles and porous structure, which saves the product from early destruction and wear. In fact, this particular procedure (rolling) is a mandatory part of the technology used to install such a coating. If you decide to ignore it, then such a poorly laid mixture on the base can lead to the failure of all further measures, make the floor uneven, and after some time the coating will become unusable.
The needle roller, as a tool for finishing work, is constantly used by work teams. If you decide to take on the task of applying self-leveling floors yourself, then you will also have to adhere to all the rules, including those related to the use of a specialized roller. You can use this tool both when working with self-leveling floors and with drywall. The device itself is covered with a special needle-shaped cover, and for convenience it also comes with a rigid frame in the form of a handle for gripping. The base of such a tool can be made of either metal or plastic.
The latter, of course, is lighter than its steel counterpart, but it will not be enough for working on large areas for a long time. Then it’s better to immediately buy metal.
About the types and operating principles of the tool
As for the principle of operation, everything is quite simple. The main thing in this matter is to carefully and efficiently roll the entire area being treated. Even the most remote areas cannot be skipped , otherwise they will become starting points for the destruction of the polymer coating.
Beautiful self-leveling floor
The width of the needle rollers can vary between 15-60 cm . The fact that the width varies is determined by the intended purpose for premises of a particular nature.
Table. Roller widths and application options.
| Tool width, cm | Purpose |
| 15-25 | Designed for rolling self-leveling mixture in hard-to-reach places. |
| 25-40 | Used in apartments where the area of the rooms is 10-20 square meters. m. |
| 45 or more | For pouring self-leveling floors in halls/halls with an area exceeding 50 square meters. m. |
The widest rollers are used in large rooms
If you buy a needle roller for yourself, you must, based on the parameters of the room where the self-leveling mixture will be poured, determine the required dimensions of the tool (usually 25-30 cm ).
The tool handle is another important factor in the successful installation of a polymer floor. The length of this part can be either adjustable or fixed.
The handle is easy to remove and adjust
Thanks to the high-quality adjustable handle, you can regulate the pressure on the tool and also minimize movement on the floor during the pouring process.
Photo of a needle roller with a telescopic handle
Important! Remember that not only the width of the needle rollers can be different, but also the length of their needle-spikes (from 5 mm to 40 mm).
In the photo - a needle roller for leveling the self-leveling floor
The length of the spikes will depend on the planned thickness of the screed. The greater the thickness, the longer the needles of the purchased roller should be.
It is important to choose the right roller
Prices for needle rollers for self-leveling floors
needle roller for self-leveling floor
Needle roller for self-leveling floor - what to look for?
A needle roller can be purchased at a specialty store. Remember that it comes in 2 types (as described earlier). You should buy one that includes a special universal handle. And for greater convenience, you can also use a telescopic extension. This type of device is convenient to use to remove air bubbles. And considering that you need to go over the surface with a roller every time after pouring the mixture, it is better to buy a good tool right away. By the way, a T-shaped strip will also help to distribute the solution over the surface. As for the roller, the handle and extension can be made not only of different materials (plastic or wood), but also of different lengths.
But the main difference is the size of the needles. They can be of different thickness and length, which means the effect of use will vary slightly. As experts advise, the length of the roller needles should be slightly greater than the thickness of the layer of your bulk solution. In construction supermarkets you can find such a tool with needles from 8 to 35 mm! But keep in mind that if the thickness of your future floor is minimal, i.e. the coating will be less than 5 mm, then you are better off immediately buying a roller with sharp needles. It can be successfully used in various works where mixtures based on cement, gypsum or polymers are used. And as mentioned earlier, the required size of the roller depends on the thickness of the layer, which means that with a gypsum or cement coating you will have to buy a large tool (at least 30 mm).
The width of this tool is also different and can vary from 20 to 60 centimeters. Of course, it would be more logical to buy a wider roller, since it is much more convenient for them to work on large areas. But do not forget that in the same room there may be hard-to-reach places (near the baseboards, doors, in the corners), and in this case your wide roller will only do a bad job - it will be difficult to solve this problem with it. So, if you do not have the opportunity to buy two products at once, it is better to stock up on a medium-sized tool. Of course, in this case it will take you more time to work, but you will not have a problem with how to deal with self-leveling flooring in corners or other inconvenient places.
The price of such a roller may vary if it is resistant to aggressive environments. If he is afraid of solvents, then it is better not to buy such a tool.
Where can I buy the tool?
Such a tool can be found in different places if necessary. If you want to touch and check the product before purchasing, you can go to a specialized store. This method is good for inexperienced finishers, who will likely benefit from expert advice.
Good options at lower prices can be found in any construction market. True, these rollers will not always be of high quality. However, the price will allow you to purchase several options at once.
For those who have already decided on the manufacturer and material, you can even choose a suitable roller in the online store. In this case, you don’t even have to go anywhere; you can make purchases while lying on the couch.
Source
Briefly about the main thing: discussions on the topic
Enough has already been said about the ordinary instrument. Therefore, we will briefly dwell on the main points.
- A needle roller is one of the main tools in the process of pouring a polymer floor.
- The roller is made in such a way that it has spikes in the form of needles. This allows self-leveling floors to become more durable and uniform.
- Polymer floors have a seamless coating.
- The use of such floors is recommended where strict adherence to hygiene standards is necessary.
- A chemical composition with special components for self-leveling floors is sold in cans. Nowadays there are about 10 different shades.
- If desired, you can also apply a “decoration effect” (applied on top of the finished floor covering). Acrylic paint will help you achieve different designs and colors.
- The most popular pattern is the “wood effect” - an imitation of natural material.
- In recent years, self-leveling floors can often be seen in restaurants and offices. Previously, they were only in industrial premises (where there are heavy loads on the coating). Now self-leveling floors for garages and apartments are not uncommon.
- The composition of the self-leveling floor includes polymers, mineral mixtures and synthetic modifying additives.
- When mixed before use, the mixture for self-leveling floor can spread in a thin layer. It hardens quickly, is plastic and has high adhesion to the base.
- The drying speed of such a coating depends on the properties of your solution and external conditions.
- According to standards, the poured surface can withstand heavy loads - up to 800 kg per square centimeter!
- The base for a self-leveling floor is often a concrete floor or cement screed. If you chose the second option and have just started work, then you will also need to calculate the cement consumption for the floor screed.
- Industrial flooring often includes polyester resins, as well as liquid rubber. They are not contained in polymer floors of residential apartments.
Appendix: How to calculate the required amount of leveler
A similar question, one way or another, will arise when preparing for repairs. That is, it is necessary to decide in advance on the composition chosen for leveling the floor (see recommendations above) and calculate the number of bags required to complete the task at hand.
We hope that the proposed online calculator will provide good assistance in this matter.
Explanations for calculations
To calculate, you first need to fill in the fields of the calculator with the requested values.
The calculation is based on the area of the room in which the floor is leveled. There can be two different approaches here:
- there is an already known value for the area of a room of arbitrary shape, no matter what;
— the length and width of a rectangular room are known.
Depending on the chosen calculation path, either a field will appear to indicate the area, in square meters (in increments of 0.25 m²), or a field to indicate the length and width of the room, in meters (in increments of 0.1 m).
- If the original floor has a height difference that needs to be removed with a screed, then this difference (the difference between the highest and lowest points of the surface) is indicated in the corresponding field. By default, it is set to “0” - as for a flat floor that requires filling solely to create a perfectly smooth surface.
- Next, you should specify the minimum thickness of the screed to be poured. That is, what it will be like after pouring at the highest point of the floor.
- The next field is the certified consumption of the dry mixture per unit area with a layer thickness of 1 mm (in kilograms per square meter). If the consumption is indicated for a layer of 10 mm, then it is simply divided by 10.
If the area for which the bag is designed at such and such a thickness is indicated, then you will have to first recalculate it. It's not that difficult. For example, as in one of the illustrations, 20 kg of mixture will give 5.7 m² with a thickness of 2 mm.
First, we divide 20 by 5.7 - it turns out 3.51 kg per “square” with a layer of 2 mm. It is clear that for a layer of 1 mm it is also divided into two. That is, the result is approximately 1.75 kg/m² for a millimeter layer.
- Next, the traditionally specified stock of material is indicated. You can calculate without it, or add 5 or 10 percent to the calculated value.
- To convert to the number of bags, you need to indicate the net weight of one package - select from the proposed options. The default is the most common standard of 25 kg.
- And finally, the cost of one bag is indicated so that you can calculate the approximate costs of purchasing the entire required batch.
Clicking on the calculation button will lead to the appearance of the results: the required amount of mixture, kilograms and, individually, bags, as well as the approximate purchase cost - rubles.
Needle roller for self-leveling floor: tips for selection and use
Self-leveling floors have become very popular lately. They allow you to create durable and perfectly smooth surfaces using a minimum amount of force. However, to create such a coating you need to have a certain tool, one of which is a needle roller for self-leveling flooring.
It is worth noting that some masters consider the presence of this device optional. At the same time, claiming that there is no practical benefit from it, which is a serious violation of the installation process, especially when using quick-hardening mixtures.
Even small areas are subjected to this surface treatment
Rules for working with a roller
Polymer floors go down quickly, so be prepared that you will have to use the roller at an accelerated pace. Ideally, the installation of such flooring should be carried out by 2 people.
After each pouring of the prepared mixture onto the floor, you need to go over it with a needle roller. The result of the work will largely depend on the quality of the tool, so do not save money and do not buy rollers from unknown manufacturers.
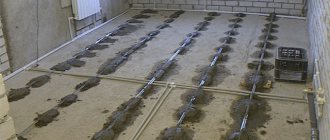
Stages of pouring self-leveling floors
To ensure a perfectly flat floor, follow some simple rules:
- remove all excess before proceeding directly to pouring (even the smallest particles of dust; it is advisable to vacuum the base altogether);
- use only high-quality tools during work;
- The poured floor must dry under the conditions specified in the manufacturer's instructions.
Flooded floor after drying
Operating principle and types
It is worth noting that the roller for self-leveling floors looks quite simple and cannot be called a complex technical device. However, its design can greatly affect the quality of the surface, and if selected incorrectly, even damage it. .
Purpose
- After stirring the pouring mixture, small air bubbles appear in it. Moreover, they remain there even after the floor of an apartment or house has been poured.
- There is a possibility that if you use a mixture that takes a long time to harden, the air will come out on its own. This is often an argument of inexperienced craftsmen who claim that rollers for self-leveling floors need not be used. However, if the consistency of the mixture is quite thick, then you should not hope for this.
It is better not to purchase a product with a short handle and without a seat for a long handle, since then they will have to be further modified
- The task of the roller is to walk over the surface with small needles to perform a kind of mixing of the layer, removing air bubbles from it.
- The fact that if such inclusions remain in the composition deserves special attention, then after solidification its structure will be greatly damaged. This will affect the surface strength and service life of the final product.
Advice! Do not neglect this device, as otherwise you can weaken the surface.
Correct installation involves first leveling with a special spatula, and then processing with a roller
Width
Currently, needle rollers for self-leveling floors are made in various widths.
At the same time, novice craftsmen face the question of what size of this product is needed.
- Wide rollers allow you to cover a larger area of the floor of an apartment or house in a short time. They are convenient to work with and the process takes little time.
- However, it must be remembered that there will always be hard-to-reach places in the room, and it is better to work on them with small rollers.
- Taking into account such features, the installation instructions recommend having both a wide and a narrow roller available in order to avoid problems in difficult areas and to facilitate work in large areas.
Advice! When purchasing a roller, you should immediately pay attention to the length of its handle. It should be large enough to allow you to work without bending over. Otherwise, when installing on large volumes, your back will quickly get tired.
Needle height
It should be noted that this product is equipped with needles of different lengths. On some rollers they are small, while on others their height is about 10 cm or more. At the same time, the price for them is almost the same, but the quality of installation depends on the right choice.
The fact is that if the needles are too small, then the roller will pass along the surface with its plane, which may not only not be beneficial, but also cause harm, creating surface tension and displacing the composition along the surface.
If the teeth are too large, then this is also bad, since the mixture will spread over them and splash, creating additional bubbles. That is why professionals recommend selecting this tool for a specific layer.
Separately, it is worth noting that there are devices on which a splash guard is installed on the back. You can also do it yourself, which allows you to use a roller with long teeth even on thin layers without the risk of damaging them.
Advice! After use, rinse the roller thoroughly to remove any remaining mixture. If this is not done, lumps will appear on its surface that will interfere with installation.
Using a product with small teeth on a surface with a large layer of fill is unacceptable, as this will only harm the quality of the floor.
DIY self-leveling floor
It’s quite easy to make a self-leveling floor with your own hands. Let's consider the phased implementation of the work.
Surface preparation
To ensure that the created even surface layer does not crack around the perimeter of the room, it is necessary to stick a damper tape, preferably made of foamed polypropylene.
Next, using a level (regular or laser), you need to find the lowest and highest points of the floor base.
From the highest point, you need to mark the height to which you plan to raise the surface - at least 5 mm, and mark on the walls a control line to which the layer of filling the leveling mixture will reach.
Preparing the foundation does not require any special construction skills from you. First, check for holes and cracks. They should be sealed, and all fragile elements should be removed along with debris and dust.
If you have an old vacuum cleaner, it is very advisable to vacuum the surface with it. Then the clean surface must be primed. The primer will take approximately 4 hours to dry.
After this time, you can begin preparing the working solution.
Selecting a dry mix
There are many types of different self-leveling mixtures on the market.
But we must remember that the correct choice of mixture depends on the quality of the floor surface and its service life.
You can take gypsum cement mixtures, for example, Thomsit DG, which harden fairly quickly within 8 hours and can withstand significant loads.
Cement-mineral mixtures are also well suited for self-leveling the floor.
Such mixtures include Polimin LC-2, Siltek F-50, Polirem SPN-511, Ceresit CN 76, F-51, and Atlas SAM 200.
If you want to make a self-leveling floor as a finishing coating or a floor with a 3D effect, or with the subsequent laying of a floor covering such as carpet, laminate, ceramic tiles, linoleum, Ceresit CN 69 is suitable for you. In the case where it is planned to install a heated floor - the best solution would be to use the Ceresit CN 72 mixture together with the elastic emulsion Ceresit CC 83. A wide range of functionality is due to additional modifiers that expand the scope of application of self-leveling solutions.
Laying work
The preparation of the working solution must be done strictly following the instructions.
Be careful and use only as much water as the manufacturer indicates.
So the quality of the solution directly depends on this - a solution that is too thin will not create a coating of the required strength, and a thick solution will not spread as it should.
The finished working mixture, prepared using a construction mixer, should be poured out of the bucket in strips. The distance between the strips is from 20 to 30 cm. The gap is needed so that there is room for the mixture to spread.
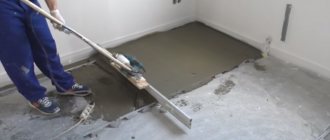
When pouring self-leveling mortar, it is necessary to level the mortar with rubber spatulas.
And be sure to roll the poured mixture with a needle roller, removing air from it.
It is better if there are two craftsmen, then one will pour out the solution and process it with a roller, and the second will prepare a new portion in the meantime.
Before laying the flooring, be sure to make sure that the solution is completely dry and only then cut off the excess pieces of damper tape.
Possible problems during installation
While performing installation work, you may encounter some common errors and problems. Let's describe the most common ones.
The solution does not spread
Don't be surprised if the solution you just poured onto the floor doesn't spread 100% on its own.
The fact is that it should not spread completely on its own - it needs help.
To do this, use special available tools, including: a needle roller, a rule, a spatula, a rule and other convenient means.
Incorrect needle roller
Remember that in a needle roller, in this case, the most important thing is not its needles, but their length.
If you use a roller with needles that are too high, the roller will only expel air from the mixture and will not move the mixture itself.
In this regard, you should choose a needle roller such that the height of its needles is only 1-2 mm above the filling level.
The floor flows over the threshold
Although the threshold seems quite high and impregnable to you, you still need to make a barrier and take care of it before you start pouring the floor.
Self-leveling floor with your own hands brings the following surprises
Self-leveling mixture does not spread
Imagine my surprise when I saw that my self-spreading mixture did not spread 100 percent on its own. That is, the mixture spread, but not completely.
I, it seems, acted according to the instructions and did everything as the seller told me, who, according to him, is an experienced builder. But no miracle happened. The correct answer was precisely that the mixture does not have to spread on its own - it needs help. Help must be provided with special and available means. Among the special ones is a needle roller, and among the improvised ones - anything: a stick, a rule, a spatula and any other homemade products.
Not enough hands
It dawned on me that I need to go into the mixture with armed hands. I'm trying to level with the means at hand. Everything would be fine, but I can’t reach the wall and the corner.
I hoped that my active actions would move the mixture and it would reach the cherished boundaries of the room by gravity. Unfortunately, this did not happen, after complete drying, my self-leveling floor turned out to be slightly underfilled to the corners, or rather to one, that very first corner...
All of the above happened because the puddle of the mixture was spilled far from the corner of the room and one batch was simply not enough to cover the desired area.
Incorrect needle roller
The instructions for the mixture indicated that it was the needle roller that was intended to level and distribute the self-leveling mass over the floor. I bought a wonderful new roller with nice long needles, but it didn't do the job. What's the matter? Defective roller? It turns out that the main thing in a needle roller is not so much the needles, but their length.
If the needles are too high, the roller will only expel air from the mixture, and the mixture itself will not move. If the size of the needles is close to the pouring depth, then the non-needle core of the roller will evenly roll the mixture over the floor, smoothing it over the surface, automatically squeezing out air bubbles. A roller with short needles will move the mixture too actively and is not suitable for filling the floor. Hence the summary - choose a needle roller with a needle height 1-2 mm above the filling level.
In those areas where I tried to frantically drag the mixture across the floor surface with an incorrectly selected needle roller, only these marks remained. Ugly, of course, but through the linoleum, it’s imperceptible to the touch.
Self-leveling floor leaks over the threshold
The problem has been solved, now we work with a rule, a spatula, and a roller. The last batch and again trouble... The mixture rushed over the threshold, which before the start of work seemed high and impregnable. Everything is learned by comparison, and relatively quickly it turned out that our floor had reached the desired level and was now becoming equal to the threshold of the neighboring room. Everything is great, but the mixture begins to flow out. We urgently build a barrier. It is advisable to take care of the barrier technological threshold before starting to pour the self-leveling floor.
Leveled, but not leveled
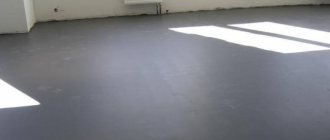
When everything was dry, joy knew no bounds. The floor turned out much better than we could have imagined. Smooth - like a table! Yes. It was worth all the effort to tackle the self-leveling floor yourself.
But a small fly in the ointment still appeared in our ointment. The mound in the middle of the room was not completely hidden under the mixture. It was covered with a thin and even layer, like a glazed gingerbread. From a distance this flaw is almost invisible, but a residue remains. A minor mistake was made; we did not measure the floor heights. It turns out that initially the floor was crooked by more than 3 mm. This means that when leveling the floor with self-leveling mixtures, you need to take into account the height difference.
Purpose
The main purpose of a spiked roller is to uniformly roll the liquid mixture over the surface that needs leveling. This manipulation allows you to remove everything unnecessary from the building composition, even the tiniest air bubbles. As a result, after complete drying, you get a perfectly smooth coating without voids.
Rolling the mixture is a very important process. If even a small amount of bubbles remains in the structure of the mixture when frozen, such a surface will be considered defective. Pores and voids will certainly lead to early wear of the floor covering and loss of its attractive appearance.
Thus, leveling the self-leveling floor with a pressure roller with needles is an important stage of finishing work, which cannot be ignored. A poorly poured and rolled mixture will ruin all the work on arranging the room.
During repairs, you need to remember that in the future there will be furniture on the flooring, often quite heavy, so it is important to lay the floors correctly, which a needle roller will help with.