Features of technology when installing ceiling plinths
When purchasing a decorated canvas, you need to pay attention to the material from which it is made and decide on its color and size. Instructions for using the decorative profile read:
- To increase the illusory size of the room, you need to choose a wide decorated profile, and a narrow one, on the contrary, if you need to visually expand the size of the room. Consequently, a wide profile is used for large rooms, and a narrow one is often used in children's rooms.
- When choosing a color scheme, you should choose a canvas that matches the tone of the ceiling or wall, depending on what needs to be emphasized. If it is necessary to make a separation between the wall and the ceiling, then the decorative fillets should be white or use soft colors when painting, but in no case contrasting ones. When painting, water-based paint is mainly used, after priming the base for it.
- When installing a decorated ceiling panel yourself, you need to know some subtleties:
- heavy plinths should be attached to self-tapping screws, having first made holes in the wall for them using a hammer drill, then drill holes in the plank itself and only after that can it be attached to the wall;
- the hole made in the profile must be made 1 mm larger than in the wall, so that there are no cracks or tears in the profile and the screw head can be hidden;
- after cutting the corners, do not forget to apply the cloth to each other dry to check the quality of the joining of the corners;
- the quality of the joining will be at a high level if the ends on both strips of material are cut at an angle of 90°;
- after puttingty, be sure to use sandpaper to polish the seams;
- the bulges on the strips of panels should not be too large, otherwise even small unevenness in the walls and ceilings will be noticeable;
- It is better to connect strips of medium length than one long and short one.
The glue is applied in a thin strip, the baseboard is lightly pressed against the surface, and then torn off. The glue should dry within 3 minutes and then press it again either to the wall or to the surface. The glue is also applied at a distance of 10 cm. The plinth material, which has a soft base, should not be pressed in too much, otherwise dents may occur. The next plank is attached not only to the wall and ceiling, but also docked with the previous plank. If the wall or ceiling is uneven, you should not mask them with ceiling decor; it is better to eliminate this defect.
With suspended ceilings, glue is applied to the border, which is attached to the wall. The cracks can be masked using sealant, and excess glue can be removed. Nowadays, special corners for panels have appeared on the building materials market, which do not require adjusting the tapes, but are simply inserted into the grooves of the blanks.
When gluing heavy fillets to a suspended ceiling, you should make cuts on the wallpaper using a mounting knife, remove them, then prime the surface, putty, and only after the above procedures attach the strips. The joints on the panels can be grouted on the second day, with the exception of grouting the corners, which is done only on the 3rd day. It is better to choose gypsum putty and you can add a little water-based paint to it. Small cracks can be filled with a hard brush.
Work planning
Before starting construction work, it is worth familiarizing yourself with samples of two-level plasterboard ceilings. There are quite a lot of them, and you can easily choose the optimal design for yourself. Based on the analysis of the reviewed material, it is possible to make several sketches of plasterboard ceilings. A large-scale drawing in color will allow you to decide on the choice of design. After the choice is made, it is necessary to draw up a drawing.
The drawing displays the following information:
- dimensions and total area of the room;
- arrangement of sheathing elements;
- shape and dimensions of the second tier;
- layout of lamps and electrical wires.
Based on the diagram of a two-level ceiling, calculations are made to determine the need for the following materials:
- load-bearing and ceiling profiles;
- fasteners (connectors, hangers, brackets);
- finishing material (photos of two-level plasterboard coverings will help you decide on decor options);
- electrical devices and cable cross-section;
- necessary tools.
When the calculations are made, the necessary material and equipment are purchased.
Ceiling baguette installation technology
The method of installing the ceiling plinth will depend on its type.
Overlay plinth
The decorative fillet, as mentioned, is glued to the wall on already installed panels. The fastening algorithm is as follows:
- Cut the edge of the plinth strictly at an angle of 45° relative to the front side.
- Apply glue evenly to internal surfaces.
- Glue to the wall, starting from the far corner of the room.
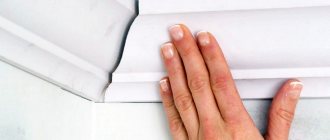
- Press carefully along the entire length.
- Carefully remove excess glue with a damp cloth.
- Give time to dry.
- Cover the remaining cracks with putty or silicone sealant.
PVC skirting board
The work begins with installing the frame on the entire wall. Wood slats or metal profiles are used for it. The bars are attached to the surface perpendicular to the direction of the plastic panels in increments of 40–50 cm.
On smooth walls, profiles can be fixed with dowels, but such surfaces are rare, so more often the product is fastened with screws, leveled using a level. In the collapsed areas, gaskets are made or wedges are hammered in to ensure strength to the frame.
The extreme slats adjacent to the corner joints will be the basis for attaching the ceiling plinth. By the time of gluing, one of the surfaces (wall or ceiling) must be finished.
The plinth for PVC panels is secured with self-tapping screws or construction staples. At the joints - in the internal and external corners - special inserts are placed on the glue, which greatly simplifies installation, making it more accurate.
Further installation of the panels will not be difficult: the guide groove of the plinth will not allow them to move to the side.
Second level installation
The second level of the plasterboard ceiling is suspended on a frame, which is attached to the horizontal rails of the first level. The design of a multi-level plasterboard ceiling may include the placement of a suspended part along the wall.
In this case, installation is carried out as follows:
- a diagram of the suspended structure is applied to the surface of the first level;
- at a height of 15 cm from the main surface, a UD profile is attached to the walls;
- another UD profile is screwed to the sheathing of the first tier on the ceiling at a distance of 12 cm narrower than the size of the suspended part;
- every 20 cm, hangers are attached to the top sheathing;
- a step-shaped sheathing is made from the CD profile and secured to hangers;
- electrical wiring is being installed;
- the end part of the second frame is sewn up with a gypsum board strip, with holes pre-drilled in it for lamps;
- connection and installation of horizontal lamps is carried out;
- the lower part of the second-level sheathing is sheathed with sheets of material (holes for vertical lamps are drilled in the fragments);
- along the edge of the upper surface of the bottom sheet of the civil code, 1 cm from the edge, a UD profile is screwed from wall to wall;
- a vertical strip of HA 7 cm high is screwed to this profile;
- An aluminum corner is glued to the corner and top of the last strip.
After this, the entire structure is puttyed. But how to paint a plasterboard ceiling? Painting a two-level coating can be done with ordinary water-based or acrylic waterproof paint. Options for two-level plasterboard surfaces can be very diverse. Their design does not imply any restrictions.
Subtleties and nuances when working with small radii
In rooms with a complex interior, where there are columns, radius panels and suspended ceiling structures of complex shapes and configurations, the installation of bent skirting boards has its own technological features, subtleties and nuances. The thing is that polyurethane baguettes and moldings are not only flexible, but also elastic. There are a number of ways to safely glue flexible skirting boards to ceilings.
To ensure that the cornice around the column is securely fixed, after installing the product on the glue, masking tape is used for additional adhesion. When working with a plastered surface or on wooden panels, in order for flexible skirting boards to hold the desired shape, thin nails are used, the length of which should not exceed 20-25 mm.
Gluing taking into account the width of the product
It is impossible to talk about how to properly glue a ceiling plinth with your own hands if you do not take into account its width. This indicator directly affects the sticker technology and the overall appearance of the room. The following features are taken into account:
- Wide parts are perfect for rooms with high ceilings, because they visually reduce their height. To obtain a reliable fixation, the composition is applied along the entire back side, this will prevent the glued elements from starting to fall off.
- Small-width fillets are an excellent solution when ceilings need to be visually raised. Fastening is carried out pointwise if lightweight products are used.
- Medium-width fragments are considered the most acceptable; they are used everywhere. Ceiling plinths of this size can be glued using all known methods.
The width of the baguette affects not only the perception of the interior, but also the method of attaching the product to the surface
On a note! The appearance of the product is of great importance during installation. Thus, fully processed, painted, textured elements require very careful application of adhesives. The fact is that getting them on the front side can lead to the fillet being irrevocably damaged.
Flaws
Unfortunately, scientists have not yet come up with a material that will be free of disadvantages. The plinth on the plastic ceiling also has some flaws.
If you compare foam and PVC profiles, you can understand that products of the first type have a wider base. Due to the fact that the vinyl profile has a narrow base, it cannot cope with hiding wide cracks. And this is not just a matter of installation errors.
PVC has a fairly high coefficient of thermal expansion. And the larger the volume of the room, the greater the distance between adjacent baguettes and the wall should be. And this in no way contributes to improving the aesthetic appearance of the room.
Installation of PVC skirting boards slightly complicates the procedure for installing ceiling panels. For example, it is not easy to fasten the last panel in a row so that nails or screws are not visible.
Advantages and disadvantages
Despite the fact that modern industry produces skirting boards from various materials, foam ceiling products are very popular and in demand among consumers. There are several reasons for such justified preferences:
- foam materials have the cheapest cost compared to other analogues made of polymers, gypsum or wood;
- the material has a long service life and retains its qualities for decades;
- installation of a foam molding is quite simple, and even a person with little experience in construction can cope with such a task;
- polystyrene foam is light in weight, so the installation of skirting boards can be done by one person;
- The width dimensions and appearance of the plinth design allows the use of foam material for interior decoration of any design style;
- in appearance, foam plastic imitates expensive gypsum stucco molding and at the same time looks dignified and attractive, harmoniously combining with any interior;
- the material does not have the property of expanding when temperature and humidity levels change;
- the plinth can be painted in any color, and it can also be installed on the surface of a stretch ceiling;
- polystyrene foam does not require special measures and methods of additional care;
- the material has good adhesive properties and is well mounted on painted, concrete or brick surfaces, drywall, wallpaper of any composition, plaster, and so on;
- the material is absolutely harmless to human health and does not release harmful chemical components into the environment;
- the surface of the foam is not susceptible to fungus or mold.
Of course, foam plastic also has a number of disadvantages, but they are so insignificant that few people pay attention to them:
When cut, coarse-grained polystyrene foam does not make it possible to make an even and beautiful joint, so the seam must be additionally sealed with putty or acrylic sealant; this material dissolves under the influence of organic solvents, so adhesive compositions containing this component are not suitable for installing foam plastic, as they burn right through it; thin foam baguettes are fragile, so you will need to be careful when performing installation work; over time, the foam decor may turn yellow, so it is updated by tinting; The glued foam plinth can only be dismantled by destruction; reuse of this material is no longer possible.
It is not difficult to purchase such decor - it is offered in a wide range in almost every specialized retail chain. Moldings look most attractive after painting; their color can be made in accordance with the overall decoration of the room or you can choose contrasting options. Inexpensive and versatile skirting boards look no worse than their gypsum counterparts, but significantly save your budget and do not cause problems when installing them yourself.
You can fix the foam plinth under the ceiling in the following cases:
- on the surface of any wallpaper - paper, liquid, vinyl, and also intended for painting;
- the wall can be painted with any type of paint or simply treated with a layer of putty;
- The plinth can be glued to the ceiling or simultaneously to the wall and ceiling.
Experienced builders glue the baseboard first, and then the wallpaper. But if you have little experience in performing such work, then it is more advisable to first stick wallpaper on the walls, and only then place the baseboards.
Instructions for installing the corner of the ceiling plinth
The instructions on how to glue a ceiling plinth and cut a corner have four important sections.
- Connecting skirting boards at an internal corner having a 90o angle.
- Cutting the ends of the fillet for the outer corner.
- Joining baguettes at sharp and obtuse angles.
- Technology for fixing ceiling plinths in corners.
Cutting the end of the baguette at 45 degrees for the internal corner
Connecting fillets at an angle close to 90o does not cause difficulties, since the ends of the right and left parts are cut at an angle of 45o. To do this, you can use various devices: a miter box or a drawing on a workbench or paper. The work is performed step by step in the following sequence:
the right baguette is tried on the wall, after which it is turned around under the left hand and placed against the far wall of the miter box face up so that the plane in contact with the wall is pressed against the side bar of the device, and the second lies on the base;
- With your left hand, the baguette is pressed tightly against the instrument;
- using the slots, cut an angle of 45o with your right hand. For work, you can use a hacksaw or a blade from it. We discussed above how to cut various materials;
- the cut area is sanded with sandpaper, since it is not always possible to cut smoothly;
- The left baguette is cut in the same way, only everything is done in a mirror image;
The quality of the cut is checked, for which the right and left fillets are joined in the corner. If the gap is minimal, the baguette is attached to the wall. You can attach it using glue or self-tapping screws if the baseboard is heavy (plaster, wood).
Notching ends for outside corners
It is not always possible to find an outside corner in an apartment. However, it is still worth knowing how to make a corner on the ceiling plinth using devices in such situations.
The step-by-step algorithm of work is the same as for the internal corner. The only, and most important, difference is that for the inner corner the bottom of the fillet is longer than the top, for the outer corner, on the contrary, the top is longer.
You also need to remember that the outer corner may be slightly round. In this case, the joint is secured with pins. After the glue has dried, they are removed and the gap is sealed with sealant.
To help home craftsmen, there is a video where a lesson on working with a miter box is given.
Trimming corners without tools
Most modern apartments do not have right angles, which precludes the use of special devices for cutting ends. How to manually join the plinth in sharp or obtuse corners correctly, we will consider below. At the same time, the technique for calculating and sawing the ends of the baguette for the internal and external corners is different.
Inner corner. For a beautiful connection of fillets in a corner with a large deviation from 90o in any direction, operations are performed in the following sequence:
- the ends of the fillets are cut at right angles so that there is no influence of extraneous factors;
- The left fillet is applied to the wall and ceiling. After finding its location, its contours are indicated with a pencil. In this case, the lines should abut the adjacent wall.
the location of the right baguette is marked in a similar way;
the fillet is pressed as tightly as possible against the adjacent wall, and the intersection of the lines is marked with a pencil or knife;
the right fillet is removed and a line is drawn between its lower corner and the mark, which will be the cutting site;
- a cut is made along the marked mark;
- the corner at the left fillet is cut in the same way;
- the ends cut at an angle are sanded with sandpaper;
- The cut ends are tried on. To do this, the fillet is joined in the corner. If there is no gap or it is minimal, the plinth is glued to the wall.
External corner. The process of joining the external corner is performed using the same technology as the internal one:
- Baguettes are applied alternately to the walls on both sides. Their contours are drawn along the ceiling and wall;
- on the pressed plinth, intersecting contour lines are marked at the top and bottom;
- a conditional cutting line is drawn according to the marks;
- the end is cut at an angle;
- a similar operation is carried out with another plinth;
- fitting of the connection is carried out;
- the ends are polished;
- the fillet is attached to the wall.
Tools and materials
The success of any job lies in the presence of certain skills and proper equipment. Some training can be obtained by watching a training video for installing two-level plasterboard ceilings.
Tools
The following tools will be required to build a double plasterboard ceiling:
- screwdriver;
- perforator;
- Bulgarian;
- soldering iron;
- metal scissors;
- knife with a trapezoidal blade;
- needle roller;
- hacksaw for metal;
- putty knife;
- sandpaper or abrasive mesh;
- building level;
- paint brush;
- construction helmet;
- safety glasses and gloves.
Of course, everything must be in order and complete.
Materials
The following materials will be needed for the construction of a 2-level plasterboard ceiling:
- cladding (regular, waterproof or fireproof gypsum plasterboard);
- UD profile;
- CD profile;
- perforated corner;
- brackets for horizontal connection;
- profile connectors;
- vertical hangers;
- screws and dowels;
- primer for gypsum plasterboard;
- starting putty;
- finishing putty;
- ceiling plinth;
- reinforcing mesh;
- antifungal liquid;
- lamps and fixtures;
- corrugated pipe and electrical cables;
- material for finishing (the design of two-level plasterboard ceilings involves the use of various paints, mirrors and ceramics);
- insulation material (mineral wool).
Construction material must be purchased in quantities 10-15% higher than calculated. During transportation, storage and operation, damage to individual parts may occur.
Types of skirting boards and choice of glue
You need to select a product depending on the material from which the baseboard is made. Some adhesives can destroy the structure of the product and are not suitable for the job. You can find different types of borders in stores, the main ones are described below along with recommendations for choosing glue.
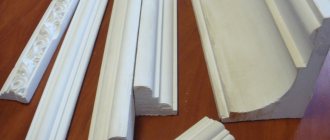
Polystyrene and foam
These skirting boards are the most inexpensive and practical, widespread, sold in every hardware and hardware store. They can be painted - the appearance will be no less attractive than plaster ones. We sell regular skirting boards, two-level cornices, fillets (plinths with a groove). Even if you have no experience in repairs, foam and polystyrene borders can be glued to the wall; the process is simple.
Many people are interested in what is glued first - the wallpaper or the baseboard first? Foam elements can be glued directly to the wallpaper; the reverse procedure is less convenient. Due to their low weight, the skirting boards will stick to any glue, but their fragility must be taken into account. You need to cut carefully, then coat it with two strips of glue. Using acrylic putty will be effective. The gaps between the planks and the ceiling can be sealed with a gypsum finishing mixture to which a little PVA glue has been added. The joints are sealed with white sealant.
Polyurethane and plastic
Polyurethane is a flexible material that is resistant to wear and temperature changes. Typically, polyurethane skirting boards are purchased for those areas where there are a large number of corners, bends, and recesses of different sizes and shapes. They are especially relevant for rooms with columns, they go well with a suspended ceiling, and are successfully glued to a suspended ceiling.
When choosing glue, you need to take into account that such skirting boards can shrink during use. The joints are made as tight as possible; any gaps, even small ones, are filled with silicone sealant. They use reliable glue - “liquid nails”, “Moment”, “Titan”. Be sure to coat the ends of the baseboards with glue; it is advisable to buy a special product for the latter.
Plastic plinths usually come complete with corners - external, internal, connecting strips. It must be glued with “liquid nails” or other glue with high adhesion to the surface.
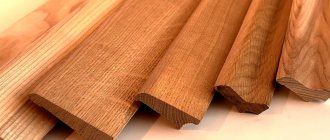
Plaster and wood
Wooden skirting boards are used less frequently than others; they require professional skills and very reliable glue. Basically, they are purchased for apartments and houses with a classic interior; they are not recommended for high humidity. Lighter models are glued with “liquid nails”, and heavy baseboards are additionally drilled with self-tapping screws.
Gypsum cornice is very durable and has an excellent safety margin. They even sell molds for self-molding parts, which come with a dry mass. For reliable gluing, use a mixture of alabaster with PVA or other polyvinyl acetate glue. More massive structures are also coated with “liquid nails”.
Which glue is better?
The choice of adhesive for ceiling plinths must be approached carefully. Knowing the type of ceiling plinth that will be used to decorate the room, you can easily select the right adhesive. Individual adhesive is used for each type of skirting board .
The video experiment will show which glue is best to choose for the ceiling plinth.
Polyurethane
If you use regular glue to glue polyurethane fillets, then all the work will be in vain. The fillets will soon fall off, requiring re-work. This type of plinth requires polymer-based glue , which sets instantly and fixes all joints. Polymer-based adhesive can be replaced with assembly adhesive, adhesive putty or joint adhesive .
Styrofoam
For this type of plinth, liquid nails, putty or polymer mixtures are used , which firmly fix the fillets to the surface. We also have a separate article where the issue of foam baseboards is discussed in more detail.
Polystyrene
For polystyrene fillets, acrylic adhesive putty, polymer mixtures, and liquid nails are used .
Tree
There are 3 options for attaching wooden fillets to the surface:
- anchor or clip fastening;
- fastening with screws or construction nails;
- fastening using a special adhesive flexible element.
PVC
Almost any glue is suitable for this type of baseboard. In a separate article, you can read more about the types of baseboards.
The main purpose of flexible ceiling skirting boards, cornices, baguettes and moldings
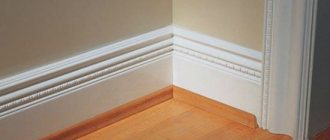
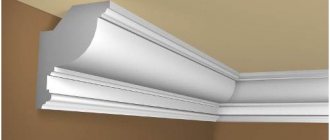
As is the case with conventional, straight cornices used in finishing work on ceilings, flexible ceiling plinths perform two functions: technological and aesthetic. First of all, due to the use of skirting boards or baguettes at the final stage of work on ceilings, it is possible to hide all kinds of technological flaws and defects made during the finishing work. As a rule, the junctions between walls and ceilings look unsightly. Spending time sealing seams and joints with putty and subsequent leveling is a labor-intensive and ineffective task. It is much more convenient for these purposes to use baguettes, cornices or plinths mounted at joints indoors.
Today the situation in this regard looks much more comfortable and harmonious. Using plastic, foam or polyurethane consumables for these purposes, the problem can be solved much faster. The quality of ceiling finishing and the level of design are changing dramatically for the better. Here we should dwell on the aesthetic content that such consumables carry.
Especially if you focus on the role that flexible polyurethane baguettes, cornices or ceiling plinths play in apartment design
How is high quality workmanship achieved when working with flexible skirting boards? The answer is simple and lies in the characteristics of polyurethane - the main, base material that is used to manufacture products for working with ceilings. Flexibility is the main property that such products have. Thanks to their use, it has become possible to implement any type of ceiling design in a practical way. A flexible cornice allows you to install complex suspended structures of spherical and radial shapes on the ceilings, giving the interior a final, presentable look.
Plastic cornices, baseboards and moldings made of foam or wood are of little use for such purposes. At large bending angles, these materials cannot withstand the stress and begin to break. For example, if ceiling work is carried out in a room where there are bay windows, columns and other complex architectural forms, it is impossible to do without creating arcs of different radii in the ceiling part. Flexible cornices are an excellent technical solution to the problem in this regard, which is why they are widely used to decorate ceilings with curved surfaces.
How to make a two-level plasterboard ceiling with lighting
It should be noted right away that for small apartments with standard ceilings, suspended systems of two or more levels are not acceptable. The average height of a single-level ceiling is 7-10 cm, while the thickness of a multi-level structure is often more than 20 cm. This depth of the suspension system is critical for rooms where the ceiling height is only 240-250 cm. Note: for decorative lighting or creating the main sources of artificial lighting, you should use halogen or LED lamps.
These lighting fixtures do not produce intense heating, which is a characteristic feature of conventional incandescent lamps. A two-level plasterboard ceiling with lighting is the simplest option. Once you have experience in carrying out such work, you can begin installing more complex structures with three levels and additional volumetric figures. A multi-level plasterboard ceiling with lighting is a completely different approach to solving ceiling design issues.
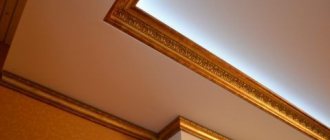
The smooth and even surface of the main ceiling is complemented by steps and other elements in which lighting equipment can be installed. Due to the stepped-shaped design of the suspended type, a striking visual effect is created that improves the visual perception of the interior space. With two levels you can achieve several goals at once: The drawing should indicate the optimal height of all vertical elements of the suspended structure. It corresponds to the width of the guides and longitudinal profiles - 50-60mm. The maximum height of a multi-level ceiling can reach 20cm, no more.
The proposed drawing shows approximate dimensions for a two-level plasterboard ceiling of medium complexity.
Step-by-step instruction
When installing a ceiling plinth, first of all you need to prepare the surface before gluing the plinth; it must be cleaned of small irregularities, after which you need to prime the gluing areas to create maximum adhesion between the glue and the wall or ceiling. The primer is the same as that used for gluing wallpaper or ceiling tiles.
Before gluing, it is recommended to take a small piece of baguette and practice cutting out corner joints so as not to spoil too much.
Now that you've got everything ready, it's time to start the process of cutting out the corners. To create an internal corner, the first of the methods described above is perfect for you. If you have smooth walls, then you can cut equal pieces from the baguettes, and cut out corner joints from them, then simply carefully glue the long planks point-blank to them. These manipulations will make your work easier when trimming and eliminate the possibility of the baguette being bent or broken.
When cutting out the outer corner, you must remember that the inner corner abuts the wall, and the outer, on the contrary, protrudes above it. Similar to the method described in the first method, you can try. The only difference will be that the baseboard extends beyond the wall to the width of your baguette strip. Once you've cut the planks at the right angle and joined them together, you may need to adjust the angle manually since the corners in our homes are often nowhere near 90 degrees. The rest of the methods we described will allow you to make an outer corner more easily. Just like when cutting out an internal corner, it is better to practice first - this will make your job easier and reduce the waste of the baseboard.
Before gluing the skirting boards, you need to make sure that the joints fit exactly. Modern assembly adhesives set very quickly, so you will have practically no time to correct a mistake, and tearing off the baseboard is both an opportunity to break it and the need to re-clean the surface of the baseboard and the wall from the glue. It is better to immediately remove excess glue with a small clean rag or sponge so that no traces remain.
How to choose the right borders for the ceiling?
The higher the ceilings, the wider the baseboard you choose.
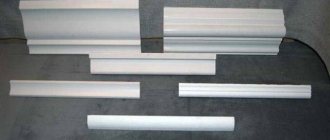
Ceiling plinths are made from different materials. Polyurethane, polystyrene foam or polystyrene foam, it can have different designs and sizes. The ceiling border consists of strips 2 m long and in order to calculate the required amount of material, you should measure the perimeter of the room and divide it in two. You can purchase skirting boards with a reserve.
The width of the border should be chosen depending on the height of the ceiling. The higher it is, the wider the strips of material will be needed. It should be remembered that purchasing fillets with an intricate relief will bring with it the worries of caring for it. The more elaborate the ornament, the more often you will have to wipe it from dust or paint it.
Decorative plugs
Another option for sealing joints is to use decorative caps for internal or external corners. Both types are usually sold at the same place where the baseboard itself is sold, and are often the most suitable in style and color. In the event that plastic and foam baseboards are used, corner and end caps are a necessary finishing detail.
Decorative caps in white
In gray
When using decorative corners on the ceiling plinth, the installation looks like this:
- The skirting boards are placed in place and cut. The accuracy of the fit does not matter; if desired, you can cut at a right angle.
- A cap is placed on the corner.
- All elements are mounted with glue, screws or secured in another suitable way.
- Seams that are too large are puttied or filled with sealant.
What to do if you don’t have a miter box at hand?
If you don’t have a miter box or you can’t use it, since not all apartments have right angles, you can get out of the situation as follows.
When cutting the corners of the ceiling plinth without a miter box, use a stencil.
You need to make a stencil from thick paper or cardboard that exactly follows the corner of the wall. If the ceiling plinth is hollow inside, it is impossible to hold it in a vertical position when cutting, you will need to build a corner from scrap materials to put a border in it, like in a miter box. You don’t have to make it perfect - you can just put together two boards. The main thing is that with their help you can reliably hold the plinth strip in one position.
We place the corner on top of the stencil - the end of the corner should be exactly above the corner of the stencil. The plinth is placed in the square. Trimming is carried out with orientation towards the lower stencil. Unlike working with a miter box, the blade of a knife or saw will rest against a corner, so trimming must be done more carefully.
Arrangement of ceiling plinth with corners
When installing a plinth equipped with a corner, you need to bring the fittings to the corner of the room and measure the distance from the zero point to the beginning of the corner, and add another 5 millimeters to the result obtained. This additional space will be recessed into the mounting groove on the side of the angle. It is necessary to cut the plinth for such a device at a right angle, that is, equal to 90 degrees.
It is usually necessary to connect skirting boards for the ceiling in a wall span, since they usually cannot cover the entire span of a wall. Taking measurements of the plinth is carried out according to the same principle as for the corners, that is, observing an additional 5 centimeters. Alternatively, you can join two profiles so that a gap of 5 millimeters is obtained. This will be enough for the connecting insert to be made correctly (read: “How to correctly cut the corners of a ceiling plinth”).