Joint design methods
Having perfectly smooth surfaces of the walls and ceiling, additional design of the joint may not be required unless the style of the room requires it, when molding is simply necessary to maintain a special atmosphere. If not, then the joint looks natural and smooth, forming a clear right angle without gaps.
Sometimes, with a perfectly even joining seam, in order to create an optical illusion and “raise” the ceiling, the upper part of the wall is painted.
If there are even small gaps, the use of special masking devices will be required at the joint. The instructions for use usually consist of simple manipulations and do not require special skills and tools, so this work can be easily done with your own hands.
Masking tape for stretch ceilings
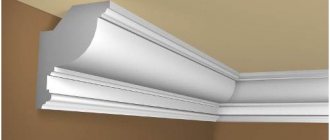
The joint between the wall and the ceiling made of tension fabric is masked using a PVC plug in the form of a special profile or insert (read more here). The junction of several levels and the junction of the structure with the wall acquire a finished, neat appearance.
To do this, you will need to place a plug in the baguette slot, where during the installation of the canvas a harpoon or profile is inserted and fixed. When flooded from above, such an insert can be easily removed, the canvas is dismantled and the water is drained, and then the product is installed in place.
There are several types of plugs for suspended ceilings:
- To accurately connect the tension fabric and slightly curved walls, an L-shaped wall elastic profile is installed in their direction;
- To design the junction of the tension fabric with a tiled or porcelain stoneware wall, T-type plugs are used. In this case, the color of the product can be chosen to match the ceiling or in contrast;
- If it is necessary to combine fabrics of different colors and textures, use a profile that differs from the shape of the baguette. In this case, the plug masking such a profile is secured in a different way than described earlier.
Recommendations for selection
It’s not easy to choose from all the options offered. But there are tips that will make the choice easier. For example, if you need to save money, it is better to purchase foam elements.
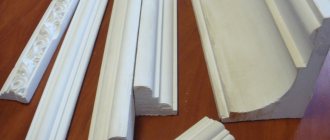
Photo of foam baseboard
If the walls have an unusual configuration (for example, rounded), then it is better to buy polyurethane baguettes.
Photo of polyurethane skirting board
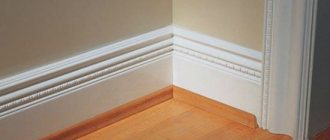
For a modern stretch ceiling, plastic skirting boards are the most suitable.
Photo of plastic plinth
When choosing a material, you need to take into account that each of them must meet several requirements. The fillets should be flexible, but at the same time durable, adhere well to the wall, harmonize with the design of the room and be lightweight.
Immediately before installing the baguettes, the plane itself and the walls need to be leveled. If you do not level, you will end up with a gap between the wall and the baseboard, which is not easy to eliminate.
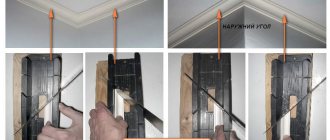
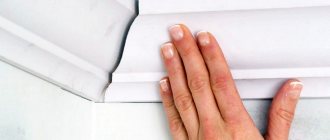
In order not to stain the stretch ceiling, you need to carefully cover it with film and begin installing the baguette. Then you need to cut the baseboards to size. To ensure they lay beautifully, you should use a miter box in the corners. The edges of each individually cut baguette should be carefully cleaned. From the inside, prepared glue is applied to the baseboard (it is selected for the material used). Then the plinth is applied to the wall and pressed lightly with your hands. You can hold it for a while until the glue sets.
Installed baguettes, especially if they are made of foam, need to be painted. This can be done even before their installation. All resulting cracks are sealed with finishing putty. A correctly selected baguette for a stretch ceiling will definitely transform the room.
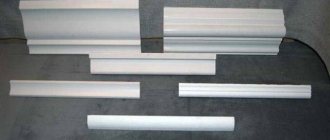
Materials
Construction supermarkets have large departments where various types of ceiling plinths are presented. The fillets are displayed in the most prominent place. They come in polystyrene foam and paper, have a flexible structure, but are also fragile.
If you do not want to purchase fillets, you can consider any other analogues of ceiling plinths, which are made from more durable materials.
Today, ceiling skirting boards are presented in a variety of designs. You can purchase products made from duropolymer, extruded, polystyrene foam, and even with a base made of aluminum profile. Some are soft, others are impact-resistant. But the main thing is that each material used has a significant number of advantages.
Foam
This material is most often used for the manufacture of ceiling plinths. The production of foam products requires a minimum of costs, hence the low price of the finished product. Foam skirting boards have several important qualities, namely ease of installation and minimal weight. There is no need to use special construction tools to install it. The only difficulty arises when cutting the product to the required angle.
By gluing the foam baseboard to the ceiling and wall, there is no need to hold it for more adhesion. And due to the minimal weight, the likelihood that the product will fall is negligible. The disadvantages of foam plinth include a high fire hazard, instability to mechanical stress, and lack of interaction with some adhesives.
Made from polystyrene
This material is obtained by polymerizing styrene, used as a heat insulator. But due to the presence of decorative properties, polystyrene began to be used in the manufacture of ceiling plinths.
The finished product has many positive aspects:
It is worth noting that polystyrene skirting boards can be used to design rounded protrusions, such as arches. However, when creating curls, special care should be taken, because the fragility of polystyrene has not been canceled.
Polyurethane
A modern building material from which many decorative elements are made, including ceiling plinths. Polyurethane moldings or baguettes have many advantages:
Due to the presence of rubber in the polyurethane baseboard, the products are flexible and acquire bending properties.
The most practical material, similar to the cost of polyurethane skirting boards. But this is the only thing that unites them. In general, ceiling plinth made of PVC material has several positive characteristics:
But along with the advantages, there are also some disadvantages:
By the way, there are detachable skirting boards made of PVC material, which have fasteners fixed with self-tapping screws. Accordingly, you won’t have to waste glue on them.
Today it is almost impossible to find a ceiling plinth made of wood. Basically, such products are made to order, and accordingly, they cost a lot of money. As a budget alternative, construction stores offer MDF baguettes. Like other samples, they have a number of positive characteristics:
However, along with the positive aspects, there are also several unpleasant nuances.
From plaster
Ceiling plinths made of gypsum are an established option, which is, in principle, common among people who create a specific style in a room. And it’s almost impossible to find plaster copies of skirting boards in a store.
Mostly they are made to order. Unfortunately, gypsum products do not have an impressive list of positive characteristics. The only advantages are the opportunity to emphasize the classic style of the room and complete the design in Provence style.
The disadvantages include the following criteria:
Defect options
Most often, owners blame both the craftsmen and the quality of the wallpaper. But if the craftsmen are professionals, and before this room they managed to glue kilometers of canvases with high quality without any comments, why did they not take into account the peculiarities of the brand of trellis when gluing. Indirect confirmation is the fact that the same problem occurs with both cheap paper and expensive non-woven wallpaper.
The answer to the question of how to make wallpaper joints invisible does not have a clear answer, since the defect itself at the joints can manifest itself in different ways:
- The neighboring canvases have separated, and a thin gap has formed through which the wall is visible;
- A lighter or darker uneven strip of glue residue appeared along the joint;
- The joints at the border of the wallpaper have risen like a “house”;
- At the joints, the difference in shades of the two canvases is clearly visible.
The last point is the most unpleasant. It often happens that when buying wallpaper in a company store, you can purchase rolls from the same manufacturer, the same brand, but belonging to different batches. To sell mismatched items and make the product attractive, salons collect leftover rolls from different batches into one and sell them at a slightly reduced price.
For your information! Even within the same batch, wallpaper may differ in shades.
Many manufacturers, due to the peculiarities of the technology for applying paints to the panel, are not able to ensure ideal distribution of the toner; as a result, one edge turns out to be slightly darker and more saturated than the other. It is impossible to hide such a defect, so an icon with two vertical arrows directed in different directions is placed on the roll. This means "reverse sticker sequence". To hide uneven coloring, each subsequent roll must be turned 180° before cutting and gluing. If you do not pay attention in time to the icon hidden in the text of the marking, the discrepancy in shades at the joints can only be corrected by painting the trellises.
Layering with a brush
You can draw a line without additional tools. If your hand is full of home repairs, then one brush with hard bristles and confidence in movement is enough. Before work, the brush is burned, that is, scorched with fire, so that there is no protruding hair. They do this with matches and a lighter - the main thing is not to overdo it, otherwise you will have to throw away the brush.
After firing, acrylic is applied to the upper edge of the flute brush, and the joint is trimmed with a horizontal movement. One wetting of the brush is enough, depending on the texture of the wall, for 20-50 cm of layering; during the work we recommend turning the brush over several times - this is better than dipping it in paint every 20 seconds.
This is a classic method used by painters; if you have no experience, it is better to use an auxiliary tool for layering.
What comes first - suspended ceiling or wallpaper?
Overview of different options for carrying out work
2301 0 0 Most of those who have decided to renovate a room and install a suspended ceiling are faced with the same question - what should be done first? Some experts advise installing a suspended ceiling first, while others recommend gluing wallpaper first.
I will talk about different options and analyze the pros and cons of each solution.
The junction of the stretch ceiling and wallpaper must be perfect for the interior to look attractive. We will analyze both options - gluing wallpaper to the stretch ceiling and vice versa.
Please read the information below carefully and make a decision based on your situation. If you answer the question of what they do first, the answer will be unequivocal - they prepare the walls. This stage is important for both wallpaper and ceilings, so you should never neglect it.
You can do the work yourself; there is nothing complicated about it. This can be done in different ways:
- For moisture-resistant options, pre-treatment with a toothed roller is required to break through the top layer and soak the adhesive underneath.
- Remove coatings using a spatula or scraper if they peel off well;
- If the wallpaper is held firmly, then you can first soak it and then begin removing it;
The flatness of the wall is checked.
The main thing is to follow the recommendations given below. Regardless of whether the ceiling will be installed before or after wallpapering, you must first prepare the walls. The instructions for carrying out the work look like this: Illustration Description of the stage If there is old wallpaper on the walls, then it needs to be removed.
If it is generally smooth and there are only isolated irregularities, then they need to be puttied. If the walls are plastered and there are a lot of small irregularities on them, then it is better to apply continuous putty to achieve an ideal plane. In case of large unevenness, it is worth re-plastering the wall or using other leveling options.
If the surface is sealed with plasterboard, the preparation will be different.
Moldings made of artificial materials:
Artificial materials that appeared in the twentieth century opened a new page in the history of interior design. Not only the price has changed, but also the process of installing decorative elements. Due to the fact that the weight of the products has been significantly reduced, most of them can be simply glued to a wall or wallpaper without resorting to special fasteners.
The general rule when purchasing such molding is that the surface structure should be smooth, uniform, and not contain dense inclusions. If upon inspection the molding is already covered with fine crumbs, then you should think about its quality, since good material should not crumble in your hands.
All moldings are easy to paint. But, even if you need a white decorative element, and you planned to install it immediately after purchasing, you should still listen to the experts and apply paint or another coating to it. This is due to the fact that artificial materials can darken over time by absorbing something from the air, or turn yellow when exposed to sunlight.
Foam moldings have a lot of advantages. They are practically weightless, easily mounted with ordinary wallpaper glue and cut with a stationery knife. And the price of these decorative products cannot but rejoice. The disadvantages include increased fragility, solvent intolerance and deterioration of appearance over time.
Therefore, the paint for them should be chosen to be water-based and you should not decorate skirting boards, doorways, fireplaces, furniture and other places where products may be subject to mechanical stress with similar elements. But they are ideal as ceiling plinths.
The price of expanded polystyrene, compared to polystyrene foam, is slightly higher, but the appearance is also more original. In addition, it is more resistant to mechanical damage, but at the same time it can be cut with a knife, without special tools.
To install products made of polystyrene foam, simple wallpaper glue is no longer enough; you will need glue-putty or a gypsum solution.
If you want to use a less fragile option for interior decoration, which will last longer than foam plastic even in contact with furniture, then polyurethane moldings are exactly what you need. Thanks to the fairly dense structure of the material itself, it holds its shape much better, which allows you to work in more detail drawing and make it look like a thin relief pattern, carved from natural materials by hand. The expressiveness of the ornament will not be lost even when painting the molding.