The use of decorative stone has no strict restrictions. The variety of shapes, textures, shades, high performance and physical characteristics allow it to be used for both interior and exterior decoration. These qualities are especially highly valued in wall cladding. The main thing is to make the right choice of material and follow the rules for its fastening.
Types of decorative stone
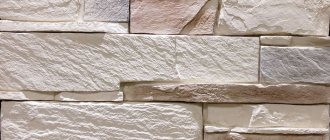
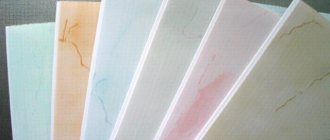
The material can be of artificial or natural origin. Natural decorative stone, which includes marble, onyx and others, is distinguished by its heavy weight and high cost. Not every wall can withstand such cladding. Therefore, most often, artificial stone on a gypsum or cement base is used for finishing.
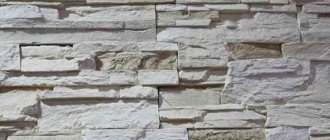
Gypsum tiles do not tolerate moisture well and are not recommended for use in bathrooms and kitchens. Stone with a cement base, on the contrary, will be an excellent choice for these rooms. Wall cladding is usually done with medium-sized stone that imitates brick or slate.
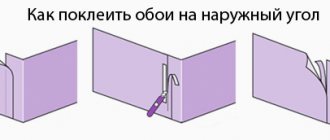
How to glue decorative stone on corners. Preparation for finishing
First you need to calculate the amount of material. If the stone will cover the entire area of the walls in the hallway, you should subtract the area of the openings and add 10%. If the decor will be located around openings, niches, in separate fragments on open walls, draw a rough sketch of the decoration and take measurements of each area. Then add up the area and add 10-15% for trimming. When purchasing material, you should remember that the amount of stone with an angular shape is calculated in linear meters, and of a regular shape - in square meters.
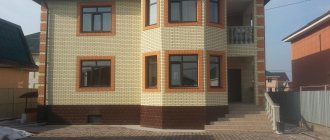
Artificial stone in the hallway
Additionally you will need:
- hacksaw or grinder (depending on the type of stone);
Bulgarian - simple spatula 7-9 cm;
Putty knife - notched spatula 15-17 cm;
Notched trowel - level;
Professional cast Kapro level - long ruler;
- pencil;
- paint brushes;
- varnish;
- file;
- acrylic primer.
Acrylic primer for walls
Artificial stone can be attached using liquid nails, cement-based or gypsum-based glue. The glue consumption must be indicated on the packaging, so when purchasing, you should know exactly the finishing area and take it with a small margin.
Liquid Nails
If you use gypsum stone, you will need a special miter box with high sides for cutting.
Plastic miter box
When everything you need has been purchased, you should start preparing the surface.
Step 1. Dismantling the coating
Dismantling the coating
If the stone covers the hallway walls completely, the old coating is removed completely to the base. If separate areas are intended for decoration, the coating must be dismantled very carefully.
On the wallpaper, mark the boundaries of the finish with a pencil and carefully trim it with a utility knife, leaving a margin of 1-2 cm wide for stones. The wallpaper glue is soaked in water and removed with a spatula, the walls are thoroughly washed
They also remove the paint if it is peeling or cracked, and clean off any loose plaster.
Step 2. Leveling the walls
putty
The stone should be laid on a flat, smooth surface - this will facilitate the work process and increase the strength of the decorative coating. Therefore, all small cracks, gaps, and depressions are filled with putty, and if there are differences of more than 5 mm, it is better to plaster the entire area
Particular attention should be paid to doorways: deep cracks may form around the perimeter of the frame, for sealing of which it is recommended to use a cement solution
Step 3: Priming
Padding
Dry walls must be lightly sanded to smooth out the unevenness of the puttied areas, and then wiped with a rag to remove dust. After this, the surface is treated 1-2 times with an acrylic primer. If there is wallpaper around the perimeter of the areas to be treated, the primer should be applied so as to cover an edge 1 cm wide - what will be hidden under the cladding.
Selecting consumables
Finishing of stone on a cement base is done with an adhesive mortar containing cement, and on gypsum - with mastic, tile adhesive, or a cement-sand composition. PVA glue is suitable for cladding plasterboard and wooden walls. The wooden surface is treated with an antiseptic before gluing the stone.
The color of the grout for the joints is selected to match the shade of the stone. The finish using slate decorative stone turns out to be monolithic. The tiles are coated with acrylic impregnation or water-based varnish. This protects the material from negative influences and increases its decorative effect.
Applications and decoration ideas
Popular ideas
Most often, decorative tiles are made with imitation stone and brick. In addition to country houses and apartments, stone-look gypsum tiles can be found in hotels, restaurants, offices and exhibition halls.
Finishing with gypsum slabs, in comparison even with ceramic slabs, has a greater chance of creating a noble interior even with minimal use. For the same reason, it is also used to decorate columns, niches and fireplaces.
Gypsum tiles are also appropriate in a loft-style interior. This rough texture seems to be created for a room that combines industrial and brutal design ideas with those that are softer and more “civilized.”
If we are talking about stone imitation, it is important to note the angle from which the light will fall on the tile. During the installation process, it would be wise to pay attention to this, since the uneven surface of the stone requires alignment. Before you start tiling, test the material on a dry finishing material so that in the future you don’t have to blame yourself for the decoration.
Interior decoration
As we mentioned above, decorative tiles are usually used for interior decoration. Gypsum porosity does not make it possible to expose the material to aggressive weather conditions: it is not frost-resistant and is not resistant to moisture. And although the use of impregnation to repel water solves the problem, you should not rely on this, since the risk of destruction of the cladding is still quite high.
When laying gypsum tiles under stone, plasterboard, brick, gypsum and plaster coatings are suitable. For cladding on an unusual base, the same preparation is required. In such situations, you need to create a layer that will have excellent contact with two surfaces at once. For example, laying tiles on tiles is possible, but only if a thick layer of adhesive is applied to the old tiles, which will not peel off. The composition of the glue, in turn, will be an excellent basis for cladding.
Facing
Cladding tools
- Notched and regular spatula.
- Hacksaw (if available, it is better to use a grinder).
- Construction level.
- Miter box.
- Foam sponges.
- Mixer-drill.
- Grout spatula.
- Construction gun (milk carton).
- Sandpaper and whetstone.
- Several brushes.
Materials
. You can use plaster/tile, for example, “Knauf Perfix” or “VOLMA MONTAGE”. Installation can also be done using liquid nails. Some manufacturers come with glue included with the tiles.
Glue- Varnish (water based).
- Seam grout.
- Seam dye.
- Primer.
Works
Stage No. 1: Marking
When facing with gypsum tiles, the laying technology is similar to laying ceramic tiles (including markings). The main thing is to find the starting points, vertical and horizontal, based on geometric aesthetics and the accuracy of the cladding. Typically, laying decorative tiles begins from the corners, for this reason the markings are also tied to them.
Decorative gypsum stone tiles have different formats, so it is important to take into account this point so that there are no duplicates that come one after another. In this regard, laying gypsum tiles is much simpler, since if necessary, you can immediately mark the placement of any element.
For correct marking, it is recommended to use a laser or water level. The first is good because it is convenient to use alone, even at the stage of tile correction. But unlike it, a water level is much cheaper - an ideal financial purchase for one-time independent use.
Stage No. 2: Laying
To mix the glue, use the mixing attachment on a drill. The consistency of the mixture should be like thick sour cream. Next, take a spatula and apply the mixture to the base, priming it in advance for better adhesion and adhesion. To level the layer, remove the remaining glue with a notched trowel-comb. Next, lay the tile, while pressing it to the base.
Masonry joints are required. To create the required distance, use available materials with the same thickness, which is equal to the width of the seams between the tiles. Stone cladding does not require seams, and they are made or not made as desired.
Stage #3: Trimming
Since gypsum is a soft material, it can even be cut with a hacksaw. For convenience, it is customary to use a grinder, but it creates a lot of dust and noise. It is very important that the outer corners are joined correctly. For a beautiful connection, the tiles are cut at an angle of 45 degrees. For this you will need a miter box. In some places, processing may be necessary, for which you can use a sanding block and then secure the result with sandpaper.
Arches and other places with a similar structure need shaped cutting. When cutting tiles, the ideal cut is along the textured line. If you use an angle grinder, you can ignore this nuance.
Stage No. 4: Grinding the seams
For putty, either grout mixtures are used, which are used in half-dry form, or glue (gypsum). It is applied into the gaps between the slabs using a narrow spatula, and it is also used to level the fugue. An alternative for grouting is a gun or a milk carton. One side of the bag is cut across the width, and on the other a hole is created, which will be 0.5 cm in diameter. Next, the bag is filled with the mixture and squeezed into the seams through the hole made.
If you are not skilled at grouting gypsum tiles under stone, try not to overdo it. If things go wrong, the mixture will set faster than you can process the seams. Remove the remains with a foam sponge. Try not to let the putty get on the facing material, since gypsum itself is a porous material, and it will be difficult to wash anything off it.
If the color of the tile and the putty differ from each other, and this was not included in the design, then after grouting, when setting, paint the jointed seams with dyes. Reliable manufacturers of rafts give such material as a gift with purchase. Painting is carried out only with a narrow brush, and this applies not only to seams, but also to possible chips that could appear during transportation or installation.
After finishing, it is advisable to treat the tile with water-based varnish for safety (from moisture), since you may accidentally splash the surface when cleaning.
Cladding of plasterboard and wallpapered walls
It is not recommended to glue this facing material to wallpaper. First, the walls are trimmed with stone, and then wallpaper is pasted. The slabs of the side rows are glued in such a way that they overlap the wallpaper by no more than 2 cm. If the walls are already covered with wallpaper, some of the canvases are removed for finishing with stone.
Plasterboard walls can withstand loads from 10 to 60 kg per 1 m2. This allows you to stick decorative stone slabs on them, which are lightweight. To ensure reliable fastening, many experts recommend reinforcing the structure with reinforcing mesh. Especially when the load per 1 m2 is 30 kg or more.
Preparing walls and mixing mortar
Decorative stone is glued only to the prepared base. The walls must be smooth, solid and durable. All old coating is removed from their surface, stripping it down to the base. This also applies to particles of dust, dirt, traces of various solutions and oil stains.
The walls are puttied, plastered and primed. If work is carried out in the summer, when the temperature rises above +30 degrees, the walls are moistened with water. It is also better to prime the slabs on the inside. This increases their degree of adhesion to the base.
The adhesive solution is prepared in accordance with the instructions. It sets quite quickly, so it is better to mix it in small portions, given that the consumption per 1 m2 of stone is about 6 kg. If the glue is prepared from a dry mixture, uniformity can be achieved using an electric drill.
Laying order
Rectangular slabs are glued in rows, oval slabs - in random order. Elements of non-standard shape are first laid out in the desired pattern on the floor. This allows you to transfer it to the wall surface.
Slabs of different sizes should be alternated, changing the sequence in each row. To create a masonry effect using elements of the same size, the first tile of the second row is cut. This ensures that the seams between the rows do not match. Cut the slabs with a hacksaw or miter box.
You can start laying stones both from above and from below. If the wall is covered over its entire height, it is better to glue the elements from the ceiling. In this case, the cut tiles will be at the bottom and will not be noticeable.
Gluing decorative stone
The glue is spread on the wall with a flat spatula and a thin layer on the back side of the decorative element. Small sides are formed on the sides of the tiles and the solution is additionally applied pointwise. The tiles are pressed against the wall and leveled with a building level.
To hold the stone tighter, lightly tap it with a mallet. Exposed adhesive must be removed immediately. To do this, you can use a damp sponge or rag. It is almost impossible to remove most solutions in their frozen form without leaving traces.
These steps are repeated with each element, laying out the entire wall or a separate section of it. Corner slabs are cut at an acute angle.
The final stage is grouting the joints. They are filled using a pastry syringe or a special bag. The top of the stone is coated with varnish or impregnation.
Video: How to glue decorative stone to walls
Do-it-yourself gypsum stone tiles
If you have large volumes for tiling, it makes sense to buy special molds (or make them yourself) and create your own batch of tiles at home.
- Coat the mold with color to avoid applying paint after the tiles have dried.
- Fill the form with a liquid mixture of concrete mortar and color. To 500 ml of water add 1000 ml of gypsum and ½ tsp. color scheme
- When the mixture has hardened, remove the tile from the mold.
- When completely dry, the tile will come out of the mold easily.
- Evaluate the result.
More visual instructions can be found in video format on YouTube.