Stone has been used in construction for centuries. The material is strong and durable, thanks to which buildings were built to last for centuries. A couple of hundred years ago, only rich people could afford a house made of stone, while the rest were content with wood or clay-based compounds. Although new technologies for processing the material have now appeared, prices for it have not decreased much. For this reason, granite, marble and sandstone in the interior are considered a sign of elite design, which only wealthy home owners can afford. For those who value the excellent aesthetic properties of the material, but cannot afford it for one reason or another, the construction industry offers a number of imitations that are indistinguishable from the original in appearance. In terms of strength, they are of course much inferior to real stone, but their main function is decorative, and not protective, as in the old days. Therefore, such a minus can be added to the list of relative ones. For those who do not trust imitation manufacturers and have free time for manual labor, we suggest making decorative stone with your own hands. The process is divided into three stages:
- Preparing the mold;
- Mixing the composition and pouring it into the mold;
- Removing and fixing to the surface to be decorated.
We will talk about each stage of the work in detail in this article, which will provide detailed instructions and step-by-step master classes that even a beginner can handle.
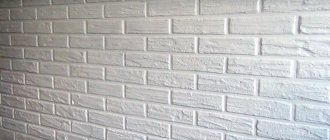
Pouring stone from plaster
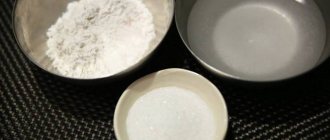
To save dye, our user pours gypsum stones in the same way, in two layers. To slow down the setting of the gypsum, add citric acid, which is also measured with a syringe (0.3% by weight of the mixture). The mixture is prepared as follows: gypsum, citric acid, dye and the required amount of water are immediately mixed well to the consistency of thick sour cream. Dye is added to the gypsum mixture at the rate of 5-6% of the weight of the gypsum. 100 g of gypsum – 6 mg of dye (measured with a syringe).
Gypsum stone can also be made with the addition of cement, at the rate of one part cement to two parts gypsum. No dye is added to the gypsum cement solution - it is painted with acrylic paint.
Gypsum stone is usually used for interior decoration. It is recommended to lubricate it with 1-2 layers of heated vegetable oil at a temperature of 60-70 degrees.
FORUMHOUSE user glebomater uses artificial gypsum stone for exterior decoration.
glebomater
Plaster with facade paint has been standing on the street for several years. Not falling apart yet.
She was taught how to decorate and paint such a stone.
Glebomater
Thin the facade paint with a collier, a little darker than the color you need. Using a soft brush, apply paint to the bottom of the mold so that there is a layer, and not just smeared. Pour in plaster. All.
Also, before pouring the gypsum mixture, the bottom of the mold can be filled:
- beads;
- any kind of sand;
- small pebbles;
- ash (such a stone looks very decent from a distance, but is unsuccessful up close).
Learn how to make your own polyurethane mold for faux plaster bricks.
Required materials and tools
Making artificial stone at home is not as difficult as it might seem at first glance. The scale of work depends on the amount of material needed to decorate the house. For some interiors, it is enough to make a couple of samples that will cover wall defects, while in other rooms stone dominates the accent walls, almost completely displacing the usual plaster. To work you will need:
- Molds (molds). You can buy them ready-made or make them yourself.
- Main material (gypsum, acrylic, cement).
- A screwdriver with a “mixer” attachment for mixing the composition.
- Bucket and measuring cup, scales.
- Plumbing silicone for sealing gaps, plywood and wafer for making molds.
- Pallets with sand to protect molds when using gypsum and cement composition.
- Wide spatula.
- Drying cabinet.
- Paints, brushes, trowels, airbrush.
- Release agents.
- Special glue or cement for fixing the stone to the wall.
The list of tools can be supplemented depending on the complexity of the work: additional painting, giving a special relief to the surface of the stone (porosity).
When working with fragile foam, you will need a respirator, a utility knife and a soldering iron. However, we will consider the procedures for manufacturing more complex and durable products that will last for many years.
What is homemade artificial stone?
The master gets a wide field for creativity, creating a unique imitation. According to their intended purpose, stones are used for external and internal work.
In the production of materials for interior decoration, safe elements are used that will not harm health. To create façade stone, you need more durable materials that can withstand the influence of the external environment.
The imitation of stone with gypsum is attractive due to its simplicity of execution and the speed of setting of the workpiece. Gypsum is positioned as a hygroscopic material. It contains additives that increase resistance to defrosting and freezing.
Builders advise using gypsum for interior rather than exterior work. On the street, it quickly rolls up, which means that there will be very little time left for making a decorative composition from gypsum and applying it to the wall.
Acrylic artificial stone is designed for interior decorative wall decoration. It is used to make kitchen countertops, sinks, sinks, window sills and even shower stalls.
This is a durable, resistant material. Tolerates the influence of a humid environment and elevated temperatures. It is environmentally friendly and does not stain; it is easy to clean by wiping with a soft cloth. The only negative is the high price, but it is justified by the many qualities of this material.
Made from natural gravel
This facing material is mixed from fragments of real gravel and several other components to enhance the technical characteristics. Resistant to external factors, it is characterized by a long service life.
Suitable for all types of work. However, more often they are applied to the outside of buildings.
Based on cement with sand
According to its technical characteristics, it is positioned as a universal material. It is superior in strength to natural stone. It is mainly used for arranging external coverings.
Its disadvantage is the long hardening time, which takes about two days. The master needs to either stock up on several forms or devote about a week to work. The second disadvantage of the material is its heavy weight.
Mold making
The shape of the decorative stone determines its appearance. To obtain variety, you can prepare several different templates at once, samples of which will alternate during installation. Typically, tray modules consisting of at least ten cells are used. Large molds will speed up the process of making stone if you need a lot of it. As for materials, silicone or plastic is usually used. Unfortunately, the service life of such molds is limited by a certain number of fills. Polyurethane is a more expensive option. These molds can be reused as much as you like, while the shape will retain its original appearance. Any stone you like will be suitable as a sample for the matrix.
Some people use molds made from boards. Moreover, the more irregularities and roughness on their surfaces, the better. The composition after pouring will repeat these defects, which will give it a resemblance to wild stone. A sample is not needed with this technique.
Silicone mold
The simplest and cheapest option is silicone sealant. Its significant disadvantage is that it takes a long time to dry. This material requires careful handling, as it stretches quite quickly and the mold loses its original shape. In general, silicone is distinguished by its degree of viscosity. Forms with a high level of detail are made from liquid compositions, which is not required when creating stone. Thick silicone is ideal for replicating the rough, rough surface of a natural sample. The stones are laid in orderly rows on plywood or a sheet of chipboard. It is advisable to pre-glue them. Each stone is then coated with a release agent, which will prevent it from sticking to the mold. After this, formwork is constructed from MDF or plywood, which is attached to a flat base. All joints are carefully sealed. Then the mold is filled with silicone. Now you need to leave the mold to dry (about a day). After this, the formwork is disassembled and the mold is carefully separated from the samples. If somewhere the mold does not give in, then you can carefully help it with a stationery knife.
To avoid the formation of voids, the silicone is carefully leveled and lightly tamped with a spatula. To prevent the tool from getting stuck in the solidifying liquid, it is lubricated with grease or any dishwashing liquid.
Compound mold
Compound is a polymer mixture containing two main components:
- Viscous substance.
- A catalyst that, under certain conditions, initiates the hardening process.
Compound molds are made in the same way as silicone molds. By the way, it is also present in most compositions. A bottle of catalyst is included with the base substance. In a separate container, the two components are carefully mixed. It is not recommended to vigorously beat the compound, as this will create bubbles, which can then lead to unsightly voids in the artificial pebbles. Then the mixture is poured into samples mounted on a piece of plywood and surrounded by formwork. If the matrix is small, then it can be made in a large bucket or bowl. After hardening, the molds are washed with running water, since the smell of the compound is not pleasant.
The compound is often used to create molds for soap, wax candles and even repeating elements of bas-reliefs and sculptures.
Stone production and pouring technology
After the molds are ready, you can begin casting the decorative stone. The principle of working with any of the materials is the same:
- First stir the composition.
- Then the molds are lubricated with a separator to prevent the stones from sticking to the matrix.
- Next, the composition is poured into molds.
- Periodically, the surface is compacted with a spatula to eliminate voids.
- Then the future pebbles are given time to “rest”, that is, to freeze.
After partial hardening, the stones are removed from the molds and subjected to final drying.
By the way, there are simpler, budget options. For example, embossed pieces of egg trays are glued onto a cardboard base. They are then covered with a thin layer of papier-mâché (soaked paper) and stationery glue. The final painting completes the process. Such decorative stones are ideal if you need “quick decor”. For example, you needed to decorate the fireplace for New Year on the eve of the holiday, or you urgently need to close an ugly corner in the room.
Based on gypsum mortar
Gypsum mortar has a big drawback - it sets quickly. For this reason, you will have to fill out the forms quickly. If the amount of work is large, then it is better to do it in “portions” or call someone for help. To slightly slow down the hardening of the gypsum, you can add a couple of grams of citric acid to it. The mixture is poured into the molds and gently shaken or passed over the top with a spatula to fill the voids. After the initial hardening, the pebbles are removed from the molds and left to dry for another day.
Based on cement mortar
Cement-based stones are created in several stages. The reason for this is the reinforcing mesh, which is necessary to give the product strength.
- Mix a dry solution of sand and cement in proportions of 1:3.
- Add dye to the water and stir.
- The colored liquid is poured into a dry solution. Oh, because the mixture should be similar in consistency to sour cream.
- It is thoroughly shaken so that all the voids are filled.
At the next stage, a reinforcing mesh is placed in each mold: it is simply “drowned” in the solution. Then the workpieces are completely filled with the same mixture or a new one without dye (in order to save money). When the solution dries slightly and becomes more viscous on its surface, which will be attached to the wall, make a couple of grooves with a nail to ensure better adhesion.
Cast acrylic stone
This option is perhaps the most time-consuming. Cast stone is made from four components:
- Acrylic (resin);
- Hardener;
- Pigment;
- Filler (gravel, granite or marble chips).
First, natural stones are thoroughly washed with any soap (even regular “Fairy” will do). Then they are calcined over fire and rinsed with water. After drying, the filler is mixed with the dye in a separate container. Then the acrylic resin is diluted with a hardener and colored pebbles are added to it. Now you need to quickly fill the mold with solution. Leave about 15-20 minutes until the acrylic sets. The stones dry very quickly, about 1 hour. Then they are carefully separated from the molds and left to dry for another day.
Liquid stone
The phrase “liquid stone” refers to the technology for producing a special coating for countertops, sinks, walls, and furniture facades. The material is sold in construction stores. Liquid stone is made by casting or spraying. We are interested in the first option. The components (hardener, polyester resin, filler) are mixed into a composition, which is then quickly poured into the mold. To form a protective film on the surface of the pebbles, the mold is lubricated with gelcoat before pouring.
Pigments
There are two ways to color a stone:
- Add pigment to its composition.
- Apply special paint to the surface after production.
The second method allows you to create a unique design with darker and lighter areas, which will only increase the resemblance to the original. To color the solution itself, inorganic pigments based on iron oxides are used. They give the mass bright shades, do not contain abrasive impurities and are highly dispersible. Decorative stone will not lose its color over time and will not fade from constant contact with sunlight.
Separators
Separators are special compounds that are used to lubricate molds before pouring the mixture. With their help, the finished pebbles will not stick to the walls of the mold and will be easily separated. For different mixtures, special compositions are used:
- For concrete, grease or lithol is used.
- For gypsum products, use a mixture of turpentine and wax in a ratio of 7:1. Making it is quite simple. Turpentine is heated in a water bath and wax shavings are added to it in portions.
- For acrylic, use a mixture of styrene and stearin in a ratio of 1:10.
When pouring a mixture of gypsum or concrete, which heats up during the hardening process, silicone molds must be additionally protected. For these purposes, they are placed 2/3 in a special container with sand.
Pouring stone from cement
The first step is to paint the mold. The painted form will allow the dye to penetrate deeper into the future stone, the paint will wash out less and stick better. Our user paints the form randomly, simply applying paint of various “stone” colors to its inner surface.
Dronduletus pours the stone in two layers. Dye is added to the first layer, but not to the second, to save money. The composition of the mixture for the first layer: 1 part cement, 3 parts sand (you can measure it on a kitchen scale), water and a little dye.
Dronduletus
For cement stone, 2-3% by weight of the cement + sand mixture (without water); that is, 100 g of cement + 100 g of sand = 4 mg of dye (measured with a syringe). But this depends on the dyes, their intensity, the degree of staining and the quality of the cement.
If you need the stone to be especially strong, you can take 1 part cement and 2 parts sand.
Dronduletus
I measure the dye with a syringe in divisions of 5-6% by weight.
The concrete mixture is prepared as follows: first, sand and dye are mixed well in a container, then cement is added, mixed well again, then water is added. The consistency of the mixture should be like thick rustic sour cream, which is “worth a spoon.” You can add concrete plasticizer C-3 to the solution, but this is not necessary. After filling the mold with the first layer, you should vibrate it on a vibrating table for a minute or simply tap it on the table.
Before pouring the second layer of sand-cement-water (but without dye), use a spatula to slightly push the mixture towards the edges of the mold to form small sides. You can put a piece of painting mesh inside, slightly smaller than the outline of the form (this is also optional). Pour in the second layer of the mixture, vibrate or tap for half a minute.
To make the stone stick better to the surface, use a nail or stick to make grooves on the surface of the mixture.
After 12 hours, the stone should be removed from the mold and placed in a polyethylene bag for two weeks - this will allow the concrete to gain strength. After each pour, the silicone mold should be thoroughly washed with dishwashing liquid and an old toothbrush. This will increase her life expectancy.
Concrete stone is used for street work, so to remove dust from the concrete and protect the dye from washing out, it must be covered with a layer of drying oil.
Here's how FORUMHOUSE user dronzub finished the base with such artificial stone.
For more or less large-scale home production of artificial stone from cement, you will need a vibrating table. It’s easy to make a simple vibration table with your own hands from an unnecessary motor from something. Our user used a 50W/220 fan motor.
Dronduletus
I placed a lamp sconce on the wire, attached an eccentric on the shaft, machined on sandpaper from a piece of iron, cut out a piece of 12 mm plywood 30*30 cm, glued squares of 50 mm foam rubber to it on one side, made holders for molds on the other side and secured motor.
DIY artificial cobblestones
Decorative cobblestones are used in summer cottages to disguise hatches or septic tanks that disfigure the landscape. They can also become part of the composition under a waterfall, fountain or in the garden near the gazebo. The principle of making cobblestones is the same as the technology for creating decorative stones. But there will be problems with the mold, since the dimensions of the product will require a large amount of silicone composition. The task can be completed without a form if the master has the skills of a sculptor. A frame is formed from the reinforcing mesh, which is filled with foam plastic or other lightweight material.
This will significantly reduce the weight of the cobblestone, since its surface will be made of concrete. Then the cement composition is mixed and applied in layers to the frame with a trowel. At the same time, the cobblestone is shaped and irregularities, bends, and roughness are made. You can use special brushes. Then the surface is allowed to harden, after which the cobblestone is turned upside down and a layer of cement is also applied. Next, the boulder is finally dried, ground and painted if necessary. As an alternative, you can make an unusual mold from fabric. In this case, a cast is taken from the original cobblestone. It is wrapped in a piece of cloth soaked in cement mortar. After drying, the piece is carefully treated again with cement to secure it. This mold is disposable, since its surface will be the “front” part of the cobblestone. Then they proceed according to the principle described above: frame, apply cement for bonding, and place a frozen cast on top. This is followed by bottom treatment and painting.
How to dry stone
Artificial stone needs to be dried in a special unit. If you don’t have one, you can make a primitive version of it yourself. Any old cabinet will be suitable for these purposes. All its “insides” are taken out and special lattice shelves are made. It is necessary that the pebbles dry not only on the top and sides, but also on the bottom, so they should not be placed on solid surfaces. If only ordinary shelves are available, then holes are evenly drilled in them to allow warm air to enter. Then the walls and door of the cabinet are lined with penofol. The artificial dryer must be closed tightly. If there is no door, then the cabinet is “draped” with the same penofol.
Painting the stone
Depending on the type of material, different compositions are used to paint stone. For gypsum products, water-based paint, concrete impregnation, acrylic varnish or glaze are suitable. To obtain bright shades, application of the composition must be repeated two or three times. To shade the whiteness of the plaster, one coat of varnish is enough. Painting can be done the old fashioned way with a brush or use a modern airbrush. Due to different distances to the surface, the sprayer can give it completely different shades. Concrete is coated with acrylic, silicone, silicate paints or a primer with added pigments. Organic-based water-dispersion compositions adhere well to plastic. It is not recommended to use oil and enamel paints for decorative stone; they are only suitable for wood and metal. If some individual areas need to be highlighted in a different color, then the area around them is sealed with masking tape. It is also used to protect another surface when color is added to the decor already on the wall. It is not recommended to use “pure” colors, since they are not typical for natural stone.
To give the stone an antique effect, an uneven layer of green paint is applied to its surface, imitating patina.
How to make artificial stone for facade finishing
According to calculations by FORUMHOUSE participants, artificial stone made by hand, taking into account energy costs, etc. Costs twice as much as store bought. There are several different technologies. This time we will look at how to make this material using a silicone mold. The subtleties of this technology are revealed by a member of our portal with the nickname dronduletus.
To make a silicone mold you will need:
- 2-3 silicone cylinders;
- piece of PVC panel.
BIG-HORROR
Look for silicone in auto stores, sometimes it’s in tin cans as a “paint remover.” It turns out to be somewhat cheaper and just a kilogram.
To make a stone you need:
- any stone from which the mold will be cast (natural, plaster or concrete); the gypsum stone will first have to be coated with 2-3 layers of varnish or drying oil);
- cement - 200 grams (or 70 grams of gypsum);
- sand – 500 grams;
- dye - 3 grams;
- a piece of painting mesh (optional);
- plasticizer for concrete (optional).
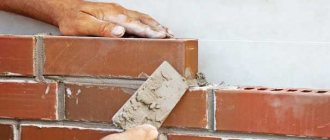
A few words about laying artificial wall stone
Facing is a creative process that completes the entire decorative stone “epic”. Place finished fragments on any surface. Concrete or brick are directly bonded to the decor with special compounds, but wood will have to be prepared. It is additionally covered with a layer of moisture insulation and a lathing is formed. The stone is attached using a cement solution or special glue. The fragments can be laid with or without jointing. The first option is preferable, since grouting the gaps gives the decor a more natural look. If you plan to grout the seams, then leave an empty space of no more than 2 cm between each fragment. Then, after installing the decor, it is filled with grout. Before fixing it, it is better to place the stones on the floor and try different combinations of their placement to find the best option. The installation itself begins from the corners and around window and door openings. Only then do they begin to secure the fragments in horizontal rows. Partial decoration of walls around some large element (arch, opening, niche) is popular among us. The “torn” edge gives the composition a careless but stylish look.