When repairing, finishing work will require a scraper or scraper. Without this device, it is impossible to efficiently clean the coating from old paint or varnish, or remove excess hardened mortar.
The editors of the Yanashla website bring to your attention a review of high-quality scrapers and scrapers for 2021. We will also talk about how to choose these construction tools and what to look for when purchasing.
Combination of paint and base
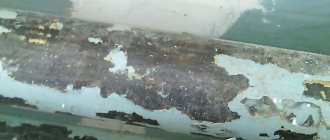
The first thing to do is assess the scale of the work. It may not be necessary to remove old material from the surface of the walls. If the coating is even, smooth, without defects - places of swelling, peeling and cracking, then apply a new layer of paint on top of the old one.
Removing old paint from walls with a spatula
In addition, the finishing must match the appearance and composition of the base. Oil paint should be placed on top of oil paint, and water-based paint should be placed on top of water-based paint. If the old decor is oil, and the new one is epoxy or acrylic, there will not be the necessary adhesion of the surfaces to each other. The composition will not lie on the walls and will not be evenly distributed.
Those who want to remove old paint from walls are advised to think about the feasibility of such work if the walls are very uneven. It may be much more economical and better to level them with drywall. Then there is no need to remove old material from the walls.
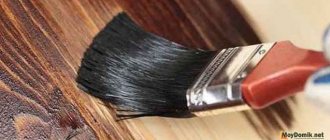
This stage of repair work is skipped when it is planned to attach plastic or other wall cladding or lining. Before dismantling old material from the walls, make sure that the chosen method can be used on the surface. Cover with paint:
- wood;
- plaster;
- cement base;
- metal;
- stone, etc.
For each of these surfaces, one or more methods of removing paint will be suitable, while others will be useless or will damage the coating so that it will then have to be restored.
Experts advise carrying out testing, removing the material in a small and inconspicuous area, evaluating the result, and only then applying the product to the entire surface of the walls.
Surface preparation
Before you begin removing paint, you need to prepare your work area. The nearby space will become heavily littered during work, so we do the following:
- We remove all furniture from the room;
- If some items are too large and cannot be taken out, cover them with polyethylene;
- We cover the floor with plastic film, but don’t just lay it on the surface, but attach it to the baseboards with tape.
- We put on a respirator, safety glasses, rubber gloves and an apron.
Which paint removal method is best to choose?
Three methods have become widespread that allow you to remove old material from walls:
- Mechanical.
- Chemical.
- Thermal.
Each of them has its own advantages and disadvantages that are taken into account when choosing. The first is the simplest, but at the same time more labor-intensive. The more layers of paint there are on a surface, the harder it is to remove them. For this purpose, various power-driven tools are used to make the task faster and easier. This will require a lot of work and time from a person.
The chemical method involves the use of special compounds with a dissolving effect. They corrode the old coating, allowing it to be removed from the wall surface faster and easier. It can be applied to different types of paints.
Chemical method of removing paint
The disadvantage of such dismantling is that it requires the use of special protective equipment and a mask. There is a danger of poisoning from caustic fumes, so it is necessary to work in a well-ventilated room, where there are no children or pets. The method is good, but not applicable in all situations.
The thermal method is also impossible without the use of special equipment - a hair dryer. It softens the old coating, which is much easier to remove from the walls. Not everyone has such a tool and you need to be careful when working with it.
If exposed to high temperatures, the paint may catch fire. Working near electrical cables and outlets is also fraught with negative consequences. In addition, when heated, the old coating evaporates, releasing caustic toxins into the atmosphere. Protective equipment is required for work.
Selection rules
Professional builders give the following recommendations to beginners:
- The choice of tool depends on the intended use. The shape, at what angle the working blade is, what kind of handle - everything matters.
- A wider scraper requires greater force to be applied when cleaning the surface.
- A telescopic tool can break if a lot of physical force is applied, so it is used if you need to remove a minor layer.
- A complete set, when the set includes replaceable blades, will allow you to use the tool for a long time. A blade pressed into plastic will not last long. The service life of this device will end after cleaning several tens of meters, that is, after one or two repairs.
- A metal or wooden handle is more durable than a plastic one. Thus, the service life of the scraper is increased.
- The edge of the working surface must be smooth. If there are nicks or irregularities, this indicates a defect in the product.
- The ergonomics of the product implies greater productivity.
- The material must be durable, wear-resistant - top quality steel.
- The popularity of models depends on the brand. The product is of a priori high quality from a trusted manufacturer.
- How much the product costs is also an important criterion. Good tools with great functionality are not cheap. And if someone offers a scraper for less than 100 rubles, it is no longer a working tool, but a children’s toy that will break in the first weeks of repair.
Popular models and new items can be purchased at retail outlets in your city and on the World Wide Web.
Tips for choosing a product in an online store:
- The lot must have a description, characteristics and photo of the product.
- The characteristics must indicate the type of work for which the tool is intended.
- The price of the goods is indicated.
- Domestic trading sites should provide the opportunity to place an order with the provision of a delivery service alternative to Russian Post. If the online store states that delivery is possible only by Russian Post and with prepayment, most likely the buyer will never receive the parcel, or the product will be of poor quality.
- You can order online only after making sure of your own consumer safety, which means you should check the availability of contacts on the site for communication with the buyer, real phone numbers, and legal address.
- Conscientious sellers also provide customer reviews, not “cleaned up” by a moderator, both positive and negative. After studying this information, it is easy to decide on the choice of product.
- It doesn’t hurt to visit independent forums where Internet users leave opinions about the provision of services by online merchants and about the goods purchased. Buyers also share information about where they can buy good products cheaper.
Tools and materials
To easily and quickly remove old paint from walls, use the following devices and materials:
- Protective clothing – construction respirator or mask, plastic goggles, thick rubber or fabric gloves.
- Scraper, chisel, knife, spatula.
- The working mechanisms designed to remove the old coating are an electric grinder, a chemical, or a hair dryer. Additional accessories for them will be useful, for example a brush for applying caustic remover or an attachment for a drill.
DIY wood scraper
Step 1: Required Materials and Tools
- To make scrapers you will need the following materials: Spatula Old hand saw
- Old circular saw
- Tools: Angle grinder with metal saw blade Metal file Finishing tool Grinding stone
- Pencil and ruler
- Step 2: Spatula Scraper
This is the simplest scraper you can make. Just remove the handle and the scraper is ready!
I decided to cut a small strip of holes so that the scraper would be the correct size and I could use both sides of the scraper. This scraper has a thickness of 0.4 mm. It bends easily and works great!
Step 3: Hand Saw Scraper
This scraper came out the best.
I took an old handsaw and removed the handle. Then I sanded it a little to remove the rust. Using an existing scraper, I drew the lines using a pencil. I then pressed down a straight piece of plywood and cut the saw blade using an angle grinder. After this I removed the remaining rust using a grinding stone.
This scraper has a thickness of 0.8 mm.
Step 4: Circular Saw Scraper
The manufacture of this scraper is similar to that for a hand saw.
It is important to use a straight piece of plywood as a guide when cutting.
Source: https://delomastera.info/skrebok-po-derevu-svoimi-rukami/
Paint removal methods
When choosing a technique that will give a good result with minimal effort, experts advise taking into account:
- Willingness to invest money. Sometimes it's easier to arm yourself with a hammer and chisel than to buy a chemical solvent.
- Time. If it is limited, it is better to call for help with a sanding machine or solvent than to methodically remove the old coating centimeter by centimeter with a spatula.
- Type of base. It is better to heat concrete with a hair dryer. It is not used for wooden walls.
- Type of paint. It is often difficult to understand what kind of paint was used on walls in the past - oil, acrylic, water-based or enamel. The most difficult thing to remove is the oil composition, especially if it is applied to a concrete base.
- Number of layers applied. Sometimes it seems that a thin layer is easier to remove than a thick one, but it happens the other way around. Thick ones are easily susceptible to mechanical stress, breaking off in whole plates under their own weight. The thin one sits firmly and requires a lot of strength to remove it.
When you can’t get rid of paint on the walls yourself
There are several design options designed to mechanize the process of cleaning walls from paints. However, all of them are characterized by such disadvantages as a high level of intelligence emitted by them and a large amount of dust emitted during operation:
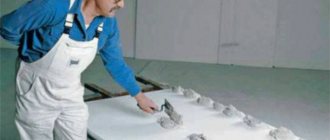
- Carrying out processing using a wide nozzle in the shape of a spatula or with stiff metal bristles attached to a hammer drill. The tool is positioned at an angle of 85-90° to the wall surface, the operating mode is selected in such a way that after removing the coating, there are no potholes or holes left on the wall. When performing the procedure, the device rises or lowers under the influence of the vibrations it creates.
Experts recommend treating the walls with a hammer drill, drill or grinder, if after the repair, instead of painting, ceramic tiles will be used. In this case, the rough surface of the walls creates good conditions for adhesion to the mortar.
- An alternative option is to mount an attachment or grinding wheel on a drill, grinder or grinder. When attaching the tool to a grinder, you can even remove paint with high adhesion rates applied to a concrete wall or a thin layer of primer. When the device operates, the old coating is simultaneously erased and the surface is prepared for applying a new layer.
A grinder with an attachment creates such an amount of dust that personal protective equipment does not help. The possibility of using this method for treating small enclosed spaces, such as closets or bathrooms, is limited.
Today, such structures are equipped with special vacuum cleaners built into the structure, which are capable of capturing more than 95% of the dust created. When working with an angle grinder, it is necessary to take systematic breaks, during which water should be sprayed from a sprayer to ensure that particles of concrete and dust floating in the air settle on the floor.
Mechanical method
To remove the old coating from the surface of the walls, you can do it manually or using various electric tools - grinders, drills, sanders. In this case, it is necessary to take into account the type of surface, as well as whether the work is carried out in a room where people live, or whether it is empty and completely given over for renovation.
In the first case, you want to carry out the work with a minimum of dirt and dust, which means you will have to abandon electrical assistants.
Mechanical methods of paint removal
Working with an electric sander
Working with an angle grinder is the fastest and most risky method of dismantling old paint. All you need to do is install a special removable attachment into the device and turn on the device by pressing a button. It is advisable to work smoothly, easily, performing circular movements.
Be sure to protect your eyes with glasses, as during the process a large amount of dust appears and pieces of old paint fly around.
If you need to remove large deposits, it is recommended to use an attachment with a chain, which, when rotated, will knock out whole pieces of dried material. But it is not recommended for use on hard concrete foundations.
The grinding wheel is a universal solution that can be tried on any surface. It is used in different rooms - bathroom, living room, hall. Using a sanding machine you can efficiently, easily and quickly remove old material from walls without damaging them.
Working with an electric drill
This tool is needed when the base is concrete. The best adhesion is created between such a coating and oil paint, which is not so easy to break and remove the used material.
Of great importance is the fact who laid the coating - a professional or an amateur. Removing old paint after a specialist is much more difficult than after an amateur. If work is carried out in an apartment building, it is not recommended to use chemical solvents so that the smell does not spread throughout the entire entrance and cause harm to neighbors.
In this case, you need to use an electric drill. This is the optimal solution both in terms of speed and security. It is also recommended to work in protective equipment and shoes, a mask, a hat, and glasses.
It is better to operate the device at low frequencies in order to maximize control over the process. To remove the old coating, only touch the wall with the edge of the nozzle, without moving too quickly or too deeply.
If the paint comes off easily, you can use a metal brush. In severe cases, it is recommended to resort to an attachment, which is a chain-linked link equipped with a washer.
Working with a chisel and hammer
A chisel is the first device that everyone starts working with when trying to remove old decor from smooth walls. It is especially convenient to use it in cavities and narrow places, as well as in areas where neatness is required - in the area of sockets, decorative elements, switches, cables.
This carpentry tool will help out when you need to remove old paint from wood. But it quickly becomes dull and its capabilities are not always sufficient to dismantle obsolete material, although this is one of the most economical and safest methods that does not require investment.
In areas where such a tool is already powerless, it is worth using a chisel. It does not bend under mechanical stress. By tapping the handle with a hammer, you can remove even the most difficult coating from the walls.
Ax work
This may not seem like the right tool for removing old paint, but it is very effective. The master's task is to make notches on the paint. The blows must be applied tangentially to the wall, trying not to go too deep into it. It is good if the distance between the notches does not exceed 10 mm.
As the cuts are made, it is necessary to moisten the surface with water. It should be absorbed deep into the material. After this, the paint can be easily removed with the same tool, bringing it almost parallel to the wall covering.
This ability is not convenient for everyone. Even a light ax is not easy to swing, especially when the repairs are carried out by women. In addition, a lot of notches need to be made, and the master’s hands will get tired in any case. Therefore, you need to resort to it only in special, difficult-to-reach places on the walls.
Video
Cleaning sander - 2 in 1 router RENOFIX RG 150 E
Specialist in processing large surfaces. With a working tool diameter of 150 mm and a wide range of accessories, the RG 150 E is the ideal tool for machining large surfaces.
Advantages
:
- Deburring milling cutter with optimal speed for processing soft materials, as well as the possibility of using diamond tools.
- Reliable and high-performance tool with 1,600 W motor
- Comfortable and safe handling thanks to the D-shaped handle
- Efficient suction and automatic sealing with brush flange
- Smooth, almost vibration-free running thanks to shock absorption of handles and working tools
- Constant speed under load.
In combination with a rod, easy removal of screed floors, coatings and adhesive residues is possible.
The ergonomic double D-handle fits perfectly in your hands in any working position.
View purchase options: with prices all Festul Renofix 150
Chemical method
This method involves the use of special removers - solutions with caustic chemical components. They corrode the old coating, making its further removal much easier.
They cope well with different types of paints, regardless of the period of their application and the thickness of the layer. When applied in multiple layers, a repeat procedure may be necessary to remove old decor from the walls.
Suitable drugs:
- Wallpaper glue. It is recommended to use it to remove water-based paint. It is necessary to soak newspapers in glue and stick them on the walls. After half an hour, the surface will swell and the paint can be easily removed from the wall.
- HEMPEL universal remover. This is a gel-like mixture of solvents that softens various materials well - one-component varnishes, enamels, primers. The advantage of this drug is that it does not leave behind reagents that can be absorbed into the walls and subsequently cause peeling of the new decorative composition.
- Paint remover PROFF NEOMID. Copes with paints based on oils, epoxy, acrylic, phenol formaldehyde, epoxy ester. Suitable for metal and wooden surfaces. The composition penetrates well into the walls; it is enough to apply it with a spatula or brush in a thin layer, leaving for 10-25 minutes. After this time, remove the paint with a spatula.
- Antikras. This is a fast-acting remover for old paint, universal and economical. It includes solvents, corrosion inhibitors, thickeners and complexing agents, which together act on all types of existing paints and varnishes. Anti-paint also removes primer and putty.
Most of these drugs require special processing. You can’t just dispose of leftovers down the toilet. Don't forget about protective equipment.
Video
Accessories and consumables for tools
The figure shows which diamond cups and cutting heads are suitable for tools (list by article number below):
- Diamond cups for Festool RENOFIX RG 130 E grinder
- Tool heads, disc cutters, grinding wheels for the Festool RENOFIX RG 80 E deburring router
- Cutting heads, disc cutters, grinding wheels for the Festool RENOFIX RG 150 E deburring router
- Further accessories for Festool RENOFIX RG 130 E and RG 150 E tools
Diamond cups
for the Festool RENOFIX RG 130 E grinder with a diameter of 130 mm, internal diameter 25/22.2 mm (follow the link to the product page with availability and price):
1. DIA HARD-D130 PREMIUM Diamond Cup for old hard concrete, epoxy coatings on solid substrates, coatings and paints on concrete surfaces
- 768017 Diamond cup FESTOOL DIA HARD-D130 PREMIUM
2. Diamond cup DIA ABRASIVE-D130 PREMIUM for materials with a high sand content, screed floors, fresh concrete, adhesive on screed floors, sand-lime bricks and porous concrete
- 768018 Diamond cup FESTOOL DIA ABRASIVE-D130 PREMIUM
- We recommend
(a cup is included in this kit) Special promotion FESTOOL RG 130 ABR /CTM – kit for removing materials containing sand, such as screeds, valid. until 31-12-2014
3. Diamond cup DIA STONE-D130 PREMIUM for very hard materials and hard concrete (harder than B 35)
- 769166 Diamond cup FESTOOL DIA STONE-D130 PREMIUM
4. Diamond cup DIA THERMO-D130 PREMIUM for thermoelastic materials on concrete, seamless floors, etc.
- 768023 Diamond cup FESTOOL DIA THERMO-D130 PREMIUM
5. Diamond cup DIA UNI-D130 PREMIUM for removing paint and glue on wooden substrates
- 769167 Diamond cup FESTOOL DIA UNI-D130 PREMIUM
Tool heads, disc cutters, grinding wheels
for the Festool RENOFIX RG 80 E stripping router (follow the link to the product page with availability and price): 6. Cutting head SZ-RG 80 = 12 “Form Spitz” carbide disc cutters for hard plaster, adhesive residues and plaster based on synthetic resins
- 767982 Tool head FESTOOL SZ-RG 80
Disc cutters HW-SZ 12 = Disc cutters for SZ-RG 80, complete set including spacers and clamping elements
- 769132 Straight disc cutters FESTOOL, set of 12 pcs. HW-SZ 12
7. Cutting head FZ-RG 80 = 12 carbide disc cutters “Form Flach” for soft plaster and fresh concrete, adhesive residues and protective coatings
- Bestseller
769131 Tool head FESTOOL FZ-RG 80
Disc cutters HW-FZ 12 = Disc cutters for FZ-RG 80, complete set including spacers and clamping elements
- 769133 FESTOOL helical disc cutters, set of 12 pcs. HW-FZ 12
8. DIA HARD-RG 80 cutting head with diamond cup for hard materials, for old hard concrete, epoxy coatings on solid substrates, coatings and paints on concrete surfaces
- 767983 Cutting head with diamond cup for concrete FESTOOL DIA HARD-RG 80
Diamond cup DIA HARD-D80 diamond cup for tool head DIA HARD-RG 80
- 769054 Diamond cup for concrete FESTOO DIA HARD-D80
9. Cutting head DIA ABRASIVE-RG 80 with a diamond wheel for abrasive materials, for materials with a high content of sand, self-leveling floors, fresh concrete, adhesive on self-leveling floors, sand-lime bricks and porous concrete
- 767984 Cutting head with diamond cup for sandstone FESTOOL DIA ABRASIVE – RG 80
Diamond wheel DIA ABRASIVE-D80 diamond cup for tool head DIA ABRASIVE-RG 80
- 769055 Diamond cup for sandstone FESTOOL DIA ABRASIVE-D80
10. Cutting head DIA THERMO-RG 80 with Thermo diamond cup, for thermoelastic materials on concrete, self-leveling floors, etc.
- 769082 Cutting head with diamond cup for thermoelastic materials on concrete FESTOOL DIA THERMO-RG 80
Diamond cup DIA-THERMO 80 diamond cup for head DIA THERMO-RG 80
- 769084 Diamond cup for thermoelastic materials on concrete FESTOOL DIA THERMO-D80
11. DIA UNI-RG D80 cutting head with universal diamond cup for removing paint and glue on wooden substrates
- 769169 Cutting head with diamond cup FESTOOL DIA-UNI-RG 80
Diamond cup DIA UNI-D80 diamond cup for tool head DIA UNI-RG 80
- 769170 Diamond cup FESTOOL DIA UNI-D80
12. Cutting head HW COARSE-RG 80 with carbide cup for rough cutting, for elastic coatings, adhesive on soft plastered surfaces and lime on beams, thick layers of paint and old paintwork, roughening fiberglass
- 769056 Tool head dir. from cups with soldering from TV alloy, rough FESTOOL HW COARSE-RG 80
Carbide cup HW COARSE-D80 diamond cup for cutting head HW COARSE-RG 80 769058 Cup with soldering FESTOOL HW COARSE-D80 13. Cutting head HW FINE-RG 80 with carbide cup for fine processing, for elastic coatings, adhesive on soft plastered surfaces and lime on beams, thick layers of paint and old paint coatings, roughening fiberglass
- 769057 Head dir. from cups with soldering from TV alloy, thin FESTOOL HW FINE-RG 80
Carbide cup HW FINE-D80 diamond cup for cutting head HW FINE-RG 80
- 769059 Cup with soldering FESTOOL HW FINE-D80
Cutting heads, disc cutters, grinding wheels
for the Festool RENOFIX RG 150 E stripping router (follow the link to the product page with availability and price): 14. Cutting head SZ-RG 150 = 35 “Form Spitz” carbide disc cutters for hard plaster, adhesive residues and plaster based on synthetic resins
- 768020 Cutting head with straight teeth. cutters, set FESTOOL SZ-RG 150
Disc cutters HW-SZ 35 disc cutters for SZ-RG 150, complete set, including bushings
- 769050 Straight disc cutters FESTOOL HW - SZ 35 set of 35 pcs.
15. Cutting head FZ-RG 150 = 35 carbide disc cutters “Form Flach” for soft plaster and fresh concrete, adhesive residues and protective coatings
- 769105 Cutting head with helical tooth. cutters, set FESTOOL FZ-RG 150
Disc cutters HW-FZ 35 disc cutters for FZ-RG 150, complete set, including bushings
- 769051 Helical disc cutters FESTOOL HW-FZ 35 set of 35 pcs.
16. DIA HARD-RG 150 cutting head with diamond inclusions for hard materials, for old hard concrete, epoxy coatings on solid substrates, coatings and paints on concrete surfaces
- 768021 Cutting head with diamond cup, for concrete FESTOOL DIA HARD-RG 150
Diamond cup DIA HARD-D150 diamond cup for tool head DIA HARD-RG 150
- 769069 Diamond cup for concrete FESTOOL DIA HARD-D150
17. Cutting head DIA ABRASIVE-RG 150 with diamond inclusions for abrasive materials, for materials with a high content of sand, self-leveling floors, fresh concrete, adhesive on seamless floors, sand-lime bricks and porous concrete
- 768022 Cutting head with diamond cup for sandstone FESTOOL DIA ABRASIVE – RG 150
Diamond cup DIA ABRASIVE-D150 diamond cup for tool head DIA ABRASIVE-RG 150
- 769070 Diamond cup for sandstone FESTOOL DIA ABRASIVE-D150
18. Tool head DIA THERMO-RG 150 with Thermo diamond cup, for thermoelastic materials on concrete, screeds, etc.
- 769083 Cutting head with diamond cup for thermoelastic materials on concrete FESTOOL DIA THERMO-RG 150
Diamond cup DIA-THERMO-D150 diamond cup for cutting head DIA THERMO-RG 150
- 769085 Diamond cup for thermoelastic materials on concrete FESTOOL DIA THERMO-D150
19. Cutting head DIA UNI-RG 150 with universal diamond cup for removing paint and glue on wooden substrates
- 769120 Cutting head with diamond cup FESTOOL DIA-UNI-RG 150
Diamond cup DIA UNI-D150 diamond cup for cutting head DIA UNI-RG 150
- 769122 Diamond cup FESTOOL DIA UNI-D150
Other equipment
for Festool RENOFIX RG 130 E and RG 150 E tools (follow the link to the product page with availability and price):
769080 Depth gauge FESTOOL GT-RG 130 769110 Brush insert FESTOOL BC-RG 130 Recommended
769109 Guide rod FESTOOL BG-RG 150 769121 Balancer FESTOOL BR-RG 150 769123 Brush insert FESTOOL BC-RG 150
Snow scraper + drawing
Almost every person living in a private house made a snow scraper with their own hands. The design usually resembles a shovel.
Sometimes the scraper is a rectangular plate with an attached handle. To make the tool easy to use, you need to know the parameters for choosing a design.
If desired, the equipment can be improved, and then clearing snow with a scraper will become entertainment.
Scraper selection options
Retail outlets offer a variety of snow scrapers, among which it is difficult to choose a convenient tool. Snow removal equipment has the following differences:
- size;
- material for making the handle and working surface;
- tool weight;
- shape of the working surface, handle;
- the presence of additional devices that simplify the removal of large snow drifts.
Usually, when buying a scraper, a person is guided by his financial capabilities, which is extremely wrong. The price is of great importance, but you also need to take into account the amount of work to be done.
First, scrapers are hand tools. Choose the size of the equipment according to your physical capabilities. The lighter and more convenient the scraper, the less fatigue you feel from clearing snow.
Advice! Plastic scrapers are optimal for women and teenagers. The equipment is lightweight and snow does not stick to its surface.
If you focus on lightness and long service life, preference is given to equipment made of aluminum or composite alloys.
Secondly, cleaning will be easier if a person does not bend over too much to scoop up snow. The scraper handle is selected according to your height. It is optimal to purchase a tool with a height-adjustable handle. Each family member can control the scraper, adjusting the handle to suit themselves.
Buckets of snow shovels and scrapers are made of plastic, composite alloys, plywood, aluminum, and galvanization. The cuttings are usually wooden or made from a thin-walled aluminum tube. The material of the handle only affects the ease of use of the scraper. The bucket is selected taking into account the surface on which snow removal is expected.
To avoid damaging paving slabs or other types of decorative coating, cleaning is carried out with a plastic or wooden scraper. It is better to row on the ground or old asphalt with an aluminum or galvanized bucket.
A plastic or wooden shovel will do, but they should have a steel blade on the edge that protects the blade from abrasion.
Advice! For convenient storage in the shed, it is preferable to purchase snow removal equipment with a removable handle.
Shovels-scrapers for snow removal are produced with different bucket widths, and it varies on average from 25 to 80 cm. If you plan to perform a large amount of work, it is better to purchase equipment with increased bucket sizes, for example, a drag scraper. The tool can be operated even by two people. For easy movement, choose a model equipped with casters or small wheels.
DIY snow scraper
Many owners of private yards make snow scrapers and shovels themselves. Usually the structure is assembled from a sheet of tin or plywood and a handle. Craftsmen approach solving problems creatively. Draw up a drawing of a scraper for snow removal, which includes wheels, stops, skis and other devices.
Wheeled scraper for snow removal
To clear large areas of snow, scraper blades are made, and wheels make them easy to move. To make a working surface, you will need a piece of pipe 60-80 cm long, 27-30 cm in diameter. The workpiece is opened lengthwise into 2 segments with a grinder. The solid semicircle for the blade is strongly bent. A strip 3-5 cm wide is also cut from it. You can try to slightly straighten the semicircular segment, but carefully to avoid the formation of dents from blows with a sledgehammer.
When the blade is ready, begin assembling the scraper on wheels:
- A steel plate is welded to the back side of the blade strictly perpendicularly in the center. At its edge, 5-7 holes are drilled in a semicircle. Another hole is drilled in the center of the plate.
- Take a piece of pipe. One hole is drilled at the end. The workpiece is connected with a bolt through the central hole of the plate. The tube will rotate up and down at the bolted connection. Now a second hole is drilled on it, matching those on the edge of the plate. The result is an adjusting mechanism for raising the blade. To fix it, use another bolt.
- The wheelset for the scraper is taken from an old stroller or made from a piece of pipe, with rubber wheels attached to the ends. The second end of the blade adjustment mechanism tube is welded to the center of the chassis.
- The handle in the shape of the letter “T” for the blade is made of steel pipe with a diameter of 20 mm. It can simply be welded to the center of the chassis at the desired angle, but it is better to make an adjustment mechanism, such as on the blade.
- The scraper is almost ready, but it will scratch the tiles and knock out crushed stone from the asphalt. You can improve it with a patch knife. It is cut in the form of a strip from a thick conveyor belt. Through matching holes are drilled along the entire length of the lining and the lower part of the blade, and the parts are connected with bolts. The finished structure for clearing a large area of snow is painted, providing protection against corrosion.
Before you start clearing layers of snow, set a comfortable angle for the bucket and handle. The elements are securely fixed with a bolt on the adjusting plate. They begin to shovel the snow with pushing movements forward.
Advice! If cleaning takes place on a dirt road, and the snow has compacted or turned into an ice crust, it is better to remove the rubber knife-pad. The metal edge of the bucket will make it easier to cut off ice.
A manual scraper on wheels can be easily converted into a shovel engine. The handle is disconnected from the chassis and placed on the walk-behind tractor using a hitch. If there is a motor lying around the farm, it is permanently installed on the scraper, having first welded a frame for it.
Drive to the wheels is provided through a belt or chain drive.
Scraper with brush
When cleaning tile sidewalks and roofing, a telescopic snow scraper, additionally equipped with a brush, is convenient. The magazine version consists of an extendable aluminum rod with a comfortable handle attached to one end. A rectangular plate is attached perpendicularly to the second end. One of its edges is plastic or rubber, and the second is made of stiff bristles that form a brush. The hard side of the scraper is used to first remove thick layers of snow. Use a brush to sweep away the remaining thin layers.