The specificity of bathroom renovation work lies in both the possession of construction skills and the use of special materials used for wet rooms. Plaster under tiles must meet certain requirements. Because of this, it is worth figuring out which plaster is best to put under the tiles for the bathroom.
Is it possible to apply plaster in the bathroom under the tiles?
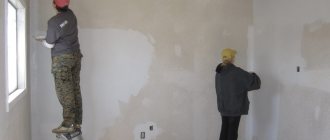
Wall finishing is an important process, as it helps eliminate defects and level the surface. This manipulation is important, especially if you need to lay tiles in the bathroom or paint the walls.
To figure out whether it is necessary to plaster the walls before laying the tiles, the degree of their unevenness is determined. If the difference in surface level is less than 3 cm, cladding can be applied; a larger figure indicates the need to cover the walls with a leveling mixture.
The basis of leveling materials available on the construction market are cement and gypsum. Cement plaster is waterproof, it can be used in rooms where there is high moisture, as well as for exterior finishing.
Due to the hygroscopicity of the main component, the gypsum composition was used for a long time only in dry rooms. Today, additives and modifiers are introduced into finishing materials that can increase their invulnerability to moisture. Due to this, it is sometimes allowed to use such a mixture in the bathroom.
Why do you need to plaster?
Why are walls plastered?
Capital builders and finishers have different tolerances. When constructing walls and partitions made of brick, a deviation from the vertical within 15 mm by two meters is considered the norm, but in fact it turns out to be even more. And for finishing specialists, a 15-mm dip or “belly” is an unacceptable error that requires correction.
If you glue ceramic tiles to such walls, the seams will not meet in the corners of the room. Of course, you can level the wall directly when laying the tiles, using a thicker adhesive layer. But this is not correct - for various reasons. Glue manufacturers indicate the recommended and maximum seam thickness for their products, and if the glue layer significantly exceeds the permissible parameters, this negatively affects the strength of the adhesive seam.
When using a thick layer of glue for leveling, voids remain under the tiles, and the amount of glue required increases, which affects the cost of repairs. And, by the way, the tiler is also unlikely to agree to carry out such work without an increase in prices. Therefore, before finishing work is carried out, the walls received from capitalists must be brought to almost ideal condition: the walls must be strictly vertical and intersect at right angles. The most common way to level walls, and the simplest one, is plastering.
This is interesting: How to paint pipes in the bathroom yourself
Types of plaster (description of types such as gypsum, cement, decorative, sanitizing)
If we talk about how to plaster bathroom walls under tiles, then today the construction market offers a lot of dry mixtures used to level the walls and create a high-quality base for subsequent cladding.
To plaster the walls in the bathroom, the following types of solutions are used:
- plaster;
- cement;
- decorative;
- sanifying.
Is it possible to lay tiles on gypsum plaster? Gypsum mortar is different from cement and sanitizing mixtures, but it can also be used for plastering walls.
Important! Gypsum is a porous material that absorbs moisture. It is recommended to purchase it for rooms that have normal humidity. For wet rooms it is recommended to use moisture-resistant gypsum plaster.
Gypsum plaster under tiles in the bathroom has advantages. The solution can be applied in as thin a layer as possible, while leveling the surface. The plaster is easy to apply and does not require much effort to spread over the wall. The mixture is plastic and has good tenacity with any material.
Laying tiles on gypsum plaster also has disadvantages:
- the average strength of the gypsum coating requires careful use so as not to damage the plaster;
- On top of the gypsum composition, waterproofing is necessary to protect the coating from moisture and steam;
- the material can react negatively with metal structures, causing rust stains.
Since gypsum mixtures are of medium strength, they are not recommended for laying heavy, thick tiles. Due to the impact of the load along with moisture, the leveling layer will not withstand, peeling and falling off of the tile will occur. And thin tiles can be glued, only before applying the glue, the walls are primed 2 times with a strengthening compound.
How to lay tiles in a bathroom on gypsum plaster? When finishing the canvas with this composition, you need to follow the recommendations.
- After leveling the walls, you need to lay tiles and seal the seams using moisture-resistant grout.
- The applied layer of plaster should be up to 20 mm.
- There is no need to clean the plastered wall, just go over it with soil.
Often, cement mortar is used to plaster walls. In addition to the main components, plaster contains hydrophobic impurities and plasticizers.
Cement plaster for bathroom tiles has a number of advantages.
- The use of the material allows protection from salts and moisture.
- Eliminates the appearance of mold and mildew.
- Has excellent vapor permeability.
- The material is reliable, high strength, environmentally friendly, durable.
Working with cement plaster allows you to create a smooth and solid coating. You can plaster the interior with a cement composition; it is better not to finish the base.
Cement plasters, depending on their purpose, are decorative. They are used to create a beautiful appearance - relief.
Interesting! Such compositions in the form of a ready-made mixture are viscous and easily follow a spatula, forming a pattern on the wall.
Often, when carrying out finishing work in the bathroom under the tiles, one forgets about humidity and the formation of moisture in the thickness of the wall, even when sealing the seams. To eliminate defects, a leveling plaster mixture for the bathroom is selected under the tiles and repaired. Sanitizing and drying materials are suitable for these purposes.
Interesting! Universal sanitizing mixtures. They can be used both in the bathroom and outside the building, as a solid basis for subsequent finishing.
Bathroom plastering
Walls - neither brick nor concrete - are never perfectly smooth. In a well-built house, defects are insignificant, they are not visible to the naked eye, and can only be noticed with the help of tools or by carefully examining the surface. To get rid of this drawback, it is necessary to plaster the surfaces.
Why do this?
There are two main reasons for this - protection and surface leveling. A layer of plaster protects the base material from minor mechanical damage and dampness. Alignment is necessary for the following reasons:
- Preparation for decorative finishing (tiles, painting) – the finishing is easier to attach, more securely fixed, and looks better on the prepared wall;
- Convenience of preparation for other work - on a flat wall it is easier to make markings for laying pipes and wiring;
- Some materials (foam block, aerated concrete) absorb water from adhesives and paints. It is impossible to fix the finish on them (the composition must be specially selected).
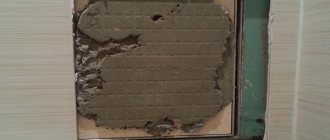
The plaster under the tiles must be perfectly smooth, otherwise all mistakes will be clearly visible, moisture will get into the seams, and the tile itself may come off.
Important! An alternative could be plastic panels. They look no worse, handle moisture, are easy to clean and cost much less than tiles. Disadvantages include flammability and instability to mechanical stress.
Preparatory stages
Before finishing, the surface should be prepared. The preparation process consists of the following stages:
- old material is removed and cleaned;
- existing rust is removed with an acid solution, old paint by burning with a blowtorch, mold with the help of antifungal agents;
- cracks need to be opened and dusted, and the through space around communications needs to be cleared. To seal cracks and crevices, cement mortar is required, and reinforcing tape is additionally used;
- on a surface that is too smooth, notches of 2-3 mm are made, which will allow the composition to better adhere to the wall;
- The final stage is surface treatment with soil.
Stages of working with walls in the bathroom
Plastering a bathroom using a leveling gypsum mixture is carried out in several stages:
- Preparing surfaces for application of a layer.
- Securing beacons.
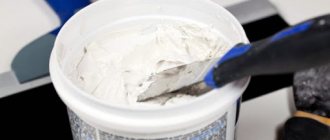
- Preparing the dough.
- Distribution of the plaster mixture.
- Grout.
- Drying.
To carry out the work, you will need to prepare a ladle, trowel, spatula, building level, hammer drill, container for diluting the mixture and personal protective equipment.
Surface cleaning
Before applying gypsum plaster to the walls, several preparatory procedures should be performed:
- Get rid of traces of old coatings and dismantle plastic, wooden or metal elements that protrude above the surface. If it is impossible to remove metal structures, they must be treated with anti-corrosion impregnation.
- Close cavities and deep cracks and smooth out all defects.
- Treat the wall with a primer mixture, which is selected taking into account the type of surface and the humidity and temperature conditions in the building.
Preparing the area
It is impossible to apply plaster for leveling over oil paint or whitewash. In addition, old and crumbling coating is not suitable for subsequent processing. Therefore, all traces of old layers are removed by cleaning down to the brick or concrete base.
Brickwork has better fixation of the plaster coating, especially if the seams are deepened by 1 cm and the surface is cleaned with a wire brush.
If there are various stains on the surface, such as grease, bitumen, traces of mold and rust, they must be removed using special compounds or chipped off to a clean material. It is also necessary to get rid of nails, staples, dowels and other metal objects.
The communication openings are completely cleared of old solution, and also thoroughly washed and cleaned of dust. Large gaps are filled with broken bricks mixed with cement mortar. All communication gaps can be covered with masking tape. Finally, the base is coated with a primer (sometimes 2 times) and dried thoroughly.
The quality of preparation of the treated area for leveling affects the durability and quality of the entire finish. Therefore, if you are not sure whether such procedures are necessary, take into account the described nuances.
Calculation of area and necessary materials
To finish a bathroom tile, on average you need to lay a mixture 20 mm thick on the surface. This value is effective, it will protect the walls from moisture, the load-bearing layer will be strong and stable, which will allow you to attach various bath accessories if necessary.
The calculation is carried out taking into account the thickness of the application layer. Differences in vertical planes are measured by applying a flat rod. If the layer thickness is 20 mm, at least 16 kg will be required, so one 25 kg bag will not be enough for 2 sq.m. If the layer thickness is 10 mm, then it will be enough to lay the solution on 3-4 sq.m.
For example, a room is 6 sq.m., and the ceilings are 3 m high, then 10-20 bags will be required, based on the thickness of the layer.
Drying time
It is very important to proceed to cladding after the plaster has completely dried. Otherwise, the tiles may fall off the wall. The drying speed differs for different types of mixtures.
Don't miss: Grounding: definition of the concept, what it's for, how it works
Laying tiles on gypsum plaster is carried out in 7-14 days. It takes 1-2 days for the tile adhesive to harden initially, and up to 7 days for complete hardening.
The drying time is also affected by the thickness of the plaster layer. It is believed that cement-sand mortar dries at a rate of 1 cm per 7 days. At the same time, it is recommended to lay tiles on it after a month. By this time, the plaster should gain strength.
Step-by-step application technology
Plastering the canvas in the bathroom is carried out several times.
The first layer is applied according to this principle:
- the walls are wetted with water;
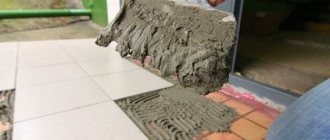
- Using a trowel, apply the liquid composition up to 5 mm.
The main layer of material should have a thickness of 5 mm. If the layer is insufficient, it is possible to apply another one. The first one must dry thoroughly before applying it. The second layer is made thicker.
When laying the rough layer, the mortar is poured onto the walls and then leveled.
The last stage before gluing the tiles is the final one. It is applied after the rough application of the mixture has dried, adhering to the following rules:
- the last layer is the thinnest - up to 2 mm;
- the canvas is sprayed with water, a simple spatula is used to level the material;
- the surface is leveled using a grater;
- The tile material can be glued only when the finishing layer has completely dried.
How to prepare a plaster surface for laying tiles
The main tasks when preparing a gypsum plaster layer for tiles, taking into account the requirements of joint ventures and manufacturers of dry mixes are:
- waterproofing the surface, at least in “wet” areas"
- minimal layer of tile adhesive;
- use of light tiles of small or medium format;
- ensuring waterproofness of the seams of the decorative coating.
Mandatory steps are to apply primer, then coating waterproofing based on latex, acrylic, cement or polyurethane in two layers (vertically and horizontally or vice versa).
Thus, gypsum-based plaster as a leveling layer on bathroom walls is suitable for tiling. But only if the above requirements are met, which is what the instructions of all manufacturers say.
Leveling the surface
When there are surface unevennesses of more than 10 mm, the square footage of the tile is very large, then leveling is done using beacons.
Step by step alignment process.
- A gypsum mixture is mixed to attach the profiles. A vertical line is determined by level at a distance of 10-10 cm from the corner, after which the mixture is applied pointwise. The profile is inserted vertically, pressing it into the plaster. The following beacons are installed at a distance of 100-120 cm throughout the bathtub. The location of all beacons is fixed in one area, horizontally.
- The material is mixed and left for 5 minutes.
- The material is thrown in a thick layer onto the surface in the middle of 2 lighthouses. Apply from bottom to top, tightly, excluding emptiness. The plaster is adjusted and smoothed using a trowel, compacting the areas along the beacons.
- After half an hour, uneven areas are eliminated. Afterwards the area is sprayed with water and rubbed with a coarse grater.
- The last stage is to smooth the walls using a wide spatula.
When the solution dries, the walls are primed. Next you can lay the tiles.
Popular manufacturers of gypsum mixtures in Russia
The main share of the Russian market in the supply of gypsum mixtures is occupied by the Knauf company. The products of this brand have been in demand in the domestic space since 1993. In total, there are over 250 Knauf enterprises in the world that produce high-quality building materials with a wide range of applications.
The next brand is Volma. Its assortment offers dozens of items of gypsum mixtures. The company has 5 factories and 3 gypsum quarries. The distinctive features of the Volma mixture include durability, reliability and relatively affordable cost.
Recommendations and advice from experts
When choosing a plaster mixture for the bathroom, it is important to pay attention to the advice of experts who will tell you how to finish the walls with high quality.
- The mixture is diluted with clean water at room temperature.
- When mixing the plaster, the dry mixture is poured into water and mixed thoroughly.
- Each layer requires its own thickness of material.
- The composition is prepared half an hour before application, otherwise it will harden.
As you know, plaster mixtures can be different, so everyone independently chooses what type of finish to use. Regardless of the choice, it is important to treat the walls of the bathtub under the tiles with moisture-resistant plaster. This procedure will eliminate the need for regular cosmetic repairs.
Expert advice
The joints of different materials (concrete and brick) are additionally reinforced with a plaster mesh extending 10 cm on each side. In order for the plaster to adhere better, special primers are used that create a protective film. If this is not done, the walls will draw moisture out of the plaster before it dries and gains strength. The surface treated with primer is first dried well and only then plastered.
For novice craftsmen, when making repairs with their own hands, it is better not to take on the task of applying a finish in the form of Venetian plaster on their own, but to opt for any other type, since all other finishes are much easier to work with. When choosing a textured mixture for the bathroom, you should avoid surfaces with deep grooves and sinks - condensation collects in them, microorganisms breed and mold gradually forms.
Plaster
Most manufacturers produce gypsum plasters for wet rooms. For Unis it is Teplon, for Knauf it is Rotband, respectively. The application technology does not differ from standard plastering with cement-sand compositions:
- installation of beacons;
- throwing the solution with a ladle;
- alignment by beacon rule;
- grouting the slightly dried layer.
You can also use cement-based plasters, but this is not necessary, and working with them is much more difficult.