Administrator Uncategorized, Articles 04.04.2020
Suitable for lining a stove or fireplace:
- Cement artificial stone .
- Clinker tiles.
- Special heat-resistant tiles for stoves and fireplaces on fireclay or other base.
I will not advertise specific companies, just use the Search. There are so many options on sale. For example, I like a rough stone that hangs over a person with its power.
Will artificial stone withstand heating of 300 C in a muffle furnace?? Is it suitable for lining a real heating stove? - read below.
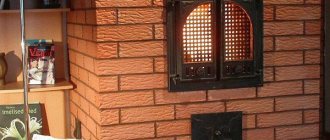
Here is the fireplace stove. It is made of the cheapest bricks. When laying under stone finishing, it is enough to observe only the external geometry, because jointing is not required, everything will be hidden under the cladding.
DIY stove and fireplace cladding
We will consider a simple option - covering the existing stove with ceramic tiles.
The finishing process here consists of the following operations:
- Surface preparation;
- Installation of steel mesh;
- Plastering the mesh;
- Tile finishing.
High-quality tiling of the stove will not work if the surface is not freed from old plaster and dust. The seams between the bricks must be cleared of mortar to a depth of 5 to 10 mm (for better adhesion to the mortar or glue).
Now the entire surface of the oven, where the tiles will stand, needs to be covered with a fine steel mesh (cells 15x15 mm). To fasten it, dowels with washers are used. They are driven not into the joints of the masonry, but into holes drilled in the brick. Dowels are placed more often in the area of the firebox, since the greatest temperature deformations occur there. After installing the dowels, the mesh is pulled over them.
Do-it-yourself oven cladding begins with the first bottom row. Here the tiles are fixed using heat-resistant mastic or heat-resistant glue strictly according to the level. To apply the adhesive, use a standard notched plaster trowel.
Pressing the tile against the masonry, it is leveled horizontally and vertically, achieving uniform distribution of the mortar. If the tile is thick enough, then use a hammer with a rubber striker to push it down. For thin cladding, the best installation tool is your hands. To obtain an even seam, plastic crosses are used. The correct installation of each row is controlled by a level and plumb line.
After finishing the cladding, take a break for 2-3 days so that the glue gains brand strength. After this, they begin to grout the joints using a dry cement-polymer mixture and a rubber spatula.
Video on the topic:
Surface preparation
Before proceeding with the coating itself, it is necessary to properly process the plane. You can install it almost anywhere.
To ensure a high-quality implementation of the introductory stage, the masters take into account the following important points:
- When cladding with wood, you need to remember how strongly it absorbs moisture. To minimize exposure before finishing work, it is necessary to apply a reliable waterproofing compound to the wood. If a specialist works with concrete or metal, you can refuse the waterproofing layer.
- The second stage is the installation of a special mounting grid, which is fixed with self-tapping screws. It is recommended to close their caps with washers for maximum reliability. There should be a distance of 5 cm horizontally and 15 cm vertically between fasteners. Installing the mesh allows you to achieve even masonry.
- Next, the plaster is applied by a professional. The thinnest layer is 1 cm, but ideally the layer is created thicker.
- When the master works with a fireplace portal made of concrete or brick, space is allocated for laying artificial stone to eliminate possible errors.
- When placing shaped elements, a special solution is used that is resistant to high temperatures. It can be a mixture of fireclay and cement or clay.
Algorithm for finishing work
Tools for work
- Measuring devices: tape measure, plumb line, level.
- Hand tools: trowel, spatula, mallet and hammer.
- Cutting tool.
- Brushes: paint brushes, metal brushes.
- Containers.
- Consumables: nails, screws, etc.
At the beginning of work, the surface is cleaned of dirt and dust. Make indentations in the masonry seams and wipe with a wet rag. To eliminate deformation, a power frame is formed. A reinforced mesh is attached to the surface of the stove with nails, and a metal profile is placed on the corners. Apply a layer of plaster and allow it to dry. After this, it is recommended to heat the stove. This will give the plaster the necessary strength. After this, you can cover the prepared oven with ceramics. This should only be done by a trained specialist.
The tiles begin to be fixed from the bottom row from the corners in different directions. The distances between the seams are maintained using a template (tile cross). When the tiles have been laid and the mortar has dried, they begin to process the joints using special grouts and impregnation solutions. At the end of the work, remove traces of the solution and wipe the surface with a dry cloth.
https://youtube.com/watch?v=bmtLfPIXSoU
Marking the base
Where to start? And how to ensure even seams? Marking the walls helps with this. It is necessary to determine the starting points of installation. To do this, use a laser or water level. The latter option is preferable if you have a limited budget. It is in no way inferior to the technological version. Plus, in a small area, using a laser does not have any pronounced advantages.
The following recommendations will help you understand where to start and how to work:
- in most cases you need to start from the corners (at least there should be whole elements in the corners);
- with seamless cladding, it is better to lay the stone from the bottom up, and when laying with subsequent jointing (especially when laying porous slabs), it will be more convenient to go from top to bottom - this way the slabs will not become dirty;
- whole slabs - the most visible places; usually these are the top and corners, but you need to look at the situation;
- Usually the bottom row is left for last - it is more convenient to cover the floor with trimming, rather than adjusting the floor covering to the stove stone.
Based on this, the starting points are determined. After this, either lay the first row along the laser mark, or pull the beacon cord (according to the marks).
Cladding stoves with tiles and photos of lined stoves
Often the surface of stoves is lined with stove tiles or glazed tiles.
Look at the photos of stoves with tiles: many of them look like real masterpieces.
Before lining the stoves with tiles, it is necessary to select and sort the tiles. They should be selected according to the shades of the glaze color, as well as in height and width.
Before properly tiling the stove, each tile should be tried on next to the one next to it, located in the same row, simultaneously hemming and trimming it in height and width. Uneven edges should be ground with a whetstone after adjustment.
Each horizontal row of cladding should begin with the installation of corner tiles, after which you need to select and dry fit all the elements of the row first. Particular care must be taken in arranging the first (bottom) row, from which the entire surface will be covered.
Each horizontal row of cladding must be installed simultaneously with the laying of the main mass. First, each tile should be wetted by lowering it into a bucket of water. Initially, it is necessary to correctly align two corner tiles, placing a thick clay mortar under their tillers. Then install the intermediate tiles dry. In this case, you need to ensure that the vertical seams formed by the side edges are tightly adjacent to each other without filling them with mortar. If the row is selected correctly, then the dry-installed tiles must be removed and then laid one by one on the mortar.
The elements that are adjacent to the corner ones should be installed first. To securely fix the tile in place, the spaces between the vertical edges of the rumps must be carefully filled with crushed stone in a clay mortar. A roll of clay mortar will appear between the tiles, which will help hold them in place.
Further fastening of the tiles to each other and to the brickwork is carried out using steel pins, furnace wire and clamps. Vertical pins made of steel wire (4-5 mm) should be passed through the holes located on the horizontal shelves of the tiller. The length of the pins should be 20-30 mm greater than the height of the back of the tile (rumpa). The protruding ends of the pins must be bent and tied with a bandage twisted from three furnace wires. The wire dressing should be twisted with a nail passed between the rows of wire. This will help ensure the tightest compression of the tiles with each other. Then, loops of furnace wire should be placed on the upper and lower ends of the steel pin located inside the pump, having first checked that its ends are located against the seam of the brickwork. The ends of the loops must be clamped between the rows of masonry and bent properly. They must be secured to each other with clamps made of strip iron. Such fastening should be done not only in horizontal, but also in vertical rows. Rumps should be carefully filled with crushed bricks in a thin clay mortar. When processing beads on the edges of tiles, the glaze layer may be damaged. Therefore, during the laying process, tiles without any visible damage should be installed in rows located at the visual level of a person of average height. In rows below the visual level, laying should be done with the damaged edges down, and above - with the damaged edges up.
With careful adjustment, vertical seams on the lined surface of the stove will be practically invisible. Taking into account the possible settlement of the furnace, the thickness of the horizontal seams should be 2-3 mm. After drying, the seams must be embroidered with chalk diluted in water with egg white, or an alabaster solution. After drying and sanding, the lined surface of the stove should be thoroughly wiped with a rag with dry chalk or alabaster.
Cladding materials
In general, the stove is considered the most important object in the house, rightfully occupying a special place. Being a source of warmth, it serves as a keeper of traditions and creates indescribable comfort. That is why you need to make every effort to ensure that the stove acquires an attractive appearance and is not subject to destruction.
The finishing material must be selected with many positive qualities. First of all, it must be heat-resistant and heat-intensive. That is, to keep the surface from heating, but at the same time, to evenly distribute the heat inside the room.
The walls of the stove can be decorated with various types of materials. These can also be coating elements known from ancient times made of special types of clay, which undergo long processing. As well as more modern materials, which are made on the basis of previously used components, but subject to more significant preparation. Let's take a closer look.
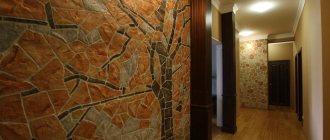
A natural stone
It has been known for a long time and has proven itself as a finishing element for brick stoves. The stone has good performance properties, many of its types are quite cheap. The most commonly used are shell rock and sandstone. Finishing the stove with decorative stone allows you to refine the heat source. The decorative component is very original. The walls of the stove have a very natural look.
Stove lined with natural stone
In addition to cheap materials, others are also used. Among them is marble. Lined walls, thanks to its external properties, acquire an individual and quite respectable appearance.
Soapstone chlorite
It has several other names (soap stone, pot stone, stove stone). It is a natural material that is formed from a combination of magnesite and talc, subjected to long-term exposure to high temperatures and pressure.
Furnace finishing with soapstone
In terms of its appearance, soapstone chlorite is very attractive. The stone does not require additional finishing.
Ceramic tile
This material is a certain type of clay that is processed.
Ceramic tiles are the most affordable material for finishing a stove
It acquires the following qualities:
- density;
- durability and strength;
- heat resistance.
Ceramic tiles have a significant thickness, reaching eight millimeters. The most commonly used variety is the terracotta variety. It is preferable to choose one that has not been covered with glaze.
Tiles
Covering the stove with tiles has been used for quite some time, in many countries around the world. Tiles can be classified as ceramic tiles, but they have a significant difference. The fact is that on the reverse side of such material there is a bowl (rumpa). It is due to this that it is possible to obtain a kind of thermal pillow. It is attached to special points reserved for this purpose. The appearance of stove tiles varies greatly.
Finishing with tiles will give the stove a magnificent and unique look
Clinker tiles
It consists of fireclay, clay and various natural dyes. This tile is characterized by:
- absence of numerous pores;
- fortress;
- good heat dissipation.
Clinker tiles are a fairly popular modern material for lining a stove.
Due to additives, they can acquire different shades. This allows you to fit it into any type of interior.
Traditional methods
The first 3 points and positions in Fig. and in the list above - traditional methods of facing fireplaces and stoves. The best of them, but the most expensive and complex, is finishing with tiles; it increases the efficiency of the stove by 15-17 percentage points. For example, if the initial efficiency of the stove is 60%, then after tiling it will reach 70%; For this reason, we will return to tiling later.
Finishing the furnace with dry-molded facing bricks gives an increase in efficiency of 7-9 percentage points. provided that it is carried out at the same time as the construction of the furnace, i.e. decorative brick cladding was included in its layout at the design stage. Otherwise, when lining an already standing fire (running) stove, an increase in efficiency is possible, as when lining with terracotta, up to 5 percentage points. The facing brick is then mounted on the fireplace/stove structure in the same way as stone (see below), but the labor-intensive procedure of its preliminary laying is much simplified.
Brick cladding of heating devices
When using a modern insulated fireplace insert with glass and a standard chimney for it, a small fireplace can be made entirely of face brick, pos. 1 in Fig. on right. Just not silicate, in Fig. just light! And a stove or stove-fireplace with a lining of red facing brick under a simple worker fits well aesthetically with majolica, pos. 2. However, these and other types of “brick” decor can be achieved more easily and cheaper by facing with terracotta and clinker. But before moving on to them, let's linger a little on the plaster.
Stove/fireplace plaster
Plastering a fireplace or stove allows you to achieve good aesthetics of the device in various types of interiors, see figure, but it is very labor-intensive even for simple white plaster. Decorative plasters, e.g. Venetian or polished stucco, you will have to leave it here altogether, this is a separate complex topic. In any case, the main obstacle when plastering a stove/fireplace is cutting the seams. If the appliance and masonry mortar in the joints are sintered into stone, preparing its surface for plaster becomes not only long, but exhausting, requiring extreme attention and experience so that a crack does not appear in the joint.
Cladding stoves and fireplaces with plaster
Next, the plaster mass needs lime. Even in the conditions of a fireplace shopping center, gypsum soon begins to lose water of crystallization, causing the plaster to dry out. The addition of vermiculite does not help, it only worsens heat transfer. In general, the procedure for plastering a fireplace or stove is as follows:
- The parts of the furnace structure to be lined are cleaned of the previous finish until there are no traces of it; the last residues are removed with a steel brush.
- The surface under the plaster is moistened by applying lightly moistened burlap or technical cloth for 1-1.5 hours.
- Masonry joints are cut to a depth of 9-10 mm with a narrow chisel for cutting out grooves - a cross-cutting tool - and light blows of a hammer.
- If the device was previously in use (heated), it will not be possible to cut the seams to the required depth right away: picking at dry clay mortar is unacceptable! In this case, wetting and cutting are repeated several times.
- The surface with cut seams is carefully brushed to remove dust and crumbs, then moistened with a plaster brush.
- Prepare a primary (starting) plaster solution with the consistency of medium-thick sour cream.
- The starting solution is used to fill the cut seams and the base surface to a thickness of 4-5 mm.
- After the primary plaster has dried, the same finishing solution or decorative plaster with the consistency of very thick sour cream or soft plasticine is prepared.
- The finishing plaster is applied in a layer of the same thickness.
- After the plaster has completely dried, a full cycle of putting the furnace into operation (starting up) is carried out: drying, a series of accelerating fireboxes, a test firebox.
Furnace painting process
The basis for painting a stove in a private house can be either a plastered surface or natural brickwork, provided that its integrity is not compromised. There are many options for paints and whitewashes. You can choose the appropriate option for painting the stove surface, taking into account the level of complexity of the work, the financial base and the overall design of the kitchen.
Painting the stove with lime
The easiest way to paint a stove with your own hands is chalk or lime whitewash. To strengthen the composition, salt is added to it, which during the operation of the structure will prevent the coloring composition from falling off. It is necessary to paint with a chalk or lime composition in several layers; not only the quality of the coating, but also the aesthetic appearance of the stove will depend on this.
There are also a number of heat-resistant paints that are easy to apply and come in a wide range of colors. The most common types among them are:
- alkyd;
- organo-silicate;
- silicon-organic.
Painting the oven after preliminary preparation
With their help, you can paint the surface of the stove in any color, as well as create a unique painting with your own hands
The painting process itself is not complicated, it is only important to carry out preliminary preparation of the surface. To do this you need:
- remove the remnants of the previous finish (if any);
- wash the surface thoroughly;
- If there are greasy stains, remove them with a soda solution.
Painting the stove surface (brickwork or plaster) is done using a medium-pile roller. The brush is used only to paint seams and hard-to-reach areas.
It is best to paint the stove with your own hands in several layers, at intervals for complete drying.
Ceramic tiles - an option for soft heating
Glazed ceramic tiles are a very popular and inexpensive way to tile stoves and fireplaces. The only limitation for this material is the heating temperature of the surface. The tiles do not have powerful hooks or locking joints to resist temperature deformation. Therefore, do not place it on ovens that get very hot during operation. It is optimally suited for fireplaces (low facade heating).
Ceramic clinker tiles are an excellent “simulator”. With its help, you can “create” any type of finish: brick, tiles, wood, granite or marble.
For those who are looking for an original and inexpensive solution for facing a fireplace or stove, we advise you to try a combination of decorative bricks and ceramic tiles.
The combination of smooth and rough textures, dark and light tones will give the hearth a pleasant charm and charm.
Tile
Not all tiles are suitable for the stove! You need to choose a material that will have heat-resistant properties.
They usually use glazed, terracotta, and porcelain stoneware. Tile is strictly prohibited because it does not adhere to the brick due to the difference in expansion when heated. Tiles are a universal choice, since you can choose different patterns, textures, and surface types. Some types of work can even be done independently, without involving a specialist, since it is simply installed on various surfaces.
Using plaster
Plastering is the most budget-friendly option for finishing a stove yourself. The product takes on a finished look and looks good in the interior. After plastering, you can whitewash it with a special heat-resistant compound.
This type of finishing is quite often used for brick ovens. The technology is as follows:
- It is necessary to properly prepare the surface. All traces of old finishing, incl. plaster and tiles must be removed. Each seam should be selected at 10-15 mm.
- We dilute the deep penetration primer according to the instructions. Carefully prime the surface. Do not forget that the primer must dry (at least 24 hours).
- We stretch and fix the metal mesh using dowels. Such reinforcement will significantly increase the strength of the tile fastening.
- Apply plaster to the stove. We recommend using a ready-made mixture specifically for ovens. The plaster must be allowed to dry for 48 hours.
- Now the stove needs to be whitewashed.
Brick oven plaster
Plaster can rightfully be considered the most budget-friendly type of finishing. There is a wide variety of folk and modern methods. The basis for most solutions is clay. At its base, asbestos, cement or gypsum can be added to the finished mixture. The construction markets offer a large selection of ready-made dry mixes. Such compositions are not inferior in quality to traditional ones. They have good heat-resistant properties, are durable and reliable.
Basic rules for plastering brick kilns
- The new oven should dry out and shrink. To do this, it is heated several times, gradually increasing the heating temperature. You can start facing work only a month after the completion of the masonry.
- The surface of the stove is cleaned of any remaining masonry mortar. The seams are selected to a shallow depth and reinforcement is made.
It is advisable to reinforce the surface with steel mesh or fiberglass.
- To ensure that the plaster dries faster, the oven is heated before starting work.
- The first layer of solution is made more liquid. They apply it, filling voids and forming corners. Subsequent layers are leveled and sanded to a flat surface.
The plastered stove can later be whitewashed or painted. For these purposes, there are a large number of different compositions. The cheapest and most environmentally friendly are mixtures based on lime and chalk. However, such dyes have a number of disadvantages. They can smear and crack if binders are not added to their composition.
In the modern market of paints and varnishes, polymer-based and organosilicon-based paints can be distinguished. These dyes can withstand high temperatures, moisture and ultraviolet radiation. If you want to emphasize the structure of red brick, you can also coat an unplastered stove with such compositions.
Types of cladding for fireplaces and stoves
On the one hand, the external finishing of metal stoves is simpler, because... the metal is plastic, elastic, and the peeled lining can often be corrected while the device is moving. On the other hand, it is more difficult due to the large TCR of the metal and the high temperature of the furnace body. Therefore, metal stoves are most often painted with heat-resistant enamels; one, but significant exception will be discussed further; we will deal mainly with brick heating and cooking appliances. It is not easy to fulfill all the above conditions, but the stove business has existed and developed for millennia. Stove makers, like all high-class craftsmen, are sensible people, so as a rule they do not reject the achievements of modern technologies suitable for their work. Therefore, for amateurs, the choice of methods for covering a fireplace and/or stove with their own hands is quite wide, see fig. and the list below:
Types of cladding for fireplaces and stoves
- Plastering with simple or decorative plaster;
- Facing brick finishing;
- Tiling;
- Finishing with clinker tiles;
- Cladding with ceramic terracotta tiles;
- Majolica cladding;
- Facing with natural stone;
- Artificial stone finishing;
- Cladding with marble and other ornamental minerals.
Tile and porcelain stoneware
Often fireplaces with stoves are lined with tiles and porcelain stoneware. The reason is the relative cheapness of materials, the simplicity and accessibility of the technology for their installation. But, generally speaking, tiles and porcelain stoneware are not the best facing materials for heating devices; they are difficult to match according to TKR in a given temperature range, and the values of their heat capacity and thermal conductivity in this case are far from the required ones.
Calibrated kaolin tiles, white on the inside, can be used to decorate decorative fireplaces, installing them in the same way as terracotta tiles, see below. If the stove is finished with tiles, additional metal supporting elements are required, see for example. video below. But this is not entirely good - parts with a large TCR appear in the structure of the cladding, so the stove must have been previously heated many times.
Video: finishing the stove with tiles on homemade corners
Porcelain tiles are suitable for cladding heating devices of the same kind using the same methods, but tiles from it must be taken of zero caliber
There are other publications about the properties of porcelain stoneware, but in this case it is important that the initial mass was minimally deformed during the firing process, which means that the TC will withstand the use at the site of use
Attractive aspects of finishing a stove with stone
- The stone has a high ability to accumulate and transfer heat, so such a stove will warm the air in the room well;
- Caring for most types of natural stone is extremely simple;
- This natural material (many of its types) has sufficient heat resistance to be used in this direction;
- The strength of the stone allows you to create the most durable finish that will be used for decades without the need for serious maintenance;
- Unique visual characteristics and variety of natural stone designs;
- Completely environmentally friendly. Even when exposed to high temperatures, high-quality stone will not release hazardous chemical compounds into the air;
- Decorative stone is quickly and easily installed. Even a person without relevant experience can handle the process.
The disadvantages of the material can be considered its relatively high price. Both natural and decorative stone for finishing a stove can cost quite a lot. However, you can find options that are attractive in appearance and have all the necessary technical characteristics at reasonable prices.
Another disadvantage of natural stone is that its installation can be a very difficult and time-consuming task, and it is better to invite a professional mason to carry it out. So a flexible decorative heat-resistant stone in this case will be the best option.
Laying process
Figure 7. Laying stone on the stove
The cladding process is easier to demonstrate in the format of a list with recommended points:
It is better to apply glue both to the stone and to the base; in one case, the glue is immediately removed, leaving a minimal layer; in the other, the mixture is leveled with a notched trowel, forming a layer of a given thickness on all slabs; the stone must be gently, but with force, pressed to the base; corner areas must be completely filled with glue - voids are fraught with destruction of the coating; when working with elements of different sizes, it is necessary to alternate slabs - this will give a natural-looking cladding; special attention to the first row; the result depends on how well the start is set; when laying from bottom to top, a rail is used to fix the first row; when working with slow-flowing glue, you don’t need to use a support, but you will have to let the mixture set a little in order to continue lining; to form seams, use tile wedges, crosses or any other auxiliary elements; when using stones of different thicknesses on the same plane, you need to start from the thickest slabs; the more porous the stone, the more carefully you need to work - glue that gets into the pores is very difficult to remove; cladding with flat slabs must be periodically controlled with a batten or rule; tiles with complex terrain (for example, cobblestones) do not need this.
Laying stone on the surface of the furnace
The back side of the stone will be dusty after brushing. It should either be coated with a primer or glued “to scratch”.
Apply glue
We remove the applied glue
Then apply again. This way the glue adheres securely to the surface of the stone.
Next, we place the pebbles on the stove wall under a level, starting with the corner elements. The stove is not a large, flat wall of the room; the stove has four corners, which makes the work a little more complicated. We use wedges to level the stone.
Below the first row we leave space for future tiles
Stone tiles have a large error in size. We even out the gaps with wedges, choosing the middle position. If possible, we use a disk to push the stone against the concrete.
Selecting the middle position of the stone
Leveling the oven base
Figure 4. Preparing the stove base for finishing
Theoretically, you can do without plastering. It is quite possible to line the stove with stone and mortar. But this is the last century - today there are many special heat-resistant mixtures on sale that increase the service life of the coating. And the consumption of such compounds is regulated by technical and financial considerations. Accordingly, the base should be as smooth as possible.
For those who want to work the old fashioned way, here is a recipe for mixing a heat-resistant plaster mixture:
- sand;
- cement;
- clay;
- water.
The ratio of sand, cement and clay is 0.2/1/3. Water is added according to the situation - the consistency depends on the layer of mortar and the size of the slabs.
However, it is more advisable to purchase a ready-made mixture. It is distinguished by a more precise composition and strict mixing. There are many options on sale.
We recommend reading about how to properly plaster in articles devoted to this process.
It is important to heat the stove before work, and then let the finished plaster sit for several days. This will increase the service life of the coating and avoid the appearance of cracks.
It will also be useful: barbecue oven - types and characteristics.
Examples of finishing a fireplace with stone in the interior - photos
Let's look at the photos of what the finished cladding made of artificial decorative pebbles looks like.
As you can see, for each style you can choose the best option, taking into account the dimensions of the room, the color scheme of the design, the preferences of the owners and other characteristics. It is necessary to remember an important point: the heating device must combine an attractive external component, practicality and functionality.
Preparing the furnace for work
Before finishing, preparatory work cannot be avoided. They are needed for smooth application of plaster and high-quality wall cladding. The first step is to remove the old plaster if the stove has been used before.
This process is carried out with a spatula and water. If the old plaster contains cement, then you will have to use a chisel or hammer. If the old material is successfully removed, the wall should be cleaned down to the brickwork.
The next step is to run a wire brush or sander over the surface of the oven.
Important! To properly attach the plaster, you will need to spray the walls with water and clean the seams between the bricks. New masonry must be dried and cleaned of dust and other defects.
New masonry must be dried and cleaned of dust and other defects.
After cleaning, the walls need measurements. Using a building level, the correctness of the corners is assessed and, if necessary, they need to be plastered to level them.
Selection of glue
In this case, you should choose exclusively from those glue widows that are resistant to high temperatures. It is important to remember that even such glue for normal setting is applied and left until completely dry on a non-heated surface, i.e. The oven does not light up for at least a day. It is better to do this in the warm season.
Adhesives, in turn, are divided by type of application:
- Soil resistance - a practical guide on how to determine the main parameter (75 photos)
Sanding timber - modern mechanical and manual processing of wood (80 photos)
Insulation of facades - selection of materials and instructions for creating ventilated facades (85 photos)
- to continuous, i.e. the composition is applied to the surface, without leaving bubbles or empty spaces, approximately 1 cm thick, smoothed with a special notched trowel, and tiles are attached to it row by row;
- and spot application, such application is more economical, but does not guarantee either high-quality fastening of the tiles or their preservation from heat. It is better to cover the surrounding space in this way, but not the stove itself;
Possible problems
The most common mistakes and tips for avoiding them:
The large distance between the stones creates the feeling of a “broken” stone. Such a seam does not look very aesthetically pleasing. Due to poor quality primer, some stones may fall out of the overall composition. Therefore, you should immediately treat your work with respect and do the job well the first time. You need to cut stones with a grinder very carefully, because
If you move carelessly, you can damage them, break them, or chip the surface. It is necessary to select the surface decor with great care to avoid disappointments. A wide variety of colors and textures of stone finishing allows you to choose the appropriate option for every taste. If you disturb the arrangement of the rows at the beginning of the work, you may end up with chaotic masonry, which will have a bad effect on the appearance of the product.
Why stone
Having built a stove, we often limit ourselves to whitewashing or painting it. After all, the brick from which this structure is made rarely has an attractive appearance. Of course, whitewashing or painting a stove is relatively simple, and almost anyone can do the job. But at the same time, we should not forget about the disadvantages, such as the need to repeat the procedure from time to time, as well as the very mediocre appearance of the stove after such finishing. Natural or decorative stone allows you to eliminate all these problems due to its attractive properties.
Decorative cladding technology, how to cladding correctly
There is a separate technology for mounting each material. If you have chosen tiles, you will first need to carefully prepare the surface. Before fixing the tiles, they are thoroughly moistened with water.
You can veneer both a real and a false fireplace
If there is unevenness on the surface, it will first need to be eliminated by using plaster. This method allows you to quickly and effectively get rid of chips. You can proceed directly to the installation itself only after the base has completely dried. In this case, the technology directly depends on the desired thickness of the seams. Experts recommend making more of them. Thanks to this, it will be possible to compensate for the difference in thermal expansion. If there are no special crosses, then pieces of ordinary drywall will do. However, their thickness should not be less than 9.5 mm.
Adhesive will need to be applied to each tile.
To obtain an even layer, use a spatula with teeth. The tile is pressed to the surface and slightly rocked from side to side. The distance between individual fragments will need to be established using pre-prepared fragments. They should be removed only after complete drying. The process is guaranteed to complete in four hours. The tiles on the fireplace should not be touched until they are completely dry. The duration of the period depends on weather conditions and the quality of the adhesive composition. The last step is to fill the seam. To do this, it is recommended to use a composition from the same company as the adhesive for installation. This will help minimize incompatibility problems. To dilute the filler, you will need to add the powder to water and distribute it evenly over the tile. The process is conveniently carried out using a spatula. Thanks to this, it will be possible to form a beautiful seam. To eliminate excess, it is recommended to use any material.
Place cellophane on the floor while you work to avoid getting it dirty when tiling the fireplace.
To obtain a beautiful surface, it is recommended to use the following tips: The tile will fit tightly if you first attach a metal mesh to the wall. Such a wire frame will increase adhesion and level the surface. To remove excess adhesive, it is recommended to use a rubber spatula. Before the process begins, the tiles are laid out on the floor. Excess mortar during laying must be removed immediately.
Remove the glue immediately; once it hardens, it is difficult to clean off.
When laying tiles, no air pockets should remain under the material. They will expand when heated. Such a process will lead to the lag of individual fragments or entire blocks and will have to be covered with finishing material again.
Building a fireplace yourself is not difficult. A wood fireplace is used to create warmth and comfort in a house or apartment. You can gather around it on a cold winter evening. You can also make your own firewood rack for the fireplace.
https://youtube.com/watch?v=k3-QPDkdhUs
Finishing the wall behind the stove
Many people pay attention only to what to cover the stove with, but completely forget about protecting the wall behind it. It is not right. There are several options, each of which is suitable in certain conditions:
Advice! It is better to take care of the wall behind the stove in advance, then you will not have to perform unnecessary manipulations.
- To protect this area of the house, it can be lined with red brick. This is the most common option. This material is not afraid of constant thermal exposure.
- You can use foil. A sheet of such material is attached directly to the wall. It successfully reflects most of the thermal radiation. This method cannot be used when the heat source is very close to the wall.
- Instead of a sheet of foil, use stainless steel. This is a durable material that is not subject to severe destruction.
On a note! If you decide to line the wall behind the stove with bricks, then you don’t have to do it completely. The main thing is to lay the masonry according to the dimensions of the heat source itself.
Any work in a house with a stove requires compliance with numerous rules and precautions. You cannot use materials that are not intended for such work. It should be remembered that nearby surfaces that are exposed to thermal effects need protection. It is better to cover them with bricks, which are covered with a stainless steel sheet. Then you can be sure that living in the house will be comfortable and safe.
Tiles
Tiles are a classic version of cladding a Russian stove, making it a harmonious and sophisticated element of any interior. Tiles look solid and expensive; they not only improve the aesthetics of the stove, but also improve the heat transfer of the structure and contribute to better heating of the room.
Tile
The tile, unlike classic tiles, has rumps on the reverse side, that is, open boxes designed for fastening to the wall. Tiles can be terracotta and majolica, have a relief or smooth pattern in any style.
Materials and tools
For tiling you will need:
- tiles of the selected type;
- steel pins for fastening (wire with a diameter of 5 mm);
- soft burnt wire;
- rosary;
- staples;
- clay (used to fill the pump);
- filler for the tiller (used together with clay, these are gravel, pebbles, broken stove bricks);
- gypsum grout;
- level;
- square;
- plumb line;
- Bulgarian;
- putty knife;
- rasp.
When calculating the number of tiles, you can use a similar diagram or create your own based on it.
Scheme of finishing a Russian stove with tiles
The work will require the following types of tiles:
- straight;
- corner on external, internal corners;
- cornices (corner and straight);
- vault cornices;
- regular tiles without a pattern;
- shelf (corner, straight).
For the base of the stove, massive tiles with a large thickness are used, for the rest - lighter and thinner ones. The pattern and color may vary, but traditionally the central part is highlighted, and the base and top are made lighter or white. But this rule is not mandatory and the type of tiled covering is chosen in accordance with the interior and personal preferences.
Instructions
Before cladding begins, the surface must be cleaned, primed, after which a mesh is attached to the seams of the brickwork. Maximum attention should be paid to the layout of the first row; it is also called “hooves” and sets the tone for the entire structure. Step-by-step instructions include the following steps:
- A layout diagram is drawn up, the tiles are carefully laid out on a horizontal surface (on the floor), each element must be numbered in accordance with the diagram;
- The tile is soaked;
- After removal from the water, each pump is carefully filled with solutions of clay and filler (you can use a mixture of clay, quartz sand, broken brick in a ratio of 1:2:2);
- The laying should begin from the bottom corner, while a metal pin is pulled through the special holes of the tiller and bent upward;
- The next row will be connected to the bottom one using this wire and staples, creating a strong fastening; the tiles are attached to the wall of the furnace with soft wire in the form of a loop inserted into the brickwork;
- The subsequent surface is finished in a similar way, with wire fasteners and loops being formed as the tiles are attached.
A day after completion of work, the seams are filled with grout, all excess mortar is removed with a damp sponge.
Work example 1
Example of work 2
Advantages of artificial stone
Expensive natural materials are being replaced by budget analogues that are not inferior in their characteristics. Artificial stone is a material that has a number of advantages:
- the technology of finishing a bathhouse stove with decorative stone is simple due to the softness of the mechanical characteristics; To prepare the material, a grinder is enough;
- the entire sequence can be carried out with your own hands without the involvement of trained craftsmen, which allows you to save;
- the composition of the finishing stone includes soft and fairly light fillers, which lighten the overall weight of the structure;
- a wide selection of textures, shapes and colors allows you to choose a pattern to suit any interior;
- artificial stone is cheaper than natural stone, which reduces the cost of the finished product;
- Decorative stone allows you to embody any design ideas.
Artificial stone is an easy-to-use material with many advantages.
Types of stone suitable for finishing stoves There are many types of stone for finishing on sale. However, not all of them are suitable for finishing a stove, as they cannot withstand sudden temperature changes. The surface cladding is made only from porcelain stoneware, gypsum stone or on a concrete base. Each of the materials has its own characteristics.
Porcelain tiles
In most cases, “artificial stone” refers to ceramic granite. This material is an analogue of ceramics or glass, exceeding them in strength. It is produced at high temperatures, but during the operation of the fireplace it does not react to temperature changes. In addition to this property, porcelain stoneware has other advantages:
- resistance to mechanical loads;
- variety of shapes and colors;
- strength;
- natural imitation of natural stone.
The composition of porcelain stoneware includes: clay of various types, feldspar, pigments and mineral additives. They improve the characteristics of the material.
concrete stone
Also popular is artificial stone, consisting of cement, sand, dyes, fillers, plasticizers and water repellents. These materials are affordable and have good quality characteristics necessary for long-term operation of the interior heating element.
Gypsum-based stone
Gypsum artificial stone is a durable decorative material suitable for cladding a stove or fireplace. Various imitations made to look like natural stone are on sale.
The material has a number of advantages:
- ease of installation;
- light weight;
- environmental friendliness;
- aesthetic appeal.
Gypsum tiles can be made by hand, which expands the possibilities of decoration.
Material selection criteria
In order not to make a mistake with your choice, you should pay attention to the following aspects:
- price. Russian-made decorative stone is not inferior in characteristics to foreign analogues, and it is cheaper;
- manufacturer. It is better to give preference to proven brands that have been present on the building materials market for a long time;
- compliance with the requirements: heat resistance, strength, wear resistance;
- presence of markings on the packaging, as well as certificates;
- date of manufacture. Finishing with too “fresh” materials will not give the desired result;
- If the level of preparation for cladding with your own hands is low, it is better to choose slabs of blurred shapes in order to hide the flaws in the masonry by grouting the joints using a bag.
If you take these tips into account, there will be fewer problems when doing the work yourself.
Finishing a brick fireplace with stone
Finishing a brick fireplace with stone
If you have access to specialized equipment, you can do the pre-processing and installation of marble or granite yourself. In the absence of the necessary equipment, give preference to shell rocks, limestone and rubble stone.
Marble fireplace portal
Marble fireplace portal
Artificial stone has no noticeable differences in appearance from natural finishing material. It can also be safely used to decorate a fireplace.
Stone fireplace decoration
You can make artificial stone with your own hands. To do this, mix cement, sifted sand and coloring pigments of the desired color and pour the resulting composition into silicone molds. Allow the solution in the molds to harden, remove the resulting products and use them to decorate the fireplace.
DIY artificial stone
Mold for making decor
The cladding itself is carried out in the same way both in the case of natural stone and when using an artificial analogue. It is enough just to fix the elements on the surface of the fireplace using mastic or tile adhesive. You can first lay out the stones on the floor to see the future finish and choose the most optimal option for placing the stones directly on the surface of the fireplace.
Stone cutting
The stone is cut with a disc on concrete, and sharpened with a diamond cup, also on concrete.
Mark the desired size
The cut stone has a different color
When laying cut stone we try:
- Hide the cut behind a thicker stone;
- Cut at an acute angle inward to hide the cut;
- We place the cut side away from the window so that the shadow hides the cut;
- We place the cut from the front side of the fireplace to the far side, where there are fewer eyes;
- We tint the cut if we couldn’t hide it.
We cut at an acute angle inward to hide the cut
Colored cut
We also mark the cutouts for the oven doors