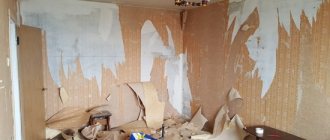
During the puttying process, mistakes can be made that can cause you not only to be nervous, but also to redo the entire job from the very beginning. If this is your first experience with puttying yourself, then this article is for you. First of all, it is necessary to understand how the processes of plastering and putty differ, since they are often confused. Putty is used on almost level surfaces that require finishing before wallpapering or painting. Plaster, in turn, will help get rid of crooked walls. Only after applying the plaster can you begin to putty. It is also worth remembering that there is no point in puttying if you are going to lay tiles or use other finishing materials.
Mistakes when plastering walls
Dirty tools
It is important to treat puttying with all the scrupulousness that you have. The solution can only be diluted in a clean, practically sterile bucket. Any foreign objects and contaminants must be removed, since a small thread or pebble will certainly stick to the spatula and remain on the walls. The first batch of solution is over - wash the bucket and mix a new one. It is advisable to acquire a special bucket only for these works. In general, make it a rule to keep all your tools clean!
Incorrectly selected spatula
Many people come to the store and take the most expensive and “coolest” spatula, concluding that it is good, forming their opinion only on the basis of the high price. In fact, everything is much simpler. You need to take the tool that suits you, regardless of its price. It’s very easy to check your compatibility with a spatula. Take a wide spatula and apply it to the wall. We inspect the joint for gaps. If they exist, then we continue the search. We tilt the tool and check again, only slight deviations in the corners are acceptable. Try to use a soft weapon. Since you are a beginner, your movements are unclear. A hard putty knife will leave streaks behind because you press it too hard against the wall. A flexible tool will adapt to your movements. A tough tool is suitable for a master of his craft. Only a professional can handle such a tool. Since you need two spatulas for work, choose one wide up to forty centimeters, and the second up to twelve. A narrow spatula is needed to remove the putty. When working, material sticks to the tool and dries out, do not forget to clean it.
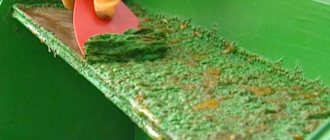
Incorrect putty solution
This is the problem of all novice puttyers. In comparison, a properly diluted solution is similar to rich sour cream. We stick a narrow spatula into the solution up to the handle. It stands and does not fall over - everything is fine. We collect the material and apply it to a wide spatula, turning it over in the air. A good solution will hold without any problems. However, it is worth remembering that the finishing layer is made with a more liquid solution. Dry putty simply will not stick to the first layer and will crumble. The solution may be to apply a thin layer of primer on top of the first coat.
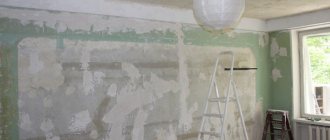
Dry walls
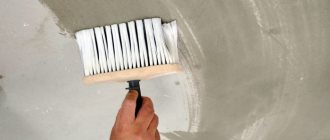
It is important to know that the primer must be applied three to four hours before puttying. Otherwise, you will not putty the walls, but simply smooth them with a spatula, on which dried material will accumulate. If you have to putty on highly absorbent walls, then apply the primer in a couple of minutes and spray them with water.
Insufficient thickness of the putty layer
Due to uncertainty in their actions, many people press the spatula too hard onto the surface. Another common mistake made by beginners. The first layer should be about one millimeter thick. The second layer is the final one, with its help it is necessary to smooth out all remaining unevenness.
Puttying from wall corners
These are the places that are the most crooked. That is, starting the puttying process from this place will only worsen the curvature. It is more correct to start working by stepping back about five centimeters to the side. Start working on the corners when this layer of putty has dried. By focusing on it as a beacon, you will get an even angle. It is important to work gradually. We wait until one side dries and only then proceed to the other. If you become the owner of an apartment with round corners, then initially you will have to work as a hammer drill. You won't get straight corners using putty alone.
Irregularities in the first layer of putty
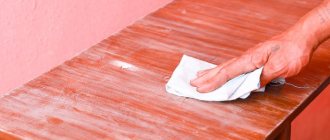
Before applying the second coat, be sure to go over the first with a dry spatula. This is done in order to eliminate shortcomings.
We recommend: How to remove plaster from a wall with your own hands
Wrong type of putty
You need to buy putty with an exact plan of what you will do next. If your next step is wallpapering, then there is nothing complicated - any will do. Painting requires finishing putty with a fine fraction. In this case, it is necessary to approach the choice of putty very carefully, since wallpaper hides flaws in the form of stripes or dents, and paint, on the contrary, makes them more obvious. Even a small scratch will be noticeable. Therefore, when puttingtying a wall with the intention of applying paint to it later, do it with additional lighting.
Comments (2)
- Pavel 3 years ago Permalink
The article about puttying walls is interesting. It’s also not bad to know about errors in this process. The material is clearly useful.
Obtaining high-quality plaster depends on:
• from the correct choice of composition for finishing, taking into account the characteristics of the room; • from complete and thorough preparation of the foundation; • compliance with the proportions of water and dry mixture specified by the manufacturer; • on the correctness of technological operations and their sequence.
If it is necessary to apply plaster in a thick layer (more than 50 mm), when applied to non-solid substrates (chipboard, polystyrene foam, etc.), as well as in the corners and joints of structures, it must be reinforced with a fiberglass mesh to prevent cracking of the finishing layer.
Large and small cracks
appear on plaster surfaces due to the use of either fatty (with a high content of binders) or poorly mixed solutions, in which a lot of binders or fillers accumulate in places.
Cracks
may also appear as a result of rapid drying of the applied plaster under the influence of strong drafts or high temperatures. Cracks also form from applying a thick layer of slowly setting mortar at one time or because the solution is applied, albeit in thin layers, but onto a previous layer of mortar that has not yet set. To avoid the appearance of cracks, it is necessary to strictly dose binders and fillers when preparing the solution and mix it thoroughly.
Definitely directional cracks
are formed on brick surfaces along the seams of the masonry. Cracks appear on brick walls as a result of applying very thin layers of mortar without first wetting the surfaces with water. The reason for the formation of cracks can also be alkalis released from the joints of the masonry.
Peeling and swelling
occur when working with damp surfaces or when surfaces are constantly wet. Most often this happens on lime and lime-gypsum plasters. To avoid scratching and swelling, damp areas must be dried and only then work can be carried out.
Plaster also peels off if lime or lime-gypsum mortar without transition layers is applied to the concrete base or cement finish. Colored and decorative coating layers peel off in cases where they are applied to very strong or, conversely, very weak soils, when the coating layer is much stronger and denser than the soil itself, or they cover soils with an insufficiently rough surface.
"Stroy MD" - professional repair of facades of apartment buildings
You can order façade repairs finished using decorative plaster by contacting the Stroy MD . We restore exterior finishes with various textures and repair facades made of colored decorative plaster, during the work strictly following construction technologies and standards for working with a certain type of plaster composition.
The full list of services provided includes:
- Thermal imaging inspection of walls of apartment buildings .
- Repair of facades , finishing work using various technologies and types of coatings.
- Insulation and repair of interpanel seams.
- Painting facades.
- Restoration of facade slabs.
- Work on maintaining facades and maintaining their operational suitability: hydrophobization , cleaning, etc.
High-quality restoration of decorative plaster is not only an attractive appearance of the facade, but also a long service life of other layers of finishing, so such repair work should be entrusted to leading specialists. Contact Stroy MD to order a visit from an expert who will determine the scope of work and calculate an estimate for repairs.
Based on the appearance of the cracks, we will try to determine the cause of their occurrence.
1. Cobwebby.
Fine surface cracks 1 mm deep (maximum 2 mm).
2. Cracks coming from the base of the plasters.
Cracks run through the entire plaster layer.
3. Cracks at seams and joints.
Through cracks passing through the entire thickness of the plaster to the masonry seams.
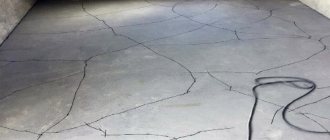
4. Structural cracks.
Straight or geometrically directed cracks with a large opening.
5. Structural cracks originating from the foundation.
Elimination of plaster defects
If narrow cracks
caused by shrinkage of walls or foundations, then in order to eliminate them, it is necessary to remove the coating around them. This will provide better grip. The treated area should be approximately 5 centimeters wider than the crack itself. Sometimes, in order for the plaster to hold better, the damaged area has to be expanded even further, and the new pothole should have a wedge-shaped shape, tapering downward.
If plaster defects are caused by exposure to moisture
, then first of all it is necessary to remove the loose and crumbling coating around the damaged area. Often it is not possible to properly repair the surface precisely because the damaged plaster has not been completely removed. It is necessary to clean the plastering area from dust, dirt and grains of the old coating.
Large bald spot or hole in the wall
filled with heat-insulating material such as glass wool or fiberglass. After this, the gap is sealed using a wide spatula with putty or plaster flush with the surface whose appearance it spoils.
Potholes are too deep, but large enough in area
simply plastered: the plaster is applied and leveled with a large triangular spatula.
Small potholes
usually sealed with putty.
If the crack is superficial
, then coating (putty) or mastic is enough. It is most convenient to apply them from a tube, especially with a spout that matches the width of the crack. Excess putty is removed with a spatula and leveled flush with the surface.
The plaster solution hardens within 20 minutes. The thickness of the applied layer should be about 6 millimeters. If the plaster is very dry, it may “false set”: after 20 minutes the mixture will harden and become unusable. A properly prepared plaster solution should not contain lumps; it should be slightly thicker than sour cream.
A layer of finishing plaster can be given texture using special materials or improvised means.
Source
In what cases should you not remove beacons?
Whether it is always necessary to remove beacons after plastering or not depends on specific conditions. So, metal profiles do not need to be removed if:
- They are made from the same mortar as the plaster leveling layer.
- Any rust that appears will not affect the finish. Cladding walls with stone and tiles does not require the removal of beacons from the plaster. Brown rust spots will not be visible through them.
It is also not necessary to remove profiles made from high-quality metal, which have certificates of conformity.
Profiles made of high-quality metal do not require dismantling
To prevent rust from appearing at the ends of the guide profiles when cutting, they are sealed with a solution that protects against corrosion.
Plaster defects
Tell me, is peeling plaster a reason to panic or not? For non-professionals, this situation can become stressful. Professionals will say that inconsistencies can be corrected. Moreover, even an amateur can eliminate plaster defects. And beginners will find useful information on how to avoid problems and give the building a respectable appearance.
Failure to comply and/or violation of technical standards and ignoring the recommendations of dry mix manufacturers can lead to defects in the plaster. When carrying out preparatory work for plastering, as well as when preparing mixtures, applying layers to the base, improper operation and when the structure settles, defects may appear on the treated wall. We will talk about them in detail in the article. For complete clarity, let's divide the problems into two categories:
Preparatory work
Upon completion of the diagnosis, preparatory work is performed, which includes the following manipulations:
- Removing whitewash.
- Removing plaster from problem areas or the entire surface of the walls.
- Joining masonry joints.
- Performing tasks to improve adhesion (performing notches, etc.).
- Dust removal.
- Repairing cracks.
- Installation of reinforcing mesh.
- Cleaning surfaces from mold, fungi, efflorescence, dirt and stains of various origins.
- Installation of beacons.
- Priming of external walls.
Plaster inspection
Quality requirements are specified in SNiP 3.04.01-87 “Insulating and finishing coatings”. You can identify and identify flaws using a linear laser level. The laser line is projected onto the wall where the laser plane should appear. In this way, the vertical deviation of the surface and the horizontal deviation of the surface can be checked. Today there are two known methods for assessing the evenness of a wall:
Restoration of plaster finishing of multi-storey buildings
In situations where not only the top decorative layer is damaged, but also the deeper layers of the plaster finish, facade repairs are performed in the following sequence:
- Old material is removed in places of deformation or completely from the entire surface of the walls.
- The surface and edges of the finish are cleaned with a wire brush, after which dust is removed.
- The repair composition is being prepared.
- The restored surfaces are generously moistened with water, which helps prevent the possibility of peeling and cracking of the new finish.
- The repair compound is applied and leveled.
- When the solution has set, grouting is carried out. After the primer has hardened, the finishing coat is applied.
Types of plaster defects
As we noted earlier, there are two types of defects.
The first ones appear when recommendations and building codes are violated. The most common defect of technology violation is the appearance of small growths (tubercles) on the treated wall, which are characterized by the presence of white spots in the middle - these are dummies. We will talk about them and how to combat them below. Let us only note that the dummies appear during the preparation of a solution of uncured lime.
The second includes cracks in the plaster and peeling. They can form over time as a result of wear and tear. To prevent the plaster from falling off, you need to regularly carry out preventive inspections and, if necessary, make cosmetic repairs. Experts recommend carrying out work when renovating the entire apartment.
So, let's take a closer look at each problem and define the “technical treatment of walls.”
Dutiki
To remove tubercles on the surface of the plaster, it is necessary to completely clean their locations using an iron spatula. Then apply the solution to the treated surface.
Cracks in plaster
The reasons for the formation of cracks in plaster can be different. This defect is the most common and is the result of errors in surface preparation. Perhaps the components of the working solution were not mixed thoroughly enough. Their appearance can be facilitated by an excessively thick layer of applied mortar if it was applied to a non-reinforced wall. This phenomenon can only be avoided by carefully mixing the gradients of the future solution.
Swelling and peeling of plaster
The defect is not that common, but it does happen. Perhaps, when plastering damp surfaces, the technology was violated: there was not enough time for the layer to dry. A defect may occur if the base is very wet. Lime-gypsum and lime plasters suffer from this “disease”.
Cracks in the husks
They arise as a result of poorly prepared joints of different components: wood and concrete, plaster and brick. Small cracks can be eliminated by grinding, which will be discussed below.
Large cracks must be “cut off”: cleaned with a steel brush while generously wetting the problem area with water. And only after that apply a new layer of solution.
The shingles are replaced with new compositions after treating the defective areas: you will have to cut out the low-quality layer.
Efflorescence
Efflorescence, or efflorescence as they are also called, appears as a result of high room humidity. This is a signal of insufficient ventilation; you need to pay attention to this, otherwise over time you may encounter fungus and mold on the wall.
It is possible to fight this phenomenon. It is necessary to try to dissolve the deposits in water. In the fight you need to use special means that are always available in the retail chain. The work uses metal scrapers, brushes and rollers.
And further
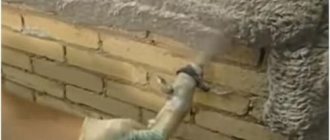
To protect the facade of the building, it is necessary to perform hydrophobization. This is the application of a special solution to the wall.
The mixture must have frost-resistant, water-repellent and airtight characteristics.
Complex measures need to be carried out when water often impacts the wall.
This is especially true for areas with high precipitation rates. Walls treated with water repellents have a service life of 10 years or more. To protect bricks, water emulsions, water-soluble mixtures or solvent-soluble components are used.
Dampness in walls and its causes
The largest scale of this phenomenon can be observed on the ground floors and basements, which were built in violation of the technology that describes the rules of horizontal and/or vertical waterproofing. Currently, precipitation often contains acids, as well as a lot of carbon dioxide, which can cause changes in the structure of concrete.
The microclimate in the room is affected by the moisture that is absorbed by the walls, which is why an unpleasant odor appears and mold forms. But before you start fighting all this, you need to accurately establish the reasons for what is happening. To find the causes, it is necessary to conduct a qualified examination of all affected structures. If the case is very complex and there are no obvious reasons, then it is impossible to do without the help of qualified specialists, since you can simply waste money.
It is quite common for home owners to listen to the advice of people who have absolutely no knowledge of waterproofing. At first glance, these tips may seem logical, but in reality they are often wrong. In this article this topic will be expanded quite widely.
Sources that moisten building structures:
- condensation that forms on freezing structures;
- with insufficient ventilation, hygroscopic moisture is formed;
- flood waters that damage the base of the building;
- drainage and drainage systems that have become leaky;
- precipitation penetrating the foundation and washing the walls;
- groundwater, which affects the enclosing structures and that part of the building that is located underground.
It will not be possible to ignore all these defects, since moisture not only causes efflorescence and darkening, but also causes destruction and also forms mold, which is very dangerous to health.
If you eliminate the consequences and do not address the causes themselves, this will only bring short-term improvement. After some time, dampness and efflorescence will return and continue their destructive effects. If the finish is restored, then it will still suffer the same fate as the old one, since for this it is necessary to use a special drying (sanitizing) plaster, which is marked WTA.
How to restore the integrity of plaster
Grinding the old layer will extend its shelf life. It is necessary to perform this technical action regularly. It can be combined with changing wallpaper, for example, or with complete plastering of the walls. The process involves grouting the old layer with the preliminary removal of old paint or wallpaper. The new plaster mortar is prepared using cement and sand with small fractions.
Finally
Knowing about the problems, you can effectively deal with them. But repairs should not be taken to extremes or delayed. It is important to regularly inspect the condition of the plaster and respond promptly, remember this.
Source
How long does it take to remove beacons?
There are two equivalent solutions when you should remove the beacons after plastering. Each of them has its own advantages and disadvantages.
Beacons can be deleted:
- In 1-8 hours. Fresh plaster does not shrink, so subsidence after removal is excluded. Removing beacons leads to the formation of grooves. It is sealed with the same plaster mortar as the wall, so the layer dries evenly. The wall turns out smooth, without flaws. The only inconvenience when sealing a groove is that the solution will fall onto the floor.
- In 12-24 hours. The plaster will set during this time, so large pieces will not fall, but it will be more difficult to pull out the beacons.
You can choose any method, taking into account the associated advantages and disadvantages.
It is recommended to remove beacons no later than 24 hours after applying the plaster