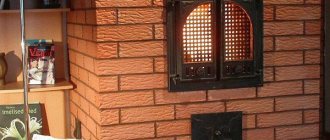
If your house is plastered (inside or outside), then sooner or later you will be faced with the task of how to repair old plaster.
reasons for the destruction of plaster :
- wall deformations,
- shaking of load-bearing structures (earthquakes, or just neighbors starting repairs),
- violation of the technology of primary plastering of walls ,
- and so on.
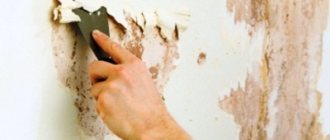
Falling off plaster is simply an eyesore and zealous owners will never allow this to continue for a long time and will quickly eliminate plaster defects .
How to strengthen plaster that is falling off walls
Plaster is a very important element when building a house or renovating. This mixture performs many important functions, for example:
- Thermal insulation. It closes microcracks through which cold air from the street passes.
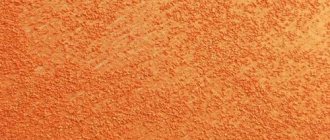
- Improving the appearance of the wall. After plastering, the walls look smoother.
In general, this mixture has many more functions that can be listed for a very long time.
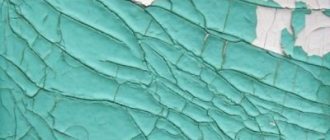
However, sometimes it happens that the plaster begins to collapse. This is a rather annoying problem. Fortunately, there are several methods to harden the surface.
What to do
When the plaster falls off, everyone has one basic question - what to do? First of all, check if there are any other places where this happened. If it has fallen off in only one place, you can get by with local repairs, but if many such problem areas are found, more serious work awaits.
The best option would be to completely redo the entire applied coating. Yes, this is both time-consuming and expensive, but only this option will guarantee that later you will not be faced with an unpleasant surprise again.
In some cases, when the area of damage is small, it can be eliminated locally. You will need to remove the old coating around the damaged area and reapply it. Upon completion of local restoration, it will be necessary to repaint the entire area of the damaged area so that it does not differ in color from the rest of the ceiling.
Causes
First, you need to figure out the reasons why it crumbles. The reasons are errors when plastering the walls. Here are the most common ones:
- No primer. The presence of a primer is a prerequisite for plaster. Most people don't use primer because it prevents the wall from absorbing moisture. However, for such cases there is a special primer that improves adhesion and holds back salts. These salts come out of fresh concrete and over time reach the plaster, almost completely tearing it off.
- Violation of drying time. The plaster mixture dries from 7 to 28 days. Most people decide not to wait, but to apply the next coat ahead of time. Consequently, after some time it begins to fall off and crumble. The room where the mixture is drying should be well ventilated, this will speed up drying.
- Adding water to the mixture rather than slowly pouring the mixture into the water. Because of this, all sorts of lumps appear, which will greatly interfere with further work, since they are difficult to break. Consequently, the surface will be processed poorly, and this will provoke further destruction.
Causes
All damage can be divided into two types: operational and technological. Let's take a closer look at each of them.
Technological reasons
They arise through violation of the technology for preparing the solution and its incorrect application to the wall surface. As a result, defects such as:
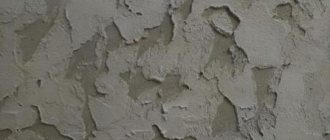
- Blistering of plaster. It occurs most often due to the incorrect composition of the solution. You can get rid of this problem if you clean the part of the wall on which the bubbles have formed from the plaster and reapply this time a high-quality solution.
- They can be caused by a poorly mixed or greasy solution, or the wall drying out too quickly. The correct ratio of the components of the solution and their thorough mixing help to avoid such a defect. If it becomes necessary to treat the walls in hot weather, you should prevent it from drying out too quickly by periodically moistening it. If cracks do appear, then the wall must be rubbed with mortar or gypsum dough, and large cracks must be widened, cleaned, moistened and plastered.
- Peeling of plaster can occur for two reasons - the mortar was applied to a dry wall or to a less durable mortar. Such a defect can be corrected by clearing part of the wall from peeling plaster. Then wet part of the wall to be treated and reapply the solution. When preparing the mixture, it must be remembered that the strength of the first layer of mortar should be higher than that of subsequent ones.
- Swelling of plaster. The reason for swelling of the plaster is excessive wetting of the wall surface before applying the solution. This defect can be eliminated by clearing the wall of plaster, drying it and reapplying the solution.
Operational reasons
There is another reason for the plaster to fall off - this is the aging of the coating, as a result of which the same peeling and cracks appear. Only these defects do not appear immediately, but after a long time. You can prevent them by regularly inspecting the wall covering and making routine repairs if necessary.
How to strengthen crumbling plaster
There are several ways to strengthen the surface:
- Use a deep penetration primer. A deep-penetrating primer designed for old and loose surfaces. Its particles penetrate deep into the plaster mixture and bind it. In addition, this material has an antiseptic effect. This method is the simplest and does not require much effort or money. Despite this, it is quite effective.
- This method is very radical. In most cases, plaster crumbles due to mistakes made during the work. In this case, you will have to completely tear it off and make a new one. It is best to leave this work to experienced craftsmen. Unlike the first method, when the material deteriorates due to age, nothing will help here as much as replacing the mixture.
Repairing cracks
It often happens that there are old finishing materials in the room; they should be removed. A coat of primer must be applied to a completely cleaned surface. After it has completely dried, the wall is thoroughly cleaned. Once the process is completed, it is necessary to create a cement mortar. It must be created according to the instructions. Applying a thin layer will help get rid of small cracks. If there are a lot of such elements, then it is worth using a plaster mesh. In this case, the layer will be strong and reliable.
How to strengthen crumbling plaster with your own hands
The plaster is crumbling, what should I do? It happens that, saving on cement, builders make plaster almost from sand. And this material is used indoors and for external decoration of walls of any building.
Plaster increases the strength of the wall by almost 30 percent, which is very important, and only then the owners decide for themselves: to paint the walls, tile them or glue them with wallpaper. In addition, such a coating helps to level walls, hide defects on them and ideally prepare surfaces for applying liquid or gluing regular wallpaper.
Composition of mortar for plastering walls
The following compositions are used for stone surfaces:
1) mix from 1.25 parts by weight to 1 part by weight of lime and 3 parts by weight of sand;
2) 1 part by weight of lime, 0.4 parts by weight of clay and 5 parts by weight of sand;
3) 1 part by weight of clay, 3 parts by weight of sand and 0.5 parts by weight of fibrous additives (any highly crushed rags).
To plaster a concrete surface, use a solution of the following composition:
1) 1 part by weight of cement, 4 parts by weight of sand, 0.2-0.3 parts by weight of lime;
2) 1 part by weight of cement, 1 part by weight of lime and 6 parts by weight of sand.
For a wooden surface, mix:
1) 1 part by weight of lime and 2 parts by weight of sand or 1 part by weight of lime and 2.5 parts of sand;
2) 1 part by weight lime, 3 parts by weight clay, 3 parts by weight sand and 3 parts by weight fiber additives.
What are the reasons for plaster crumbling?
Plaster can crumble due to high humidity in the room if the technology was violated during its application or a low-quality solution was used. To ensure that the plaster holds firmly, it is better to entrust the work to an experienced craftsman.
If the walls of a home are plastered with old cement-sand mortar (see Let's look at how to plaster with cement-sand mortar), which begins to crumble at the touch of a spatula, or you are not sure whether it is possible to putty on the old coating without damaging the mortar, the plaster should be:
- Strengthen. This method is used if the coating is just crumbling. In this case, before starting puttying, it is enough to apply a deep penetration primer to the old plaster or treat the wall surface with concrete contact, which should fix the surface well in cases where the primer cannot cope with this.
- Use a more radical method - completely remove the coating . This method is used if the plaster is crumbling. This usually occurs due to non-compliance with the technology when applying it or due to incorrect temperature conditions, when the room temperature is very low.
Grinding plaster
In order for your plaster to last as long as possible without repair, it must be periodically updated. Over time, any plastered surface begins to become covered with small cracks. Before things go too far, you can grind the top layer of coating. This process is carried out as follows:
- Old wallpaper is removed from the wall. If the paper adheres too firmly to the surface, it is soaked and scraped off with a suitable tool. Remains of paste or wallpaper glue are also washed off with warm water.
- Do the same with paint, scraping it off the wall with a spatula. You need to work with the tool carefully, trying not to leave deep scratches on the coating, otherwise they will have to be covered with putty later. If the paint is water-soluble, you can simply wash it off.
- The grinding process is carried out in zones. Select an area of approximately 0.5 m² on the wall and moisten it a little.
- Then, using a special trowel, the surface is covered with a thin layer of plaster. The distance between individual strokes should be about 10 cm.
- After this, the treated area is thoroughly rubbed with circular movements of the tool.
- If small defects remain on the wall, they are covered again with a small amount of solution.
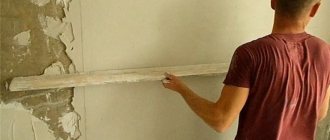
How to repair plaster
Advice: If you are not confident in your own abilities or have never had to plaster walls before, you should trust the professionals. They will complete the entire process faster and better than a self-taught amateur.
Plaster repair is carried out in several stages. To isolate the wall surface from moisture, you will need to apply a protective compound, and then proceed to further operations.
The repair procedure is as follows:
- The wall is carefully and carefully scraped with a metal brush to remove all remnants of the old plaster.
- A special primer mixture is applied in two layers.
- Any stains remaining after the primer has dried are lightly washed off with a stream of water.
- The wall dries for about three hours.
Advice: If the coating defects are very serious, the damaged areas should be re-applied with a putty mixture or plastered.
- The applied coating should be about three centimeters thick.
- When plastering a wall, the powder is dissolved in water and applied in a small layer.
- The first layer is performed to level the wall (see Leveling walls with plaster according to all the rules).
- After one hour, a second layer is applied superficially.
Wall restoration
It is worth noting that replacing old plaster may be necessary not only if part has fallen off, but also if dirty or greasy stains have appeared on the finishing materials used in the room. Most often they form if cracks have formed in the plaster. In order to get rid of dirt and dust, you need to consider the following features:
- Removing greasy stains should be done using hydrochloric acid;
- If you find traces of rust on the coating, then you should use copper sulfate. Experts also recommend using a 3% hydrochloric acid solution;
- If the stains are very large, they are painted over using special dyes.
How to strengthen plaster
To work you will need:
Instructions for strengthening cracked, peeling or crumbling plaster:
- To avoid such defects, the plastered surface must be strengthened with a primer. Such a coating is an important condition for performing finishing and repair work of good quality. It is used to finish the surface of walls and ceilings before applying paint, wallpapering and tiling. A primer is a mixture of a solvent, a binder component and various additives that determine its properties. The dried material creates an opaque film of one thickness, increasing the adhesion or adhesion of subsequent layers of coating.
- According to their purpose, primers are divided into:
- metal surfaces;
- wooden surfaces;
- universal, having an acrylic base. Acrylics are used for concrete, cement and gypsum plaster, wood and fiberglass wallpaper. Such compositions dry quickly and do not have a pungent odor.
- The impregnating composition is applied with a roller, in one layer or with a wide paint brush.
- When finishing rooms with high humidity: bathrooms, showers, special compounds are used, they create a layer of waterproofing. For example, Aura Primer is suitable for dry rooms and high humidity. The mixture is diluted with water immediately before use in a ratio of 1:4. The degree of dilution can be reduced to 1:6, this will increase protection against moisture.
- Cheaper strengthening of plaster can be done with wallpaper glue. This method is often used before wallpapering. With high-quality glue, the adhesion is strong, and the wallpaper and putty will not come off. But this option does not apply to heavy vinyl wallpaper.
- An unjustified savings is the use of PVA glue for primer, especially in rooms with high humidity. The adhesive contains dry components; they are capable of absorbing moisture, which after painting can contribute to the appearance of matte spots due to uneven paint absorption.
How plaster is strengthened with impregnations
Today, manufacturers produce high-quality “strengthening” impregnations in plastic containers. Before use, the liquid is poured into a convenient container, then applied to the plaster with brushes or rollers.
Some types of compounds penetrate more than a meter into plaster and concrete. At the same time, they close the pores at the chemical level, transform the material, and bind even microscopic particles together.
After strengthening the plaster with impregnations, cracks will not form and the coating will no longer crumble. Using this method with your own hands to strengthen the surface is quite simple.
How to make a defect invisible
For small defects sealed with sealant, you can make them invisible using a small brush and paint.
Simply paint the white caulk over the edge of the resulting hole with a brush.
It is advisable to match the paint by color, but if it does not match too much, it is not a problem.
In a small area this will not be very noticeable.
For larger defects, full finishing is carried out.
If the defect is on the wallpaper, it is necessary to putty the defect and align it with the rest of the wall, and then replace the sheet, carefully cutting it along the adjacent wallpaper. If the defect is on a painted wall, it is puttyed and painted over.
In this case, you need to very accurately select the paint color to match the base color. If on a tile, several tiles are placed at the site of the defect. If it is not possible to hide the defect, the entire wall is refinished externally.
How and with what to seal the grooves is shown in the video:
It is unlikely that you will be able to completely plaster the ceiling and walls if you lack the skill, but you can still try to repair individual areas.
For plastering, solutions are used consisting of binders (cement, gypsum, lime, clay), fillers (sand, slag) and water, which are mixed in certain proportions.
Usually internal stone walls
plastered with lime mortar containing 2 parts sand to 1 part lime.
Walls in bathrooms
plastered with a waterproof lime-cement mortar that is easy to work with and adheres well to the surface: 1 part of cement is mixed with 2 parts of sand, diluted with lime milk and stirred until a plastic mass is obtained. The solution is good for one hour.
Wooden interior walls
plastered with lime-gypsum mortar (1 part gypsum to 3 parts lime mortar). Pour a little water into the bowl, add gypsum in small portions and quickly mix everything until a liquid dough forms. Then, within 2 minutes, a lime solution prepared in the same way is added to the resulting gypsum solution while stirring. This solution should be prepared in small portions, as it sets quickly.
Loose, swollen plaster
you need to knock the wall off the foundation with a hammer. By lightly tapping with a hammer, check the strength of adhesion of the plaster to the base around the damage site. A dull sound means that the plaster is not held firmly, so this plaster also needs to be beaten with a hammer. Then you should prepare and moisten the surface for new plaster, remove paint and wallpaper around the areas to be repaired, make a suitable solution and re-plaster, carefully rubbing the new plaster onto the old one.
Walls and ceiling
clean from remaining mortar, sand, and dirt with a spatula and then with a wire brush. A thick layer of paint from repeated painting with adhesives is cleaned with a spatula or scraper. If the paint holds firmly, the surface is repeatedly moistened with hot water using a brush. When the paint gets wet, it is cleaned off.
After cleaning, the surface should be rubbed: moisten the plaster with water, apply thin (1-3 millimeters) layers of a solution of the same composition as the plaster in separate strokes. After this, the wall is wetted again and the solution is rubbed over the surface with a grater without leaving any gaps.
Grinding on lime and lime-gypsum plasters is carried out with lime mortars, and on cement-lime and cement plasters - with cement-lime mortar.
If there are rust stains
, it is best to knock it off and plaster these areas again, making sure that the old and new plaster form one plane. Plastering begins with applying a more liquid solution about 5 millimeters thick to the area to be repaired that has been moistened with water, which is designed to ensure good adhesion of the plaster to the base. After applying the first layer, a mesh is drawn crosswise on it with a trowel and a nail to improve the adhesion of the next layer. After the first layer has set, soil from a thick solution is successively applied to it in layers of 10 millimeters thick and leveled until a flat surface is obtained. After setting, apply the last layer of creamy solution, filtered through a clean sieve (covering) 2-4 millimeters thick and carefully level it. The repaired area is rubbed with a wooden float covered with felt or a rag pad, wetting the plaster with water if it has dried out. The new plaster must be carefully rubbed onto the old one to create a uniform, even plane.
For better adhesion of the solution
When plastering brick or concrete, the surface should be cleaned with a wire brush to remove dirt and notches should be made on a smooth surface.
When plastering a wooden surface
it should first be covered with a layer of glassine for waterproofing, and then a metal reinforcing mesh with cells from 10*10 to 40*40 millimeters should be hung. The mesh is stretched and secured with nails 80-100 millimeters long, placing them in a checkerboard pattern and bending a part of the nail 10-15 millimeters long onto the mesh.
Reinforcement mesh
It is also necessary when plastering joints of dissimilar materials - wood and stone, brick and concrete. The joints are reinforced with a mesh in the form of a strip 15-20 centimeters wide.
Cracks in the walls and ceiling
deepen it a little with a spatula, clean it of dust, pieces of plaster and sand, then moisten the cleaned crack or depression with water using a brush and apply the solution with spatulas, after which the plaster is smoothed, rubbing it with a grater in a circular motion.
Crack sealing solution
in plaster on internal stone (brick) walls they are prepared from lime and sand in the ratio of 1 part lime paste (slaked lime soaked in water until creamy) and 1 to 4 parts sand. The lime dough is placed in a box, covered with a small amount of sand and mixed. Sand and water are added several times in small portions until the solution of desired thickness is obtained. It is easy to determine the thickness: you need to dip a wooden stick into the solution - a normal solution will stick to it in a small amount, and a too thick one will stick to it more strongly. The quality of other mortars is checked in the same way.
Gypsum mortar
It is good to seal small cracks and damage to the plaster in the walls. Gypsum solution is prepared by mixing gypsum with water (2 parts gypsum to 1 part water). You can add a small amount of sand to the solution to obtain a texture similar to the texture of the wall. Gypsum powder is poured into a vessel with water and mixed thoroughly. The set solution is unsuitable for use, so it must be prepared in such a quantity that it can be used within 5 minutes.
from hardening quickly
, add a little wood glue to it. The solution will not harden longer when covering cracks and crevices if the gypsum is diluted in water with an equal amount of vinegar added to it. For the same purpose, gypsum can be diluted in water to which PVA glue is added, or diluted in PVA glue without water.
To prevent the gypsum solution from sticking
line the walls of the dish in which it is kneaded with plastic wrap.
Cracks in the ceiling
, on the walls can be sealed with a mixture of liquid wood glue and chalk powder or tooth powder. The mixture should be thick, like putty.
Cracks can also be repaired with the following composition: 1 part by weight of gypsum is mixed with 2 parts of ground chalk and 2 parts of diluted wood glue (dilute 50 grams of glue in a liter of water).
Closing the gap before whitewashing
in plaster, the solution can be placed in a plastic bag, in which one of the corners is cut off. When you squeeze it with your hand, the solution is slowly squeezed out through the hole in the bag and fills the gap well.
After the repaired plaster has dried, it can be painted. Before painting
wash off the old layer of paint. The ceiling and walls can be cleaned of water-based paint by sticking old newspapers on it. When the glue dries, tear off the newspapers along with the paint layer.
If the ceiling is flooded by the neighbors above
, the stains that appear must be washed 2-3 times with a solution of copper sulfate, prepared as follows. Pour 3 buckets of water into a wooden bowl or old tank and add a bucket of sifted chalk. Separately dilute 1 kilogram of copper sulfate in hot, almost boiling water so that the crystals are completely dissolved. In addition, separately dilute 300 grams of wood glue and 400 grams of laundry soap in hot water. After mixing the soap with glue and adding a little drying oil, pour in the vitriol solution mixture (you cannot pour just soap solution into the vitriol - the mixture will curdle). Pour the resulting mixture into a tank with water and chalk and mix thoroughly.
After washing the stains on the ceiling with copper sulfate, let the ceiling dry thoroughly (at least 24 hours). After this, you can whitewash, paint or wallpaper.
Repair secrets
The article is based on material from the book “Household Secrets. Universal reference book", authors B.V. Berkov, G.I. Berkova, PUBLISHING HOUSE “Ural LTD”, MOSCOW 1972.
The beauty and neatness of any interior depends on many aspects, and walls play a big role in the design of the room. It is known that over time their appearance can suffer under the influence of various factors. In this article we will look at what to do if the plaster has come off the walls, as well as the reasons for this phenomenon.
All possible damage to plaster can be divided into 2 types: technological and operational. Below we will take a closer look at each of the categories.
Technological disadvantages
They can occur as a result of a violation of the technology for preparing the solution, as well as as a result of improper application of the coating to the wall. These defects include the following:
- Bloating. One of the reasons that your plaster is falling off is the incorrect composition of the solution. If you use uncured lime, which contains unslaked particles, to prepare the mixture, it can cause small swollen tubercles to form on the walls. Over time, these voids lead to deterioration of the coating. In order to get rid of this problem, the area where bubbles form must be cleared of the plaster and a higher quality mixture must be reapplied.
- Cracks. This phenomenon occurs when you use insufficiently mixed or greasy solutions. Fatty formulations are those that include a lot of astringents. The appearance of cracks is also promoted by drying the wall surface too quickly. To avoid the occurrence of such defects, you need to carefully monitor the ratio of all components in the prepared plaster, and in addition, mix the mass very thoroughly before using it. If you are treating walls in hot weather, you should prevent them from drying out too quickly. To do this, the surface must be moistened periodically. If cracks do appear, they can be eliminated by rubbing the wall with mortar or plaster paste. Very large gaps must be widened, cleaned, wetted and sealed with plaster.
- It happens that the plaster comes away from the wall as a result of peeling. This problem can occur for two reasons: if the mortar is applied to a wall that is too dry or to another mortar that is less durable. To get rid of such a defect, the area with the peeling coating must be cleaned, thoroughly wetted and re-coated with the composition. Remember that before starting such work, you must carefully inspect the entire wall and determine in what other places the coating is peeling off. When preparing the mass and applying it to the wall, it is important to remember that the strength of the composition should change in decreasing order. That is, the first layer of solution should be stronger than the subsequent ones.
- Swelling. Unlike peeling, this problem occurs due to the application of plaster to an overly wet surface. To eliminate this defect, the affected area will have to be cleaned, the wall dried and re-coated with mortar.
Operational defects
Another reason why plaster falls off is damage caused by aging of the coating. Such defects include the same cracks and peeling, only they do not appear immediately, but after a long time. To prevent the appearance of defects or eliminate them in time, you need to regularly inspect the coating and make repairs if necessary.
What causes plaster to crumble?
Why does the plaster coating fall off the walls? First of all, let's look at the types of this phenomenon. The coating may snap off the walls if there is no adhesion between the thickness of the coating and the base. In this case, the solution can have the appropriate strength.
Another option is a crumbling plaster cover that is easily destroyed when pressed or abraded. The causes of these two conditions are different.
The first option occurs if the preparatory work was not fully completed before plastering.
- stains from grease and other oils are not degreased (or not degreased enough);
- soot has not been removed from the room;
- dust has not been removed;
- the surface has not been removed;
- plaster is laid on old paint;
- the wall was not primed;
- spraying was not carried out (sufficient adhesion to the surface was not ensured);
- the hardened mortar is stronger than the base material (the internal stresses arising during hardening are higher than the wall surface can withstand).
That is, the plasterers did not take measures to ensure adhesion (adhesive strength) of the applied mortar to the wall material.
In addition, the reason may be the wrong choice of composition for plastering or an unsuitable primer (you can read about which primers to use in the article on our website):
- Gypsum mixtures are used in rooms with high dampness.
- In a building still undergoing shrinkage, the walls were plastered with mineral compounds that are sensitive to vibrations and movements (it would be correct to use elastic materials with a polymer base).
- Application of concrete contact. Concrete contact is intended for one case: when a gypsum mass (light) is applied to concrete. The primer forms a waterproof, rough film that prevents the gypsum from getting wet where it meets the concrete, and also prevents the gypsum dough from sliding down the wall. However, the adhesion of the film itself is low, so sometimes it cannot withstand the weight of heavy coatings and the plaster comes off along the film.
The reason why the plaster shell crumbles can also be structural violations:
- the gypsum mass was applied to a concrete base or cement surface without installing a separation barrier between them;
- waterproofing was not done, and the gypsum cladding, getting wet at the border of the junction with the wall, is destroyed;
- the dew point falls at the junction of the finish and the wall;
- the thick-layer mortar garment was not reinforced with mesh.
The second option - easily crumbling dried plaster is obtained as a result:
- sanding the solution (small amount of binder);
- violations of application technology (the solution was not protected from dehydration, as a result of which the dough, having lost the water necessary for chemical reactions, did not gain strength);
- violation of hardening conditions (short-term freezing, insufficient humidity for hardening of the cement mass, etc.).
The reason that the plaster has begun to crumble may be the increased load on the walls or the old age of the finish itself.
Causes of cracks
There are a number of defects that appear if the proportions of the components of the composition or the application technology are violated. These include:
- peeling of new plaster from the wall;
- the appearance of tubercles on the surface, as well as swelling;
- the appearance of cracks throughout the depth of the solution;
- the occurrence of sedimentary cracks;
- white salt deposits, stripes and spots form on the wall after the plaster layer has completely dried.
Why do these disadvantages appear? Bulges and swelling can occur if the limestone composition has not been sufficiently cured or if there are unslaked particles in it.
To do this, you should hold the plaster until the lime is extinguished. The defects are exposed, moistened with plenty of water and filled with plaster mortar. You just need to wipe the surface.
Sedimentary cracks occur when the binder is contained in large quantities and when mixing is poor.
If you do not deviate from the standard proportions of the composition and dosage indicated on the packaging, the problem will solve itself. You just have to thoroughly stir the plaster and make the surface smooth.
If the wall swells at the site of the crack
The plaster may also peel off.
This occurs because the solution was applied to an overly dry surface. Or this solution was applied to another solution having lower strength. To correct the situation, you should clean off the peeling plaster, wet the wall and apply plaster on it again. Do not forget that before work you should carefully examine the wall and understand where else the material may peel off. When creating a solution and spreading it on the wall, do not forget that the strength of the solution should vary in decreasing order. That is, the first layer of plaster should be stronger than the rest.
Swelling also occurs due to plaster covering an excessively damp wall. To correct the situation, you should clean off the material, dry the surface and apply the solution again.
Tips and tricks
You need to follow these tips and recommendations when puttingtying walls:
- Before applying the putty, you should wet the wall with plain water. This can be done with a spray bottle.
- The temperature in the apartment should be less than +24°C, but more than +5°C.
- It is impossible for direct rays of the sun to fall on the wall and for there to be a draft.
- A solution with a layer of more than 2 cm must be secured using beacons.
- Before applying the next layer, you should carefully inspect the previous layer to ensure there are no cracks on the wall.
- Gypsum-based plaster is applied in a layer less than 1.5 cm, and cement-based plaster is applied in a layer less than 2 cm.
- We must not forget that on surfaces made of brick, concrete, stone, plaster is applied in a layer of less than 0.5 cm, and on wood - less than 0.9 cm.
- You need to read the instructions written on the bag of dry plaster.
- The components should be mixed in a certain order.
- The walls are reinforced.
To prevent cracks from appearing on the walls later, you must strictly follow the technology for applying plaster. Avoid drafts and direct sunlight into the room.
If cracks do appear, they need to be cleaned and the walls puttyed again.
Why do walls crack after plastering?
If you cover a wall with a plaster composition without following the technology, it will definitely crack:
- Aerated concrete is vapor permeable, which is why the plaster applied to aerated concrete must also be vapor permeable. It is even better if it has stronger vapor permeability than aerated concrete, otherwise steam will accumulate in the coating and it will crack.
- You also need to remember that finishing must be done in one day. Otherwise, the next day the air temperature and humidity will be different, they will change the conditions for the mixture to solidify, and the wall will crack.
- If moisture gets on and under the plaster during work, it may crack.
How to fix a locally fallen piece of plaster
This wonderful facing material has many positive qualities, among which one of the most important is the possibility of local repair of a section of a plastered wall or ceiling, without even having to completely change the material. If a piece suddenly falls off in some part of the wall, no matter what size or how much plaster it takes with it to the floor, you can easily repair the “hole” using the simplest technology. First, you will need to use a spatula to select a square area that will need to be replaced. If the piece of plaster that has fallen off is not square, then it is worth allocating a square space to the size of the fallen piece - this will make it easier to replace the loss.
Using a spatula, you should remove all the plaster in the square, clean off any residue, and apply a primer. It is always worth remembering that the primer should not be neglected under any circumstances, since it is the connecting link between the wall and the plaster, and the primer will help to lay the plaster layer evenly.
After the primer has dried, it is time to apply the plaster. Do not use too much material, as in this case the replacement will be visible immediately.
As a result, it is very easy to replace a piece of plaster that has fallen off and for this you do not need to change the entire facing material - convenient, practical, simple. If there are damaged areas on the plaster layer in the house, then you can try this simplest and most effective method.
Source