Decorative wall painting
Is it possible to do decorative painting of walls with your own hands? Of course, this is a completely affordable way to update and decorate the interior. Almost any paint and varnish materials intended for interior decoration are suitable for this task.
There are also many ways, and new ones appear almost every day. And tools for decoration can be purchased at a construction supermarket or made from improvised materials.
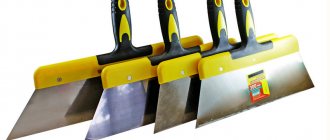
Paint roller
Wall decor is most often done using this particular tool. The effect obtained when painting depends on which nozzle is used in the work. The decorating nozzle is made from different materials:
- sponge, foam rubber,
- faux or natural fur,
- rubber based materials,
- plastic, cellophane
- different types of fabrics.
Standard option
A roller is a very simple tool consisting of a handle, a cylinder that can be changed into different “coats,” and a holder made of metal. Often, for convenience, the paint roller is additionally equipped with a telescopic handle; This device makes it possible to paint ceilings and upper sections of walls without climbing a stepladder.
Zoning by shades
The easiest way to decorate is to create a series of plain surfaces. Zoning (dividing the surface when painting into areas of different colors) is done using masking tape, which allows you to make the boundaries between zones perfectly even.
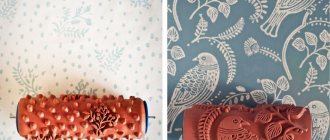
Creating patterns using a roller
To apply a pattern to the walls or ceiling, paint the walls with a roller with a pattern. A special nozzle leaves a colored imprint on the surface. To apply the ornament efficiently, you need at least a little experience. It is quite possible to master this skill in a short time, which will allow you to combine different types of paint, combine nozzles of various configurations in your work and carry out quite complex design solutions.
How to apply a design with a patterned roller. Video
"Author" tool
Rollers for decorative painting of walls can be equipped with textured devices of our own production. Options:
- wrap the cylinder tightly with a thick textured rope;
- tie together several long pieces of fabric of different densities and tie the resulting blank around a roller cylinder so that the knots “look” outward;
- an unusual shaped print can be created by simply sewing pieces of sponge or foam rubber, hard and soft fur, braid, as well as fragments of other materials, the use of which seems interesting, to an ordinary “fur coat”.
Important: this entire “constructor” must be attached in such a way that its parts do not create splashes, that is, it is undesirable to have elements that are too long or voluminous. The surface of the roller, despite its texture, must be more or less uniform so that no streaks or gaps form on the wall to be painted.
Such bold experiments often lead to wonderful results, but before painting the main wall, it is better to test the resulting tool on a piece of cardboard or plywood to ensure the quality of the print.
The history of the appearance of the textured roller
If earlier the combination of two colors was created using a crumpled rag or a plastic bag, today it is popular to apply different images using a roller.
Today they are again gaining great popularity as a universal decorative tool. The history of the patterned roller began more than 200 years ago; it was at this time that it was almost impossible for ordinary people to buy wallpaper in Europe. Because of this, many have been looking for budget-friendly ways to decorate their homes.
It was at that time that the designs of the first patterned rollers appeared.
Due to the fact that they were cut out of wood and did not absorb paint well, it was not very convenient to work with them.
Despite the fact that tools for creating patterns on walls are on the open market today, many people create pattern rollers with their own hands, coming up with a unique design. The standard design is simple - two cylinders on the handle, the first one has a three-dimensional pattern, and the second one is used for applying paint. More advanced tools have reservoirs into which the recommended amount of paint is pre-filled, which is then applied to the drawing.
Today, with its help you can not only transform the interior, but also update furniture and even textiles. Let's take a closer look at how to use this tool to change the color of the walls yourself.
Painting process
To decorate the walls with a figured coating, you will have to use at least two shades of decorative paint: the base one and the one with which the ornament itself is applied directly.
You can paint the base in a darker tone and put a light-colored pattern on top, or vice versa. The main thing is to maintain relative contrast so that the shades do not merge. Staining is carried out as follows:
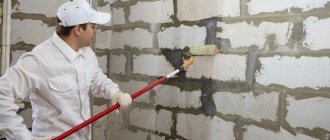
- The surface is carefully prepared, that is, cleaned and leveled, if necessary (in any case, it must be perfectly clean and level). To solve the last problem, use regular and finishing putties, as well as sandpaper.
- The walls are treated with a primer to create strong adhesion (adhesion of the painting material to the surface), as well as for the purpose of more economical consumption of the decorative coating.
- A base coat of paint is applied to a completely dry base. At the beginning of this stage, you will have to work with a brush to paint joints, corners and other hard-to-reach places, and go around sockets and switches. The remaining area is treated with a roller, moving from top to bottom, and alternating vertical and horizontal movements to thoroughly paint the entire surface.
- When the first layer is completely dry, they begin the most interesting part - working with a curly nozzle. A steady hand is important here, because you need to act carefully and accurately. Having practiced beforehand, you can be sure of success. The roller is rolled from top to bottom, carefully combining each new strip with the previous one (there should be no overlaps).
Sometimes the resulting dried surface is also treated with a transparent varnish to give the coating strength and extend its service life.
Working with a patterned roller on texture paint. Video
Surface preparation
Painting walls is a type of finishing work that anyone can master, the main thing is to properly prepare the surface. If you neglect the pre-treatment of the walls, then you can’t count on the quality and durability of the finish.
Work order:
- Clean the surface from old coating, for example, wallpaper.
- Smooth out any uneven surfaces on the plaster or concrete base using a sander.
- Prime the wall and seal cracks, sinkholes, and chips with a plaster mixture.
- Level the base with finishing putty and sand.
- Dust the surface with a vacuum cleaner or grass brush.
- Re-treat the base with primer to increase adhesion to the decorative coating and reduce its consumption.
When the wall is completely dry, you can start decorating.
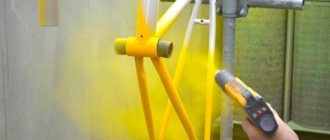
We recommend: How to paint with a spray gun
Alternative methods of decorative painting
In addition to working with a paint roller, there are other methods for creating beautiful patterns on the surface. For this, various devices and decorative compositions are used.
Stencils
In stores specializing in the sale of finishing materials, you can always purchase stencils, with which it is very easy to apply a pattern of any complexity to the walls. To implement your own ideas, you can make this device yourself. You will need suitable material, for example:
- sheet of thin plastic,
- dense polyethylene film,
- rubber based material.
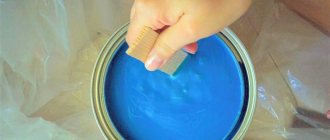
Decorative paint for walls in an apartment: uniform coloring
Wall paint has a very liquid consistency, so the presence of lumps, sagging and grooves during the processing process is excluded. Be sure to paint the walls in several layers, unless a special sprayer is used for processing, thanks to which you immediately get a uniform layer without gaps. In the case of hand painting, only a brush and roller are used.
When painting, it is important to pay attention to the prepared surface - it must be completely dry after treatment with primer and putty. Otherwise, the coloring material will lie unevenly with obvious defects.
Each applied decorative layer must dry thoroughly before applying the next one. It is imperative to carry out the final painting in the direction of the light rays incident on the surface - this will visually improve the coated layer and give it uniformity.
Unusual coloring compositions
The building materials market offers the modern consumer a wide selection of paints and varnishes:
- fluorescent paints that glow in ultraviolet light,
- luminescent compounds that absorb and accumulate daylight in order to release it at night,
- coatings with the effect of velvet, mother-of-pearl, brocade and marble,
- paints with fillers in the form of small pebbles or natural shell chips, multi-colored glitter and flakes.
A surface painted with one of these materials looks very stylish and unusual. These coatings can last up to 10 years.
Decorative painting of walls can be done using very unusual methods. For example, use the following materials as a tool for drawing:
- a piece of foam rubber or sponge,
- crumpled piece of fabric
- crumpled sheet of paper.
These simple devices are simply dipped into the coloring composition, the excess is removed and an arbitrary pattern is “printed” on the surface on top of a previously applied and dried base tone. The resulting pattern creates a textured effect for the coating, an imitation of marble or natural porous stone, walls made of coral, and in general gives a result that is not only no worse, but sometimes even more interesting than rollers for decorative painting of walls.
One of the solutions for creating an original interior is also decorative paint for walls, of which there are many types, and its combination with unusual application methods is a fascinating and generally not financially burdensome creative process, but it will require time and imagination.
Source
What types of textured paint are there for wall decoration?
To decorate walls, a wide variety of textures are used, which differ in composition, types of textures and color.
Types of textured paint for interior decoration
The main criterion for choosing textured paint is its base; therefore, finishing materials for interior work are classified into the following varieties.
| Type of texture | Description |
| Vinyl | Has excellent protection against external factors. |
| Acrylic | Water-based, has good plasticity, but is not resistant to ultraviolet radiation. |
| Silicate | The composition includes liquid glass, which protects against external influences. One of the disadvantages is the high consumption of material. |
| Silicone | It has excellent ductility and resistance to mechanical stress. |
| Mineral | It contains cement and has excellent vapor permeability and moisture resistance. For use in exterior finishing it is necessary to include additional additives. |
Before choosing a texture, you should study its properties
Characteristics of textured paint for exterior use
- waterproof;
- resistance to temperature changes.
Since the layer of texture is thicker, it will take longer to dry, so it is necessary to choose textures that contain special additives that speed up these processes.
Paint roller: how to choose a tool to implement a design idea
It is impossible to imagine a renovation without a paint roller when it comes to painting walls. Thanks to the variety of products in the store, choosing such a tool is easier. Meeting the needs of the buyer, a roller for applying an even layer of paint or creating a ribbed surface is considered an indispensable assistant.
How to choose by size
The main part of the device is a cylinder of different types:
- mini - having a diameter of 3–9 cm and a length of up to 15 cm. A tool with such a cylinder is used for painting surfaces with a small area;
- midi - practical medium-sized rollers. The diameter of the cylinder is 9 cm and the length is up to 20 cm. This is a type for finishing the interior surface of a house;
- maxi - used for exterior decoration of the house. The diameter of such a cylinder is 8 cm, length - 30 cm.
The size of the tool is selected in accordance with the area of the surface to be painted. For small jobs they use mini, and for large ones – midi and maxi.
Sometimes it seems that using large rollers to decorate the walls of rooms is better because they are large. But, during interior work, the base becomes heavy due to absorption, and the paint splashes or leaks. Another thing is painting the facade of a house: in the fresh air the coating dries faster, so speed plays a decisive role. For such work, tools with a maxi-size cylinder are used.
Application of a relief roller
This tool is one of the most popular when finishing with textured plaster. The base of its cylinder can be metal, rubber or plastic, the covering is made of fabric or foam rubber.
There are also relief rollers made of leather. From this we can conclude that purchasing the necessary tool is not a problem, the main thing is to find an acceptable texture, for example, wood, stone or marble.
When choosing a roller surface, you must understand what final result you want to see:
- The pile will allow you to achieve a “fur coat” effect. Keep in mind, the longer it is, the more prominent the surface will be. When processing brick and concrete surfaces, choose a tool with a pile thickness of 18 mm.
- Plastic holes allow you to make small indentations on the work surface.
- To obtain a longitudinal texture, use a tool with a convex top layer. If the image is too rough, touch up the sharp corners with a brush.
- Do you need to make the surface look like stone? Buy a roller with “ears”.
How to decorate a wall with a roller
Prepare materials and tools for work:
- deep penetration primer based on resins;
- putty, for example, “Blik”, “Rotband”, etc.;
- building level;
- a rough sponge;
- roller for creating relief;
- foam roller;
- brushes for painting surfaces;
- metal smoother or with a sanding mesh.
Applying decorative plaster with a tool must follow certain rules, which the instructions will show below:
- from the previous material and prime them thoroughly.
- Place the first layer on the surface and plaster the wall to a smooth surface, and if you decide to combine layers, then paint it in the desired color.
- Apply a decorative second coat. Select the required density of the solution and color it. Take your time, first practice on a section of the wall how you will do it.
Tip: to achieve the necessary separating effect between layers, use masking tape, which can be used to make clear boundaries, and for arbitrary ones, use a self-adhesive sealant used for windows.
- Take decorative plaster rollers and start quickly creating a design, because the material dries very quickly.
Advice: do not press too hard on the plaster with the tool, otherwise you will simply ruin the textured pattern. Move it very lightly, as if sliding along the surface.
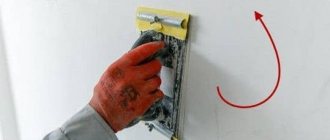
- After 15-20 minutes, moisten the smoothing pad with sanding mesh with water and smooth the raised protrusions with light movements.
- After two days, clean the small particles remaining after work from the surface of the wall and paint the layer with a brush or sponge in the desired shade.
We make the roller ourselves
More reminiscent of a creative than a finishing process. Therefore, in this situation, it is more advisable for each drawing to be as original as possible, for which it is best to make a roller with your own hands rather than use a standard one.
For example:
- wrap a regular magazine tool with a thin cord or overlapping clothesline in any order. It is unlikely that anyone will be able to repeat the same pattern at home, and the price of the product is minimal;
- take a standard vegetable net or plastic bag. Wrap one of them around the rigid roller cylinder and secure with tape, leaving natural folds. Thanks to this, not a single identical pattern fragment will appear on the decorative plaster;
- buy a foam roller and cut out everything you can on it. Although this process is labor-intensive, the final result is impressive.
Roller for structural plaster - make the interior original
And most importantly, having your own roller and finishing surfaces with it will add to your sense of self-satisfaction.
How to determine the length of the pile
The quality of the work performed depends on the correctly chosen length of the fur coat pile. Depending on the structure of the surface to be painted, rollers with different pile lengths are used.
- Up to 5 mm. — for painting smooth surfaces (mainly varnishing).
- 5–10 mm. - for painting ceilings and putty walls.
- 5–20 mm. Mainly used for painting concrete surfaces, unsanded wood or rough plaster.
- 20–30 mm. Coats with a long pile length are used to paint brick, concrete surfaces, walls with relief plaster, strong porosity and roughness.
Components of the roller
The tool has two components: the machine and the main working surface of the cylinder - the coat. The machine consists of a handle and a yoke.
Varieties of handle
The handle has a shape that is convenient for use; it can be made of wood or plastic. There are no specific standards for handles. When choosing a tool, you need to take into account the combination of size and weight: the handle should be comfortably grasped by the hand, and the fur coat should not outweigh the handle, otherwise it will be difficult to work.
Attaching the nozzle
The cylinder has three types of fastening.
- Rigid mount. Such a tool cannot be disassembled; after the coat wears out, the roller becomes unusable.
- The presence of a coupling. If necessary, the fur coat is replaced with a new one.
- Frame system. This type involves repeated use of the tool without a core.
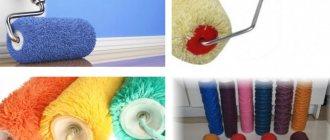
Types of materials
A variety of materials makes it possible to choose the appropriate tool for a specific type of work. There are many types of fur coats:
- foam;
- fur;
- velor
- thread;
- polyamide;
- polyacrylic;
- polyester.
Each type has certain properties and, accordingly, a price.
A fur coat paints evenly, does not leave bubbles, it absorbs a small amount of paint, which is why there is almost no splashing. The only negative is that fibers may separate and remain on the surface to be painted.
If there are a lot of cracks that need to be filled with paint, it is advisable to choose a tool with longer bristles. A roller with a velor coat has the same qualities as a fur coat, but does not leave lint. The painted surface remains perfectly smooth.
Polyamide material is easy to clean after use. Thanks to its resistance to aggressive environments, the fur coat does not deteriorate, easily absorbs and releases any type of paint (even those containing water or synthetic solvents). Polyacrylic is considered a lower quality analogue of polyamide, but paints just as well. However, if different types of paint are applied with a polyamide coat, then only water-based ones are recommended for a polyacrylic coat.
The simplest painting tool that can be found in hardware stores is a foam rubber one. It copes well with smooth surfaces, but it is difficult to paint over uneven surfaces. It has a low cost, so if it is purchased only for one time, the option is quite suitable.
Wall roller - choice and technique of working with the tool
At the beginning of the process of painting walls, you need to choose the right paint, and then the roller itself. For painting interior spaces, water-based and acrylic paints are often used. They are harmless to health, have no toxic odors, are diluted with water and dry quickly. In addition, such paints are suitable for different substrates - wood, stone, concrete, brick.
Water-based wall paint provides the surfaces being treated with vapor permeability and a breathable effect; the microclimate of the room becomes favorable. The quality of the coating remains bright and rich during operation. Read on to learn how to paint with a roller and how to choose the right one.
Which roller is better to choose?
Rollers are great for working with water-based and acrylic paints. They are often used for interior painting. Rollers come in different coverings and sizes. Knowing all their features, you can decide which roller is best to paint the walls with.
The most popular rollers are foam rubber. This material wears out quickly, but is inexpensive. It is better to take fur or velor rollers for oil compositions or enamels. These polyamide and thread tools have proven themselves to be quite good. For deep relief and creating the necessary texture on the surface, it is better to choose a roller with long pile.
The rollers are durable, easy to clean and after use they can be stored until the next repair. By size they are divided into large, medium and small. Professionals work first, medium ones are convenient for painting walls at home, small ones are used for painting around baseboards, jambs, and windows.
Recommendations before painting walls
Considering the tips below will improve your technique of working with a roller, which will affect the quality of the repair:
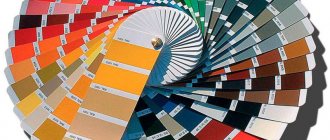
- The estimated area for cladding must be measured in order to know the required amount of material. A large assortment of water-based and acrylic paints in the retail chain will help you decide on a color. Their consumption is always indicated on the jar label, and the drying time is also indicated there.
- After painting, it is worth purchasing a primer, putty (deep penetration, starting, finishing), sandpaper, masking tape, and plastic film.
- You will also need additional tools - a bucket, brush, gloves.
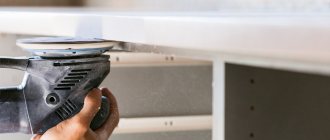
- The surface that is going to be painted must be carefully prepared. Old layers of paint and wallpaper are removed with a scraper. After the surface is degreased, cracks and chips are sealed with putty.
- Using an emery block, rough edges are removed (sanding walls), and any dust that appears is removed with a damp cloth.
- To ensure strong adhesion of the paint to the base, the entire prepared surface is treated with several layers of acrylic primer. As a result, the painting will be smooth and durable.
- Each subsequent layer of primer is applied only after the previous one has completely dried.
- The paint is diluted according to the instructions on the can. The emulsion is poured into a tray and you can begin painting after putting on glasses.
We recommend: Painting with a spray gun - what are the rules for cladding walls and ceilings?
Such recommendations will be useful to those who want to know how to properly paint walls with a roller.
Roller technology
To get a perfectly smooth and neatly painted surface, you need the correct technique for working with a roller. It has characteristic features:
- Painting boundaries are marked with masking tape. It must be at the same level, which is checked with a spirit or laser level. When gluing the tape, it is advisable to press it for a tight fit to avoid water-based paint getting under it. The height, shape, size and location of the tape can be any - vertical, horizontal, high or low. It depends on the intended interior and the taste of the owner. The tape is removed when the coating is completely dry.
- The roller should not be completely immersed in the paint; the axis of the tool must remain dry. Several twisting movements are made on the ribbed wall of the pallet to evenly distribute the paint throughout the masking tape, which can be removed, washed and stored upon completion of the repair.
- The movements of the roller should resemble the letter W, that is, up and down, if horizontally, then from left to right, with a brush in some narrow places crosswise. Vertical movements in one direction leave marks. Knowing how to paint walls with a roller without streaks, you can get the perfect result.
- The sequence of work is to paint the ceiling first, then the walls. Usually start from a corner or doorway. A small roller is used here
- You shouldn’t apply a lot of paint in one stroke; smudges and drops should be rolled out. Often one layer of water-based paint is not enough. They are applied at least two, and each subsequent one when the previous one is completely dry.
- If the strokes are uneven, the roller is renewed.
- If it is not possible to remove the furniture, it is moved to the middle of the room, covered with covers or film, which is secured with masking tape. The same is done with doors and windows. Water-based paint drips from such surfaces are difficult to remove.
- For high-quality painting near electrical wiring, the power must be turned off, and the sockets must be protected with the same tape.
- After completing the painting of the walls, all switches and sockets that were dismantled at the beginning of the work are installed in their places, the floor is cleaned, and covers are removed from the furniture.
A separate option for painting: textured rollers
When you want to create an unusual texture on the wall surface, use textured rollers. For the granulating effect, you will need a fur roller and a special textured paint that lies unevenly on the surface. The drawing is applied using a special textured roller - stencil.
Which one is better to choose?
The working tool must be selected in accordance with the expected result. Some types of textured rollers are convenient for creating beautiful patterns, while others are useful for completely painting a wall with a ribbed effect. The aggressiveness of the paint used is also taken into account when choosing a coat of suitable material to match it.
Stencil with a pattern
An interesting option for painting the surface of a room is stencil rollers.
Such fur coats are a cylinder on which a pattern protrudes. Stencil sizes range from small (for painting small areas) to large (they are used to apply a pattern to the entire surface of the wall). The lines connect smoothly, so you can easily paint the entire wall without noticeable joints.
Use does not require skill or much effort. The main thing is to adhere to some rules:
- roll along the wall without pressing too hard, the pace is unhurried;
- New paint is applied when the old one is completely finished.
Wide with pattern
The main advantage of wide stencil rollers is the quick painting of an area. The roller with the stencil is easy to match with the pattern applied earlier, which visually creates the feeling of a complete pattern.
Applying structural paint to a wall
Surface preparation
Like any other type of finishing coat, applying textured plaster requires preparation of the base. True, there is no need to level the walls to perfection, as we have already discussed above.
However, if the walls are too crooked, then plastering is indispensable. You can find out how this is done on our construction portal.
After the plaster layer has dried, the base must be coated with a primer. For these purposes, Betonokontakt is most often used.
Preparation of structural paint
The primer should be applied in an even layer using a roller, while avoiding drips of the solution and its accumulation on individual sections of the walls. You can start painting only after the surface has completely dried. Typically this takes about 24 hours.
Tools
Before you start applying paint to the walls, you need to prepare the following tools:
- Wide spatula.
- Paint roller. To make the surface truly structural, the paint roller must have a pattern. The structure of the roller is selected in accordance with the desired pattern on the wall.
Roller for textured paint
Applying paint
Now you can proceed directly to painting.
The instructions look like this:
- First of all, you need to get the desired color of the composition. To do this, you need to take a small part of the mass and gradually add color to it until the desired color is obtained. In this case, you should remember the proportions in order to dilute all the paint in the bucket in the same way.
- Then the composition must be mixed well. If the manufacturer allows, you can add a little sand to the paint, which will make the surface rough.
- Then a small amount of the mixture is applied to a spatula and rubbed over the surface of the walls. Thus, this process resembles conventional puttying.
- Next, you need to moisten the structural roller for painting walls with water and then roll it over the surface treated with the composition. It is more convenient to do this work together, so that one master applies the composition to the wall, and the second one then gives the surface a structure using a roller.
Of course, you can make a design on the surface not only with a roller, but also by hand or using a stencil. For example, to obtain the effect of a scratched surface, you can use graters or combs. However, using a roller is the simplest method.
Since the coating will begin to set within 20-30 minutes after application, the work must be done fairly quickly.
- To prevent color variations on one wall, you should finish the surface from corner to corner in one go.
- After 48 hours, when the coating has hardened well, it can be treated with decorative wax, varnish or acrylic enamel.
Note! You can only apply paint in one layer.
The complete drying period of the paint is from 8 to 12 days. After this, the surface can be subjected to various mechanical loads and washed with water.
In the photo - applying the structure with a roller
Note! Before you start applying paint to the walls, it is necessary to eliminate drafts in the room, and also protect the wall from exposure to direct sunlight. In addition, the temperature in the room should be between + 25 - +30 degrees Celsius.
Double structural roller
How to choose: tips
When choosing a roller in a hardware store, pay attention to some features.
- The roller must have a coat suitable for the selected type of paint. It is worth making sure that the material from which the roller coat is made is suitable and will not deteriorate after the first use.
- You need to decide on the amount of work, and then choose what size the roller should be.
- If you need to apply a drawing to the wall, you need to choose it from the variety of proposed drawing options. When painting an entire wall, rollers with different coatings are available.
Which roller to choose is up to the buyer’s discretion. A conscious choice of working tool makes it easier to create the desired effect.
Method of use
Stencil rollers are great for beginners, as working with them allows you to avoid unnecessary smudges of paint and varnish materials. As a result, the ornament will be neat and uniform, without sharp transitions of shadows and shades. Although, the decor may not look as artistic as if it were made with a brush. At the same time, it is much easier to make it.
When working with this stencil tool, you can use many available tools, which allows you to save a lot.
For example, paint can be mixed in disposable bowls or other plastic containers. In this case, you can take an ordinary household sponge that is suitable in size. To remove excess paint, you can use disposable paper napkins or towels.
How to make a roller with your own hands
It is not necessary to buy a roller for painting work, because you can always make one yourself. Firstly, you won’t have to spend money, and secondly, if it concerns a decorative roller, you can create an unusual, unique pattern on the wall.
Decorative
A decorative roller can be easily made at home using available materials.
For this purpose, there must be an old unnecessary roller at home. To create a decorative painting on a wall or ceiling, household items attached to a roller are used. For example, you will need a roller and a plastic bag; they are secured together with tape. It is important that there are as many folds as possible; they will create a unique relief pattern on the surface. Instead of a bag, they also use hair bands, a net for vegetables, scraps of fabric, etc.
An interesting option for creating a unique decorative roller at home using foil and acrylic putty. You will need thick foil (such as from under packages of dairy products) and an object that will be used to squeeze out the pattern.
Using the selected item, a favorite design is stamped on the foil: geometric shapes, stars, daisies, birds, straight lines, checkered patterns, interlacing curving stripes.
A layer of acrylic putty is applied to the back wall of the embossed foil and wrapped around the coat of the roller to give it a cylindrical shape. The main thing is to do this quickly so that the putty does not have time to harden ahead of time. At the last stage, the foil is glued to the roller.
Textured
Making a factor roller does not require much effort.
An old roller with a foam coat will be given texture by sticking ropes on it. Having wrapped the cylinder with them many times, the roller will leave behind a complex pattern. You can also use threads to highlight individual parts of the foam coat. A stationery knife is often used to make a homemade decorative roller. First, the desired pattern is applied to the foam coat with a marker, after which the unnecessary parts are cut off with a knife. The pattern can be very diverse: checkered, striped, imitation brick, etc. This is how you get a homemade decorative roller.
Using a knife and carbon paper, the same can be done with a rubber coat. The pattern is made based on the desired thickness of the pattern texture.
Universal
Making a universal roller is easy. First, take a cylinder, for example, from toilet paper, adhesive tape for removing lint from clothes, or a tin beer can. It is covered with woolen fabric or thin foam rubber, 1 cm thick, which will absorb the paint. A thick, rigid wire, bent in the shape of an “G”, will become a yoke.
Ways to create popular patterns
The simplest method is considered to be the rag option. It allows you to paint two colors and create original patterns on the walls. To create an imitation of textile upholstery, walls are painted in the background color with a semi-matte composition. While the paint is drying, prepare a patterned roller for this decor; for this, a standard roller is wrapped in crumpled cotton cloth, having previously cleaned it of any dirt and cut off all frayed threads. There should be several pieces of fabric, since they need to be changed from time to time in order to prevent the paint from completely saturating the fabric, otherwise the design will be unclear.
To obtain a thin layer, you need to dilute the paint a little with plain water. In this case, the second color is applied not to the tool, but to the surface of the wall.
To create a pattern, they pass through a device that partially removes the color, leaving a pattern. For an ideal pattern, the movements cannot be interrupted and it is advisable to constantly change the knurling directions.
To imitate brick, for example, on a lining, annular channels are made on a regular roller, dividing the entire surface into parts.
After this, transverse notches are made on each in a checkerboard pattern. As a result of such manipulations, a rectangular imprint will be obtained on the wall, which will become an imitation of bricks.
To imitate wood, a rope is wound on a regular roller, and all the turns must be in different directions. This surface will allow you to imitate wood fibers.
Tips and tricks
Splashes that remain on the walls after painting the ceiling can be painted over when treating the walls. But first you need to prepare the paint. The paint tray into which the paint is poured helps regulate the amount of paint. The roller absorbs the mixture, and the excess is squeezed out on an inclined wall, reducing paint splashing to a minimum.
Today, the roller has become an indispensable tool in repairs. Thanks to the variety of its types, you can make repairs that best meet your expectations. The tool can be easily purchased at a hardware store, and an old damaged roller can be given a “second life” using certain methods.