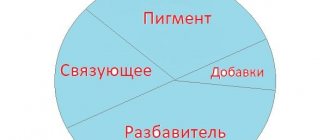
What is bas-relief in a modern interior
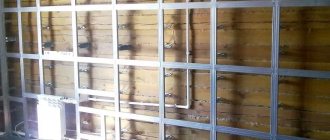
The presence of bas-relief in the interior allows it to perform decorative and utilitarian functions. For example, a relief on a wall can mask unevenness. This is also an effective solution to reliably hide elements of utility networks. In other cases, with the help of relief images, zones in residential premises are demarcated or the technique of visual distortion of space is used.
Using the bas-relief technique, three-dimensional drawings of any complexity are created - from simple convex geometric shapes to entire landscapes with detailed elaboration. The range of sizes is just as diverse.
The use of bas-reliefs gives quite a wide scope for interior decoration
Types of bas-reliefs
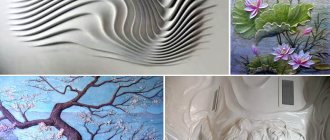
The bas-relief on the wall is made using the technique of low relief (top left in the figure) or high, with protruding figures (top right). A high bas-relief is also called high relief. Technically, high relief differs from low bas-relief in that the figures are sculpted like a round sculpture (see below). Low bas-relief looks good in any lighting, except very dim, and high relief looks better in diffused light.
Types of bas-reliefs
In living spaces, which are often lit quite brightly and evenly, it makes sense to use a mixed bas-relief technique (bottom left), without making the figures very convex. How to sculpt the bas-relief “Klimt Tree”, see for example. Master class video below:
Video: master class bas-relief “Klimt’s Tree”
The peculiarity of this work is that it uses almost all the techniques for creating bas-reliefs at home. Having become familiar with them visually, it will be easier for you to understand further and apply them in any of the techniques described below.
Reverse bas-relief, or counter-relief (bottom center in the top figure) is no longer stucco, but stone carving (the contours are cut in depth), which is technically much more complex. Therefore, we only note that the counter-relief needs bright and sharp oblique light, because the image actually draws a shadow. There is also a special type of bas-relief - shadow, lower right, where the entire pattern is formed by shadows from small and minute protrusions and depressions of a certain shape. When the direction and angle of incidence of light changes, the pattern changes, even changing facial expressions throughout the day. Shadow bas-relief is the highest art and, alas, short-lived: the protrusions and depressions become clogged and lose their shape when cleaned. The drawing fades, blurs, disappears.
Bas-relief techniques
Stucco molding on the wall at home can be done in one of the following ways, in order of increasing technical complexity:
- Plastering of free ones, i.e. models that were not initially fixed to the supporting surface and cannot be removed;
- Plastering of non-removable models on the supporting surface. These methods are especially good for beginners, because... allow you to receive the corresponding high and low relief, without risking the need to redo the whole work again in case of failure;
- Reverse casting from plaster according to the model to be removed. The method is somewhat more labor-intensive, but also suitable for beginners, because... You can pore over the model as much as you like until it is perfect. In addition, in one mold (form, mold) made according to a model, up to 20-30 identical products can be cast at home;
- Artistic plaster stucco in place, i.e. directly on the supporting surface. It requires thorough skills, but makes it possible to create large relief panels covering the entire wall, with contours around corners, going to the ceiling, and complete freedom of creative expression.
In place or on a sheet?
It is possible to make a bas-relief using methods 2-4 both locally and in parts on a table or floor. An excellent basis for fragments of prefabricated bas-relief is plasterboard sheet, plasterboard. It is prepared as a base surface (see below), parts of the overall picture or complete compositions are drawn out on separate sheets or pieces of the desired shape (see figure), and mounted on a leveled wall.
Relief panels
The fastener heads and joints of the fragments are puttied with a base compound, then plastered and rubbed to match the base texture. Another good thing about prefabricated bas-reliefs is that a piece damaged due to inexperience can be remade without touching the rest. The bad thing is that the whole composition turns out to be heavy; It is impossible to attach a prefabricated bas-relief to weak walls (plasterboard, PHB partitions, etc.). however, it is generally not recommended to load weak walls with bas-reliefs - the load-bearing base must be stronger than the material of the composition.
What can be decorated with bas-relief
Most of the works of famous masters decorate the facades of buildings or they are displayed on the pedestals of statues. At the same time, even in an ordinary apartment there are several places or surfaces for such an element. You can decorate various parts of the room with bas-relief:
- Doorways, as well as the doors themselves, fireplaces, niches, arches, end parts of furniture.
- Wall surfaces are the best place for bas-reliefs of medium or large dimensions.
- Miniature elements will be a wonderful decoration for frames for family photos, mirrors, and jewelry boxes.
As for specific figures, it all depends on imagination. It could be prancing ponies or larger horses, a tree wrapped in a snow coat, flowing streams of water from a mountain or rock, daisies, butterflies. Such compositions would be appropriate on the walls of different rooms - from the kitchen and dining room to the bedroom in the apartment.
Bas-reliefs easily and organically fit into different design styles of rooms for different purposes
How to make alabaster mixture for bas-reliefs
If you are using silicone molds, you do not need to lubricate them with anything. But if you pour gypsum into a plastic bag, then you need to thoroughly lubricate it with sunflower oil.
We make the filling mixture like this:
- 2 parts plaster
- 1 part water
Pour the powder into the water gradually, stirring constantly, avoiding the formation of lumps.
There is no need to stir too intensively, there is no point, you will only oversaturate the substance with oxygen and the finished figurine may be covered with bubbles.
Then pour it into the chosen form, flush with its edge. And you rest for about a day.
In general, plaster sets much earlier. But the longer the figurine stays in shape, the stronger it will be and the chance of damaging it when removing it will be zero.
Advantages and disadvantages of bas-relief on the wall
Bas-relief is considered a separate type of finishing work and has positive aspects. The main advantage is the ability to create an original interior in any room. Other benefits include:
- Effective play of shadows, allowing you to create a special feeling of space that can change when switching light sources.
- Masking significant differences in walls.
- A visual way of zoning rooms with smooth transitions.
- Creation of original compositions.
- The ability to independently create three-dimensional images, without the involvement of specialists.
- Effectively hides those elements that are best kept out of sight.
- Creating bas-reliefs creates a special charm and emphasizes the individuality of the owner of an apartment or country mansion.
These advantages are felt only if the technology is followed during the formation of convex ornaments. However, you should be aware of a number of disadvantages:
- For beginners, the process will seem difficult, especially when creating a complex composition with many small details. For this reason, such work is entrusted to professionals.
- High price.
- Have artistic skills at least at a basic level.
- It is extremely difficult to repair such a surface if damaged.
- Dust quickly accumulates on any bas-relief.
If you want to decorate your home with volumetric relief of different heights, you need to take into account both the existing advantages and disadvantages.
The bas-relief visually changes the room, hiding the imperfections of the wall surface
The use of decorative non-standard wall design: bas-relief and its relevance
The use of bas-relief drawing techniques in wall decoration makes the space original and gives the room an atmosphere of sophistication. Bas-relief is a stucco molding known and used in the decoration of houses since ancient times. It also has practical significance: it visually hides communications or cables, wall defects. The volumetric figure above the bed looks especially impressive.
Today, designers are again thinking about combining luxury interior design with inexpensive materials. Therefore, this option for wall decor will not only be interesting, but also a fairly economical way to renovate.
The plaster pattern goes well with both a classic style in the interior and a very creative one; it can be re-painted when changing the overall color scheme in the apartment.
Materials for creating a bas-relief
Initially, compositions were created only from stone or wood. But today the range of materials has been expanded. The bas-relief can be formed using both manual techniques and casting. Anything that can be cut, can be sculpted, and is also suitable for pouring into wooden forms can be used. These are the following materials:
- polymers;
- decorative mixtures;
- gypsum;
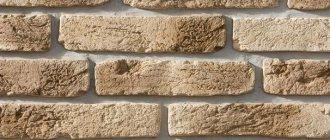
- limestone;
- clay;
- stone;
- tree.
Of all the materials, it is worth highlighting gypsum, which does not shrink, is plastic, hardens quickly and is environmentally friendly. Gypsum powder diluted with water forms a dough from which it is easy to make fine lines. A frozen bas-relief made of gypsum can be sanded and cut.
In the case of layer-by-layer formation of a relief ornament, it is necessary to treat each subsequent layer of putty with a deep penetration primer to obtain a rough and sticky coating.
Many modern finishing mixtures can be used to create stucco images
What to make a bas-relief from? Materials, tools
Let’s make a reservation right away: step-by-step technologies and a complete list of all components will be indicated below in the corresponding section.
First, we will list only the basic things you need to have:
- Alabaster;
- PVA glue;
- Finishing putty;
- Water.
This is the basis of the basics, but the auxiliary materials already depend on the type of drawings, which we will deal with here and now.
The most substantial bas-reliefs come from an alabaster mass poured into molds.
Depending on the type of the latter, you can get absolutely any configuration of a convex pattern: fruits, flowers, shells and even classic capitals.
The main thing here is just to find the right shape, and the rest is just trifles. Pouring plaster is not difficult at all.
These are approximately the same decorative elements that can be made in just an hour. This is a marine theme, and you are free to choose whatever you want.
These shells are cast using regular children's sand beads and attached to sheets of drywall. And the framing of the frame is made of ready-made foam moldings, which are usually attached to the junction of the ceiling and wall.
It seems like nothing complicated. There is plenty of plaster in hardware stores. But where can you get a good form?
Here we have to disappoint you, the choice is not that great: it is not enough to simply find a sample that is visually suitable in appearance, you also need the material to withstand the heating of the gypsum during hardening.
Yes, yes, it heats up quite strongly and expands! Therefore, molds for making soap, for example, are not suitable. They will simply burst and that’s it, since they are made of too thin plastic, not of the best quality.
You need something more substantial, like the same plastic beads, or even better – silicone for baking. It is not afraid of any metamorphosis of the material, since it is designed for both high heating and stretching.
And most importantly, it is much easier to remove the finished product from it than from something hard.
We have superficially dealt with this type of bas-relief with our own hands, and we will give you a detailed description of the process below, in the corresponding subsection. There you will also find a complete list of necessary materials and equipment for each type of painting with your own hands.
But besides casting, there are other execution options.
For example, a bas-relief made from ready-made plaster figurines! Such a picture looks extremely expensive, but its final price cannot but rejoice.
Panels with various Greek mythical characters, for example, Aphrodite or little angels, look especially beautiful.
If you take these ladies from plaster and not marble, then such a purchase will not hurt your pocket. But these are not all the options!
You can make a very cute composition using ordinary fabric flowers, the types of which are countless in souvenir shops. In addition, you can use cones and other suitable forms. It will look like this:
A bas-relief made of plaster can be made removable, like an ordinary painting, or it can be made monolithic, as one with the wall, as you already saw in the top picture with shells.
And if you know how to draw, then it will not be difficult for you to make a three-dimensional drawing directly from putty, without using any auxiliary means or forms. But for this you need to have artistic taste and the most basic modeling skills. Here's what might happen:
Or even so, but for this you need to be a master.
These are, in fact, all the methods available to almost everyone. Now let's move on to specifics and finally start doing, and not dreaming!
Required Tools
To create various types of stucco molding, you will need special tools, which can be found in many construction supermarkets or stores dedicated to creative activities.
Experts recommend mixing the solution in a hemispherical container. Half a ball works because there is no need to scrape and clean anything from the previous batch and prepare for a new batch. All you have to do is turn the ball inside out. The homemade container has no corners, making it convenient to stir and scoop out the mixture.
To form some elements of the bas-relief you will need palette knives. Outwardly, they look like spatulas of various shapes. It is easy to make grape vines with these tools. For work you will need both concave and convex palette knives.
But due to the high cost, spatulas are replaced with spoons - coffee, tea, dessert, table. Plastic cutlery is easy to use. If you heat the handle of a spoon, you can give it the desired shape. Many craftsmen have noticed that the solution follows the plastic well. An aluminum spoon is used as the main tool, and a plastic one serves as an addition.
Using an artistic knife, small texture details are created. A shoe analogue will do instead. A pastry syringe with attachments or a medical one helps to apply fine lines. You also need two brushes - flat and round, 2 pieces.
The range of tools and devices for shaping the relief is quite extensive
Methodology for self-production of a matrix for bas-relief
There is no need to take any super complex actions. The following set of materials should be prepared:
— drawing-sketch (patterns, lines, geometric shapes, etc.);
- thin sheets of durable plastic. Each stencil is used once, so you should stock up on a sufficient number of PVC sheets;
We recommend: How to choose curtains for your interior - types of curtains and tips for choosing
- stationery tape;
- graphite pencil, permanent marker.
After preparation, you should perform the manipulations in full accordance with the step-by-step instructions:
1. Selecting a ready-made ornament or drawing it yourself. You can choose interesting options on thematic websites or in special albums.
2. Preparation of material for the stencil. Here, you need to clean the sheet of plastic from packaging or dirt, if any. Additionally, it is recommended to degrease its surfaces.
Advice! The optimal blanks for flares will be sheets of PVC plastic (thickness 0.14-0.17 mm) for brochure covers. This material is flexible, very durable and transparent, and the latter property will greatly facilitate the transfer of the design from the sketch stencil!
3. Cutting out the stencil. The edges of the cuts should be smooth and clear; the formation of burrs or cuts should not be allowed - they can spoil the future stencil, which will be reflected in the final result in the form of unevenness.
4. Drawing on plastic. This can be done in several simple ways:
- using carbon paper when the planned pattern is printed on thin paper;
- outlining the contours of the pattern placed under a sheet of transparent plastic;
- neat outline of shapes cut out of thick cardboard.
Clue! To avoid displacement, it is necessary to securely fasten the sheet with the main pattern with tape to the surface of the plastic sheet!
Popular types of designs for bas-relief
Various subject compositions are relevant as panels. They can occupy the entire surface of the wall or be located in a corner. Drawings of nature are especially popular. And not only a variety of vegetation, but also representatives of the animal world.
Nature
A bas-relief in the form of a landscape suits interiors in a classical style, as well as other options - art nouveau, modern, empire, rococo. As for specific implementations, you can depict a small forest area. Another option is a marine composition. For example, create a coral reef, “release” a school of fish, “plant” some algae. Or even “give life” to the newt.
Nature
Sakura
Creating a bas-relief in the form of sakura will appeal to lovers of Japanese flavor. You can complement the image with dragons. A branch of a plant from the Rosaceae family will become a harmonious decoration on vertical kitchen surfaces or hallway walls.
Sakura
Rose
Bas-reliefs of roses on the walls are a harmonious wall decor in the bedroom. Lush tea roses suit the classic style. It is advisable to color the flowers in appropriate shades. A scattering of small roses is perfect for any room. If you choose the color wisely, the three-dimensional image will look great against the background of stone or textured brick.
Rose
Vine
The textured grapevine design symbolizes Italian sophistication. This is a good decor for decorating columns or empty niches. White vine can be placed on painted surfaces. The accent of colored wicker is clearly visible on the white walls.
Vine
Apple trees
Wood designs, regardless of size, also suit any room. However, you should treat the hallway with special care. The convex bas-relief in this room can visually reduce the space of an already small room.
Apple trees
Birds
Creating a bas-relief in the form of birds is extremely difficult, especially for beginners. All birds, without exception, have different types of feather cover. Therefore, if you need to “populate” an apartment or house with birds, you should stock up on a lot of patience and time. You will have to draw out each feather, most likely by hand. Of course, you can create the outline of a bird, but you won’t achieve the desired effect.
Birds
Flowers
The symmetry of the shapes, as well as the simplicity of the lines, allows you to create any three-dimensional images of flowers. It is not difficult to “plant” lilies, tulips or other variations. When you connect your own imagination, original plant images are born.
Flowers
Other types of drawings
The formation of drawings with volumetric texture can affect any types and themes. The final result depends on the personal skills, abilities, and practice of the master. The larger the image is created with the inclusion of small details, the more difficult and painstaking the work.
Abstraction
Animals
Marine theme
Types of bas-reliefs
Bas-relief
Before you start creating a bas-relief, you should familiarize yourself with its varieties. The image should protrude no more than half the volume above the wall surface. If the composition protrudes more than half, then it is usually called high relief.
You can create a three-dimensional pattern on the wall surface using a solid mold, or assemble it from individual elements. Other types of bas-relief include:
- Ornamental - a composition consisting of ornaments and patterns
- Subject-figurative - bas-reliefs, in the center of which there is some kind of painting
- Flattened - three-dimensional images, between the details and the plane of which it is customary to maintain a minimum distance
- Facing - compositions that are used when carrying out facing works. Most often, such bas-reliefs are created as ornamental
- Picturesque - flat figures in which you can see elements of nature
- Multifaceted - different components, shadow effects, contrasts are used during work
Volumetric composition
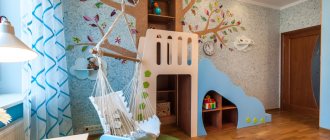
In the kitchen, voluminous compositions depicting pets, utensils, vegetables and fruits would be a suitable option. To decorate a children's bedroom, it is better to choose light and bright panels with characters from fairy tales and cartoons, which, like statues, are located in the wall.
How to make a bas-relief on the wall with your own hands
As experts note, it is better for beginning craftsmen to learn how to create bas-reliefs with their own hands using simple patterns. It is difficult to form complex patterns, especially when there is no relevant experience.
There are three main techniques for creating bas-relief elements:
- plastering;
- casting;
- modeling
Plastering - a layer of plaster is applied over a model of a suitable shape. With this technique, mobile (type I) as well as static (type II) forms are created. The first ones are created in a separate wooden box, after which they are attached to the wall using glue (light paintings) or self-tapping screws (weighty ornaments). The second ones are created directly on the surface itself, where it will take its place. After the plaster has hardened, the models are not removed, but serve as the basis for creating a bas-relief.
Casting - model molds are used, which are removed when the gypsum mass hardens (type III). In this case, first a model is made in the required shape. Next, with its help, a mold is made in order to then cast the necessary parts. This technique is suitable for novice craftsmen, since it is easier to work on the model, which eliminates errors on the surface.
Modeling - the process is performed directly on a vertical surface. Therefore, it is necessary to have initial experience. This technique is successfully used to create large bas-reliefs. Moreover, if necessary and depending on the complexity of the image, you can even go to adjacent walls or ceilings. It is advisable for beginners to first practice on sheets of plywood and drywall.
Having artistic skills and minimal modeling experience, creating a bas-relief with your own hands is much easier
Preparatory work
Regardless of the technology for creating bas-reliefs, each technique includes a mandatory preparatory stage. The base is leveled and the surface is thoroughly cleaned so that the weighty bas-relief is firmly held to ensure safe operation. The following list of operations is performed step by step:
- Old finishing is removed - wallpaper, paint, whitewash, peeling plaster.
- Clean the walls from oil traces, rust stains, pockets affected by pathogens. Excess fasteners are removed, and those that need to be left must be insulated.
- Repair defects - cracks, chips, depressions, joints.
- Dust is removed.
- The surface is pre-primed and dried.
- If necessary, the walls are leveled.
Static models are immediately made for subsequent plastering, as well as mobile ones (using the first type of technique). Flower petals, leaves, and berries are formed from gypsum plaster or polystyrene foam. The surface of the created products is primed and necessarily dried. In those places where thickenings will be made, hardware is screwed in to more securely fix the bas-relief.
Before starting work, you need to carry out some mandatory preparatory activities
Create and transfer a sketch
It is desirable that the theme of the drawing corresponds to the functional purpose of the room. In the apartment, landscapes are appropriate for the living room, fairy-tale creatures are suitable for the children's room, and it is better to create an appetizing still life in the dining area. Office motives will be very different, because in such premises there is a predominantly working atmosphere.
If you have artistic skills, there should not be any particular difficulties in creating a bas-relief sketch and transferring it to the wall. But not every beginner has the appropriate skills, and therefore a number of ways will help them:
- On the printed image, as well as on the place where the drawing will be located, a grid is drawn to the required scale. The cells serve as a guide to indicate the outline of the ornament.
- The selected picture is printed on the printer in full size.
- Holes are made along the lines of the printed picture. Now the drawing is applied to the wall, after which the holes are plugged with cotton wool or a sponge dipped in coal powder.
The sketch of the bas-relief is carefully drawn. For large panels, it is not necessary to work out the entire sketch at once - it is enough to indicate the main lines and the area to be designed.
The idea of the drawing is selected according to the purpose of the room
Creating a reinforced frame
If the bas-relief has a large convexity, it is necessary to make a special frame on the wall. It is created from wire - aluminum is used for the main branches, and soft copper is used for small branches. In the case of a low-relief panel, the wire is replaced with a cord.
To obtain a run along the cord, the number of strands is reduced. The cord is dipped in plaster mash and then laid out along the lines of the drawing. It is better to do this on film - after drying, the branch can be easily removed and glued to the wall surface using a plaster mixture. For a pattern more than 2 cm thick, the frame is made along the contour, retreating 10-30 mm for modeling. The wire frame should be wrapped in a bandage, which is pre-moistened in plaster mash (the consistency should resemble kefir). The roll of bandage itself is dipped. To strengthen the wings and sheet plates, a metal mesh is recommended.
A particularly convex bas-relief may require the manufacture of a special frame on the wall
Formation of the main relief
The putty bas-relief is created by applying it in sections. The putty composition is applied to the wall using a convenient tool. The thickenings are created in several passes. In order for the top layers to better adhere to the base, the bottoms do not need to be leveled. In this case, its main part is formed with a large tool (trowel, spatula). Sometimes the master will have to use his own hands.
If the dimensions of the “high” section are large, the screws are evenly distributed over its entire area. Screw in the fasteners in such a way that they serve as a guide when applying layers of putty. Leave approximately 1 cm above the hardware heads for modeling.
Parts that were prepared separately are attached to the wall. The joints are filled with gypsum. When the composition dries, the formed three-dimensional image is leveled with sandpaper.
The main relief is performed with a large tool
Formation of small parts
In those places where the desired height has been achieved, immediately begin to form the surface of the bas-relief. Next you should move on to small details and, last but not least, the surface texture. At this stage you will need brushes, palette knives, and syringes. Excess mass is removed with a knife.
You should not prepare a lot of solution for small parts at once, since the preparation of small details takes time.
The panel does not always contain massive elements. For shallow relief, details are created by transferring the mixture to the surface using a trowel. When applying the composition, try to smear it in order to ensure strong adhesion.
For narrow and small elements, it is more convenient to apply the mixture with a palette knife. Having applied the mass, you need to begin shaping the surface using a spatula, chisel, or scalpel. With their help, a subtle pattern is created.
You should not prepare a lot of solution for small parts.
Adjustment with chisels
When using cutters (chisels, scalpel, knife), the lines of the pattern become clear. Gypsum can be easily cut with a wood cutting tool. Due to this ability of the material, it is possible to create the finest patterns, as well as adjust complex shapes.
Grinding
Smoothing and eliminating roughness on bas-relief surfaces is done with sandpaper. Work should begin when the plaster is completely dry. At the initial stage, medium-grain paper is taken to obtain the desired outlines. Finally, you need to sand the surface with fine-grain sandpaper. At the last stage, all dust is removed with a brush, and a primer is applied to the bas-relief.
There is no need to apply much force to grind gypsum compounds.
Coloring
Three-dimensional paintings are valued due to the play of shadows, which is manifested in monochrome colors. But some design ideas require coloring or tinting the image. Before painting, the stucco molding should be allowed to dry completely, after which it is painted over the top.
Gypsum relief decoration is painted with special coloring compounds. Immediately after applying the paint, it is shaded with a damp sponge. This creates subtle halftones. With acrylic paints it is possible to achieve sharp color transitions.
When the plaster dries, the colors fade. In order to restore the shade, the bas-relief is treated with a styrene-butadiene latex compound. Excess latex will be absorbed and evaporated. You can varnish the surface after a week or two.
Before painting, wait until the stucco molding is completely dry.
Organization of lighting
The created wall relief can “come to life” due to lighting. However, you need to approach this wisely and, before starting work, conduct hidden wiring on the wall to the lighting source.
It is necessary to take care of reliable fastening of the lamps, as well as select the required power and suitable design. They should not give too bright light.
It is better to highlight relief patterns with LED linear or point light partings. The design of the lamps should be selected in accordance with the overall style of the room and the created decor.
To revive a relief panel, you need proper lighting
Do-it-yourself artistic plaster modeling in an apartment: step-by-step guide
It is better to start the first steps in creating a bas-relief using simple tools and materials.
Tools
List of necessary tools for creating a bas-relief with your own hands:
- cardboard, if you plan to cut out a stencil yourself or a finished stencil;
- sandpaper for grouting;
- masking tape;
- knife, spatula and plaster or sculpture stack;
- brush;
- spray bottle with clean filtered water;
- an oil felt-tip pen if you plan to highlight the contours with color;
- scraper;
- household gloves.
Relief patterns will turn out especially clear if you use a special form to create them.
Materials
It is better to use putty as materials. The main condition is that it must be plaster, otherwise the created figure will easily collapse. You can buy this putty ready-made or mix it yourself.
List of materials for bas-relief:
- gypsum putty in a volume of about 3 kg;
- primer of similar weight;
- acrylic paint;
Polyurethane stucco molding is highly durable, its texture resembles plaster. The material can withstand temperature changes, humidity, and minor mechanical damage. The surface of the figure can be painted in any shade; it is easy to create an antique effect.
Blanks for future plaster modeling
Surface preparation for the application of volumetric forms is very important. The surface must be flat, otherwise the pattern will be distorted and its adhesion to the surface will not be reliable.
When constructing the model, special forms are used.
Preparation of plaster or plaster mortar
The most suitable plaster compositions are products from the Knauf line, for example, Rotband Knauf. This mixture, ready for application to the wall, must be diluted with water strictly in accordance with the operating conditions specified on the packaging by the manufacturer.
The use of other plaster mixtures is allowed. The main condition is that the material must be of high quality from a trusted manufacturer, plastic, and its structure must not form lumps.
When to use wire
For thin and curved lines, wire must be used. It will give strength to fragile elements, create a kind of frame for refined parts, protecting them from deformation.
How to lay out a relief design on a wall
The prepared stencil must be fixed to the wall with masking tape. To do this, you need to attach it to the surface and press tightly, leaving the holes free. The mixture is poured into these holes.
Fastening and drying
After some time, the mixture will begin to harden. At this moment, seven grabs the wall.
Further process of modeling the bas-relief on the wall:
- the stencil must be carefully removed;
- it is necessary to fill the voids with plaster stack;
- sprinkle the elements with water;
- model each curve of the design with a brush;
Leave until completely dry, then scrub with a scraper.
Toning
Before tinting, it is necessary to sand the model. To do this, you need to take fine sandpaper and rub it evenly over the convex and concave places over the entire surface of the figure in a circular motion.
Next, use a brush to remove gypsum dust, carefully cleaning it from narrow concave areas. After which, the figure is coated with a thin layer of primer, for example, a special primer varnish to protect it from the damaging effects of sunlight or the adhesion of dust. If the walls are to be painted, then apply the paint in two layers, allowing each layer to dry.
Creating a bas-relief using specific examples
To clearly understand what the process of creating a bas-relief is, it is worth considering several specific options.
"Lilies"
Marseilles wax is suitable for the job. The whole process includes several sequential operations:
| 1. Protect walls, doors and other surfaces from contact with the composition used. This is done by covering the entire workspace with masking tape. | |
| 2. The base is puttied, dried, then primed. For this stage it is better to use primer paint, since it contains grains of sand - after drying, they form a rough coating. On such a surface, the following layers of material are firmly held. Drying of the primer paint takes from 2 to 3 hours. | |
| 3. Apply the first layer of Marseilles wax to the work surface with a trowel. The material hardens quickly - 3-4 hours. | |
| 4. A transparent film is attached to the top of the wall. It should cover the entire working surface. Only the bottom edge of the film is not fixed so that it can be folded back without hindrance. | |
| 5. On the film with a marker, draw a sketch of lilies according to your own imagination. You can twist the lines of the stems, give the flower buds and leaves an original look. | |
| 6. After completing the drawing, proceed to applying Marseilles wax under the film according to the sketch. First, a trowel is used in the work, and then a palette knife. |
Marseilles wax is white in color, but to better appreciate your efforts, apply lightly colored water to the dried bas-relief. Now you will notice places where there is a lack of believability, where to add material or adjust the shape of the lines of stems, flowers or leaves. The procedure for adjusting the bas-relief in accordance with the sketch and realism can take from two days to a week.
When the bas-relief takes the desired shape, you need to let the composition harden, then apply a second layer. Use acrylic paint of the desired shade. The composition is prepared according to the instructions. Drying of the paint and varnish material takes from 5 to 8 hours.
After painting, the finishing layer is applied. Ottocento decorative paint is suitable here. The composition is applied using a wide brush to the entire work surface in two layers, allowing each to dry. Drying time between layers is from 1 to 3 hours.
Bas-relief of lily flowers
"Tulips"
The preparatory and working stage is carried out according to a familiar pattern:
- after plastering, the coating is painted with primer paint;
- Marseille wax is applied;
- the film is attached;
- a sketch is drawn;
- the bas-relief itself is created;
- the surface is painted, including the composition of ottocento.
To give tulips a realistic and sleek look, it is best to create the buds by hand. Additionally, it is better to treat the surface of the flowers with a slightly moistened sponge.
Bas-relief tulips
"Tree"
The entire process of creating a bas-relief tree on the wall may include already familiar operations. This particular type of volumetric texture is performed as follows:
| 1. After preparing the wall, the image lines are transferred from tracing paper. | |
| 2. Prepare a thick acrylic putty composition containing quartz sand. | |
| 3. Using a palette knife, the formation of the main trunk begins from the upper thick branches, moving lower to the base. If the foreground of the trunk is made thicker and, on the contrary, reduced towards the edges, the texture is thereby created more voluminous. Next, work on other noticeable branches and dry everything overnight. | |
| 4. A second layer of decorative plaster is applied to create the texture of tree bark. The barrel is dried again, then treated with sandpaper. | |
| 5. A white backing is applied in the background. Namely, under the branches in the sky, checking with the bas-relief sketch. | |
| 6. The white trunk is painted with brown paint. In this case, irregularities are carefully coated. Without waiting for the surface to dry, start wiping with a rag, which allows you to get the look of tree bark. | |
| 7. Subsequent layers are applied using a roller and in different colors. For 3 – gray, 4 – shade of ocher, 5 – a glaze composition with the inclusion of white is used. As a result, the contrast is enhanced, and the bark takes on a natural shade. The branches are not painted all the way to the top, as if they were still young branches. | |
| 8. The foliage is drawn. Start with the background, for which a light green tint is taken, and for the background, a darker and more saturated color. | |
| 9. The finished background is covered with glaze paint along with white, allow the surface to dry and move on to the foreground. Thanks to the layer, the effect of space is created, the tree gains volume. For the last layer, a light green color with a warm tone is used. Light and space are created in the crown. | |
| 10. The root zone is painted in the color of the ground cover, including shades of herbaceous inclusions. |
The bas-relief in the form of a tree produces an expressive effect, which allows you to set the appropriate tone for the overall atmosphere in the room.
Bas-relief tree
Bas-relief technologies
Creating a bas-relief on the walls in an apartment (or on plasterboard sheets, if the bas-relief is prefabricated) is carried out in stages as follows:
- The base surface is cleaned of old finishing, leveled with an accuracy of no worse than 2 mm/m, primed and covered with a base compound or any decorative plaster (see also below). GKL for prefabricated bas-relief does not require leveling;
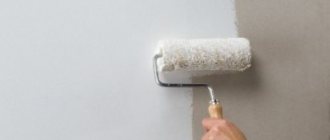
- The background texture is applied to the base coating: with a foam rubber or fleecy roller, by “slapping” with foam rubber or felt, etc. At the same stage, the base is tinted, see below. If the base coating is decorative plaster, texture creation and tinting are not required;
- In one way or another (from those indicated above and described below), the relief is formed. During the formation of the relief, tinting is possible similar to that for the base;
- If necessary, the relief is painted over the top when completely dry. It is convenient to do surface painting with special paints for gypsum stucco molding - they are immediately shaded into very subtle halftones with a damp sponge. Acrylic paints will give sharper color transitions;
- The completely dried relief is covered with styrene-butadiene latex (sold in construction stores). The colors on dried gypsum stucco fade, like on frescoes, and latex treatment restores their color;
- After 1-2 weeks, so that the excess latex is completely absorbed and evaporated, the finished relief is varnished with acrylic varnish as needed.
How to tint stucco?
From the video above it is clear that the stucco bas-relief needs to be formed in layers. To tint the base for the relief and, if necessary, its details, apply thin layers, 1-2 mm each. Typically, layers of thick, low-fat sour cream are applied with a brush and smoothed with a palette knife. The batch for each layer is tinted with a color (pigment) for plaster; the deeper, the darker, or vice versa. For example, for the bark of a tree they take a brown pigment of ever-decreasing concentration, and for leaves they add green pigment as they move outward. The next layer is applied to the set but still wet previous one. The texture with shades can be applied right there with a brush or then rubbed with zero-grit sandpaper or, coarsely over large areas, with a metal brush. For more information on tinting gypsum stucco, see the following video.
Video: how to cover a bas-relief on a wall
"Free" plastering
This method is used to create tall floral bas-reliefs or low patterned overlays from disposable paper napkins. From the latter, using an inverted plate or bowl greased with lanolin as a model, you can get a plaster vase, but its practical meaning is more than doubtful. The base solution described above is not used. It is durable, holds its shape well, but its color is not pure white. Also, tinting is not used due to excessive consumption of material; finished elements are painted.
For plastering, a liquid, almost watery solution of architectural plaster is prepared. A model (an artificial flower, a napkin) is dipped into it and placed on a board covered with plastic film. Flowers are placed in the position in which they will be in the finished composition, see fig. When the solution has set, dip it again, then again, until the model is plastered with a layer 1-1.5 mm thick.
Drying artificial flowers during the gypsum process
Flowers for drying are placed in the same position each time. In this way, flat areas are formed on them, allowing them to be firmly glued to the base. Glue with acrylic plaster of sour cream thickness or acrylic glue. You can also glue PVA.
Plastering on site
This is perhaps the most accessible way to make, say, a molded lampshade for a chandelier (see figure) without experience. Plastering the model in place differs from the previous method in that the model is first glued in place and then plastered with a brush. The plaster solution is made thicker, like sour cream. If the stucco is on the ceiling, the layers are applied very thin, translucent, so that there are no drips. Accordingly, up to 10-15 or more layers will be required.
Stucco lampshade for chandelier
The main problem here is the material of the model. They are usually made from polystyrene foam, polystyrene foam, polyurethane and other soft plastics. But over time they all decompose. This happens very slowly, but still, after 3-7 years, dirty gray or yellow-brown irremovable stains begin to appear on the stucco. Therefore, it is best to sculpt models for on-site plastering from salted dough, the same dough from which you make your own Christmas tree decorations. Salt dough is glued to plaster, stone and other mineral building materials with acrylic glue or any mounting glue. Stucco molding based on non-removable salt dough models retains its appearance for 30-50 years or more.
Reverse casting...
This is the most common way to create stucco with your own hands, allowing you to obtain results of a completely professional appearance and quality without excessive work and skill. The classic procedure for reverse casting from plaster is shown step by step on the left in the figure, pos. a-e. Model 1 made of plaster, plasticine, plastic, etc., or an exemplary product that it is desirable to repeat/replicate, is placed on a flat board 2. Now, in order to facilitate the removal of the mold with the model, the board is covered with film.
Reverse casting from plaster
Then the model is coated with a thin layer of lanolin. It is not advisable to use medical Vaseline; the model may stick to the mold. A plaster and any other porous (wooden, salt dough, stone, etc.) model is coated several times, allowing the lanolin to soak in for an hour or two, until a solid greasy sheen appears on the surface.
Next, the model is coated with a layer of gypsum or alabaster mortar of 3 dough thickness, approx. 1 cm, immediately forming protrusions-anchors 4 and stiffening ribs 5. The set and almost hardened, but still slightly pliable coating is tied with a frame made of soft (annealed) steel wire 6. The branches of the frame are fastened with ties 7 made of thin copper wire.
The next step is coating 9 with a thick cement-sand mortar from M150 in a layer up to 5 or more cm thick, this is already a casting mold. Here you need to remember to form the supporting surface of the mold 8. After a time of gaining 3/4 of the strength with cement-sand mortar (7-20 days, depending on external conditions), the finished mold 10 is separated from the shield using a wedge 11. Well, what if the shield was covered film, the mold is simply removed.
Finally, the inner surface of the mold is cleaned with a copper brush 12 and, if necessary, defects are corrected with gypsum or alabaster mortar. The burr is removed from the side of the mold 13 and, from its internal edge, a chamfer of approx. 0.7 mm. In a mold without a chamfer, the casting will almost certainly get stuck. Before casting, the inner surface of the mold is coated with lanolin, like a model. The mold is filled with the casting mass layer by layer. As soon as its penultimate layer begins to set, eyes with mustaches are inserted into it (upper right in the figure), by which the casting is then pulled out. For small ebbs, the eyes can be made from paper clips. The last layer is poured when the eyes are already firmly seated in the penultimate layer, i.e. when it is completely hard, but still slightly damp. It is unacceptable to test the firmness of the lugs by shaking them!
Currently for runs up to 15-20 pcs. in the old fashioned way they do not cast from plaster; the mold for such cases is cast from silicone (bottom right). Model prepared as before. case, pour silicone layer by layer, in layers 1-2 mm thick, until a mold thickness of approx. 1.5-2 cm. In addition to technological simplicity, the silicone mold allows you to produce castings with shallow recesses, because it is elastic and stretchable.
Mini gypsum reverse casting
Also, small rounded plaster parts are poured into silicone molds: berries (see figure), acorns, mushrooms, etc., even small fish. In this case, a flask tray is sculpted from plasticine, and the model is also sculpted from plasticine. The silicone is poured into the flask all at once; The flask and the model are not coated with anything. Once the silicone has hardened, the mold is simply torn off and the model is picked out. This is the so-called. mini – reverse casting of plaster.
...and not the other way around
In plaster mini-casting, a removable model is already used; I mean, the model disappears and needs to be made again for the next batch of castings. A silicone mold can also be made for plaster casting using a lost wax model, then from it it will be possible to obtain up to 100-200 or more castings, but convex ones, without depressions. In this case, the flask is made in the form of a box without a bottom made of plywood with a height 2-3 cm greater than the height of the model and a size such that the gap between the flask and the model is at least 1-1.5 cm.
The model is formed from wax on a board covered with film. Then they place the flask and cover the gap at the bottom with plasticine. Next, the model is doused with silicone in layers, as in the previous one. case, and when its last layer hardens, silicone is also added layer by layer along the contour until the mold is filled to the top. As soon as the last layer is poured, fill the plywood bottom. The model is melted with a household hairdryer: the lousiest silicone holds 140 degrees, which a hair dryer does not provide.
Modeling
Sculpting a bas-relief in place allows, as mentioned above, to achieve maximum artistic effect, but requires certain skills. You can purchase them without enrolling in an evening department at an art university or courses. Just practice with plasticine; The technique is the same, only when working with plaster the time is limited - work with the next section must be completed before it begins to set. Technically, plaster modeling is distinguished between low (flat) and high (round).
Flat
The technique of flat plaster modeling is shown in the selection of photos below. The rules here are like this. First, the material of thick dough or rich sour cream is applied in layers. Second, each layer is first smoothed, forming a relief at the same time, and then its contour is trimmed. The third, next layer, as in general in layer-by-layer filling with gypsum, is applied to the set but still wet previous one. Fourth, as the layers build up, they switch to smaller tools. And fifth, in each layer the work is carried out from the thinnest and smallest details to the thickest and roughest. In this case, from the leaf teeth to its petiole.
Low plaster casting
About branches
It is best to remove branches on bas-reliefs with a pastry syringe or, very thin ones, with a medical syringe. The thickness of the branches is adjusted by pressing harder and weaker on the piston (item 1 in the figure). In this case, the texture is applied with a brush, and the kinks are formed with the tip of a palette knife. The syringe is filled with the base solution, and for painting and for snow-white it is plaster, like a non-removable model in place.
Branches on bas-reliefs made of plaster
Strongly twisting branches (item 2) can be obtained by soaking a cord or twine in a gypsum solution of sour cream thickness, laying it on a board covered with film along the contour, and when dry, gluing it to the wall. If the bas-relief is prefabricated, lay out the cord immediately, it will dry firmly. To obtain branches of decreasing thickness, some of the strands are removed or, conversely, 3-5 branches of twine are twisted at the butt, then 2-3, then left alone. If the cord is visible through the plaster, the branch is gypsumed in place, applying the solution with a brush
Note: branches for bas-relief made of gypsum cord can be soaked several times in tinted mixtures. The desired color is obtained by grouting with sandpaper.
Sharp ribs
You've probably seen sharp ribs in pictures with bas-reliefs. They are formed by folding the thumb and forefinger, and the thumbs by folding the fingers of both palms bent back. The height and thickness of the rib is changed by smoothly moving/spreading the fingers (palms) in motion as the rib is formed. Fingers, as in general for hand sculpting, should be slightly damp.
Round
The basis of the round molding is a wire frame anatomically similar to the object, i.e. with the proportions of the object and the location of the branches where the main bones of the skeleton are. The frame in a round figure works in the same way as the skeleton of a living creature. Information about skeletons can be gleaned from any course on the plastic anatomy of humans, animals and birds. Plastic anatomy is a discipline not of medical, but of artistic education. The material there is presented from the point of view of how to sculpt, and not how to treat, and is designed for listeners who are not inclined to the subtleties and rigors of science.
The figure is approx. from 30-40 cm is molded onto the frame as shown in pos. 1 pic. For smaller figures, the frame is simplified (item 2), but respecting the principle of anatomical similarity. In humans, by the way, it is not so complicated: we divide height by 8; 1/8 of it will be the dimensional module of a harmonious human body, pos. 3.
Plaster molding on the frame
The frames of small animal figurines are made in a similar way (items 4a and 4b). It is advisable to reduce the weight of larger figures so that there is less fuss with securing the bas-relief (see below). In this case:
- The basic frame (pos. 5a) is made voluminous approximately along the contours of the body minus 1-3 cm for modeling, with the help of additional. branches from the same wire (pos. 5b). Auxiliary branches are attached to the main ones and fastened together by winding thin copper wire, or even better - by soldering.
- In a liquid plaster solution, like low-fat kefir, rolls of medical bandage are soaked, as for plaster casting broken limbs (see, for example, the film “The Diamond Arm”), and the frame is wrapped with a plaster bandage, pos. 5th century It is the rolls that need to be soaked: as soon as the bandage begins to peel off poorly from the skein, it means that the plaster has begun to harden and the rest of the roll goes to waste.
- Once the plaster frame has completely dried, it is covered in layers with a base solution (tinting can be used), the shape and texture are adjusted with tools and sandpaper, and it is plastered to pure white (if necessary) with a solution of architectural plaster.
Note: for frames of unfolded wings of birds, butterflies, elves, bats, ghouls, dragons, etc. It is convenient to use thin and fine metal mesh. Another option is branches of the main branches, covered with paper or scraps of nylon tights.
Features of creating bas-relief from different materials
Materials suitable for creating three-dimensional relief have their own processing characteristics. For interior decoration, paper products are suitable, which are dipped in plaster and, when dry, hung on walls, frames, etc. But most often plaster or wood is chosen.
From cement
The bas-relief, located on the street side, is created from cement mortar, as it is exposed to atmospheric precipitation.
Sometimes, instead of gypsum, putty with cement is used, which is used to create panels. However, for practicality, it is better to choose a cement or cement-polymer plaster mixture. However, this composition is heavier, hardens more slowly than gypsum, is less plastic and shrinks. Therefore, difficulties may arise. For this reason, it is better to involve professionals to create a bas-relief from cement-based compositions.
The cement composition is heavy and has little plasticity.
Based on polyurethane foam
In some cases, this material allows not only to reduce the time needed to create a bas-relief, but also to remove restrictions on the dimensions of the “products”. It’s easy to create images that look “heavy” at first glance on the walls. Craftsmen create static models from polyurethane foam, which are then covered with plaster and painted.
You can make absolutely any bas-relief from polyurethane foam
Made of wood
To create wooden bas-reliefs, you need the appropriate tools. Namely, cutters of different types:
- conical – for clean surface treatment;
- end - with its help, rough work is performed.
Large-sized bas-reliefs require the use of high-precision equipment, as well as special software.
To create a bas-relief from wood, in addition to the source material, you will need cutters
From fabric
Fabric is suitable for creating an original three-dimensional relief. The technique will arouse interest not only among beginners, professionals will also find passion in it. The main advantage is complete freedom in improvisation using your own imagination. Work order:
- In a separate container, a mixture of yogurt consistency is prepared from gypsum, alabaster, plaster and PVA.
- Finished fabric products are dipped into the prepared solution several times.
- Before each subsequent dive, you must wait for each layer to dry. Dip until the coating disappears.
- Dried crafts are glued around the perimeter of the panel or frame.
Another option is to make separate compositions.
The technique of making bas-relief from fabric is perfect for beginners
What material is stucco made from?
To create three-dimensional drawings, any materials that can be carved or those that can be poured into a mold are used.
List of materials for creating a bas-relief:
plastic; gypsum mixtures; stone; clay, including decorative clay; decorative plaster; wood, including bamboo; metal.
Plastic elements are lightweight, inexpensive, and easy to install. Stone or metal bas-reliefs are more expensive, but they look incredibly luxurious. Gypsum is considered an environmentally friendly material, non-flammable and does not support combustion.
Restoration and care of the bas-relief
If individual parts break off, they can be easily restored with the original composition. At the same time, in order to increase adhesion, the surface to be repaired is cleaned and primed. Next, diluted gypsum mass is applied to the damaged areas (if there are several of them).
During the formation of the bas-relief, it is necessary to try to ensure that the transition is invisible. If the relief image was painted with rich colors that have lost their brightness over time, then a new layer of acrylic is applied to the drawing. If a panel is treated with varnish, it can be cleaned with water or a wet cloth when dirty.
Creating a bas-relief with your own hands is quite a feasible task even for a beginner
Even any novice finisher can create a bas-relief on his own. The main thing in such work is patience, perseverance, as well as a willingness to work out the smallest details, which takes a lot of time. If you are in a creative mood, the work itself can arouse interest. If the result is successful, novice masters learn a useful and valuable lesson.
Was this information useful to you? Share in the comments!
Required materials and tools
To create a bas-relief, you will need some specific tools that can be purchased at hardware and art stores.
List of materials and devices that will be needed for work:
- thumbnail image;
- polyethylene film;
- trowel;
- pencil;
- marker or pen;
- stencils;
- gypsum or gypsum putty (you can also use clay or alabaster);
- special primer;
- paint brushes;
- palette knives (special spatulas of different sizes, which are used to create three-dimensional images; they can be plastic or metal);
- sculptural loops;
- masking tape;
- latex gloves;
- for colored bas-reliefs - color or paint of the desired shade.
Stage No. 2. Main part
Now we proceed directly to the formation of the bas-relief. This is the longest stage, during which the image gradually becomes embossed.
- The putty is applied layer by layer to the wall along the drawn contour.
- Each layer is allowed to dry, and only then the next one is applied.
The putty should be moderately thick, flexible and harden gradually.
- All details of the bas-relief are drawn with palette knives, and sculptural loops are used in difficult places.
If the parts are very convex, then it is advisable to screw self-tapping screws into the wall, which will reinforce the structure. This will allow the bas-relief to maintain its shape and not crumble.
Use of ottocento
The mixture is prepared in accordance with the instructions. Such compositions dry in about 5 hours. At the final stage, it will be necessary to apply only the finishing layer - ottocento or another composition with the same properties. When applying this bas-relief material to a wall with your own hands, you must create a double layer on a section of the wall.
Between approaches you should wait until it dries completely. This will take about 2 hours. Each element of the composition must be well painted. In order to give it additional volume and expressiveness, white ottocento is applied to certain areas.
Preparation
All master classes on bas-relief begin with preparing a sketch. But the very first, preparatory step is choosing the room and wall where you plan to create a volumetric composition.
- First you need to think about the interior of the room where the bas-relief will be located. Three-dimensional images can be made in any room, but most often they can be seen in living rooms and bedrooms.
- Then you need to decide on the wall on which the bas-relief will be created. In this case, you need to take into account how much space the panel will take up and whether there is enough free space for it. Lighting must be taken into account, since the perception of the work depends on light. If it is not enough, it makes sense to organize additional illumination of the bas-relief.
USEFUL INFORMATION: Decorative PVC panels: great opportunities with minimal costs
Now you can choose the appropriate sketch. Beginners should not immediately take on complex multi-layered and very voluminous figures. To gain experience, you can limit yourself to simpler forms: leaves, flowers or fruits. You should not immediately try to complete a complex plot picture where there are many characters. But there is also no point in taking too primitive images: they will not look very interesting.
It is easier for beginning craftsmen to work with gypsum or gypsum plaster. They are flexible, hold their shape well, and set quickly.
Important tips that will be useful during the preparation stage
The bas-relief can fit perfectly into an interior decorated in any style, be it fusion or modern. At the first stage, it is important to choose the wall where the drawing will subsequently be. You should consider what kind of lighting will be used - natural or artificial.
If you do not have experience, then you should not take on a genre painting depicting hunters or wild animals. The most suitable images in this case would be images of fruits, leaves and flowers. Before starting the manipulations, you must attend the “bas-reliefs on the wall” master class. Many home craftsmen create such “paintings” with their own hands. Experts recommend not choosing primitive images, but the drawing should not be too complex.
Making a bas-relief from gypsum plaster: photo report
For the relief painting on the wall, a marine theme was chosen - with fish, octopus, algae. A great option for getting your first experience! A light pattern that can be formed gradually.
Here is a drawing on a marine theme for the first making of a bas-relief
Preparatory work
The drawing is transferred with a pencil onto a previously leveled and primed surface. To make the bas-relief, gypsum plaster SHEETROCK (with finer grinding) is used. When diluting the solution, a smaller amount of water is added: take 0.5 liters of water per kilogram of mixture (instead of 0.6 as recommended). When mixed in this way, the composition turns out to be somewhat harsh, but this is the best one for making a relief image on the wall.
The solution should be thick enough. Let's start with the simplest: algae
Immediately mix a small amount of the solution: gypsum plaster quickly loses its elasticity (15-17 minutes) and you need to have time to not only lay out the entire volume on the wall, but also level it and give it the desired shape. For the first time, knead 300-400 grams, lay it out, give it some shape. If during the process you feel that you can handle more volume, knead a larger quantity.
We spread the solution little by little with a palette knife, filling the contour of the algae, cutting off the excess, smoothing it out as much as possible
With this tactic - small portions of the solution - most of the time is spent on mixing the putty. It is better to knead in a container with high sides - a bucket or pan. However, the frozen solution is difficult to remove from them. If you have an old ball in the house, you can cut off the top and mix the putty in it. Even small particles can be easily removed from such a container.
Pour the powder into the container, add clean cold water, mix quickly with a spatula, then bring the mixture until smooth, leave for 5 minutes, then mix again. There should be a homogeneous thick paste without lumps or irregularities. The holding and “setting” time is indicated on the putty packaging; if you use a different composition, follow the manufacturer’s recommendations.
Formation of small parts
It's easier to start with shallow terrain to begin with. When forming small parts, take a small amount of mortar on a trowel and apply it to the desired location, trying to smear it well so that the adhesion of the mortar to the wall is good. If the wall is coated with a primer that improves adhesion (the surface is slightly rough and sticky to the touch), there will be no problems. If the parts are very small - such as jellyfish tentacles - it is more convenient to apply the solution with a palette knife.
Making a bas-relief of a jellyfish from plaster or acrylic putty is not much more difficult...
Having laid out the mixed portion of the mortar on the wall, we immediately begin leveling and forming the relief. We work with the tip of a trowel, palette knives, knives, chisels, scalpels - everything that is at hand and that can give the surface the desired shape. If during the process the part has already dried, but has not yet been finished, you can moisten it with a spray bottle and try to finish it after a few minutes. When you achieve the desired degree of perfection, clean the mixing container from the remaining solution and mix a new portion. Please note: the container must be absolutely clean . The smallest particles will leave scratches.
Forming the main reliefs
When making a bas-relief that protrudes beyond the wall by no more than 2 cm, no reinforcing structures are required. For larger thicknesses, in those places where a layer thicker than 2 cm is planned, self-tapping screws are screwed in. You can use them to guide you when applying plaster, and they will support the solution, preventing it from slipping.