You can create creative designs with liquid wallpaper with your own hands. Pictures are applied to the walls using a special technology that allows you to create flat or three-dimensional artistic creations from simple to the most complex. Your own design, created using liquid wallpaper, will make your home extraordinary and very interesting. You can take a creative approach to decorating your interior and do all the work yourself. To successfully complete the event you will need a little patience, a desire to create and at least the slightest artistic skills.
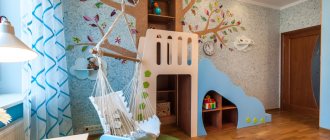
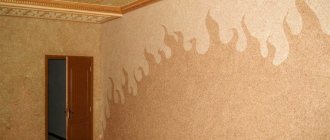
An example of an interior with a pattern of liquid wallpaper
Required tools:
- putty knife;
- roller;
- acrylic grater.
The drawing itself is transferred to the walls or ceiling using a marker, pencil or a special stencil.
Surface preparation
Liquid wallpaper will hide unevenness and cracks, but only barely noticeable ones. Therefore, the walls must first be prepared in the same way as before gluing ordinary wallpaper. The old coating must be completely removed so that the liquid wallpaper does not peel off over time.
Before applying liquid wallpaper, the surface must be well leveled.
All gaps are carefully hidden using putty; large cracks should be especially well sealed and protrusions leveled - too much material may be required to level out these defects using liquid wallpaper.
Attention! Before applying designs with liquid wallpaper, the surface of the wall must be primed.
Drawings of several colors
To create complex works, you will need to reproduce the image on the wall as accurately and evenly as possible using a pencil.
For convenience, it is better to use a stencil, or first apply an even grid on the wall, on which it will be easier to draw the image, focusing on the proportions of the cells.
To draw complex designs, use a stencil or a scaling grid
It is better to buy the liquid wallpaper necessary for the composition with a margin of 10-15%, because... The material consumption when creating a pattern is slightly higher.
To make the lines more pronounced, you can outline them with a black marker.
Don’t go overboard with the thickness; you shouldn’t make lines thicker than 5mm, they won’t look natural and can ruin the result.
Lines can be highlighted with a marker
Try to move from the center of the drawing, or from top to bottom - this way there is less chance of damaging the already applied areas.
As with simple designs, apply colors one at a time.
Wait until the previous layer dries before working on the next one. For particularly complex designs, we recommend leaving the applied layer for 10-20 hours for better “adhesion” of the material to the wall.
Great decoration for a little princess's nursery!
Recommendations for choosing a suitable pattern
Drawings can be applied in living rooms, but most often they decorate the walls in children's rooms and bedrooms. Liquid wallpaper is no less popular in the kitchen, since the finish is not afraid of humidity and temperature changes. For each individual room, the appropriate design is selected. Drawings made in cold colors will make the space visually larger, and warm shades will create a special coziness and a warm homely atmosphere in the room.
Drawing with liquid wallpaper for a children's room
In a children's room, the design should be selected depending on the child's age, hobbies and gender. It is advisable to coordinate the theme with the baby so that he feels comfortable being in the room. For the little ones, drawings with fragments of cartoons and images of fairy-tale characters are usually selected; marine themes are popular. At the same time, psychologists do not recommend decorating walls in too bright and flashy colors, so as not to irritate the child’s psyche.
All kinds of still life elements will look organic in the kitchen: fruits, vegetables, teapots, cups and other kitchen paraphernalia.
Advice. You should not paint the walls with too large drawings, as this will visually reduce the area of a small room.
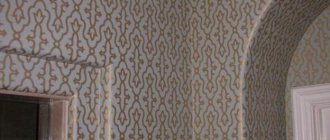
Abstract drawing on the wall
Before you start directly drawing the drawing, you need to select or come up with a sketch. The applique can be smooth or voluminous, simple or with complex and elaborate lines. Two-color designs are considered the simplest. The more fine detail and color an image contains, the more difficult it will be to recreate. In any case, you need to first calculate the number of colors used in order to determine the exact amount of material to purchase.
Advantages of liquid wallpaper
Liquid wallpaper easily lays on the wall in an even layer, fills all the cracks and evens out unevenness on its surface. They are easy to work in places where it is difficult to glue other types of wallpaper: in uneven corners, joints, around trims and sockets. When they are applied, there are no visible seams, they do not deform during the drying process and do not lag behind the walls during use.
The possibility of using liquid wallpaper in rooms with different functional purposes is attractive. A wide range of colors allows you to achieve the desired effect of a design solution when decorating apartments and office premises. Cold gray in various tones is perfect for office decoration.
The inclusion of various fabric additives makes it possible to vary the effect in different rooms. So, when decorating a living room, you can use liquid wallpaper containing silk and gold threads. This option is suitable if you want to emphasize the luxury of the room's interior. Gentle, warm, soothing colors are suitable for a children's room.
Liquid wallpaper should be chosen by those who want to make their apartment original. They allow you to experiment with color and pattern. Professional craftsmen can turn your apartment into an avant-garde work of art, but this will not be cheap, like everything original.
Another valuable advantage of liquid wallpaper: they can be used when decorating a new home without waiting for it to shrink. Usually new houses are finally finished only after shrinking for several years, because cracks may appear during this period. But liquid wallpaper is not susceptible to shrinkage, so the apartment can be finally finished immediately upon completion of construction. This feature is explained by the presence of natural elastic fibers that do not tear when the house shrinks.
By choosing liquid wallpaper with different fiber structures, you can achieve different effects. Some types of wallpaper allow you to get a thin, smooth coating 2-3mm thick, while others create the impression of a fabric covering due to the volume of 4-5mm. This is also an important feature of liquid wallpaper, distinguishing it from other finishing materials.
Liquid wallpaper is also attractive because it can be applied to metal, covering pipes and other small metal elements that need to be decorated under the wall. However, the metal must be treated with anti-corrosion agents, otherwise rust stains will appear over time. In this case, the positive quality of liquid wallpaper to allow air and moisture to pass through plays against us.
An important fact is that the natural fibers in liquid wallpaper, without having an eclectic charge, give the coating antistatic properties. Therefore, dust does not accumulate on the surface of the wall covered with liquid wallpaper, which makes it easier to maintain cleanliness in the room and has a beneficial effect on the health of residents.
Liquid wallpaper has heat and sound insulation properties. These undoubted advantages when decorating residential premises turn into disadvantages if they are used in finishing kitchens or bathrooms. They easily absorb moisture and soot. True, this drawback is easily eliminated by applying colorless varnish, which does not change the appearance of the wall. But in this case, liquid wallpaper stops “breathing” and the whole point of using it is lost.
Liquid wallpaper is fireproof: fire does not spread along a wall with such a coating.
When soiled, liquid wallpaper is easy to restore: simply remove the dirty stain from the wall and apply a new layer. To do this, it would be good to freeze the remains of the diluted wallpaper after the repair and use it if necessary. In this case, the restoration would be completely invisible. Small stains can be removed with an ordinary eraser.
How to apply pictures with liquid wallpaper
- Drawing a sketch. The outline of the future image can be drawn in one of three possible ways. The first option involves manually copying from a sketch or painting by the artist directly on the wall. The master draws an outline with a pencil and marks all the colors on it. The second method is stenciling, which is suitable for two-color designs. To apply wallpaper, simply attach a paper stencil, printed in full size, to the wall surface using double-sided tape. As soon as it has been treated with liquid wallpaper on all sides, the stencil is carefully removed and the free areas are filled with a different color. The third option is to draw a sketch.
Before applying wallpaper, be sure to complete a sketch.
This method is considered the most accurate, as it allows you to transfer all the contours onto the walls without the slightest error. Drawing is carried out using a piece of glass and a lamp that directs the light onto the wall. The emerging shadows of the picture are simply outlined with a black marker on the wall, thus marking the contours of the future picture. - Applying liquid wallpaper to areas distant from each other. First of all, areas of the same color that are not touching each other, that is, located at some distance, are filled. The mixture of liquid wallpaper is distributed in small portions using a spatula and laid in a layer approximately 2 mm thick. If liquid wallpaper is applied directly to adjacent areas that have not dried, the contours will be unclear and the colors will mix.
Applying liquid wallpaper of different colors to individual areasAdvice. To make applying liquid wallpaper more convenient, it is recommended to go around the outer contour of the pattern with masking tape.
- Trimming the edges. Areas where the mixture has gone beyond the contours are tamped with a spatula.
- Drying liquid wallpaper. After applying the mixture, you need to give it time to dry - usually the process takes at least 1 day. You can speed up drying by using a hair dryer.
- Filling the remaining areas. All colors are adjusted closely to each other to form one solid canvas. In this way, after drying, all the free areas of the picture are filled sequentially.
- Outlining contours. For greater clarity of the contours of the drawing, its contours can be outlined with colored felt-tip pens or wax pencils, which will emphasize thin and complex lines.
Carrying out the drawing
Working with material
Many people get confused just before work, thinking about what to do and in what order. Some rules may help you with this:
- Make a consistent plan for your work. This point should not be neglected. In the plan, be sure to indicate a diagram that will indicate the location of the material, design and other details. You can do this using various computer programs (Google SketchUp, Graphite, FloorPlan3D). Of course, you can do everything on paper, but many electronic versions will be able to carry out additional necessary calculations.
- Prepare tools and devices that may be useful to you in your work (buckets for diluting material, spatulas, gloves, rags for cleaning up accidental spills, etc.). When everything you need is at hand, things will go much faster.
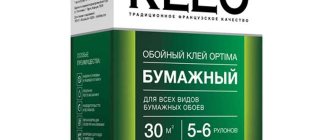
- Buy materials only from trusted manufacturers. You should not buy liquid wallpaper in bulk from dubious retail outlets.
The choice of material must be approached responsibly - Prepare the walls for painting. Ideally, if you can do this work before purchasing materials. If shortcomings are identified during preparation, most likely, the picture of the next actions will be slightly changed. For example, additional work will be required to eliminate defects using special solutions.
Important point! When purchasing wallpaper, pay attention to the production time. This period at the time of purchase should not exceed one and a half years. In some cases - two years, if you are confident in the manufacturer.
Prices for various types of liquid wallpaper
Liquid fights
Video - How to choose liquid wallpaper
Preparing the walls for wallpapering
Preparation for the application process is the most important stage in wall design. The first step is to prepare the surfaces for the upcoming decoration. Here's what you'll need to do:
- achieve a perfectly flat, uniform surface without any defects. Although, as already mentioned, liquid wallpaper can hide the imperfections of the walls, they do not level the structure, and this must be taken care of separately, before applying it;
- give the walls a white tint. This can be achieved using finishing putty and primer;
- the area that will be used for work must become homogeneous, without any applied mixtures, peeling paint, or pieces of old wallpaper;
- strengthen the walls or correct any defects, if any. For example, you need to fix areas that are starting to crumble or fall apart.
Remember that liquid wallpaper is an expensive material, and if you don’t do everything correctly, you will soon have to remove everything, repair and re-decorate the walls, spending the same amount of money.
It is easy to apply the coating if the wall is flat and smooth
Preparation for applying liquid material involves the following steps:
- Removing old coating (paper wallpaper, plaster). It is recommended to remove the top layer of plaster in any case so that the wallpaper lasts longer. This needs to be done especially carefully in old houses. We will look in detail at how to remove wallpaper from walls, step by step, with instructions and tips, in a special article.
- Check for metal structures inside the walls (they are often found in concrete surfaces). If you find metal, you should paint it with oil paint and let it dry, otherwise rust may appear.
- If the quality of the walls is poor, it is advisable to lay the plaster in two layers. This will help achieve a more even surface, since any bumps or holes in the walls will be visible after applying the wallpaper.
- If your walls are made of concrete or brick, then professionals advise using a gypsum mixture as a coating. This material will save you from future absorption of wallpaper by the walls. As a result, you will get a uniform color that will not change over time.
- Apply priming in two layers - absorbent (first) and fixing. In this case, the primer should be white and only one that will not change color after use.
Treating walls before wallpapering - Walls made of plasterboard will also need to be completely plastered. Some people believe that finishing requires only the seams between sheets of material, but this is wrong. With this approach, after a while, stripes may appear on the wallpaper that has already been applied, which will ruin the appearance of the room. After puttying, you need to apply white water-based paint.
- With wooden surfaces things are much more complicated. First you need to seal all the joints between the material. After this, the surface is primed with a solution that is able to penetrate into the material. Then you need to cover the surface with water-based paints. If all these procedures are not carried out, the walls may change due to increased humidity.
Prices for deep penetration antiseptic primer
Deep penetration antiseptic primer
All actions must be done one at a time - this applies to primer or putty. If the procedure is carried out in several layers, be sure to wait until the previous layer has completely dried.
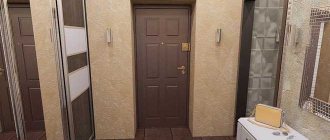
It is important to properly prepare the foundation
Important point! Often the finishing of an apartment is carried out along with the replacement of doors and their openings. If you also combine these things, then do not forget that you first need to make slopes, and only after that proceed to wall cladding.
Wallpaper breeding
It is easy to dilute liquid wallpaper; this must also be done in a special sequence, following the necessary rules. The main thing is to let the already diluted composition brew for ten to twelve hours. Only after this time has passed will the material be ready for application.
As already mentioned, liquid wallpaper consists of three ingredients. Manufacturers in this regard are divided into two types: some immediately mix all the components and sell a homogeneous mass, while others package the ingredients in separate bags, which you then have to mix yourself.
Step-by-step instructions: how to dilute liquid wallpaper
Step one: carefully read the instructions for the wallpaper you purchased. This is important because each manufacturer has different proportions and dilution requirements. The main thing is to rely only on the instructions for the purchased material, and not to take information from other sources.
Instructions for using the coating
Step two: dilute the wallpaper with water. Do not divide the volume of dry matter into parts - knead the package at once, otherwise the wrong consistency may be obtained.
Dilute in a large container
Step three: knead the composition. Mix only with your hands! Even if the manufacturer’s instructions indicate mixing with a mixer, use it first, and then mix with your hands. Don't worry, the composition is harmless. Mix only as much material as you can apply to the walls in one go (in bags). For example, if you paint only one half of the wall, and the other half later, the transition will probably be visible.
Knead with your hands
Step four: consider product consumption. For every square meter there is one kilogram of composition.
One area should be covered with wallpaper at a time
Important point! If your wallpaper is packaged in bags, then start mixing with the decorative components, and then add the rest.
Video - Diluting the coating composition
Wallpaper application
To get started, you need to prepare all the tools. To do this, you will definitely need the following devices:
- plastic or metal grater;
- ironer;
- trowel;
- spatulas;
- spray.
To apply wallpaper you need a spatula
After preparation, you can proceed directly to work. The material application process includes the following sequence:
- Check the consistency of the wallpaper. After 10 hours after diluting the composition, the mixture may harden. In this case, you need to add one liter of water at room temperature and mix thoroughly. In this case, the room temperature must be at least 17 degrees.
- The mixture is applied from the corner to the middle of the wall using a trowel. To make imperfections visible, it is better to apply wallpaper from the light side of the room to the darker side.
- Leave the material to dry for 60 minutes. After a while, return to the room and position the switched-on lamp so that it is at a slight angle with respect to the wall. Next, wet the spatula and go over the uneven surfaces, smoothing them out.
- You can ventilate the room without creating drafts. Heating is prohibited, as it will dry out the material.
The mixture should sit for 10 hours
If you have a special spray bottle, the work will go faster. You can apply wallpaper using this device. Of course, at the end you will still have to level the surface, but you will finish the finish faster. But for this you need to practice first, otherwise you can ruin the wall.
Liquid material can be applied with a spray bottle
Prices for spray guns
Spray
Video - Applying wallpaper to the wall
Rules for applying three-dimensional drawings
The technology for applying three-dimensional pictures is similar to flat pictures. The only difference is that the thickness of the layer is not equal over the entire plane, but protrudes and forms a relief. In this case, the wallpaper mixture is used like ordinary plasticine, from which absolutely any shape is molded within the outlined contours of the design.
The boundaries between colors in three-dimensional drawings are indicated using a spatula, which simply presses shallow grooves.
Conclusion
When applying flat designs, the layer thickness should be no more than 2 mm over its entire area. If we are talking about three-dimensional pictures, then it may be larger. Adjacent areas should be painted in different colors only after they have completely dried to prevent mixing of colors and blurring of contours. The wallpaper is adjusted closely, excluding the slightest cracks and gaps.
How to make a drawing?
Let us draw your attention to the fact that liquid wallpaper with a pattern does not exist in nature. There are liquid wallpapers, and you can use them to create an ornament, but only with your own hands. The advantage is that you can depict any design and not only in different colors, but also in different textures.
There are 2 drawing techniques:
1. Stencil application; 2. Arbitrary combination (independent).
The techniques are quite different from one another, but you should always start the same way - prepare the walls. And then use your preferred drawing technique.
As mentioned earlier, you can slightly adjust the surface, hiding small flaws or cracks. But maximum attention should be paid to the cleanliness of the walls. The surface for liquid wallpaper must be clean, without any remnants of old wallpaper or paint. After cleaning the walls, we apply primer or use deep penetration impregnation. We wait until the surface dries. And only then can you start working with liquid wallpaper and drawing.
Drawing with liquid wallpaper on the wall: photo
conclusions
Liquid wallpaper allows you to embody the most daring ideas for images on the walls. Choose only those that will bring satisfaction and the most positive emotions. The exclusive design of the walls, decorated with liquid wallpaper with a pattern, provides unique scenes on the walls that can transform the room beyond recognition.
Change your home, make it beautiful and unusual with the help of drawings on the walls with liquid wallpaper. Such a design solution will surprise everyone, and you can only rejoice in what was made with your own hands. In addition to liquid wallpaper, there is liquid granite, which you can make yourself.
Preparing the mixture
The contents of the bags are poured into a large container and filled with water at room temperature. Information about proportions can be found directly on the packaging.
Advice! All decorative elements (glitter, granules, crumbs) cannot be poured into the finished mixture.
To create fewer lumps, the decor is poured into the water first. Stir thoroughly and only then add the base.
It is better to mix liquid wallpaper with your hands - many lumps form in the mixture; they need to be kneaded thoroughly, being careful not to damage the integrity of the fibers and structure. After stirring, the mixture is left to swell for 12 hours. After this time, the kneading is repeated.
In order for the wall covering to be monochromatic, you need to adhere to the rule - one wall should be laid out from one batch. It is better to soak more mixture at once than may be needed. Then the remaining mixture is mixed with a new portion - this way the shade will be more uniform and transitions and joints will not be visible.
For more information on how to properly prepare the mixture, watch the video: