Modern types of repairs have become better than before and now the need for a smooth wall surface is a prerequisite for a house or apartment.
True, even a brick house, a new building made of aerated concrete, has crooked walls, and older houses even more so.
In this regard, it is necessary to level the walls with wallpaper or other finishing materials.
How to level walls in apartments and private houses with your own hands, as well as leveling methods will be presented in the article.
How can I level a wall?
Construction technologies are developing rapidly, but leveling walls with your own hands is carried out, as many years ago, using two methods:
- Leveling the walls with putty.
- Leveling walls with plasterboard.
How to level walls with your own hands
If we talk about plaster, then many types of it are sold. The composition is different and it can be made of gypsum or cement, but when installing drywall on walls, adhesive is used for installation, a frame made of wooden slats or a metal profile.
Some people use gypsum fiber sheets (GVL) for walls instead of drywall. They contain gypsum material and plant fibers, but such material does not withstand impacts and other loads well; damage can occur even with light impacts. All this has led to the fact that GVL is rarely used. In some cases, drywall is replaced with OSB boards, whereas previously plywood was used. True, such materials are not the best alternative to gypsum plasterboard, which over time begins to crack along the plane and can swell. Chipboard is also used for uneven walls or floors, but the material is several times more expensive than drywall. Therefore, today it is best to use drywall for leveling.
Advice! Plaster and putty can also be used. This option should be chosen only if the walls are relatively flat and have small differences, up to 5 mm. In this regard, you can putty on already smooth walls in order to obtain an ideal surface.
Many craftsmen say that it is better to use drywall for DIY work. It’s easier and more convenient to work with, and wall decoration is cheap. But if you use alignment of the wall using beacons, then the work is also not difficult, a novice builder can do it, the main thing is to understand the technology and not rush into the repair process.
How to make curved walls straight in a new building using the dry method yourself
The second way to level walls in a room is to cover it with plasterboard. In addition to practical tasks, this material perfectly copes with a decorative function. Arches, all kinds of partitions, fireplaces, suspended ceilings, etc. are made from it.
Panels for leveling plasterboard: selection parameters, the best way to finish
For work, you should choose wall plasterboard with a thickness of 12.5 mm. Ceiling (9.5 mm) is not suitable for leveling walls, since it cannot provide the necessary strength with respect to mechanical loads.
In addition to the usual white, there are two more types of drywall on the construction market:
- red (fire-resistant) – the best option for renovations in wooden houses;
- green (moisture resistant) – suitable for lining walls in the kitchen.
When plasterboard on a profile is used in the kitchen: mounting the frame horizontally
A plasterboard box is often used in the kitchen to hide various communications, hide unevenness and other wall defects, and also recreate the original structure (niches, ledges, etc.). For these purposes, galvanized profiles and waterproof plasterboard are used.
To level a wall using the “dry” method, you need to perform a number of operations.
- Attach the profile around the perimeter, mark and secure the material in the middle of the wall. The planks should be mounted at a distance of 40-50 cm. The fastenings should be located at a distance of 25-30 cm.
- Drill holes with a hammer drill and drive plastic dowels into the fastening points.
- Install the frame using screws and self-tapping screws.
- Cover the frame with plasterboard sheets. To do this, you should cut the gypsum boards of the required sizes in advance and make marks on them in the places of planned fastening. The distance between the screws should be 25 cm.
- Seal the joints between the sheets with putty. Large cracks can be filled with polyurethane foam with a small expansion. After hardening, remove the remaining foam with a knife and cover with putty.
- The final stage is treating the structure with an antifungal primer. After it dries, apply a thin layer of putty to the surface of the drywall.
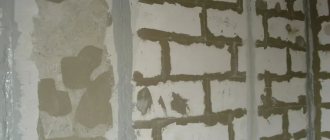
Is it possible to glue drywall to an uneven brick wall?
If the installation of drywall is carried out on a brick wall of uneven masonry, then it is necessary to use Perflix glue. It should be applied pointwise, along the entire perimeter of the sheet. The thickness of the adhesive layer should be 5-30 mm, and the spaces between the points should be 30-50 cm.
A device for leveling already plastered walls
To frame level the plastered walls, you will need the following devices and tools:
- drywall;
- profile;
- level;
- self-tapping screws or self-tapping screws;
- drill;
- screwdriver
Surface preparation and priming
Removing old wallpaper
Concrete walls or walls made of brick and other materials must be prepared before leveling. It makes no difference which type is chosen. Preparation consists of the following sequence:
- The old coating on the walls is removed, especially those that are weak.
- Cracks in the wall need to be repaired, then inspected and assessed how crooked the wall is. If the protrusion is large and very prominent, then it is removed with a hammer and other equipment.
- If you have old plaster that is firmly attached to the wall, you can assess its condition and the need for removal. It is enough to knock on the wall; if there is a dull sound, there is a void between the plaster and the wall, so when leveling, there is a high probability of the wall collapsing. It is recommended to beat everything down to the very foundation so that the old material does not spoil future work.
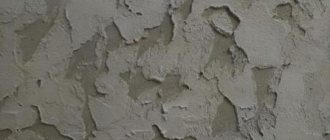
Alignment of problem areas
- If there are large depressions, you will need to seal them separately. A very thick layer of mortar or putty can fall off, due to this, defects are sealed, and the protrusions simply get knocked down.
- If the walls are painted, the paint may peel or simply fall off in pieces due to its perfect evenness. A primer will help solve the problem, namely its type - concrete contact, which makes the surface rough. In this case, the putty holds well and nothing falls off.
- To improve the adhesion of materials, notches on the wall are used. Previously they were made with an axe, today they use a grinder. For 1 sq.m. About 100 notches will be enough.
Based on the choice of putties, a primer is selected. The main purpose of the soil is to improve the adhesion of the plaster to the wall. The instructions on the packaging will allow you to make the right choice, and will also familiarize the person with the correct application to the walls. Often the compositions are ready-made, but there are also those that need to be diluted. You can apply the primer to the walls with a roller or other device. The preparation is simple, but the leveling process will be more difficult.
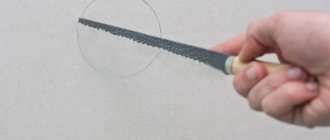
Installation of beacons
Installation of beacons
To make a flat surface from a curved wall, beacons are used to level the walls. This is a profile that is placed in one plane on the wall; the beacon will direct the plaster to the right places, filling voids and making the walls even. The beacon method involves the use of a galvanized steel profile; these are T-shaped profiles, although timber is also used as guides.
A metal beacon is more convenient to use than the timber method; it is easier and more convenient to install. The plaster layer will be approximately 8 mm. The disadvantage of the method is the cost, the amount is not large, but it is an additional expense. In addition, plaster and steel do not adhere well to each other, so when the mixture dries, the beacons are removed and the holes are sealed.
When using wooden slats, the process becomes cheaper, but even timber is more difficult to find. Moisture damages the wood, and the plaster layer is uneven. Some people use the solution as beacons. Initially, strips of plaster are applied to the wall, leveled, and after drying they are used as beacons. The method is cheap, but also more complicated than other beacon types.
Important! The evenness of the walls depends on the correct installation of the beacons. If you place the beacons exactly, then the result will be excellent; if there is an error, then the desired result will not be the best and the work may need to be redone.
To install on the wall, several cakes of plaster are made, a profile or block is sunk into them, everything is leveled to the desired degree, you can use a plumb line. When the cakes dry, you can continue working. The width between the beacons is taken from the calculation of the rule that is available.
Metal profile for plasterboard partition
Any plasterboard partition has a “skeleton” base for attaching gypsum board sheets. The sheets themselves are quite heavy and the frame for attaching them must be reliable. The profile for a plasterboard partition copes well with this load. The structures are quite strong and perfectly level.
Profiles vary in types and sizes; they require connecting elements that will complement the structure with greater reliability and connect the frame:
- The guide profile is used to attach the frame to the ceiling and floor;
- The rack forms the basis of the frame;
- The jumper profile connects the rack profiles;
- Ceiling;
- Corner element of the invoice;
- Suspensions;
- Single level connector;
- Two-level connector;
- Flexible arch profile is used to create arches;
- Extension cut.
Profiles can also be reinforced or non-reinforced; it is better to make a drywall frame from reinforced profiles. It is worth paying attention to the quality of the material. More details on the types of metal profiles are presented in the article: whitestrip.ru.
A galvanized profile should not have any damage or traces of rust; the best profile is one with a zinc content of more than 99%; it is least susceptible to corrosion. Factory defects are often masked by painting profiles; it is worth understanding that hidden manufacturing defects are dangerous; the partition can simply collapse.
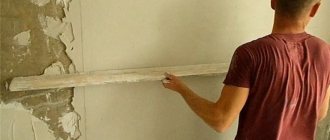
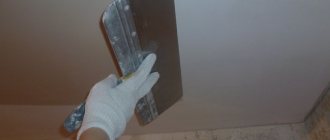
Throwing mortar
Applying the building mixture to the wall using a spatula.
The plaster is prepared according to the instructions on the package, after which it is applied to the wall. The work will require a spatula or a painting ladle. After sketching, the order of work is as follows:
- You need to start pouring the mortar between the beacons from the bottom point, covering part of the wall.
- The rule is placed on the beacons at the lowest point, leaning on them, the plaster is pulled up. You need to lay the mixture by gently rocking it from side to side.
- It is necessary to putty until the mortar laying is continuous and even.
- The adhering mixture is removed with a spatula and again thrown onto the concrete or wall.
- The work is carried out to the top. After one strip of beacons, you need to lay the next one, and so on every square meter until the room has smooth walls.
This completes the first part of the work. The starting layer has been laid, but the walls still need to be leveled, even visually the unevenness is noticeable. It will be possible to completely level the wall with a more liquid composition.
Leveling for putty
Grouting and leveling the putty
If the first layer begins to dry out, but does not have time to harden, then it’s time to level the wall under the putty. All defects are rubbed over with a solution; in terms of consistency, it is necessary to use a mixture that is thinner. Application is done with a large spatula and leveled using the beacon rule. Thus, the entire perimeter is covered, it is better to make the layer thin and the base turns out to be close to ideal. This stage is necessary so that the putty consumption is minimal.
If the solution is like thick plasticine, the beacons are removed by prying them up with a screwdriver at the bottom. Next, the seam is filled with putty and the wall is leveled with a spatula; if necessary, the seam can be trimmed, because when the mixture is not completely hardened, it cuts perfectly.
Important! During leveling, you need to ensure that the plane remains level. This completes the alignment of the walls. Next, you can carry out interior finishing work, painting the walls in different colors, gluing wallpaper on them, laying tiles and other finishing materials.
Leveling the walls with your own hands (video)
DIY wall leveling technologies
The procedure for leveling walls is a headache for residents who have started a major renovation. The geometry of premises in new buildings is far from ideal, not to mention houses with a Soviet layout. A few decades ago, few people cared about defects and curvature, but today smooth walls are the main condition for repairs.
A person without experience will find this procedure difficult, but by studying the step-by-step instructions and being patient, even a beginner can handle it.
What types of mixtures are there?
Various dry mixtures are used for finishing. They all have different compositions and different characteristics. To level the surface, dry material is most often used, as shown in the table:
| Mixture: | Description: |
| Cement: | They come with different fractions of sand and cement. Some contain lime to improve the plasticity of the solution. Due to this, they distinguish: cement-sand mortar and cement-lime mortar. In the first type, large fractions of sand are used for the initial finishing, small particles of sand are used for the finishing layer. Calcareous species are more versatile. |
| Plaster: | Plaster is used for painting work and is popular. Allows wide application, excellent flexibility and fast drying. Additionally, it has heat and sound insulation properties. Plaster has a high water absorption, so it is better to apply the mixture in small parts. |
| Clay: | Previously, clay was often used, which was applied to the walls and then whitened. Today, the material is rarely used and only to create a specific effect. Clay is environmentally friendly and regulates the microclimate in the house. |
Pros and cons of cement compositions
Cement mortars are good because they can be chosen for interior and exterior work; you can level the façade of a private house. A cement-sand dry mortar or with the addition of lime is used. These materials fit perfectly on walls. In addition, the material is cheaper than gypsum-based putties and is excellent for wet areas, for example, bathrooms, basements, and garages.
The disadvantage of this material over gypsum is that the texture is not very smooth. After application, sanding or applying a finishing solution is often necessary. The downside is that such plaster takes a long time to mature, so finishing the walls takes time; as a rule, the mixture will completely harden in 20-30 days.
Leveling walls for tiles
Not everyone succeeds in leveling walls for tiles using the beacon method; the process is lengthy and the material takes a long time to dry. It is faster to level the walls using sheet plasterboard material. This method applies to the dry type of plaster, and the result is no worse. The walls are smooth, the interior will look decent and you can decorate the walls with any decorative material. This technology has some disadvantages:
- To hang heavy objects on the wall, a frame is made of wood or metal.
- Plasterboard material takes up a little space, which is not good for some types of housing, especially if it is a Khrushchev-era building.
Of course, if you attach drywall to walls without a frame, you can save space. The size of the room will remain the same.
Frame installation method
You can level any walls using frame technology with plasterboard, including the ceiling, window or door opening. Initially, a frame is created that needs to be leveled; it is better to use a laser level, so the accuracy will be higher. Assembly is carried out in stages:
Profile fastening
- A guide profile is placed at the level of the floor and ceiling.
- Fastening is carried out with dowels to the wall.
- On the installed profile, the installation locations of the vertical parts should be marked with an interval of 60 cm.
- When everything has been calculated, a vertical line is drawn on which the installation curtain is fixed.
- Bearing profiles are placed in the guide parts.
- Everything is leveled into one plane and secured with curtains.
Drywall installation
- Plasterboard material is screwed to the mounted frame. Preliminary measurements of the parts are made and the drywall is cut out.
- The space between the wall and the drywall can be insulated using mineral wool or polystyrene foam.
- A mesh is glued to the joints, then covered with putty and everything is leveled.
- All holes from self-tapping screws are also plastered.
As you can see, leveling walls with plasterboard is easy to do, and a step-by-step lesson will help you understand the essence of the process. At the end, such a wall needs to be sanded with plaster and finishing can begin. Make tiled walls, use any tile material, wallpaper or simply paint. It is recommended to use PVC panel for windows, and MDF for doors.
Drywall
If the walls have significant flaws on the surface, the easiest way is to create a smooth surface using sheets of plasterboard using a frame or frameless method.
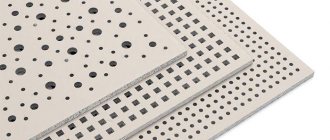
Separate sheets for finishing walls and ceilings, as well as moisture-resistant material
In a situation with deep potholes, the following correction:
- most effective;
- least time-consuming;
- economically beneficial.
The frameless method is technically not entirely correct, but amateur builders use it very often. With this finish, sheets of plasterboard are glued directly to the wall. If the surface has significant flaws, it is unlikely to be done efficiently.
Frame device
The surest way to level out significant defects is to construct a frame to which the sheets will be attached. The frame is assembled from aluminum rack profiles and guides or wooden beams.
Accordingly, wooden structures should not be used in rooms with high humidity. This frame is less durable, susceptible to microorganisms and prone to deformation.
The rack profiles are rotated to the surface of the concrete wall, taking into account the vertical and horizontal levels. The distance between the profiles is set depending on the size of the sheet. The guides are attached every 50 - 60 cm, depending on the size of the gypsum board (plasterboard sheet).
The pitch of the profiles should be selected based on the sheet size
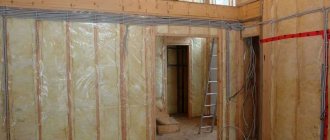
On a note! After the frame is installed, measures can be taken to install thermal insulation using mineral wool or polystyrene foam.
Drywall sheets are attached to the frame using self-tapping screws. It is better to use screws made of oxidized metal. The fastening pitch is 15-18 centimeters - the screws rotate into the profile. The head of the screw must be flat; during installation, it is slightly recessed into the sheet.
The structure of the frame allows you not only to create a perfectly flat surface for decorative material, but also to hide communication cables. Wiring in a concrete wall requires channeling, a very noisy and messy process. The structure of the frame allows you to lay communications at minimal cost, while all wires will be completely hidden.
On a note! Using a similar technology, you can cover the walls with sheets of plywood or plastic. But with these materials, taking into account their physical properties, it is better to use wooden beams to assemble the frame.
All necessary communications can be laid in the chamber of the frame device
Installation of sheets
Installation of drywall sheets is simple; the work requires a standard tool:
- Screwdriver.
- Ruler.
- Screwdriver.
- Self-tapping screws.
Fastening drywall to the wall
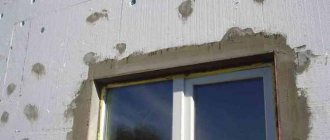
Screw in the screws at a distance of 20-30 cm from each other. The fastener heads are sunk into the drywall so that at the end the wall is level and they do not stick out. If you don't have a screwdriver, you can use a drill with a bit. If desired, the work can be done independently in a day. After which the dacha, house or apartment will have smooth walls. It is worth considering that by leveling the ceiling with plasterboard material, the height of the room will be slightly reduced. When leveling a wall near a window, it is better to use a perforated corner at the corners to give the correct shape.
Sheet material is easier to use for leveling walls without a frame. Plaster, glue or other material is used for fixation. The mixture is applied to the wall, how much thickness should be depends on the walls. Next, the drywall is applied to the wall and adjusted correctly so that the slab is level. If necessary, the material is pressed against the wall using your hands.
Important! When the material is level, all edges are sealed with plaster. Next, you need to install the next piece of drywall. This is how the walls in the house are aligned. For reliability, you can screw the material directly to the wall after a day. The visual effect is excellent, the kitchen, loggia, bedroom and other rooms will have smooth walls.
The list of materials for leveling walls is large; the choice of materials depends on skills and preferences. During the work, it is recommended to check each section of the wall after leveling so that defects do not begin. Design methods can be seen in the photo on the Internet, and how to make house walls smooth is presented in the video:
Utilities in the kitchen walls
If you plan to plaster the walls, then the installation of hidden electrical wiring in the walls should be done after the plastering work. Electrical wiring grooves are sealed with gypsum mortar.
Depending on the thickness of the plaster, it dries from a day to three. After drying, the color of the plaster should be uniformly light gray.
Before puttying, the plaster is lightly sanded with coarse sandpaper and primed twice.