Classification of plasters by texture
Depending on the texture, all building mixtures can be divided into two large groups.
Classic smooth plasters
After drying, such solutions remain smooth. They are usually used to create the first (base) layer, as well as to apply the second layer of facade plaster if it is planned to be subsequently painted.
Smooth facade plaster
Decorative plasters
Decorative compositions are mixtures from different manufacturers, which, after drying, form a surface with a certain texture and relief. Such compositions look very impressive and are suitable for outdoor work, but have a higher price than classic solutions. Decorative plaster can give the following effects:
- “bark beetle” - an original surface with small grooves;
- “lamb” - the base will become rough after drying;
- “Venetian” - the base will imitate a marble coating.
Base bark beetle
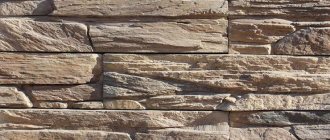
Stone-like plaster
Stone-like finishing is very popular in construction work on the design of facades and plinths. “Stone” plaster consists of cement, quartz sand, plasticizers, binders and fine stone chips. After hardening, the surface will become very durable and will not allow the base to collapse for many years.
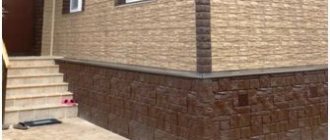
Finishing the foundation of a house with stone
How to paint the base of a house over plaster
The final finishing is carried out after complete completion of all plastering work. Careful attention is paid to the choice of paint, because low-quality paintwork materials will quickly fade and peel. Usually, good facade paints are used on an acrylic, silicone, or combined base, which are characterized by wear resistance, elasticity, durability and vapor permeability. The color is chosen according to the general idea, taking into account the shade of the house and roof. It is also possible to paint the base with resin, which after drying will become matte and practically not subject to contamination.
Painting the basement of the house
Materials and tools
In order to carry out high-quality work on applying decorative plaster to the base, you will need the following tools and consumables:
- work clothes and gloves;
- a basin, spatula and sticks for mixing the required proportion of the composition;
- construction electric mixer;
- reinforced mesh (5×5), metal beacons (up to 15 pieces);
- construction level (laser is better);
- chisel;
- polyurethane trowel;
- rules (trapezoidal, H-shaped);
- metal trowel;
- structural roller;
- brush (hard);
- matrices;
- broom with dense rods (metal);
- wide brush;
- spray.
In addition, you will need a plaster and sand-cement mixture, a primer for exterior work, concrete contact (for concrete work) and a paint of the desired color.
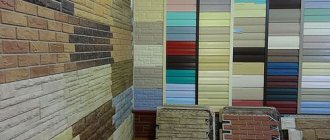
Tools and consumables for work
In addition to the ready-made building mixture or self-prepared mass, you need to prepare the following accessories for work:
- metal slats-beacons;
- spatulas;
- rule;
- trowel or grater;
- primer;
- hatchet;
- plaster mesh;
- edged boards 20-30 cm wide;
- dowels;
- electric drill with mixer attachment;
- concrete mixer;
- wide brush;
- construction level;
- shovel;
- hammer and perforator;
- hard brush;
- grinding machine;
- plastering ladle.
Tools for plastering work
If you want to obtain a colored or decorative surface of the mortar, you should immediately prepare pigments, marble or granite chips.
Main types
Currently, there are various materials suitable for cladding the basement of a building, but due to its durability, reliability and quality, plaster occupies a leading position.
LNPP acrylic plaster "Classic Velor"LNPP acrylic plaster "Aurora"LNPP acrylic plaster for plinth
| Type of plaster mixture | Characteristics and Features | Standard flow |
| Mineral mixture based on white cement | It does not have sufficient elasticity and can crack; it allows you to obtain a vapor-permeable coating that becomes dirty quite easily. In addition, this species is characterized by a poorer color range. | On average, it can vary between 1.5-4.5 kg/m2. |
| Acrylic mixture based on acrylic resin. | It has good elasticity, which minimizes the risk of cracking, is sufficiently resistant to mechanical influences, has a rich and stable color, but is characterized by insufficient vapor permeability. | On average, it can vary between 1.5-4.0 kg/m2. |
| Silicate or silicon mixture based on liquid potassium glass. | It is resistant to mechanical damage, has good vapor permeability, is distinguished by a rich color palette and is highly resistant to mold and fungi. However, the composition is quite difficult to apply, and the presence of alkali makes it unsafe for people. | On average it can vary between 2.0-4.0 kg/m2. |
| Polysilicate or polysilicon mixture with the addition of silicone resin. | The composition is elastic and UV-resistant, easy to apply to the surface and quite safe to use, but has low resistance to mold. | On average it can vary between 2.0-4.0 kg/m2. |
| Silicone mixture based on silicone resin. | The created layers are resistant to mechanical damage, have excellent vapor permeability, are easy to clean and are available in a very rich range of colors. | On average, it can vary between 1.7-2.4 kg/m2. |
Mosaic plaster for plinth
Cement plaster VOLMA-SOKOL
Cement plaster Yunis-Silin
Features of plinth and foundation plastering
When applying the plaster composition to the base, the following positive effects can be achieved:
- Increase the strength of this structural element.
- Protect the surface from moisture, both in the form of external precipitation and from the soil.
- If the appearance is lost or cracks appear in the finish, it is quite easy to restore the structure.
- The price of various plaster mixtures, regardless of composition and brand, is affordable for a wide range of consumers.
But, assessing the characteristics of plaster cladding, it is worth highlighting the disadvantages of this method:
- Cement-based mixtures often develop cracks. They also quickly lose their appearance due to the fact that all the dirt sticks to them quite intensively.
- Where increased vapor permeability is required, acrylic mixtures cannot be used.
- Silicon-based compounds are quite difficult to work with, so it is better for specialists to work with them.
If you take into account all the features of such plaster solutions, you can achieve not only visual appeal in the finishing of the base, but also give the necessary qualities to the house.
It is important to remember that up to 60% of all moisture penetrating indoors passes through the lower part of the building, including the basement.
Facade treatment
Experts assure that the technological methods for applying mosaic plaster for the facade are almost no different from the finishing work of the basement.
But a number of features will have to be taken into account:
- layers of plaster mixture are applied alternately without waiting for them to dry completely;
- Having breaded the multi-colored tones of the facade, the connecting areas of the shades are glued in advance with masking tape. First of all, a single-color layer is applied with an overlap on the tape, after which the strips are removed and re-glued onto the plastered surface. Now the wall is treated with a second shade. Ultimately, you will have smooth and beautiful connecting areas;
- to form the corners, you should wait until the plastered surface has completely dried;
- finishing material should be purchased with a certain reserve, since its loss is inevitable during work;
- the work is carried out carefully, but quickly, because the mosaic plaster sets quickly.
Plastering using wet facade technology
For a “wet façade”, special mixtures containing water are required. This mixture is applied as follows:
- The base is prepared by leveling it, cleaning it and getting rid of all defects. Next, apply a layer of primer.
- The base profile is installed 30 centimeters from the ground, and the metal profile is screwed in with self-tapping screws.
- The insulation is attached to the base with a special glue; the glue must dry for 3 days, and only then it is possible to supplement the fasteners with dowels.
- Next, the insulation is lubricated with a thick layer of glue, the reinforcing mesh is attached and the glue is applied again. This action should be performed as quickly as possible to obtain a reliable monolith. It should dry within 7 days.
- After complete drying, they proceed to applying decorative finishing.
For a “wet façade”, special mixtures containing water are required.
Plastering the plinth will give the house a more beautiful appearance, but most importantly, it will help make it more durable. And these works are not so difficult to do with your own hands. It is only necessary to carry out high-quality preparation and direct plastering work.
Features of laying decorative artificial stone
Cladding the facade of the house
The durability of the facade cladding directly depends on the condition of the walls of the house. If they are plastered, the tapping method is used to check their strength. When struck lightly, a high-quality surface should produce a fairly high-pitched and ringing sound. If the plaster has peeled off, the sound will be dull. Such areas must be cleaned and re-plastered.
You need to remember one rule: natural and artificial stone cannot be placed on wet plaster. Wall humidity should not exceed 5%. There is another point that you need to be aware of: a wall that is too dry will draw moisture from the adhesive mixture and the curing process of the adhesive will be disrupted. Therefore, it is not recommended to lay stone on walls heated by the sun. It is advisable to carry out facing work in warm, but not hot weather.
There are two options for laying decorative stone: with jointing and without jointing. If you decide to use the first method, galvanized or plastic mesh is used to strengthen the wall. If the stone needs to be laid on a new concrete wall, it is pre-treated with a sandblaster. This is necessary in order to remove the specific “waxy” film that is typical for new buildings made of concrete.
When performing masonry work you need to be extremely careful and careful. If the adhesive or grout mixture gets on the front side of the decorative stone, these stains will be difficult to remove. Especially if the surface has a deep relief
When sawing artificial decorative stone, you must take precautions: wear safety glasses and work gloves.
Stages of applying the plaster mixture to the surface of the plinth
Plastering the foundation should be done in stages.
Plastering the surface
This stage involves the following sequential actions:
- Fill cracks and gaps with the prepared solution.
- Install a metal reinforcing mesh, it will help increase reliability and durability.
- Next, beacons are installed. Step back 0.3 meters from the corners and screw in the screws. A vertical thread is used to connect the sides of the upper and lower screws, then the same actions are performed, but with horizontal threads. It is necessary to maintain a gap of at least two centimeters from the wall to the threads. Metal beacons are installed horizontally on the threads, leaving a distance of about one and a half meters. The beacons are attached with cement mortar and wait until it hardens.
- The distance between the beacons is covered with a solution and leveled along them. This process is carried out until the surface is completely plastered.
- After six hours, the beacons are removed, and these places are covered with mortar and rubbed with a special trowel for plaster.
Install a metal reinforcing mesh, it will help increase reliability and durability.
Final stage
This stage depends on what you decided to use to plaster the base of the house from the outside. Decorative cladding requires proper drying of the surface. It is covered with film to prevent precipitation and ultraviolet radiation from reaching it, and dried for 2-3 weeks. During this period, you should moisturize it with water; it is advisable to do this procedure a couple of times a day. When everything is dry, apply a primer and move on to the sheathing.
Decorative cladding requires proper drying of the surface.
How to plaster a base
To plaster the foundation plinth, you need to perform a number of operations:
- Prepare the base.
- Apply a primer coat.
- Install beacon profiles and reinforcing elements.
- Apply and level a layer of plaster.
- Remove beacons
- Perform final leveling.
The base is carefully prepared. The old layer, if any, should be completely removed. Eliminate any contaminants, especially those that can worsen the adhesion of the surface to the primer: paint, greasy stains, technical fluids, etc.
It is necessary to identify and remove all areas where the wall is crumbling. They are cleaned to a solid base. The existing recesses are widened and repaired so that the surface of the base becomes sufficiently smooth. If the surface is too smooth, then notches are made to improve adhesion.
The surface is primed, corner plaster profiles and reinforcing mesh are installed. It is fastened with dowels with a wide head, the optimal density of fastenings is 16-20 elements per square meter.
To install beacons, first make markings using threads. Install screws 30 cm from the corner and level their position using plumb lines. The resulting points are connected with threads horizontally and vertically. According to the markings, beacons are placed in increments of 1-1.2 m. They are fixed with cement-sand mortar.
Then plaster is applied. Depending on the type of mixture and the thickness of the layer, it can be done in one or several layers. The solution is leveled using the rule. After a couple of hours, when the composition dries, the beacons are pulled out. The surface is finally leveled and treated with a grater.
The consumption of plinth plaster depends on the type of mixture used. Usually it averages about 17 kg of the finished mixture per 1 m2 with a plaster layer thickness of 10 mm.
It is covered with polyethylene, and the surface is moistened with water for two weeks to prevent the plaster layer from drying out. This will slow down the drying of the plaster, making it stronger and more uniform. After this, you should wait until the base dries, then you can perform decorative finishing.
Ways to imitate a stone wall
So, let's look at what you can use to make a wall in your house or apartment like in an ancient castle. If we do not take into account the cladding made from natural prepared material, then there are several popular methods of imitation:
- From tiles . This does not mean tiles, but relief tiles made from gypsum or cement-sand mortar. Artificial stone is sold ready-to-use, already painted, and is used for interior decoration and on facades. Most often this is an imitation of torn slate, limestone (travertine), dolomite, sandstone or rock. You can make such tiles yourself by pouring the solution into rubber molds. But this is a labor-intensive process that requires special equipment (vibrating table) and painting materials for high quality.
- Stone-effect hinged panels . Plastic panels are often used for cladding the facade of a building. The advantages of this method: speed of work, practicality, attractive appearance, reasonable price. The textures are the same as those of stone made from gypsum slabs - slate, limestone, etc.
- Made from polystyrene foam . This cheap way to create artificial stone requires creativity and certain skills. The essence of the decorating process is to cut out masonry on a sheet of polystyrene foam (foam plastic, penoplex, etc.). The surface is roughened using hard brushes or other available tools. After the finished panel is glued to the wall, it is painted in a suitable color.
- Made from plaster . This is no less simple, but more practical and, perhaps, the most common type of stone finishing. Plastic mortar provides enormous opportunities for simulating any stone surface. For decoration, I will use gypsum, cement-sand (on the facade) or polymer plasters (acrylic, silicate, silicone). They may contain mineral fillers: sand, marble chips, rounded granules, etc., which help emphasize the created effect of the stone texture. Below we will look at this finishing method in detail.
Selection rules
The main plastering is carried out using cement mortar, on top of which decorative layers are often applied.
Plastering of the plinth should be carried out according to the requirements
Therefore, such a vapor-permeable material must have a high adhesion coefficient and good strength, and also meet the following basic requirements, including:
- the presence of sufficient biochemical stability;
- high fire safety indicators;
- increased hydrophobic qualities;
- resistance to low temperatures and ultraviolet radiation;
- durability and environmental safety;
- ease of use and ease of independent work.
Basement finished with plaster
A correctly selected and high-quality base plaster mixture allows you to not only imitate the texture of almost any finishing material, but will also serve as additional protection to the main layer.
Decorative plaster of the base
Surface preparation
Basement before renovation
Release the bottom of the wall from contact with the ground
The base of any structure is often not only a monolith that extends the foundation base, but can also be represented by various superstructures made of foamed fiber block or brick. Depending on the design of the base part, the preparatory activities will have some differences that must be taken into account in order to obtain the highest quality and durable plastered surface.
We recommend: Decorative Plaster from Regular Putty. Versailles.
Preparing the brick base
A special feature of the preparation of this type of plinth surface is the presence of a joint space, which is filled with cement mortar. After a certain period of time, such a solution quite actively dries out and crumbles, which can manifest itself in the formation of cracks of different sizes, as well as sometimes even very significant gaps in depth and width.
At the stage of preparing the brick base, it is very important to thoroughly clean and remove all crumbled or loose particles and fragments using a narrow construction tool and a brush with metal bristles. All cracks formed as a result of such work must be completely cleaned, removing small elements, sand and a layer of dust.
All loose plaster is beaten off with a hammer or chisel.
Remove any fragments of plaster that do not adhere well
Use a wire brush to thoroughly remove all remaining plaster.
Detected defects in the masonry are moistened before repairing the brick plinth lining
To fill existing voids, you should select bricks of the appropriate size
The next stage of repairing the base with your own hands is to fill the voids with prepared bricks and secure them with masonry mortar
Before plastering the surface, it must be thoroughly moistened.
Preparing a rubble concrete base
This surface option will also require careful preliminary preparation, which will consist of removing poorly secured and heavily worn fragments of masonry, as well as their competent replacement. The loose element is subject to mandatory dismantling, high-quality cleaning and return to its original place, with fixation using a standard cement-sand mixture.
Base preparation
Preparation of concrete-cement base
If during a visual inspection of the concrete-cement plinth it was possible to identify defects in the form of deep cracks, then it is very important to check the strength of their edges and carefully remove all parts that are crumbling or crumbling. If there are signs of even partial displacement of the foundation, it is strengthened. After preliminary cleaning, small cracks and potholes are leveled with a regular cement mixture.
Requirements for basement plaster
Before applying decorative plaster to the base of the house, you should choose the right composition that will meet the requirements for such mixtures used under difficult conditions. The plaster layer on the surface of the base should be highly durable and resistant to moisture. The material must withstand frost well and be resistant to ultraviolet radiation. Since the lower part of the house is constantly exposed to negative influences, the plaster layer becomes a favorable place for the formation and development of biological life. Therefore, the protection of the lower part of the house must also be resistant to the formation of fungus and mold.
Short description
Plastering the base or wet facade is the application of cement-sand or other coating that performs protective and decorative functions:
- Protective. The plaster layer, alone or as part of a more complex coating (stone, ceramic granite, relief plaster, insulation) partially or completely protects the surface from mechanical damage and freezing. It creates a water-repellent barrier, protects against the formation of fungus, and the plaster does not transmit ultraviolet rays.
- Decorative. Mosaic plaster for the base hides all flaws and irregularities and decorates the facade of the house. It helps to create a unified color and stylistic composition.
Basic application rules
Mixing plaster
This material is already sold as a mixture in plastic buckets or containers. Immediately before use, their contents should be mixed very thoroughly. A mixer is ideal for this procedure. As with many products, this happens, some products from different batches may differ in production on the same day. This is due to the fact that natural mineral chips are used in production, so individual batches may differ in color
When purchasing several packages, it is advisable to pay attention to the serial number, which will show whether these goods were produced in the same batch. If the mass was produced on different days or even months, in order to protect yourself from color differences in the plaster, the entire purchased mass must be poured into one large container and mixed thoroughly
The resulting mixture must be used according to the conditions and rules specified in the technical data sheet of the product. It is better to carefully monitor to ensure that the process runs smoothly. You also need to constantly ensure that the fresh mass, already applied to the walls, under no circumstances comes into contact with the one that has dried - this is where the difficulty of application lies. Otherwise, the place of their joints and connections will be noticeable.
Finishing the base with artificial stone using tile adhesive
Let's consider the most common method of finishing a plinth with artificial stone - laying it on tile adhesive. Here are standard step-by-step instructions showing how to work with this material correctly. Everything that is stated in it can be successfully used for finishing the base with artificial stone.
Artificial stone laying works
But first, let’s take a look at the list of tools needed for laying artificial stone:
- building level;
- roulette;
- drill with mixer attachment;
- stone cutting machine;
- spatula and trowel;
- brush;
- a set of several brushes;
- syringe for applying grout;
- wedges for maintaining the position of stones;
- containers for water, tile adhesive, and also for preparing grout.
Step 1. Prepare the surface of the base; if there are significant (more than 5 mm) unevenness, plaster it. Then successively apply two layers of primer, which will ensure better “adhesion” of the tile adhesive to the surface of the base.
Preparing the primer mixture
Applying primer
Step 2. Perform preliminary markings - determine which stones will fit in which places
Pay special attention to the corners and top. It will be useful to first lay out the stones in the same order in which they will be attached to the surface of the base
At the same time, check how well they fit together and whether there are any samples between them that seriously stand out from the general color scheme.
The stones are laid out in the same order in which they will be attached to the surface of the base
The stones are laid out
The presence of corner elements made of artificial stone greatly facilitates the process of laying on a plinth or any other surface
Step 3. Using a brush, clean the inner surface of artificial stones from cement laitance - a foamy light layer.
Cleaning the inner surface of the stone
Step 4. Prepare tile adhesive. To do this, follow the instructions written on the packaging. When stirring, be sure to use a mixer - this is the only way to achieve a homogeneous composition that will hold the finish of your base firmly and for a long time.
Follow the proportions specified in the manufacturer's instructions
Preparation of tile adhesive
Step 5. Apply a layer of tile adhesive 5-8 mm thick to the back side of the artificial stone with a spatula. Do not leave areas on the surface that are not covered with adhesive - this will significantly reduce the service life of the finish.
Glue is applied to the back side of the artificial stone
Step 6. Carefully attach the stone to the desired location on the plinth. At the same time, move it slightly to the sides so that the tile adhesive “adheses” better to the base surface.
Fastening artificial stone
Step 7: Carefully remove excess tile adhesive from the joints between individual trim pieces.
At this point, the instructions for laying artificial stone without “seams” on the base are completed. In the future, you should only repeat the previous steps and attach one tile after another. But if you choose a finish with “seams” created by grout, then be sure to study the second instructions in this section, presented below.
Step 1. Lay individual elements of artificial stone according to the same principle as in the previous instructions, but respecting the gaps to which grout will subsequently be applied. To maintain exact dimensions, insert wedges made of plastic or wood between the slabs.
Laying elements
Wedges for maintaining precise gaps between elements
Step 2. Prepare the grout mixture and put it into a construction syringe.
Step 3. Using a construction syringe, apply grout into the gaps between the artificial stone tiles. Choose the layer thickness yourself, based on personal preferences.
The gaps are filled with the prepared mixture
Step 4. Using a narrow spatula or any other similar tool, smooth the grout applied between the artificial stone tiles.
Smoothing the grout
Finished artificial stone masonry with seam
Artificial stone laid on the plinth in any way requires mandatory treatment with a water repellent - a composition that protects the finish from moisture, sunlight and other factors.
Requirements for raw materials
The main requirements for decorative plasters used for exterior finishing of the plinth are the following:
- Fire safety.
- Resistance to chemical and biological environmental factors.
- Waterproof.
- Durability (more than 10 years).
- Mechanical strength.
- Resistance to frost and UV rays.
- High vapor permeability, protecting against mold and fungi.
- Easy installation.
- Hiding imperfections and surface irregularities.
- High-quality composition of the mixture, in which the proportions of all incoming components are maintained.
- Interesting unique design that gives the building uniqueness.
- A large selection of finishing material textures and colors, creating your own shade using color.
- Contains polymers and plasticizers that improve properties.
- Possibility of quickly replacing a section if part of the base is damaged.
- Manufacturer's warranty.
- Convenient packaging of ready-made solutions and dry mixtures.
Plaster in the form of a mosaic is applied only after the cement mixture.
Conditions to be observed
If a finish with a stone pattern is chosen as the outer covering of the plinth, the general requirements for such a coating must be observed:
- Mechanical strength (important when installing it yourself);
- Moisture resistance;
- Frost resistance;
- Biological resistance (fungus, mold, microorganisms);
- Neutral to ultraviolet radiation.
Based on this, dry ready-made facade mixtures with the specified properties are purchased, designed for a large number of weather cycles in a given climatic zone. There is another option - prepare the solution for finishing the base yourself, choosing additives, plasticizers and chemical additives.
If there is a layer of thermal insulation for the foundation of a house made of polymer materials, the reliability of its external protection should not raise doubts. Seepage will lead to loss of specified properties and premature failure.
A few words about technology
It is necessary to comply with technology requirements at every stage. The solution is mixed in strict proportions. When mixing by hand, the building mixture cannot be poured into water; the liquid is added gradually. You cannot add dry mixture or add water to the prepared solution; if necessary, you need to make a fresh portion of the solution.
You cannot speed up the drying of the plaster using artificial methods, for example, heating it with heat guns. This will have a bad effect on the quality of the layer; cracks and peeling of the mixture may occur.
The craftsmen from the site plastering.rus are well acquainted with the technology of plastering plinths and any other surfaces. They perform work mechanically, which allows them to complete tasks faster.
Foundation preparation
Plastering the foundation with your own hands is not a difficult task, but it is painstaking. In order to apply plaster efficiently and correctly, the foundation must be prepared in advance. In this case, you must adhere to 4 rules:
- For brick or block foundations, it is necessary to clean the joints, which is done using a thin spatula. It is necessary to carry out cleaning so that no traces of the old solution remain. A stiff bristle brush will help get rid of crumbs and dust.
- In the case of a foundation on a concrete strip, cracks and fractures can often occur.
It goes without saying that finishing the foundation with plaster can only be done here after these defects have been eliminated. In order to eliminate cracks, it is necessary to stitch out the gaps, and then sweep away the dust with a brush. Finishing the foundation - Before you start plastering, you need to treat the foundation with a deep penetration solution. Such liquids are not difficult to find; they are available in every hardware store. If it is impossible to purchase the liquid in full to cover the entire foundation, it is necessary to apply it to the areas of chips and crevices. This step is simply necessary. Thanks to this solution, the plaster will adhere most firmly to difficult areas of the foundation.
- If curvatures of the foundation or any protrusions appear, it is necessary to remove these protrusions, after which the tape can be leveled with plaster.
Selection of plaster
The functional significance of finishing the base is enormous; it creates additional protection from moisture, improves thermal insulation, and gives the house a more aesthetic appearance. The selected material must meet high requirements: be moisture resistant, withstand temperature changes, and soil freezing.
Popular options for basement finishing: concrete, plaster, facing with artificial or natural stone, tiles, siding. Among them, plastering is the most common.
The base is leveled with cement mortar and is ready for decoration, for example, with clinker tiles.
Cement-sand and cement-lime plasters are best suited for exterior work. They are durable and moisture does not harm them. In addition, they are rarely affected by mold.
Expert opinion Sergey Shablovsky Plasterer
Cement for plaster is taken of high grade M400 or M500, this should be taken into account when mixing the components yourself; sand is sifted with medium grain size. Approximate proportion 1:(3–4). The main thing is that the material is homogeneous and fits well on the wall. For ease of work, mixtures with the addition of lime are often used in the solution.
If plaster is applied over insulation boards, then a cement-based adhesive composition must initially be applied to their surface. Thickness is approximately 3-4 mm. A fiberglass or metal mesh is attached to it, and then a leveling and decorative layer of plaster is applied. Read more about this.
Preparation of plaster mortar
How to properly plaster the foundation part of a house? The work is carried out in three stages. Initially, a spray is applied to the fixed plaster mesh, i.e. throwing a thick (4-5 cm) layer on the wall. After this, a primer layer is applied, which fixes the spray and levels the surface. At the final stage, grouting is carried out in order to give the surface a decorative appearance and its final fixation.
In each case, the plaster mortar is prepared from a mixture of cement and sand with the possible addition of a plasticizer. But the ratio of the constituent components and the consistency of the solution differ:
- for spraying, you need to add 3 parts sand to 1 part cement and prepare the solution until the consistency of thick sour cream;
- for the primer layer, take a ratio of 1:2.5 and a solution resembling liquid sour cream;
- Grouting is done with a 1:2 solution with the addition of 1.5 parts of lime and a density at the level of milk cream.
Decorative plaster of the base under the stone
To finish the façade of the plinth, you can use stone cladding that imitates the surfaces of natural materials. This method is the best in terms of natural appearance.
A mixture of sand and cement is used, where one part is M400 cement, and three parts are sifted sand. The mixture is diluted with water to a thick sour cream, since it is convenient to apply it to the walls.
The thickness of the layer of decorative material is calculated based on the masonry of the wall. For bricks or blocks it will be 0.5-1 centimeter.
To imitate the surface of torn stone or pebble, natural or artificial stone, you need up to 3 centimeters.
The sequence of work is as follows:
- Stencil application, for which the blanks are applied to the surface by lightly tapping them. The screen mesh is removed and the seams are unstitched. Then you get even rows of patterns;
- Cutting, when the shape of stones is cut into the mortar with sharp objects, and large elements and the roundness of their shape are made by hand. The resulting surface will not be similar to the work of Titian, but externally it will be practically indistinguishable from stone cladding, especially if a mosaic is made.
Any paint for the base can be used for outdoor work. You can paint the base within a couple of hours.
Preparing the base for plastering.
Finishing the base with decorative plaster is carried out in the same way as regular plastering of walls and requires surface preparation.
New plinth
A fresh basement wall does not require special preparation. Before applying the coating, just moisten it with water and wait until it drains and is partially absorbed.
Preparing the old base for repairs.
The old basement wall requires more attention:
- Removing old coatings. Anything that does not hold well, wobbles or moves when pressed (old concrete coverings) must be removed and cleaned.
Concrete cannot be thrown onto unstable surfaces (anything that “shakes”) and onto weaker layers (chalk whitewash, clay and lime plasters). Its connection with such a surface will not be reliable.
- Sealing cracks, lunges. Deep depressions in the wall must be repaired:
If possible, cracks and crevices are widened, a reinforcing mesh is strengthened here and “clogged” with mortar, working with energetic “slaps”.
Crevices.- Notches. Deep (more than 1-2cm) depressions in the wall are usually sealed and leveled. Plastering a plinth under a stone in a certain sense “needs” some curvature of the walls, so it looks more believable.
- Loss of masonry. Drops of stone or brick must be replenished. To do this, throw a solution into the opening and place a pebble of suitable size.
- Primer. Before applying plaster, the wall should be covered with primer. This will increase adhesion and fill the pores so that they do not “pull” water out of the solution, weakening it, and the base “stone” plaster will not fall off over time.
The prepared surface must be hard, stable and clean.
Advantages and disadvantages
Plastering the base is a manipulation that, of course, has alternative options, so you should consider the pros and cons of such a finish. Among the first are:
- low material costs;
- ease of application;
- good efficiency;
- high strength;
- maintainability.
The plaster layer, however, also has its disadvantages. They lie in the relatively low strength if you put the finish in the form of tiles or stone on the other side of the scale. This cladding also has an insufficient level of thermal insulation, it does not cope very well with sudden temperature changes and does not have such outstanding vapor permeability compared to other solutions.
But in order to improve performance properties, you can use paint for the base. It is offered for sale in many different types, and it happens:
- silicate;
- latex;
- acrylic;
- textured.
Each of these solutions has its pros and cons. But the most common option is a silicate composition, which fits well on concrete with a mineral structure.
Advantages
If the decorative finishing of the base will be carried out by applying plaster, you should become more familiar with the main advantages of this material. It can be made on different bases, which have their own properties. For example, a textured mixture is good because it not only provides surface protection, but also allows you to realize all sorts of design ideas, for example, creating textures and patterns. If you know that the base can change geometric parameters, you should prefer an acrylic mixture, the main advantage of which is its high elasticity.
But if the base comes into frequent contact with mechanical stress, silicate plaster is suitable, which also has a high vapor permeability. If you are thinking about the question of which plaster is best to apply to the lower part of your house, you should also think about the conditions under which it will be used. If the base is exposed to sunlight most of the day, you should choose a composition that will be resistant to such conditions. The polysilicate mixture, which is prepared with the addition of silicone resin, has a similar advantage.
Flaws
Before plastering the base with a certain mixture, you should consider its disadvantages, because during operation properties that you were not aware of before may appear. For example, a cement-mineral mixture can become cracked and its surface becomes easily contaminated. If vapor permeability is important, you should abandon the acrylic composition. It is better for novice craftsmen not to choose silicon mixtures, as they are difficult to apply. In addition, the composition contains alkalis, which can be hazardous to human health.
How to combine the basement and façade of a house: advice from designers
In order for the exterior of the house to look harmonious, it is important to carefully select the color, texture and simulated pattern on the base and the rest of the wall of the house. To ensure that these two parts of the plane are combined with each other, you can use the following design tips:
- The two elements must contrast in relation to each other in terms of the chosen color. But at the same time they must be harmoniously combined with each other.
- Base shades that work best are those that are close in color to natural colors - dark brown, gray, sand.
- Most often, the base is made darker than the rest of the wall. Although the reverse combination is also possible.
- When using organic pigments in formulations, it should be taken into account that over time they are capable of changing the shade quite significantly towards a lighter one due to fading. Therefore, the appearance of the building will be transformed.
- In terms of textures, imitation stone, brick, and rubble looks good on the base. It gives the entire structure impressiveness and solidity.
- If cement plastering of the base is used, then it should be coated with at least a special paint that will imitate a certain type of surface or recreate a color play.
Base - marble plaster, facade - bark beetle
Features of decorative finishing
Imitation stone can be used as a decorative finish for the foundation. To do this, you will need to buy or prepare a sand-cement mortar yourself. The thickness of the decorative layer of plaster for the plinth depends on the type of masonry chosen. For brick, 1 cm will do, and for stone, 3 cm will do.
You can create decor on the plinth in two ways:
- cutting. Using a sharp object, the plaster is cut into small stones. Larger round stones are made by hand;
- stencils. To do this, the blanks are applied to the surface, pressed to form an imprint, and then removed. The seams widen and get an even pattern.
After creating the desired pattern, it is left to dry completely. Then the base is coated with a primer and, if desired, painted.
Surface preparation
The base can be of different designs from any materials. Preparing concrete or brick, as well as any other surface for plaster, has its own characteristics.
Preparing a brick plinth
After removing the old plaster, an unpleasant picture may appear as the mortar filling the seams of the old brickwork begins to crumble over time. You can see the bricks that need to be replaced. Then the seams are cleaned of crumbs, parts of the rejected brick are removed, the old mortar is removed with a wire brush, and dust is removed.
Preparing a brick plinth before plastering
We recommend: Painting on wet plaster or how to make a fresco yourself
After wetting the surface of the masonry with water, they carry out repairs (insert new bricks, placing them on the mortar). Deep seams are filled with mortar, leaving the upper part of the seams 10 mm deep unpainted. New masonry is also cleaned with a wire brush. The seams are deepened by a centimeter to increase the adhesion of the base to the solution. Before applying the plaster, the brickwork is generously moistened.
Preparation of rubble and rubble concrete base
This base may also require replacing unusable stones and removing crumbled mortar. The loose stones are removed, the area is cleaned, and the stones are placed in the solution in the same place. The resulting voids are filled with a non-shrink solution.
Preparation of concrete and reinforced concrete foundations
Identified potholes, chips, and cracks require repair. If cracks are evidence of displacement of the foundation, it is strengthened. The cracks are being repaired. The surface is cleaned of dust. The cracks are sealed with cement mortar with the addition of sand. Strengthen by reinforcing with mesh. Concrete contact is used as a primer.