Why do you leave gaps when installing OSB?
All wood materials react strongly to increases in humidity and temperature. And oriented strand board is no exception in this regard. During the heating process, the sheets expand greatly and without the provided compensation gaps, two adjacent panels are capable of deforming each other.
Therefore, compensating gaps of 3 mm and 15 mm along the perimeter of the coating are created between the sheathing elements. They continue to work throughout their service life and should be preserved without affecting the appearance of the designer finish.
The fulfillment of two mutually exclusive conditions is possible if the joints are covered with elastic materials that well hide the joints and preserve their purpose.
Fixing OSB with glue to concrete
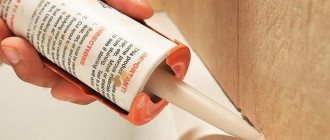
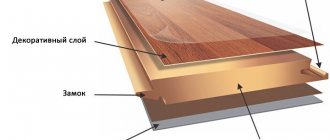
Another popular method of installing oriented strand boards to a concrete base is using glue. For fixation, use universal acrylic-based mounting adhesive. It is used to fix tiles, linoleum, parquet boards and other types of finishing materials. The concrete surface must be carefully prepared and, just as in the case of dowel fastening, the base must be smooth, clean and primed. Sheet lumber also needs to be additionally treated with an antiseptic composition. Before applying glue to the prepared surface, you need to determine in what sequence the slabs will be laid. The glue is applied sequentially according to the diagram, one sheet at a time. Using a notched trowel, distribute the adhesive composition over the surface of the cement screed in an even layer, no more than 3 mm thick, following the manufacturer’s recommendations. It is also necessary to leave technological gaps around the perimeter of the sheet, which, after the glue has dried, are closed with wood putty and sanded. If necessary, sand the entire surface and then coat it with a primer for OSB panels.
Technology for performing work on seams.
When filling seams with any of the above traditional materials, the composition of the work and the actions performed are very similar. Carrying them out correctly provides significant time savings:
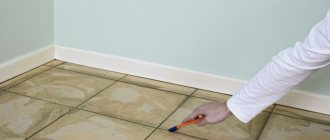
- If subsequent decoration is planned, then OSB boards are cleaned of paraffin by grinding;
- Mandatory coating with a primer with antifungal properties;
- After the primer has dried, the edges of the seams are taped with masking tape to protect the front surface of the sheets from the seal;
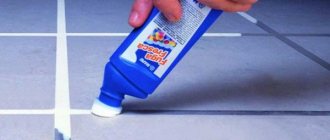
- The parquet varnish and primer are carefully rubbed into the gap with a spatula, and the sealant is filled into the joint using a gun;
- Use a small spatula to remove excess material that protrudes above the surface;
- After polymerization, the masking tape is removed;
- The filled seam can be sanded away from protrusions and irregularities.
You can learn about how to choose a primer and how to apply it correctly in a separate article: primer for OSB - types, application.
If the gaps exceed 5 mm, then they must be additionally reinforced with sickle tape. And, in this case, only putty is used (usually, this phenomenon is observed along the walls). If you fill the space without reinforcement, then after polymerization the composition forms cracks and spills out over time.
Sectional view of seam sealing. When finished, the mesh is not visible.
The varnish composition is mixed with sawdust to completely hide and make the cracks invisible. After drying and sanding, it is sometimes impossible to determine the location of the seam.
Painting OSB panels
The final stage of finishing the OSB surface will be the application of parquet varnish or painting in several layers with paint for wooden surfaces. The paint coating must be applied following the manufacturer's recommendations, including the use of a primer recommended by the manufacturer of the parquet varnish, in order to avoid incompatibility of components. The plinth is attached last and if it is made of wood, it must be painted in the desired color or varnished in advance. You can secure the plinth in several ways - fastening with glue or self-tapping screws. To prevent the plinth from bursting, a through hole is drilled in the places where it is attached; a recess can also be made with a drill of a smaller diameter for the self-tapping screw and under the head, and upon completion of installation, all holes in the plinth are closed with putty, sanded and repainted. As you know, there are nuances in installing oriented strand boards to a concrete base, but if you follow the sequence of work and recommendations, laying a finished OSB floor with your own hands is quite simple.
Other options for sealing cracks and gaps with OSB
Along with traditional ones, there are methods that are less widespread, but in some cases their use is preferable. So, when the temperature drops to +5 degrees and below, sealant and putty cannot be used. They will simply be half-frozen and unable to create high-quality protection. In this case, various means that have long been used in other areas come to the rescue. They can be used with one caveat - only for outdoor work.
Machine protection
Automotive plasticine traditionally protects car bodies from moisture and can be useful in this matter. The main thing is to be a little smart and melt it before using it. The liquid mixture is perfectly poured into cracks that are located horizontally (building foundations, flat roofs). Of course, this is not the best solution, but leaving the panels unprotected is much worse.
Using autoplasticine:
By analogy with the method described above, you can use rubber mastic, as well as two-component polyester automotive putty.
Wooden inserts
When working internally in unheated areas of country houses, it is simply not advisable to use substances with a pungent odor or toxic emissions. In this case, you can hide the gaps before finishing using pliable balsa wood. Cork is completely invisible against the background of a textured wooden surface and allows for any type of subsequent finishing work, including varnishing.
The disadvantages of using cork are quite significant and, whenever possible, it is better to use traditional options:
- It does not create a moisture-proof layer;
- Specific experience is required to properly close seams;
- Finishing work is somewhat extended over time;
- Careful subsequent sanding of all cracks is required.
In view of these disadvantages, it is much better to use liquid cork, which is used when laying laminate, but this is only possible at the appropriate temperature.
The work process can be significantly simplified and speeded up if you take standard (in size) wooden slats. The only condition is that for them you need to cut joints of equal width using a router.
Of course, this method also does not provide adequate protection from moisture. In addition, if you use hardwood to fill gaps in the OSB board, then its edge may be slightly damaged, which will affect the overall appearance of the front surfaces. However, when OSB forms the basis of the load-bearing frame and is used for rough foundations, then this effect is not terrible. The walls will receive additional strengthening and the panels will be protected from potential displacements in the gap area. In this case, filling this space with wood is very useful.
Leaving cracks without filling
And finally, if OSB sheets are used as a rough surface, then the gaps between the sheets do not need to be sealed at all. Of course, it is better to insulate them, but if there are difficulties in carrying out this work, it is permissible to leave the slabs in their natural form. In this case, it is necessary that an important condition be met - water should not get on the sheets of oriented strand board. That is, they are necessarily hidden under other surfaces (vapor barrier film, insulation, kronospan, etc.).
Examples of such applications of OSB with open seams are:
- Roof plane for soft tiles;
- Rough ceilings;
- Subfloors;
- Load-bearing walls;
- OSB in sandwich panels.
You should not forget to treat the open slab with an antiseptic and primer.
How to lay OSB on a concrete floor with dowel fastening
The technology for laying OSB is simple; the sheets are arranged in a checkerboard pattern. The first sheet is laid entirely in the central part of the room, and markings are applied for the dowels. The distance between them is maintained at 20 - 30 cm, it is also necessary to make an indent of at least 2 cm from the edge of the sheet, and a recess under the dowel head. It is necessary to leave a technological gap of 5 - 10 mm around the perimeter near the walls. Gaps between the wall and the sheets of oriented strand boards are needed to avoid deformation of the sheet lumber. The sheet is fastened from one edge to the other in stages so as not to cause the appearance of “waves”.
After the whole sheets are laid, the remaining pieces are measured and secured, it is important not to forget about the indents. Hidden dowel fastenings and cracks are covered with wood putty. After drying, these areas must be sanded and any dust that has formed on the surface of the OSB removed. Next comes the time when you need to coat your new DIY OSB flooring with a wood primer and wait until it dries completely.
Alternative ways to protect OSB seams and gaps
There are fans who believe that the strand board itself looks beautiful and is not worth covering. However, the finishing coating performs another important function besides the decorative one - it protects the sheets from the destructive effects of the external environment. When panels are left open, harmful effects on them must be minimized.
Firstly, you cannot remove the factory paraffin layer - it at least slightly protects the wood from moisture and the resin from the destructive effects of ultraviolet radiation.
Secondly, it is better to use a variety of oil impregnations to increase the service life of the casing.
Thirdly, the most vulnerable places on OSB sheets are the joints. From the ends, these wooden products remain uncovered and, from there, the process of decay and rotting most often begins. Therefore, it is advisable to close the gaps, even if the panels remain bare.
To make the sealed cracks look beautiful, they are decorated and highlighted as much as possible. For these purposes, they are covered with wooden slats, filled with sealant and painted over. You can also fill prepared joints with plastic or translucent polycarbonate profiles.
This contrasting combination looks very attractive, and when the entire surface is covered with stain, the slabs can serve without deteriorating for a very long time.